
I started by asking the service center at our dealer. I felt that if this was something that I could do rather than have them do it for a fee, I certainly would do it myself. They told me to use white lithium grease as a lubricant and that there were gears on the antenna unit on the roof to apply this to. I did a little more digging and found a manual for the antenna online. Here is a link to that manual and you want to look at "Page 5" for what you need to know and see about lubricating the antenna. This summer I did the job myself and I will tell you about it and the step by step on how it is done.
First, the manual says to use silicone spray - and NOT white lithium grease. The two may work just as equally well, but I decided to go with what the antenna company (Winegard) recommends. I found silicone spray lubricant in a hardware store. I just found it at Lowes and it is now made by the WD-40 company. The advantage of their can is that it has the red detail spray straw as a permanent part of the nozzle. You will need the spray straw to do this job! (And those buggers when you get them just taped to the can get lost very easily and they are not available on their own for sale anywhere!) So get yourself a can of Silicone Spray Lubricant - with the spray straw to do this job. DO NOT USE REGULAR WD-40 - IT WILL DAMAGE THE RUBBER PARTS!
Next, you need to get to the roof of your Roadtrek and I used a six foot aluminum ladder to do this. It was barely just tall enough to get me to where the antenna is and be able to work. This is a bit precarious and have someone hold the ladder when you do. If you have a ladder that leans against what you are climbing up, cover your Roadtrek with a thick blanket between the Roadtrek and the ladder. It is just too easy to do damage to your Roadtrek with the ladder scraping along the side. I am not found of ladders or heights and the Roadtrek roof at 8 foot 9 inches tall is a bit more than I was prepared for. Once you get up there, get comfortable because you need two hands to do this job.
When you are up at the roof you are going to be applying the silicone spray to two different places. The manual says to do this first step three to four times a year. For the time being I think I will stick with two times a year which is required for both steps.
Lubrication Point 1 - The Lift Gear
When you get up to the roof and look down into the antenna unit you will see the teeth of a gear. Here is a photo.

You see the gear right there in the middle. With the spray straw on your silicone lubricant nozzle, spray a liberal amount of silicone spray onto the teeth of the gear. Do this with the lift in the DOWN position. Get into the parts of the gear that you can't see with the straw.
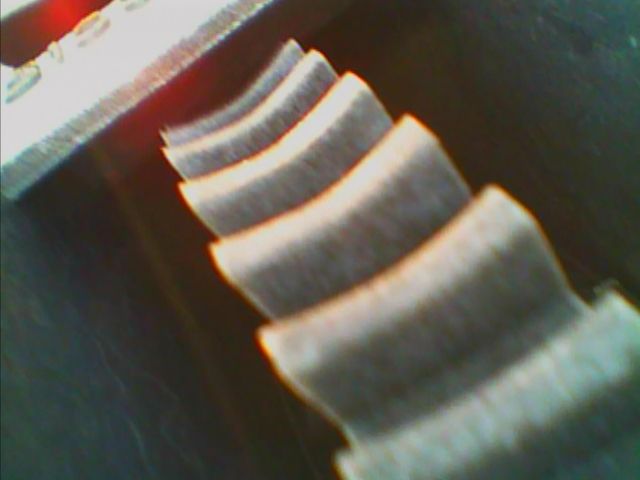 |
| Close Up of the Lift Gear |
Once you have applied the spray, climb down from the ladder. Go inside your Roadtrek and crank the antenna up and then down again a couple of times. This will distribute the lube all over the gear. Leave the antenna now in the UP position so that you are ready for the next lube location.
Lubrication Point 2 - The Rotation Gear
Climb back up the ladder and get yourself into position again. You are going to need to get to the far side of the antenna base. You are now looking for a plug that you are going to have to pull out - AND NOT LOSE! The plug is black rubber.
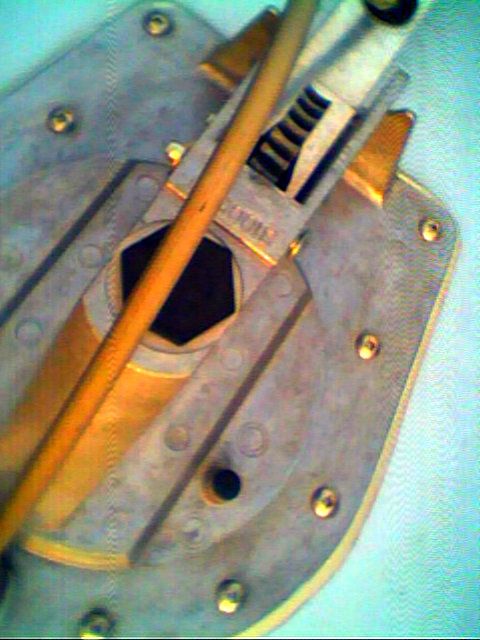 | |||
| Lower right black dot is the PLUG - antenna is down in photo |
 |
| Close Up of the PLUG |
<><><><><><><><><><><>
The manual goes on to another lubrication point - the worm gear rubber ring. I was not about to disassemble anything and it appears that the rubber ring they are talking about is inside the lift mechanism below the lift gear that you have just lubricated. I put so much lube down onto that gear that some of it had to have gone down into this assembly. I may be wrong, but I am hoping that I lubed this rubber ring in the process. **
<><><><><><><><><><><>
One thing to be very aware of is that silicone spray has an ODOR and after I finished lubing the antenna I could smell the spray inside the Roadtrek. Do not do this job if you are about to go out in your Roadtrek on a trip (or even a drive). The smell does go away in a few days.
That was all that was involved in lubricating the antenna. I did see a big difference after this in how much more easily the antenna rotated, so the lube does help. For me the hardest part was getting up on the ladder. If you are comfortable on ladders this job is a cinch! I will do it twice a year. I am not sure really when to space it out. After we de-winterize I will do it again and then, I think, I will do it in the Fall.
(The photos used in this article were taken with the inspection camera that I wrote about a few weeks ago. In daylight, the quality was a little better, but getting the extension arm of the camera to where it needed to be to take these photos was ridiculous. It wound up taking both of us. Me to maneuver the lens to almost where it needed to be - while up on a tall step ladder and Meryl to hold the monitor and take the picture. The camera has been returned.)
**ADDENDUM:
When this article appeared a reader asked about the third lubrication point that I talk about above as not accessing. This "rubber quad ring" is what keeps rain and water from coming down through the mechanism into the inside of your RV. By lubricating this ring, Winegard says it will keep the rubber from drying out and cracking. This sent me to do some research on how to lubricate the rubber quad ring as recommended by Winegard. I was able to find out how to do it but also found a warning from an RVer about doing it. Take a look at the first photograph above in this article. At the back of the gear housing you see a black hexagonal shape. It is made of plastic. This is suppose to unscrew to access the shaft and the worm gear that raises and lowers the antenna. According to Winegard, unscrew this nut (cap) and very carefully take it off (without moving the shaft that it attaches to). Take the straw on the silicone lube can and spray silicone lube down that hole and you should be able to reach the rubber quad ring that needs to be lubricated by the lube that will drip down. Carefully return the hex nut and tighten it back on. Now, here is the warning that I found. One RVer who seemed to know what he was talking about advised not to open this as you run a risk of moving the shaft out of position and then the antenna lift will not work properly if it is out of alignment. Good warning to heed. I am not recommending doing this process. Do it at your own risk. Others comment about this quad ring as I had above - soak the gear enough and you will get plenty of lube on all of the parts including this one. Decide for yourself and if you do this, do it cautiously.
**MORE IMPORTANT ADDENDUM:
The following is from a Winegard company service technician who trains dealers on Winegard Tech:
"My personal recommendation is that you NOT remove this plug as you can get the exact same result buy spraying some dry silicone spray into the opening while stowed (you can see the gear and the worm drive), spray a bit more while it's up and the spray a bit more while someone is cranking it up and or down.
Do this twice per year and you should never have any issues."
That, friends, is the ultimate in advice. Do what the man says and don't unscrew the hex nut cap to lube the quad ring.
Timely post! I've been wondering about how to accomplish this recommended maintenance. I so admire you DIYers. Think I'll have to get the dealer to do this one. Thanks for all the work you do. It's like taking a graduate course in Roadtrek!
ReplyDeleteThe dealer will do it. I had asked before I tried myself. If you have no problem getting up on a ladder this is easy to do yourself.
Delete