I printed out my instructions from this site and had that with us the whole time so that we would follow the procedure just as we had been shown. While we were doing this ourselves this year, I took some photos and when we were done I made some observations about the process that I will share with you here.
First - the process that I have uses both compressed air and antifreeze to winterize the Roadtrek. This dual process seems to cause some comment from those who just use compressed air and no antifreeze and those who just use antifreeze and no compressed air. The dual process is just a double protection. Many find that this is not necessary and that one or the other is fine. I would suggest that if you were to choose one over the other, choose using antifreeze alone. AND - if you do not own a compressor, and many do not, don't go out and purchase one just for this. All you need to do is skip the step about blowing out the lines with compressed air and move right to adding the antifreeze into the lines.
We started by draining the fresh water tanks. Our Roadtrek has two fresh water tanks - an interior tank and an exterior tank. Your Roadtrek may only have an exterior tank. Only the 190 and 210 models have two tanks. To drain the tanks we removed the drain cap that is located under the driver's door under the van. Our drain has a simple screw off cap. Some Roadtreks have an actual valve under there to turn. To speed up the draining we turned on the water pump and ran water out of the outside shower faucet. At the same time I wanted to drain as much of the water in the hot water tank that I could before opening that tank to drain it. To do this, we just opened the hot water knob on the outside shower and that will let out most of the water from the hot water tank. When the LED monitor lights inside showed empty for both fresh water tanks we were done. We did let the water continue to drip from the under the van drain the whole time we were working on winterizing. In this way just about every drop would come out.
Observation - when the fresh water tanks are empty the water pump does not shut off. This gave me some concern until I realized what was happening. Just shut off the water pump switch on the wall.
We next dumped the waste tanks - both the black tank and the grey tank. They were not full. There was just over a gallon of water that I keep in the black tank at all times to prevent the tank from drying out and also very little in the grey tank. We have a Roadtrek with the built in macerator and used that, dumping the tanks as normal. Because we have no dump connection at our house, we used a bucket and only filled the bucket so that it was easy to carry and could be emptied right into the toilet in the house.
Because we were running the macerator and the water pump and would be running the water pump throughout the process, I decided to plug the shore power line into our house using a 30 amp to 15 amp adapter. In this way I had unlimited power and did not have to rely upon the coach batteries. The coach batteries would be fine alone.

Please note at this point that it is impossible to end up with completely dry tanks. There will be a layer of water remaining in all of the tanks but this is NOT A PROBLEM. What you are concerned about when winterizing is that water will freeze and expand in small spaces such as pipes and valves. If it does in those confined and small places the expansion can cause damage. The tanks are large and open. A small amount of water freezing on the bottom of the tanks should not cause any harm.
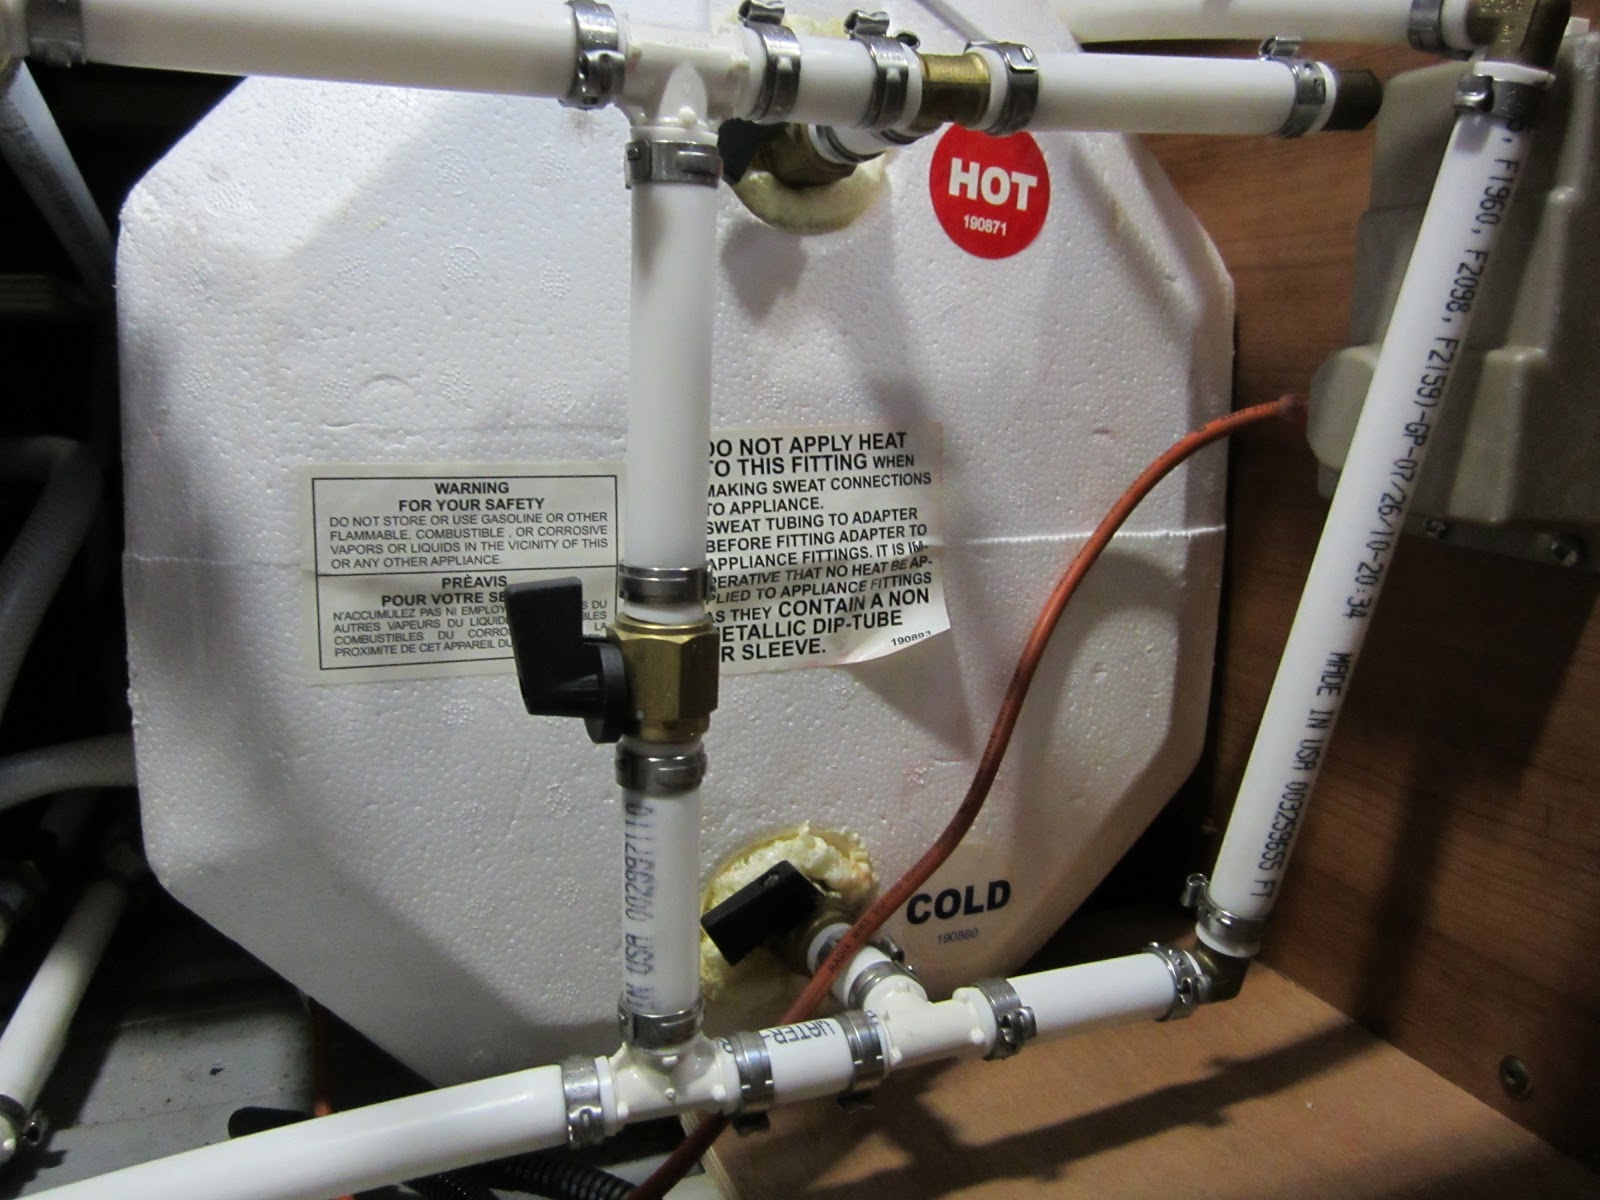
OK - you are now ready to move inside and continue with the instructions from my first article. Next, we bypassed the hot water tank. My hot water tank is located in the first cabinet under the bed next to the refrigerator. Other model Roadtreks may be different as to locations. Below are two photos of the hot water tank valves placed into BY-PASS POSITIONS:
 |
| Front View - See the three valves! |
 | ||
| Top Down View |
In ByPass Position the top and bottom valves are turned to the side and the valve on the middle of the connecting pipe is turned to follow the direction of the pipe. This is confusing to many. That one is OPEN while the top and bottom valves are now CLOSED.
Your two fresh water tank Roadtrek should also be in SUMMER MODE which is well explained in this article. This is all that is necessary to put the Roadtrek's hot water tank into ByPass. The simple turn of three valves. Now, what this means is that water or air or anti-freeze will not enter the hot water tank any longer but "bypass" it and go straight through to the faucets and toilet.
NOTE: I HAVE BEEN ADVISED BY ROADTREK THAT USING COMPRESSED AIR TO WINTERIZE THE WATER SYSTEM IN A ROADTREK CAN CAUSE DAMAGE IN MULTIPLE WAYS AND IT SHOULD NOT BE DONE. I AM TAKING THAT ADVICE AND I RECOMMEND THAT YOU SKIP THE COMPRESSED AIR SECTION THAT FOLLOWS AND INSTEAD RUN THE LINES DRY WITH THE WATER PUMP - IN OTHER WORDS RUN THE WATER PUMP AND OPEN AND CLOSE EACH FAUCET AND FLUSH THE TOILET UNTIL NO WATER COMES OUT AND THEN PROCEED WITH PUTTING IN THE ANTI-FREEZE.
SKIP
 |
| My Compressor |

I attached my compressor hose adapter to a regular RV water pressure gauge and then attached that to a four foot fresh water hose just to make it easier to connect to the city water inlet on the outside of the Roadtrek. The other end, as you see in the photo above, is attached to the air compressor hose quick connect.

MAKE SURE THE COMPRESSOR PSI IS SET TO NO HIGHER THAN 40 PSI OR YOU WILL CAUSE DAMAGE TO YOUR ROADTREK.

I set my compressor to 30 PSI. The water pressure gauge that I put on the line was a safeguard as it will not allow more than 40-50 PSI of pressure to pass through to the Roadtrek. Don't turn on the compressor yet. Go inside the Roadtrek and take your shower hose and put it on the floor at the floor drain. Now, go back outside and turn on the air compressor. Come back in right away and follow the instructions to turn each faucet hot and cold and flush the toilet. You will see water shoot out first and then just air. Don't forget the outside shower!
OBSERVATION: It did take awhile for just air and not a mist of air and water to come out as we went from faucet to faucet.
OBSERVATION: The shower head on the floor will shoot back when you turn the shower faucet on. Have your partner hold it in place. We wound up with water shooting all over the floor.
Once the air blew the remaining water out of the pipes, the faucets, and the toilet flush,
START HERE BUT RUN ALL OF THE WATER OUT OF THE LINES AS INDICATED IN RED ABOVE:
we were ready to start putting anti-freeze into the system. I have the waterline bypass kit installed in my Roadtrek on the supply side of the water pump as I detailed in my winterizing article (linked above). This makes it simple to just remove a brass cap, connect a hose, turn a valve to get antifreeze from the bottle of RV antifreeze into the water pump and pumped into the pipes and system. There is another easy way to do this and that is with a hand pump that is connected outside to the city water inlet. The pump connects to the city water intake and has a hose that goes into the bottle of RV antifreeze. You pump the pump and the antifreeze flows just as if the city water was connected. You do not use the water pump with this method - and the water pump will not get antifreeze in it. This seems to me to be a drawback of this method. You could also just remove the pipe connection from the supply side of the water pump and connect to that a hose that can be placed into the RV antifreeze bottle. This would then work the same way as the waterline bypass kit. (But I feel that disconnecting and reconnecting the pipes like this each year can lead to potential problems - and the waterline bypass kit is much easier. Besides, while you have the pipe disconnected just install the waterline bypass kit.) The antifreeze is drawn out of the bottle, through the filter before the pump and into the pump and then into the pipes. Open the faucets one at a time and flush the toilet and all will fill with antifreeze. Have a second bottle of antifreeze near by. The bottle empties quickly and will only be sucked in as far down as the hose reaches into the bottle. Just put the almost empty bottle aside to use for the traps and waste tanks.
We followed the procedures that are in my instructions and we got antifreeze into the entire system. It took one and a half gallons of antifreeze up to this step. I did not fill the two traps YET. First, I poured about a half gallon of anti-freeze down the sink into the grey tank and almost a gallon of antifreeze down into the black tank. We went outside and ran the macerator first opening the black handle and then opening the grey handle until we saw pink come from the macerator. It did spurt clear water before it turned to pink, so we saw that there was water still in the macerator or hose. I could have dumped this back into the black tank down the toilet but decided not to.
OBSERVATION: When I stepped on the toilet flush valve to open the flap to pour antifreeze down into the toilet I saw the antifreeze that was sitting on the toilet line come out and flush down the drain. It occurred to me that perhaps I would have been better off pouring the gallon of antifreeze into the black tank BEFORE I ran the antifreeze into the toilet line. Last year the process was done exactly the same as the process here this year and there were no problems throughout the winter. Frankly, I am not sure if it makes any difference that there is or isn't antifreeze at the toilet supply hole on the top of the toilet fill. I may fill the tank before, as stated here, next year.
 OK - lines filled with antifreeze, macerator filled with antifreeze. Now, it was time to pour a cup of antifreeze into each trap. There are two traps. In the 190, the traps are in the kitchen sink and in the floor in the shower drain. In models with the enclosed bathroom, there is the additional trap in the sink in the bathroom. This is simple. Take a measuring cup - you can see mine here on the right with the antifreeze already measured out - and put in one cup of antifreeze. Pour it into the middle of the drain slowly so that it goes down and sits in the trap. Do the same thing in the sink(s). The pink you see here around the drain is what was left from the shower.
That finished the whole thing. Winterizing complete. After draining the tanks, it took less than an hour. We used three gallons and one cup of antifreeze. I had four gallons standing by. I would have only needed three gallons if I had remembered to hold one more cup out for the second trap. Before you leave your Roadtrek, turn off the battery switch. There is no reason for this to be on all winter. (I always turn the battery switch off when we are not using the Roadtrek.)
With the Roadtrek winterized you can still use it for winter trips. You just have no running water on board. You can carry bottled water and you can use toilet waste bags in the toilet or just flush the toilet with antifreeze. Just DO NOT allow water to go down any drain.
Don't forget that you still need to go into your Roadtrek all winter. You must run the generator under load (in the winter this means connect an electric heater to put the half load needed on the system) for two hours every month to keep it running properly.
Once the air blew the remaining water out of the pipes, the faucets, and the toilet flush,
START HERE BUT RUN ALL OF THE WATER OUT OF THE LINES AS INDICATED IN RED ABOVE:
we were ready to start putting anti-freeze into the system. I have the waterline bypass kit installed in my Roadtrek on the supply side of the water pump as I detailed in my winterizing article (linked above). This makes it simple to just remove a brass cap, connect a hose, turn a valve to get antifreeze from the bottle of RV antifreeze into the water pump and pumped into the pipes and system. There is another easy way to do this and that is with a hand pump that is connected outside to the city water inlet. The pump connects to the city water intake and has a hose that goes into the bottle of RV antifreeze. You pump the pump and the antifreeze flows just as if the city water was connected. You do not use the water pump with this method - and the water pump will not get antifreeze in it. This seems to me to be a drawback of this method. You could also just remove the pipe connection from the supply side of the water pump and connect to that a hose that can be placed into the RV antifreeze bottle. This would then work the same way as the waterline bypass kit. (But I feel that disconnecting and reconnecting the pipes like this each year can lead to potential problems - and the waterline bypass kit is much easier. Besides, while you have the pipe disconnected just install the waterline bypass kit.) The antifreeze is drawn out of the bottle, through the filter before the pump and into the pump and then into the pipes. Open the faucets one at a time and flush the toilet and all will fill with antifreeze. Have a second bottle of antifreeze near by. The bottle empties quickly and will only be sucked in as far down as the hose reaches into the bottle. Just put the almost empty bottle aside to use for the traps and waste tanks.
We followed the procedures that are in my instructions and we got antifreeze into the entire system. It took one and a half gallons of antifreeze up to this step. I did not fill the two traps YET. First, I poured about a half gallon of anti-freeze down the sink into the grey tank and almost a gallon of antifreeze down into the black tank. We went outside and ran the macerator first opening the black handle and then opening the grey handle until we saw pink come from the macerator. It did spurt clear water before it turned to pink, so we saw that there was water still in the macerator or hose. I could have dumped this back into the black tank down the toilet but decided not to.
OBSERVATION: When I stepped on the toilet flush valve to open the flap to pour antifreeze down into the toilet I saw the antifreeze that was sitting on the toilet line come out and flush down the drain. It occurred to me that perhaps I would have been better off pouring the gallon of antifreeze into the black tank BEFORE I ran the antifreeze into the toilet line. Last year the process was done exactly the same as the process here this year and there were no problems throughout the winter. Frankly, I am not sure if it makes any difference that there is or isn't antifreeze at the toilet supply hole on the top of the toilet fill. I may fill the tank before, as stated here, next year.

That finished the whole thing. Winterizing complete. After draining the tanks, it took less than an hour. We used three gallons and one cup of antifreeze. I had four gallons standing by. I would have only needed three gallons if I had remembered to hold one more cup out for the second trap. Before you leave your Roadtrek, turn off the battery switch. There is no reason for this to be on all winter. (I always turn the battery switch off when we are not using the Roadtrek.)
With the Roadtrek winterized you can still use it for winter trips. You just have no running water on board. You can carry bottled water and you can use toilet waste bags in the toilet or just flush the toilet with antifreeze. Just DO NOT allow water to go down any drain.
Don't forget that you still need to go into your Roadtrek all winter. You must run the generator under load (in the winter this means connect an electric heater to put the half load needed on the system) for two hours every month to keep it running properly.