Roadtrek

Roadtrek
Showing posts with label Roadtrek. Show all posts

Thursday, May 7, 2026

WHEN YOU HAVE TO GO - YOU HAVE TO GO ---> THE TOILET IN THE ROADTREK

 Toilets are everywhere. Toilets are in houses, in apartments, in stores, in schools, in restaurants, in places of worship, in hotels, in theaters, on street in some places, at rest stops, and in Roadtreks!  The toilet in Roadtrek is one of the big advantages of the Roadtrek when traveling or just taking the Roadtrek for a ride.  If you have to go, you do not have to start looking for a rest area or someplace to stop that has a restroom. All you have to do is pull over, park, and get out of your seat and walk halfway back into the van and there is a toilet! 

 The Chevy Roadtrek came with two different types of "bathrooms". One is what Roadtrek called the "aisle bath".  This consists of a door into an open space that is a little bit like a small closet in a house with a toilet inside facing the aisle and next to the toilet is a shower curtain that is pulled out along a track into the aisle for the shower that is there at the front corner near the ceiling of the aisle bath.  With this style bathroom you sit with your legs and feet into the aisle. If you are showering you stand in the aisle with the shower curtain pulled around you. On the fiberglass floor in the aisle the floor is slanted toward the front of the van where under a plate that is removable along a open slot on the floor there is a drain that connects below into the grey waste tank (grey meaning just water and soap goes into it). 


In the aisle bath there is no bathroom sink. Instead Roadtrek provided a heavy plastic molded bowl with wide rim that fits into the kitchen sink which is just opposite of the aisle bathroom that goes into the sink and lines up exactly and goes into the sink drain to use as a bathroom sink - designed in such a way that washing your hands from using the toilet kept all water and that which is washed off your hands so that it goes directly down the sink drain and never touches the inside of the sink - or the top rim of the drain. Since one is sitting in or showering in the aisle the door does open in such as way as to block the view to to your traveling companion in the front of the van.  In earlier Roadtreks there was a half cabinet door next to the aisle bath that opened and the top blocked and a curtain that hung down from the bottom of the door to block the view from the back - or any window without a closed curtain. Our 2011 190 Popular did not have that back half cabinet door with curtain. The half cabinet door is there above but no curtain to block below.  One can open the shower curtain. Meryl made a drape out of a black bed sheet cut down to size with magnets sewn into the top seam to attach to the shower curtains metal track on the ceiling with completely blocks the view from the back.  But if one is traveling with a very close significant other - as I have said in prior articles - there is zero privacy inside a Roadtrek anyway -  and you are not seeing anything that has not been seen before. 😉  

  
The other style of Roadtrek bathroom which was first coming out when we first started looking to buy a Roadtrek in 1990 is a "private or permanent bath" This bathroom has a much wider closet which not only contains the toilet and the shower but also a sink inside the bathroom with plumbing connecting to the shower.  It is possible to completely close yourself into the cabinet - though if one is claustrophobic it can be a bit UN-nerving. The door is hinged so that it can remain open. The private bath because it is longer along the aisle than the aisle bath does take away storage cabinet space resulting in less storage. I do not have a photo of the permanent bath (not sure why RT decided to call it a permanent bath as it is no more permanent than the aisle bath which is not going anywhere.
 
The toilets in an RV are not like the toilet you have in your home. The home toilet has a tank above the bowl to hold clean water that when flushed empties into the bowl and the bowl drain will carry the waste and the water in the bowl down into the house's septic system - either sewer  or septic tank or cesspool.  The RV toilet has no such tank above the bowl.  When you step on the flush pedal centered at the bottom of the toilet base, that opens a valve which runs water from either your water pump or city water (water from a connected hose to a spigot outside) and at the same time opens a drain flap at the bottom of the bowl and washes the contents down the drain and into the black tank. Take your foot off the pedal and the flap closes and the water shuts off.  Now - doesn't all of this SMELL??!!!  No, there is a vent that goes from the black tank up through the Roadtrek wall behind the toilet and up through the ceiling and out the roof to vent any sewer gas - odor - out above the Roadtrek roof and away! There is more that one can do about odor - that I will go into later in this article. 
 
OK so now you know about the two types of Chevy Roadtrek bathrooms but what about using them.  Of course you know how to use them, but there are some Roadtrek owners who will not use the toilet in the Roadtrek bathroom regardless of the type.  Some who use it will not flush toilet paper down into the black tank from the toilet bowl!   Why?   Older Roadtreks had a gravity dump system to dump (empty) the black (waste and water from the toilet - the black tank in the Chevy Roadtreks is 10 gallons) and water and soap from the grey tank. A gravity dump system relies on gravity to bring the waste from the waste tanks into a wide hose which is connected to a sewer hole at a campsite. The problem with a Class B RV like the Roadtrek is there is not much height off the ground for gravity to be strong enough to get the waste all out of the tanks. At some campsites the sewer hole is above on a small hill - there is not enough gravity to get the waste up the hill.  So what does Roadtrek do? They started using a macerator. A macerator is an electric motor which pumps waste from the black and grey tanks into a smaller - one inch diameter hose and that hose is put into the opening of the sewer drain of the campsite and the waste is ground up inside the macerator by spinning metal knife blades and out the hose into the sewer hole. It takes just a few minutes to empty a tank instead of waiting for gravity to take its course. The macerator can pump up hill if need be. Sounds great - so why will some not use the toilet? Because the macerator if the right toilet paper is not used can jam or clog,  Also the macerator can not cut up anything really solid - so one must be careful that objects are not dropped down into the toilet. The macerator can break - what breaks is the nylon impeller that spins to pump - and then it does not pump any more. It can be repaired but more often it is easier to just replace the macerator with a new one. One RV service tech at a dealer told me that the most common thing that they find inside macerators that have gone bad is hair.  Hair goes down the shower drain - or sink drain - and gets into the macerator and wraps itself around the impeller and as it collects it jams the impeller preventing it from turning and burns out the motor. This is very much like what happens with a vacuum cleaner's roller that picks up hair and it wraps around the brush roller under the vacuum cleaner head. 
 
Everyone can do whatever they please in this regard but I did not spend what I spent to buy the Roadtrek to not use the toilet or to collect dirty toilet paper in a plastic bag or a wood box on the wall (yes, I have read multiple times about the toilet paper box)! What goes into the toilet including toilet paper gets flushed into the black tank in my Roadtrek.  Our macerator lasted 9 years before it stopped working. If you use the right toilet paper there will be no problem. 
 
What is the right toilet paper.  One can buy special toilet paper for RVs - it is expensive and while most  does breakdown completely once in water, not all do.  What we do is use Scott's home single ply toilet paper. A few sheets off the roll are strong enough to do a good clean up- and once in water it breaks down completely in a few minutes. (We are not paid by Scotts to feature their toilet paper - it just works well!) There is a test that one can do to test toilet paper for use in an RV. Take one sheet of toilet paper and put it in a clear glass of water.  Stir a couple of times and wait. In a few minutes if the toilet paper is OK for your RV toilet the paper will have disintegrated to fibers in the water. If it does that use it. If it doesn't - don't use it!
 
To help breakdown the waste that goes into the black tank, there are RV toilet treatments that both break down waste and stop odors.  There are many different ones. With the Roadtrek's macerator do not use one that comes in dissolving packets - as they do not completely dissolve and it will jam the macerator.  You also do not want to  use tablets for the same reason. The best thing to get is the liquid in a bottle. The bottles usually have a measuring guide along the side - or you can get a measuring cup to use to measure out the amount needed. Then after you dump if you are going to continue to travel right then with your Roadtrek or before you leave on a trip, you put this down into the toilet and flush it down into the black tank. I have found that the one that has worked the best is Camco TST RV tank treatment. It comes in different scents. The easiest scent to find is Orange as this is sold in most Walmart stores on the shelves in the auto aisles where they have RV supplies.  There is also citrus - not as orange and there is "fresh scent". 
 
For some time it was popular called the GEO Method to use a home made mixture of  Borax powder dissolved in hot water and Dawn dish washing detergent followed down into the black tank with several gallons of water.  We tried this for one full RV season. The mixing became a pain. The water needed to be added down into the tank took away a significant volume of what the tank was supposed to hold - the waste and we were dumping the black tank much more frequently. It did not work any better than the Camco TST. It did not fix the black tank sensors to work accurately. It involved carrying more than the just one bottle of tank treatment that cost less than the borax and detergent. We went back to the TST. 
 
The one thing your RT black tank likes more than anything else is water. You should never allow the black tank to dry out. It must be kept moist as not all of the waste is going to get dumped out of the tank. If the tank is dry after dumping that waste builds up - dries out and will clog the opening into the pipe to the macerator and stay inside the tank.  The fix is simple - put in one gallon of water into the black tank after dumping the tank and leave it there.   I have a collapsible silicone gallon pail that is easy to fill up and dump into the toilet and down into the black tank. It is flat when not in use and fits easily into one of the RT storage cabinets. The other place to keep moist is the flap in the toilet bowl. That needs to be kept moist so that the rubber flap which seals the toilet bowl to hold water does not dry out - as if it does the toilet will not hold water and you are using the bowl dry which means some cleaning that you do not want to do.  To put water into the bowl after flushing just hold the foot pedal down only part way and the flap will stay closed and water will go into the toilet bowl. Once the flap is under water stop.  With both of these - when winterizing and there is no water - use RV antifreeze into the black tank to keep it moist and do the same over the flap. 
 
What can go wrong with the toilet? One thing that we experienced when our RT was winterized the first two years that we had it was that at that time the winterizing process started with using compressed air to clear out the plumbing before using the RV antifreeze. NOTE DO NOT DO THIS!  The compressed air pushed mineral deposits in the pipes into the toilet flush valve - the valve behind the left side of the back of the toilet - looking from the front of the toilet - and the mineral deposits jammed and broke the flush valve. This happened after dewinterizing on a trip and the water flooded the floor of the Roadtrek and the only way to stop it was to shut off the water pump - turning it back on caused the flooding to start again. Our RT was under warranty at the time and the dealer service replaced the flush valve. We were not aware that the compressed air did this and winterized the same way with the air the next year-  and the same thing happened when we de-winterized.  This time the service shop took the valve apart and rebuilt it.  What else can go wrong? Even with the flush flap moist with water in the bowl after 12 years the toilet bowl stopped holding water. I tried different recommended ways to fix this - none worked. Recommended was get a silicone plumbers gel lubricant and open the flap and smear the lubricant all around the bottom edge of the flap - it still leaked all water out and down the toilet drain in a day. There is a liquid lubricant for this - hard to find.  Got one local RV repair shop to order a bottle for me - did not work! We took the Roadtrek to that dealer who replaced the rubber flap and the rubber seal between the toilet drain and the black tank pipe. (The two seals are sold as set.) To do this the toilet had to be removed from the floor, plumbing disconnected, and the bottom seal is put onto the toilet from the bottom of the toilet - and the flush flap seal is also put in the same way. Some try to do this with the toilet in place - but the drain seal can only be put in with the toilet off the floor. If flush seal is bad so is the drain seal. 
 
Alternatives to a regular RV toilet -- 
Some look to replace the toilet with a composting toilet. Some years back when the original Roadtrek was still in business, Roadtrek was asked on a forum why they did not put a composting toilet into the Roadtrek. Their answer was - the inside of the van is so small that a composting toilet's odor will overwhelm the inside of the Roadtrek. That is not something you want to sleep with inside.  Also - RVs that have composting toilets are not only larger but there is an access panel from outside to inside where the toilet is to empty the compost out. Without this you are scooping and carrying compost through the Roadtrek and out - and finding a place to put it. More stench! 
 
Then there are cassette toilets. A cassette toilet collects the waste into a box which has to be removed and carried to a restroom and poured out into a toilet - hopefully not including it pouring on your legs and feet. Again RVs - and some Class Bs have an access panel through the RV wall form outside to get the box out and not have to carry it through the RV to get it out. I saw a very funny episode of a show from England where composing toilets are popular in RVs (there called Caravans).  The man in the show pulled the cassette out through the access panel and it started to spill on him and the ground and then he started off looking for a place to pour it out and getting there it emptied itself all over him. It was funny - and done for humor but oh so possible to happen. 
 
Is there something to use if your toilet is not working. Yes - this article shows that and explains it. Go to the end of the article and read about DOUBLE DOODIE  Toilet Waste Bags! 
 
 Well that is everything you either wanted to know or rather that you did not know about the Roadtrek toilet. 
 
If you have questions - email us with the link in the right column that says Email Us.  


Tuesday, January 6, 2026

HOW TO AVOID PROBLEMS WITH A BAD CAMPSITE POWER OUTLET


 This article applies to any Roadtrek, motorhome, RV, or Travel Trailer. All plug into a campground power box pretty much the same way, 

You get to a campground and are going to plug into the 30 amp outlet in the power box at the camp sit. What if that outlet does not work and you wait to later to plug in and then find this out. I do the following to avoid any problems before it is too late the get the campground to do something about this or move you to another site.  

I carry a plug in polarity tester (inexpensive sold in Home Depot, Lowes, etc. I also have a 30 amp plug to 15/20 amp adapter. And I have a 110/120 volt AC plug in meter. The meter was hard to find and what I found was expensive, so I bought a "KILL-A-WATT" meter (brand name) in Home Depot which is less expensive and  it  has a setting to just check voltage. 

After we check in at a campground we go to the site with the Roadtrek and I test the 30 amp outlet. The polarity tester plug goes into the 15/20 amp socket on the adapter and the 30 amp end is plugged into the 30 amp socket --- I never plug in with the breaker above the 30 amp outlet in the campsite box ON, that is a lot of current to get a shock from --- once plugged in I flip the breaker to on and the polarity tester lights up to show that the outlet is working correctly or not. Polarity problems are common in campgrounds. 

With the polarity OK. The breaker switch goes off, I set the Kill-A-Watt meter to read voltage and unplug the polarity tester and plug the Kill-A-Watt meter into the 15/20 amp side of the adapter still plugged into the 30 amp outlet. I flip the breaker on and read the voltage. I look to see that the voltage is correct and within the correct range. 

Any problems and I would go right back to the office, tell them there is a problem with the 30 amp outlet in the site and they either go right now and fix it or put us in a different site. Just in case I also have a 50 amp plug to 30 amp adapter - and if the 50 amp outlet in the box works - then I can plug the Roadtrek into it with the adapter - a 50 amp adapter has no connections to the additional lugs on the 50 amp plug and only puts 30 amps into the Roadtrek. 

I will say that we have only once in all the years found a campsite with a bad outlet and when we went to the office they apologized and moved us to a different campsite that was just as well located as the first.   

Usually we get into a campsite too early to waste the rest of the day in the camp site and we then head out to do some exploring in the Roadtrek and when we get back later I plug in the Roadtrek with our EMS unit -I never plug the Roadtrek in without the protection of the EMS unit that we have.

This article will tell you all about EMS units.  If I was buying a new EMS unit today I would buy the Progressive Industries 30 amp portable unit. This is why -  the Surge Guard works very well - never had a problem with it BUT if there was an actual SURGE - not an out of range voltage but a lightening type of surge - the surge board inside the Surge Guard would be destroyed - as are most such boards in just surge protector units. So you throw the whole thing away and have to buy a new one. The Progressive Industries EMS unit has a replaceable Surge board inside. You can buy as spare and if there was a surge all you have to do is open the screws that hold the case together - pull out the burned out board - and push the new board into place - close the case and you are already to plug in again.

https://roadtrek190popular.blogspot.com/2016/09/an-ems-unit-for-your-rv.html


Thursday, July 24, 2025

REMOVING THE SCREEN ON THE FANTASTIC FAN

 There are times that the screen on the Fantastic Fan on the ceiling of the Roadtrek needs to be removed.  The screen seems very fragile when  taking it off the fan base, but if you are careful and follow this simple process it is easy. 

Why would you need to do this?  When the fan lid is opened the support arm that opens the fan lid when you turn the knob pushes a switch that will let the fan turn on. If the lid is closed the fan will not turn on. The lid must be at least 1/3 open for the fan to turn on. What controls this is a small switch that when the support arm passes the switch turns that little switch on and the fan can then be turned on. There are times when that switch gets stuck and the fan will not go on. Rather than having to go up to the roof of the Roadtrek outside and work on the fan with the lid open - by taking the fan screen off - you have access to all that you need to get to when fixing this. 


 In the photo above you will see a bump out on the plastic frame of the fan screen. There is a small opening under the bump out that you can get a finger tip into. 

 1. Put a finger tip into the opening below the bump out and gently pull down. That part of the fan screen frame will come down a small amount.

2. Move your finger around between the screen and the fan case gently around the entire circle of the screen.  Don't pull it down - that can damage. Go all around the entire screen frame separating it from the fan base. The screen will then come off and into your hands. 

THE SCREEN IS NOW OFF!   😃

With it off you can work within the frame. Just push the blade around and out of your way to get to what you need to get to. 

Taking it off means you are going to have to put it back on!

 All you have to do is reverse what you did to take it off. 

1. Put the screen up into the hole  and at the bump out push that edge up into the opening so that the edge of the screen is on the base of the fan. 

2. Again gently - go around the edge of the screen frame and push it back on all around the edge. It will snap into place as you go. 

 THAT IS IT! 

 At one point the fan in our Roadtrek was not working. It would not turn on even when the lid was fully open. I figured that the fan would have to replaced or I would have to take it to an RV shop to get it fixed.  I read about the little switch and decided that I could see if I could fix it.  That was when I saw how to remove the screen without breaking it - and I was reading posts on forums about how easily they break.  Turns out the support arm was hard opening and was missing the little switch. I lubed the support arm joints with a silicone gel lubricant (Dielectric grease) from a tube -  put on a cotton swap to apply it and straightened the support arm to do its job with the switch. No need to go on the roof. No need to take it to be fixed or replaced - saving some money.   


Monday, June 2, 2025

THE BEST CABINET LATCH REPLACEMENT IN YOUR ROADTREK

 In December 2013 I wrote an article about the cabinet latches in the Chevy chassis Roadtrek models. 

https://roadtrek190popular.blogspot.com/2013/12/roadtreks-cabinet-latches.html

Since the original Roadtrek that built the Chevy chassis Roadtreks is long gone and the new owners no longer support the Chevy chassis Roadtreks the latches once available from them are no longer available from the "new" Roadtrek. The brown push bar latch is infamous for how easily it breaks. While there is a way to avoid as best as possible to keep it from breaking - when closing the cabinet door keep the brown push bar pushed all the way in until the cabinet is completely closed so that inside the cabinet the latch goes over the metal catch open - and once completely closed and you let go of the latch bar it is not pushed and broken by the metal catch - eventually that latch will break. What is available looks like these latches but are even less strong than these are. 

So when you need a new latch what should you get?  The best way to go is to get a latch with NO movable parts and nothing to break.  Does such a latch exist? Yes!

You want a latch that has strong enough hold that the cabinet door will only open when you want it to open and not when taking a sharp curve on an interstate or when something in the cabinet falls against the door and pushes it open. What you want is a 40 pound pull 90 degrees magnet latch. What does 40 pound pull mean? To pull the magnet off the metal catch it takes a physical pull of 40 pounds. There is nothing that is going to push the cabinet door open from inside - and no way that cabinet is opening by the pull of gravity going while driving. 

 Here is what such a latch looks like - in its parts -  


This 40 pound pull magnet latch is made of stainless steel.  Two screws go onto the 90 degree magnet bracket into the side of the cabinet door (before putting in any screws check to make sure they are not too long and will come through the wood of the cabinet to the outside of the cabinet. One screw goes around the metal disk into the back of the cabinet door frame to match up with the 90 degree magnet on the bracket. Again - make sure the screw is not too long. IF the screws are too long - stainless steel screws like these are available in all sizes in Home Depot, Lowes, or Ace Hardware.

Since you need a strong hold on the door to pull it open - get a decorative and functional door pull handle - again -  Lowes, Home Depot, Ace or any other local store that sells cabinet hardware. The handle must be put into the solid wood edge frame of the door. Do not put the pull handle on the thin wood on the center of the cabinet door - that wood is too thin and will break if you pull on it.

Now you have a cabinet door that is going to stay closed when it should be closed and likely will never have to replace that cabinet's latch again. This will work on cabinets, wardrobe doors, and the bathroom door. 

Where to get these - I have not seen these in the local big box home stores' hardware departments. They are available on Amazon, and other hardware supplies who will ship. The lowest price I have seen for these is $10,99 each. They do go up - for the same ones - to over $20 - for one. Google this - 

" 40 pound pull magnet 90 degree cabinet latch " 

and they will come up on a search. 

Woodcraft Stores - a tool and woodworking specialty stores has these in their stores and online for $10.99 each. 

Rockler woodworking supplies - another tool and woodworking specialty stores has these in their stores and online also for $10.99 each.

Some listings for these will also show lower pound pull magnet latches that look the same - 10 pound pull and 20 pound pull are NOT strong enough to keep the door closed. 

Walmart online shows the 40 pound pull magnet for almost $30 - way too much to pay for this.

Amazon - $17.00 and they claim "free shipping" but it is being shipped by a third party. 
 

Wednesday, April 16, 2025

ROADTREK TIRE PRESSURE

 When we first got our Roadtrek 2011 190 Popular new I was curious about the tire pressure that should be used. Inside the driver's door frame there is a sticker that says 50 psi front tires and 80 psi rear tires.  It sounded to me to be a big difference between the front and the rear psi - so I called Roadtrek's factory number and spoke with a Roadtrek service technician that I was connected with. 

I am going to share what he told me - as this comes up often on the Roadtrek Facebook groups and Roadtrek forums. He was very clear that the 80 psi in the rear is a MUST - do not go higher and do not go lower. He then said that the 50 psi in the front is a suggested starting point for the front tires. He said that by varying this number up in increments of five the ride of the Roadtrek changes. 

He said to drive with the tires at 50 psi in the front and evaluate how the ride feels. Then go to 55 psi in the front tires and do the same. Do this for each more 5 psi until you get to 65 psi - and stop. He said that after 65 psi in the front the ride starts to degrade - so do not go over 65. 

We did this - and found that the best ride (for us) was at 60 psi in the front.  We have kept the tires in the front at 60 psi since then. I have read that others also have preferred the feel of the ride at 60 psi - but this does not mean that you will like it there - so you should do the changes by 5 psi from 50 to 65 psi and see what you like. 

One more thing that we learned right away with the Roadtrek and the front tires, was when Meryl drove the Roadtrek home from the dealer in Pennsylvania with me following in our car (yes - Meryl was the first to drive our Roadtrek) she found that the Roadtrek was not holding straight in the lane of the highways we were on to get home. She felt it moving all over the road.  When we got home she told me about this and we both got into the "new" Roadtrek and I drove it on a local expressway - and sure enough it was all over the road. (I did not doubt that it was doing this when she drove it home - but if we were going to call the dealer - etc. I wanted to be able to describe it myself.)

 We thought it needed an alignment and we called Roadtrek who told us to call Chevy - and show them the papers we were given showing the warranty started on the Chevy chassis when we took delivery of the converted  Chevy Express 3500 van a couple of days before when we picked up the Roadtrek.  When we got to the local Chevy dealer they said that they do not do alignments but send them out to a local alignment shop and they sent us there. When we got there the manager looked at the Roadtrek and told us that it would not fit into his shop and his alignment rack would not hold the weight of the Roadtrek. He suggested a local truck service shop that could do the alignment - but he said wait a minute and let him check the front tire pressures. (This was before we set the fronts to 60 psi - what was in the tires at this point was what the Roadtrek left the factory in Canada with in the tires which was driven to the dealer in Pennsylvania by a Roadtrek driver.) 

The tire alignment manager checked the two front tires. They were over 20 psi apart from each other. He got the tire hose from his compressor and put the two tires at 50 psi (which is what they should have been when they left the factory). He said take it out for drive and see how it is now. He also said watch to see that they don't go down in case there is a leak that caused this. 

We took it out on the expressway and drove for a distance and it was perfectly holding the road and centered in the lane! Driving and days went by and the tires never lost any air - there was no leak.  It needed no alignment! It made us wonder why the Roadtrek driver who drove from Canada to PA did not report to the dealer that the van was all over the road... (but this was typical of Roadtrek at that time in 2011!) 

So the point of this little tale -  make sure that both front tires are exactly the same psi - or the van will go all over the road and not hold straight in a lane.  

What to know about the PSI when you are driving:

When any vehicle - van, car, truck, RV, Roadtrek is driven the friction between the tires and the road cause heat to build up inside the tire and that results in the tire pressure increasing. This is normal and tires are manufactured to allow for this to happen. SO while you are driving the Roadtrek and if you have tire pressure monitors on the tires (my Roadtrek came standard with this - and the readout is shown with the push of a button to the left on the dash) you may see the back tires not at 80 psi but close to or over 90 psi - not a problem - this is expected.  You might see your 60 psi in the front tires reading 70 psi  - again this is expected - and one of the reason's why the Roadtrek tire size has an E at the end of the tire size - E rated for high pressure in the tires. Don't get excited if you see this. Don't panic! 


Friday, March 21, 2025

HOW TO CHECK THE COACH BATTERY(IES)' VOLTAGE ON A ROADTREK THAT HAS A TRIPPLITE

 With the battery switch on, when you press the test button on the monitor panel in Roadtrek the battery column of LEDs light up to show you how much charge is in the coach batteries, The top C green LED indicates that the Roadtrek is charging (if plugged in, running the generator, or running the engine). The next LED down - G amber LED - if  lit indicates that the voltage is approximately between 12.5 and 12.7 volts (12.7 is considered full charge). The next two LEDs down to the bottom of the column - both RED LEDs - indicate from the one below the G to the one on the bottom that the batteries are 12.4 volts for the upper one and 12.3 volts for the bottom one. When the upper red LED is lit at 12.4 volts the batteries are at half charge - and at this point the Roadtrek needs to have the batteries charged by either plugging in for 12 to 24 hours, running the generator (which is the slowest way to charge), or taking a two to three hour continual drive on a limited access road at the speed limit.  BUT with the monitor panel battery column what you are seeing is not exact but an approximation of the level of charge. If you want to see an exact battery voltage level you need a multi-meter - an electronic device that will read both AC and DC voltage (separately) by putting a positive and negative probe on the battery terminals. You want a multi-meter with a DIGITAL display.  Using one with a dial and needle is not going to be easy to read. These can be found in Home Depot or Lowes or any electronics store or auto store - or on line. A digital meter will cost about $40 or more but is well worth it both for the Roadtrek and at home. Prior to 2011, Roadtrek had the battery(ies) in a slide out tray inside an outside cabinet on the passenger side of the van. This was either one or two cabinets - when there were two cabinets there was a battery in each. When there is one cabinet both batteries are in that cabinet.  When these cabinets has sliding trays it was easy to slide the tray out and have access to the battery terminals.  In 2011 Roadtrek changed from using deep cycle RV wet cell battery(ies) to no maintenance AGM batteries. With no way to open an AGM battery and no need any longer to check battery fluid levels - there was no need to access the top of the battery(ies) and since Roadtrek did not want you to even attempt to do that - they took away the slide. Here is a photo of my 2011 190 Popular with AGM batteries with the battery cabinet door open - 


With this getting to the terminals of these two 6 volt AGM batteries wired in series to output 12 volts DC to the Roadtrek is a major pain as the batteries need to be lifted out as it is awkward to get to the terminals needed to take a reading with a meter. 

BUT - there is a simpler way!  For Roadtreks equipped with a TrippLite Inverter/Converter/Charger you can easily get a reading right from the battery connections going into the TrippLite. This works with both the earlier TrippLite 600 and the TrippLite 750 that Roadtrek uses later. 


This is the TrippLite 750.  This is located in the back of the Roadtrek behind the passenger side cargo door.  To see where this is and how to access it - in many Chevy based Roadtreks - but Roadtrek over the years had a way of putting things in different locations so it is possible yours may be elsewhere - this linked article will help you get to it (with photos)  in the same location mine is.  One thing for certain it is inside near where the battery(ies) are outside. 

Take a look at this photo on the bottom left. There is a black cable and a red cable - the black cable is the negative battery cable coming DIRECTLY from the battery(ies).  The red cable is the positive battery cable coming DIRECTLY from the battery(ies). The TrippLite is directly connected to the battery(ies). IT BYPASSES THE BATTERY DISCONNECT/CONNECT SWITCH ON THE WALL INSIDE THE ROADTREK. THESE TWO CABLES HERE ARE ALWAYS LIVE - THEY HAVE POWER GOING THROUGH THEM EVEN WHEN YOUR BATTERY SWITCH IS OFF AND/OR THE ROADTREK IS COMPLETELY SHUT DOWN. 

NEXT - take a look at the top of the BLACK cable in the photo - SEE THE SCREW HEAD THERE. That holds the cable into the TrippLite. There is the  another of that SCREW HEAD on the top of the red cable (hidden in the photo by the red cable - but it is there just as easy to reach. (Don't touch the two at the same time with your fingers - these are live connections.)
 
NOW - Take out your multi-meter - set it on DC - if there is a voltage range set the range to include 12 volts. There will be a probe with a red wire and a probe with a black wire that you plug each into the meter. Some meters have a button to hold the reading on the screen once the reading is taken and this makes it easy to look at once you have crawled out from where the TrippLite is located, stand up outside and read what it says - especially if you have a Roadtrek with a power sofa bed and the TrippLite is under the bed and the bed frame is in the way of the TrippLite. Once your meter is all set - and you can get it set up even before you start - you can take your reading.
 
HOLD each probe, each in a different hand and put the metal tip of the probe on the top of the corresponding battery cable screw head.  Hold the probes away from the metal tip on the end of each prob. Do this not plugged in, best if the battery wall switch is of inside so there is no draw on the batteries when taking the reading, van engine off, generator off. Inverter wall switch OFF . Instantly the meter will display the exact voltage of both batteries - or your single coach battery on its display screen. 

That is all there is to it. No struggling with battery(ies) in a small cabinet - no need to slide out anything. You just use this easy access method to see what the exact voltage of your Roadtrek coach battery(ies) is.
 
This is the meter I have. I bought it either in Home Depot or Lowes. This meter comes with the standard probes but it also has a temperature probe used to show the temperature coming out of a air conditioner, etc. It uses batteries to run but I do not keep those batteries in the meter unless I am using it - as I am not using it often. The pouch came from Walmart - though I have not seen these there in awhile. In the pouch it is an easy grab and go with everything needed inside to use it. I keep it in the house and it is on the what to pack into the Roadtrek before a trip check list. It is easy to find a place for it inside the Roadtrek!


Saturday, November 2, 2024

CONNECTING TO A CAMPGROUND CITY WATER SPIGOT

 What would just connecting to a city water spigot in a campground need an article for? After all you take your hose and attach to the spigot,  connect the other end of the hose to your city water connection on your Roadtrek - and turn on the water. Right? Well almost right.


 There are two things to do before what is simply described above. The first thing to be aware of is that many of these spigots are close to the ground and in many campgrounds there are dogs and other animals wandering around the campground during the day - and at night.  The dogs, especially, find these low down city water spigots a favorite thing to lift their leg against and cover the spigot at its opening and and the screw threads that you are going to attach your city water hose to. Yuck! This common.  

The most suggested way of disinfecting the spigot is to mix a solution of bleach and water in a spray bottle and spray that into the spigot opening and allover the outside of the spigot.  We did this when we first got our Roadtrek. We would mix up a batch in a spray bottle and keep it from trip to trip. Then we found out that the bleach loses its effectiveness over time - and especially mixed like this in the heat of the summer.  So we started mixing it just before we would use it - and wind up discarding more than we sprayed - and it was a pain to do this when you are trying to get through hooking up. 

I recently found out about a better spray to disinfect a campground spigot for this reason from an RV TV streaming show.  They said to spray hydrogen peroxide and that it was available already in spray bottles.  As long as hydrogen peroxide is kept in its brown bottle and kept closed it lasts for a very long time. I went out looking for hydrogen peroxide in a spray bottle and found out that it is sold in Walmart stores in the pharmacy department.  

This bottle is very inexpensive and it is easy to store in the outside cabinet on the side of the Roadtrek with your hoses. Spray the inside of the spigot hole and all around the spigot head. Let is sit for five minutes and then turn on the water to flush out the spigot before you connect you city water hose. 

There is just one more thing to always do when you are connecting a city water hose to your Roadtrek. You MUST attach a Water Pressure Regulator. The best place to attach this is between the city water hose and the campground spigot. After you spray the spigot with the hydrogen peroxide - attach the city water connection to the spigot and then attach you city water FRESH hose (yes there is a special hose to use on an RV - these hoses have no lead in their connections and they are usually white hoses or a white with a blue stripe hose, or a blue hose. The hose is labeled on its packaging as "drinking water safe" or "safe for potable water".

Water pressure regulators for RVs come different ways. The one above has the max pressure it will limit through it permanently set to 40 psi - which is the most pressure you want in the Roadtrek or any RV plumbing that will not burst the pipes.  There are other preset city water pressure regulators that have an analog meter attached to see the water pressure - which is not really necessary. Then there are water pressure regulators that you set to the allowed pressure. They also have an analog meter attached to see what the water pressure is - which for this type of water pressure regulator is very important. This might seem like the best to get, but if you forget to set it or it has moved off the setting you set it to last time, you will damage your Roadtrek's plumbing.

RV accessories retailers online have all of these. Many Walmart stores have RV accessories in their Auto aisles in a section of their own on the shelves. They have the water pressure regulator shown above in the photo. They may also have a water pressure regulator that looks the same but is made of blue plastic. I do not recommend buying the plastic one - get the brass one. Plastic too easily can break or get a small crack and the pressure will be effected. 

So hooking up to city water is a little more than just connecting the hose - but it is just as easy when you add these few steps.

Also - if you are concerned about the water that comes out of a city water spigot at a campground, you can buy a filter that is attached to your city water hose and it will filter all water going into your Roadtrek (even when filling the fresh tanks through the door openings).  This is a thick walled plastic cylinder about a foot long and maybe two and a half to three inches in diameter. I have a four foot fresh water hose that I put between my pressure regulator and my long city water hose and the water filter is attached between.  We also have a regular Brita kitchen sink water filter - the same that goes on kitchen sinks at home - on the kitchen sink faucet in the Roadtrek.  This lets you know when the filter needs to be changed - and then you just take out the old cartridge and drop in a new one.  The hose filter is also found at Walmart in the RV accessories section and the Brita water filter can be found in most places that sell household items.


Saturday, October 12, 2024

CARBON MONOXIDE, PROPANE, AND SMOKE DETECTORS

  Roadtrek installs detectors to protect you inside the Roadtrek from three dangers - carbon monoxide poisoning, a propane gas leak, and fire by detecting smoke.  Two of these detector units are hardwired to your 12 volt DC house battery(ies). One is powered by a common 9 volt DC battery or with the latest technology in detection devices, a 10 year battery built into the unit - and that is the smoke detector.

There are a few things to be aware of with each of these detectors - and also the history of what detectors Roadtrek has used or is currently using.  We will start with that first and then look at the different detectors. Prior to 2012/2013 Roadtrek used an individual carbon monoxide detector and an individual propane detector. Around 2012/2013 Roadtrek started using a combination carbon monoxide detector and propane detector- both functions in one unit. Roadtrek has and still uses an individual smoke detector. 

THE CO DETECTOR

CO (Carbon Monoxide) Detector alarms will go off when CO gas - engine exhaust, gasoline motor exhaust - either from your Roadtrek or your Roadtrek's generator - OR from another motor home that is running its engine or generator closed to your Roadtrek. CO gas will first cause dizziness, then will knock you out, and then without it being cleared, will kill you,  The CO Detector is hardwired to your house 12 volt battery(ies) as a safety precaution - and should never be replaced with a battery run home detector (for this and another reason). How does the gas come in?  It comes in from an open or partially open window, through the vent over your cargo doors for the A/C unit, from an open ceiling fan,  from a leak in your muffler or exhaust pipe, or from another close by RV with those problems. These units last just five years.  When they are about to expire in one month  (they have expiration dates), they will go off intermittently - without any CO present. This is to warn you that the CO detector must be replaced.  In the last month of its life span, it goes off continually - if it has not been replaced - to tell you that you absolutely MUST replace the unit NOW!  If you do not you will not be protected. If you pull the fuse to stop it - it will go off but you are NOT protected!  There is one other reason why these go off when there is no CO present - they monitor the voltage in your house battery(ies) and if the battery voltage is LOW the CO alarm goes off. This is to warn you that with a low house battery(ies) you are NOT PROTECTED from CO poisoning.  The CO Detector comes on with your Roadtrek battery switch and there will be a green light on the front of the detector indicating it is on and working. There is also a push button test button to push in and sound the alarm for you to test that it is working. The other reason why a CO Detector should not be replaced with a home detector but always with an RV CO Detector is that the operating temperature range of the RV CO detector is much wider a range from a home detector - it will work in much higher temperatures and much lower temperatures (the home detectors are made for inside a house where the temperatures are more controlled and not as hot and not as cold as the inside of an RV can get.

CARBON MONOXIDE IS LIGHTER THAN AIR AND FLOATS TO THE CEILING.

For this reason the CO Detector is installed by Roadtrek near the ceiling of the Roadtrek in the rear (usually on the passenger side). 


In this photo you are looking up from the bed to the ceiling - the CO Detector is just above the thermostat panel. 

THE PROPANE DETECTOR 

The Propane detector alarm will go off when propane gas is leaking into the inside of the Roadtrek. For many Roadtreks, your stove, your hot water heater, your three way refrigerator, and your furnace use propane gas that is located in a propane tank under the chassis of your Roadtrek. Any break or crack in a propane pipe, pipe joint, pipe connection, the propane tank - or any one of the appliances that use propane can put Propane gas into your Roadtrek.  Propane is EXPLOSIVE.  A propane fire does not go out until all of the propane gas is burned off. Propane fires have been known to burn an RV to its shell. Propane explosions can level a house. You only have to see a propane fire or a propane explosion once - either in person or in a photo or video to know the massive destruction it can cause. THIS is why you have a propane detector to warn you with enough time to get out and away from the RV.  Like the CO Detector, the propane detector has a five year lifespan and it will do the same thing that the CO Detector does. One month before its expiration date it will intermittently go off to warn you to replace it. In the expiration month it will go off constantly telling you that you were warned to replace it and now you MUST replace it NOW. Also it will go off if the house battery(ies) are low voltage. There are a few other things that will set off the propane alarm - any aerosol can sprayed near the propane detector will set off its alarm. Your dog passing gas next to the propane detector will set off the alarm. (I supposed a person doing the same can have the same result.)  The way to test a propane alarm is to use a cigarette gas lighter. Put the lighter next to the propane detector - close to it - and push down the button that releases the gas from the lighter - Do Not flick the wheel on the lighter - you do not want a flame. The propane detector should go off immediately. There is a light on the front of the propane detector to show you it is working. It is still advisable to do a test with a lighter.

 PROPANE IS HEAVIER THAN AIR AND SINKS TO NEAR THE FLOOR 

For this reason Roadtrek installed the individual propane detector near the floor under the bed to the aisle wall of the passenger side floor cabinet.


This is the propane detector that Roadtrek used before 2012/2013. This company has become a one man operation who is making them in his basement - and my experience with him and the replacement I bought from him was a terrible.


This is the Safe-T-Alert Propane Detector that I got to replace the original after the fiasco with the replacement for the original. 


THE COMBINATION CARBON MONOXIDE AND PROPANE DETECTOR

As said in 2012/2013 Roadtrek started using a combined in a single unit propane and CO detector. It does both jobs and protects you from both. Again - a five year life span with the same alarms going off as with the individual unit when it come to the month before its lifespan expires.  I have seen some Roadtrek photos were this is installed about halfway between the floor and ceiling. I asked for a photo of one of the combination detectors in a Roadtrek and this photo was kindly shared by Susan Howell. Here is a photo of the unit in her 2013 190 Popular Chevy chassis Roadtrek. You will see that is is installed near the floor.  Since this is an early year with the "new" combo detector Roadtrek may have moved it higher in later model years. There are videos showing mounting these mid-way. This is not up for debate - where yours is mounted in your Roadtrek is where it should be.  


THE SMOKE DETECTOR - FIRE ALARM  

 
The smoke detector that is in your Roadtrek is a regular house smoke detector. It is not hard wired to house battery(ies). It  is either run by a 9 volt DC put in the back battery or with newer replaced smoke detectors it has a 10 year never needs replacing until it dies in 10 years battery. The smoke detector is located in just about the worst place a smoke detector is to be placed -  in the front of the Roadtrek just across the aisle from the stove. If you buy a new smoke detector for your house it will have in its installation instructions that it should not be placed in a kitchen but at least 20 feet from your stove or cooking appliances. Of course, 20 feet in a Roadtrek in any direction is outside Roadtrek. So as a result the smoke detector will go off when you are cooking on the stove using an electric cooking appliance on the kitchen counter, etc.  Contrary to a belief I have heard from some (I say laughing), the smoke detector is not there to tell you that dinner is done cooking when the smoke alarm goes off. 😀

I have to share that we were heating a can of soup on the Roadtrek stove, the smoke detector went off. There was no smoke - just steam and not further than just above the pot. We tried using a two slice toaster on the kitchen counter and the smoke detector went off.  And to get it to go off we had to take if off the wall and take it outside and wave it around and then had to take the batteries out.  Even the ceiling fan exhausting out the invisible smoke did not shut the smoke alarm off.  It is important to have -  it can be funny at times but an electrical short that starts a fire  and it goes off it can save your life and your Roadtrek. But for this reason when it came time to replace the original in my Roadtrek and I found out that in this state stores are only allowed to sell 10 year smoke detectors - and you cannot take the battery out of it if it will not go off (the way you can with a 9 volt battery operated smoke detector alarm - I waited until we were on a trip in the Roadtrek and bought one in Pennsylvania, where both types can be sold, that uses a 9 volt battery.   With the 9 volt battery detectors - just like at home - if you hear it chirping and that does not stop - it needs a new 9 volt battery. And as is advised every New Year's Day - replace the battery in the 9 volt battery smoke detectors. 


REPLACING THE CO DETECTOR AND THE PROPANE DETECTOR

These two articles have been on this site for a long time. One is how to replace the individual CO Detector and the other is how to replace the individual propane detector.  When I replaced each I made some simple modifications to the wiring to make it easy to replace each when the time came again. The modifications make an easy job even easier! 

REPLACING THE CO DETECTOR 


REPLACING THE PROPANE DETECTOR 

(The propane alarm article details what went wrong when I tried to use an exact replacement of the original and what I finally had to do with a different one.) 


So that is it. Seems simple - is simple!  Obvious to all?  You might think so - but apparently not...


Wednesday, July 24, 2024

THE GENERATOR SEEMS DEAD - THE GENERATOR RUNS BUT THERE IS NO POWER IN MY ROADTREK!

This article applies to Roadtreks with the Onan gasoline powered generator Microlite 2800 models up to the KY model that came out mid to late 2012. It applies to the KV model that is the model before the KY and should apply to earlier Onan's.  I DO NOT KNOW if it applies to the newest Onan Microlite 2800 model as that has a very different motor.


The Onan Microlite 2800 gasoline  generator in the Roadtrek will at times not start - it does not try to start and stop. When the start switch is pressed - either on the wall or inside the generator itself - the motor seems to be DEAD! This could be a mechanical issue inside the Onan but the first thing to check is the FUSE inside the Onan.  Early Roadtreks had the Onan in a compartment on the outside of the van on the side wall.  These are easy to work with inside the generator. Later Roadtrek moved the generator under the chassis of the van.  Look under the rear bumper toward the driver's side and you will see it hanging down.  The FUSE is inside the generator case. The fuse is between the Roadtrek battery(ies) and the ignition of the generator motor and this goes through the generator's control panel. 


Sometimes the generator starts just fine - and runs perfectly but there is no 120 volts of AC power coming out of the generator.  You turn on the A/C and nothing happens! You turn on the microwave and nothing happens! The first thing to check is the CIRCUIT BREAKER inside the Onan! The internal Onan CIRCUIT BREAKER is between the Onan's output and the Roadtrek! 

As you can see in the illustration above - the breaker and the fuse are near each other. 

 Getting to the Onan when it is under the chassis -  

I should not have to say this but before going to the generator SHUT THE GENERATOR OFF!

 Sorry to say, you have to crawl under the back of the van's rear bumper on the driver's side either on your back or on your belly. When you get close enough it will be above your head - and it is a pain to work on it propping yourself up on your elbows or reaching up on your back looking at it upside down. 

You then have to remove the access panel on the front of the Onan's case by pushing up on the two buttons - shown in the first illustration - at the same time and then pull forward and down on the panel to take it off.  Once the panel is off you will see an  open space in the middle - as shown in the second illustration.  In the picture here it is easy to see. Looking inside the Onan upside down or trying to look up at it - it is not so easy to see.  You might not see it all all.  if that is the case you are going to have to rely on touch.  

 FOR THE FUSE - PUT TWO FINGERS IN AND FEEL FOR IT - it is a regular automotive blade type fuse - 5 amps. Get hold of it with two fingers and pull it out (try not to drop it). Look into the center of the top of the fuse and see if the metal connection inside is broken. If so the fuse is blown and must be replaced - and when you do so the generator will start right up - if this was what the problem is. 

FOR THE CIRCUIT BREAKER -  PUT A FINGER DOWN AND FEEL FOR THE LITTLE BLACK HANDLE THAT POINTS TO THE PASSENGER SIDE.  Once you find it push it DOWN TO RESET IT and then with a finger under it PULL IT UP TO SET IT. It will click into place and stay there.    

 If you want to wait to put the access panel door back on and go and try the generator to see if all is well, then there is no problem leaving it off until you go inside and turn on the generator and if it was the fuse make sure it starts and if it was the circuit breaker to make sure you now have power.  Then crawl under again and put the access panel back on.    You have to push up the two buttons again and put the top in first and swing the bottom into the Onan to close the panel - once set in let go of the buttons  and if they don't want to go on their own - push them down to lock the panel on. 

IF you changed the fuse and want to start the generator with the internal start switch - shown above - you can BUT the generator when it starts is going to vibrate and you do not want to have your hands or your head anywhere close to it. I don't recommend it having done it. 

 WHY DID THE FUSE BLOW?  The generator may have overloaded when starting.  When the generator is being difficult to start - do not just keep holding onto the start switch inside the Roadtrek. Let off the switch - wait a half minute and then push the button again. After several attempts to start it - let is sit for ten minutes and then try again.   

 WHY DID THE CIRCUIT BREAKER TRIP? This can happen if a load over 2800 watts is put on the Onan - A/C turned on and then the Microwave is turned on at the same time. AC is running and a hair dryer is plugged into an RT outlet and turned on.   

BUT IT IS VERY COMMON FOR THE BREAKER TO BE SHUT OFF WHEN ANYONE - PRO OR OWNER DOES ANYTHING INSIDE THE ONAN - INCLUDING JUST CHECKING THE OIL.                                                    

What happens is the set breaker handle is located close enough to the top of the open space that hands easily hit it down and turn it off. I have been at an Onan shop and when they told me it was ready and aI went inside to turn it on and make sure - and the Onan is running - great! - BUT the microwave display is dark (this is a quick place to look to see that you have power as when plugged in or running the Onan the display is lit - even though the microwave is not turned on. I turned on the A/C just to make sure - A/C - it did not start - just like it was dead - which it is without any 110/120 volt electricity. I called the service tech back over and told him to go under again and put the breaker back on - as he obviously hit it when he was working inside. He was not happy. They hate going under to work on it also. 

WHAT IF NEITHER OF THESE WORK TO FIX IT?    

The least expensive thing to have happened is a connection from either the fuse or the breaker came off of the Control Board. This happened to me - found by an Onan service tech - we both thought it was the breaker but a wire from the breaker came loose on the control board inside the Onan.  Worst case is there is something much bigger wrong with the Onan.                                                                                                                                                                                                                                                                ======================  

The last time I had my Onan in for service I watched the service tech go under in a different way to work on the Onan. He rolled under on a mechanic's creeper from behind the driver's rear tire from the driver's side of the Roadtrek. He was not on the ground. The mechanic's creeper lifted him up high enough to more easily look inside and get inside of the Onan. Every so often Harbor Freight stores put a nice creeper on sale for less than $30. (No I don't work for Harbor Freight and I get nothing from them for mentioning their store! (I wish I did 😉!) 

The two illustrations are from the Onan KV manual.  If you do not have an Onan manual, EMAIL US! and I have a KV and a KY manual that I will email you the one you need. I also have a KV service manual which is very thick in pages. I can email that to you if  you ask for it - it is for the KV but the basics will apply to the KY. Be sure to tell me in the email if your Onan is a KV or KY so that you get the correct manual.  These are no longer easy to find on the Cummins/Onan website.                                                                                                                                                                                                                                                     


Tuesday, July 16, 2024

TWO BATTERY CHARGING SYSTEMS IN A STANDARD CHEVY ROADTREK ELECTRICAL SYSTEM


This article gets into some very technical explanations which I have tried to simplify as best as I can!

 There are two key components of the battery charging system in the Chevy Roadtreks. The two components in some cases work independent of the other. In other cases they work together. The equipment for these two components also vary by year and model of the Roadtrek.

One of these components charge the Roadtrek battery or batteries (which also depends on year and model) when the engine is running. The other of these components charges the Roadtrek battery or batteries when the Roadtrek is plugged in or running the generator.

 Before we go any further – none of what is in this article applies to Roadtreks that have the optional electric system components that began to make their appearance in late 2013 and beyond. These are – Roadtrek designed Ecotrek lithium ion batteries, solar panels, the underhood generator, and a system Roadtrek designed called VoltStart.  (Voltstart monitored the coach batteries voltage and when the voltage dropped automatically started the Chevy engine to run the optional underhood generator to recharge the batteries. There was also an option to get Voltstart which would start the Onan generator when the battery voltage dropped and the battery (batteries) needed to be recharged.) Also any modification to the Chevy Roadtrek’s electrical system by an owner to include lithium ion batteries, solar panels,  a DC to DC charger, replacement of the TrippLite inverter/converter/charger, etc makes anything in this article not apply to your Chevy based Roadtrek.  Any of these options and owner modifications changes what needs to be on when, what does what, and how things work in regard to the electrical system.

 What Roadtreks does this article apply to - any Roadtrek with the standard basic electrical system – and though this article we will talk about what that consists of.

 This article is not going to be broken down in parts – it will be one article with everything in it – and, therefore, it may be long.  So let’s get started.

 First we are going to look at how driving the Chevy based  Roadtrek or running the Chevy Roadtrek’s engine charges the batteries (battery). 

 Year and model effects this.  Chevy Roadtrek 170, 190, 210 and Chevy Roadtrek Simplicity models and Ranger Models (the Chevy based Simplicity was a scaled down 170 or 190 – Roadtrek later names a non-Chevy based Roadtrek the Simplicity – and that is not included here. The Ranger was also a scaled down Chevy based 170 or 190 with options to include some of the features of the regular 170 and 190.  Both the Simplicity (which was short-lived) and the Ranger were an attempt to reduce the price of a Roadtrek to make it more affordable). Year determines also what electrical components Roadtrek is installing.

 Early Roadtreks and into the mid 2000s for the Chevy based Roadtreks have a battery isolator installed by Roadtrek in the engine compartment.  The battery isolator connects the engine battery with the Roadtrek coach battery(ies). A cable is run from the coach battery(ies) to the engine and is connected to a battery cable connection on the battery isolator. Between the cable and the isolator Roadtrek installs a self-resetting circuit breaker. A cable connected to the engine battery is also brought to the battery isolator and also has a self-resetting circuit breaker between the cable and the connection to the isolator.  There is a ground cable also attached. Here is a photo of a Roadtrek battery isolator – under the hood against the back engine wall.

THIS PHOTO COMES FROM RED ROVER

 The battery isolator works in only one direction – from the engine battery to the Roadtrek battery(ies) and only charges the Roadtrek coach battery(ies). Of course, the engine battery is charged normally by the van alternator.  So why mention this  -  when you are plugged in to shore power or running the Roadtrek generator – if you have one – the engine battery is NOT charged by the battery isolator.

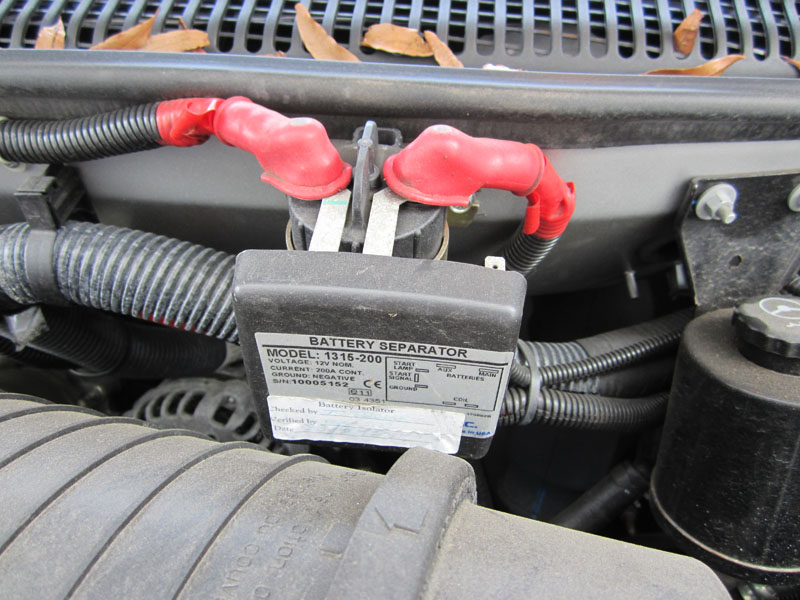
 This continues in the Roadtrek standard electrical system until 2007 later year built Chevy Roadtreks and then 2008 and beyond – with the standard electrical system.  According to the creator of the Roadtrek Electrical Simulator in his written NOTES that accompany the Simulator, in 2008 Roadtrek changes from a battery isolator to a battery separator as at this point Roadtrek found that the isolator was not working as it should when connected to a TrippLite 750 inverter/converter/charger.  (The 2005s have a TrippLite 600 inverter/converter/charger. Per the Roadtrek brochures for 2006 and 2007, they have the TrippLite 750 but they do not change over to the battery separator for these years and remain with the battery isolator though some later built in 2007 Roadtreks may have the battery separator. This is a photo of the battery separator, Notice the simpler and fewer connections.


What is the difference between the two?

The battery separator does the same thing as the battery isolator but in a different way electronically. They are connected the same way. They both charge the Roadtrek coach battery(ies) when you drive but it has an added feature – it is bidirectional – which means not only does it charge the coach batteries when the engine is running but it also charges the engine battery WHEN THE ROADTREK IS PLUGGED IN OR RUNNING THE GENERATOR! 

I can best explain how the battery separator works as I am most familiar with that.  The battery separator monitors the battery voltage – the separator monitors both sides – the engine battery voltage and the Roadtrek coach battery voltage. The battery separator used by Roadtrek is the Sure Power 1315-200 (BIDIRECTIONAL) 12 VOLT 200 AMP BATTERY SEPARATOR.  There are two voltages that the battery separator looks for.  When either battery – the engine battery or the Roadtrek battery(ies) is below the “disconnect threshold” (which is 12.8 volts DC) the relay is opened connecting the two sides – engine battery to Roadtrek battery(ies). This starts charging of one or the other of the two sides.  Which? If the engine is running the engine battery is charging the Roadtrek battery(ies).  IF you are plugged into SHORE POWER OR RUNNING THE GENERATOR then the Roadtrek battery(ies) are charging the engine battery at the same time the TrippLite is charging the Roadtrek battery(ies).  When the “connect threshold” voltage (which is 13.2 volts DC) of the battery(ies) being charged is reached the battery separator shuts off charging.  The battery separator is designed when it is off to preserve the engine battery at 12.8 volts – which is 100% of the engine battery’s capacity to start the engine.

 This is very confusing to most and is from the Sure Power documentation for the battery separator. These voltage numbers to most of us are not important – BUT if a mechanic needs to test the battery separator (or a battery isolator – he needs these numbers to make it connect and disconnect. While we are paused for the moment, I want to explain simply about 12 volt battery voltage.  It would seem that when a 12  volt battery is fully charged, if you read the voltage of the battery it would read 12 volts. That is not what it will read. If it is fully charged it will read between 12.7 and 12.8 volts. Between 12.2 and 12.4 volts the battery is half charged. At 12 volts it is one quarter charged.  At 11.9 volts it is DISCHARGED!  Deep cycle batteries should not be allowed to go below half charge. On the Roadtrek monitor panel half charge is the two bottom LEDs lit – on the digital panel that would be the bottom two indicators. AT THIS POINT THE ROADTREK BATTERY(IES) NEED TO BE RECHARGED! GOING BELOW THIS POINT THE BATTERIES WILL LOSE CHARGING CYCLES - HOW MANY TIMES A BATTERY CAN BE CHARGED TO FULL.

 Back to the battery separator – when you plug in the Roadtrek to shore power and have someone stand next to the front driver’s side of the hood of the van you will hear a CLICK. That click is the battery separator connecting the batteries together on each side – engine and Roadtrek sides connected – and charging!

 When you start the engine, IF YOU LISTEN VERY CLOSLY, you will hear a faint CLICK. The battery separator just connected the batteries and they are charging. Want to be sure – go to the monitor panel on the wall and turn on the battery switch and press the test button – the battery column will be lit top to bottom – top LED or indicator is labeled C for CHARGING!  The Roadtrek battery(ies) are being charged by the engine separator.


A QUESTION THAT OFTEN IS ASKED:

DOES THE BATTERY WALL SWITCH NEED TO BE ON WHEN THE ENGINE IS RUNNING TO CHARGE THE ROADTREK BATTERY(IES)?  THE ANSWER IS A SOLID NO!  THE BATTERY(IES) WHEN THE ENGINE IS RUNNING WILL STILL CHARGE WHEN THE BATTERY WALL SWITCH IS OFF!  CAN THE BATTERY SWITCH BE ON IF YOU WANT IT TO BE ON – AS FOR RUNNING THE FRIDGE ON DC WHILE DRIVING? YES, OF COURSE! THIS IS YOUR CHOICE AND EVERY THING WORKS AS IT SHOULD.


WHAT HAPPENS IF THE BATTERY SEPARATOR OR A BATTERY ISOLATOR GOES BAD?

Things happen on either the engine side or the Roadtrek side of the electrical system that cannot be explained by any logical reason.  The engine battery could be drained dead. The Roadtrek battery(ies) could be drained dead. Both could be drained dead. Electrical things start happening that just do not make sense!

When this happens take the Roadtrek to either an RV shop or a vehicle mechanic who understands battery separators or battery isolators.  These units are common in food trucks, refrigerated trucks, etc.  Any vehicle where there is a battery for the engine that needs to be connected to a battery for the coach that gets charged by the engine battery when the engine is running. The mechanic who works on my Roadtrek surprised me when I bought my Roadtrek to him because the coach batteries were not charging and draining fast. He tested the battery separator - I gave him the two documents from Sure Power that have all that is needed to test it – and he tested the two self-resetting circuit breakers.  The diagnosis – the battery separator was not putting out any power to the Roadtrek side. The battery separator needed to be replaced.  That time I was lucky because a week before I decided to order a new Sure Power Battery Separator to carry in the Roadtrek just in case and it arrived the day before. I brought it to him and he removed the old one and installed the new one. It was very easy – simple swap of wires and attach to the wall into the same screw holes that held the original.  I highly suggest that you get one to carry as a spare.  They are not found locally – I had to order that one on the other side of the USA. 


WHAT HAPPENS IF YOU DO NOT HAVE A SPARE AND IT IS DRAINING THE ENGINE BATTERY AND YOU ARE STUCK!

First make sure a mechanic has told you that the battery separator is not working correctly. Ask the mechanic to remove the cables from the Roadtrek battery(ies) and the Engine battery from the Separator (or isolator).  Ask them to secure these cables and wrap the ends with electrical tape so that they do not short out under the hood – also to label them to which goes where.  (The BIDIRECTIONAL Sure Power does not matter which battery cable goes on which side) The battery isolator matters and the correct cables need to be connected to the correct connections.  This should take the battery separator or isolator out of the system and allow the battery sides to work independently of the other. This does mean THE ROADTREK BATTERIES WILL NOT CHARGE AS YOU DRIVE OR RUN THE ENGINE. THEY WILL STILL CHARGE WHEN YOU PLUG IN OR RUN THE GENERATOR. WITH THE BATTERY SEPARATOR YOUR ENGINE BATTERY WILL NOT CHARGE WHEN YOU PLUG IN OR RUN THE GENERATOR.  IT WILL CHARGE NORMALY WITH THE VAN ALTERNATOR LIKE ANY OTHER CAR OR VAN.


This will get you home or to your destination. If you are on a long term trip try to find the battery separator on the Internet and have it shipped to the location you will be at within the delivery time – and then you can have it installed and all put back together.

 There are two PDF documents that I cannot attach to this article. Both are documents for the Sure Power battery separator written about here.  They are worth having and being able to share with any mechanic if your battery separator needs to be tested. Use the EMAIL US! Link on the right column of this article and ask me to email it to you. I will do so as soon as I see your email!


 MOVING ON AND IT GETS A LITTLE EASIER TO UNDERSTAND!

 The second charging component in a Roadtrek!  

 This is also dependent on year and model of your Chevy Roadtrek. To charge your coach battery(ies) when you are plugged in or running the generator (if you have a generator) your standard electrical system Roadtrek either has a CONVERTER/CHARGER or a TRIPPLITE INVERTER/CONVERTER/CHARGER. Roadtreks 2004 or earlier have a Converter/Charger. (Someone with a 2004 is going to say I HAVE ONE!!! – you may – how come – Roadtrek starts putting newly adapted equipment sometimes in a late year built Roadtrek so sure it is possible that someone will have a 2004 with a TrippLite! But according to the 2004 brochure – you have a converter/charger).  Roadtrek started offering a stand alone inverter to the Roadtreks that only have a converter/charger as an option. Some will have it and some will not.

In 2005 Roadtrek installs the TrippLite 600 watt inverter/converter/charger into each of the 2005 Chevy based Roadtrek models. In 2006 Roadtrek installs an upgraded TrippLite 750 watt inverter/converter/charger. The main difference between the two is that the 600 has 150 watts less of inverter wattage from the 750. Right here we need to clarify something very important.  Many refer to the TrippLite – either 600 or 750 – as “the inverter”.  The inverter is JUST ONE of the functions of the TrippLite.  The other two functions is that it is a converter and a charger. By calling it “the inverter” it makes it very confusing trying to determine what a problem with it one is referring to. Some one asks  – “Do I put the inverter on?”  -  is that do I put the inverter function wall switch on or do I put the TrippLite on? Well, most of the time the TrippLite is always on – (we will get deeper into that as we go along) – and it is supposed to be. All the wall switch that says INVERTER on it does is start the inverter function working.


THE TRIPPLITE

THE INVERTER FUNCTION WALL SWITCH


If you have a 2005 – you do not have an inverter wall switch. The connection for it is on your TrippLite 600 but Roadtrek chose for some reason not to connect it.  This means that it is always has the inverter function on which can drain your Roadtrek coach battery(ies). To stop this there is a slide switch on the TrippLite that needs to be changed – more about this coming.

Ok – what does the inverter function do?   

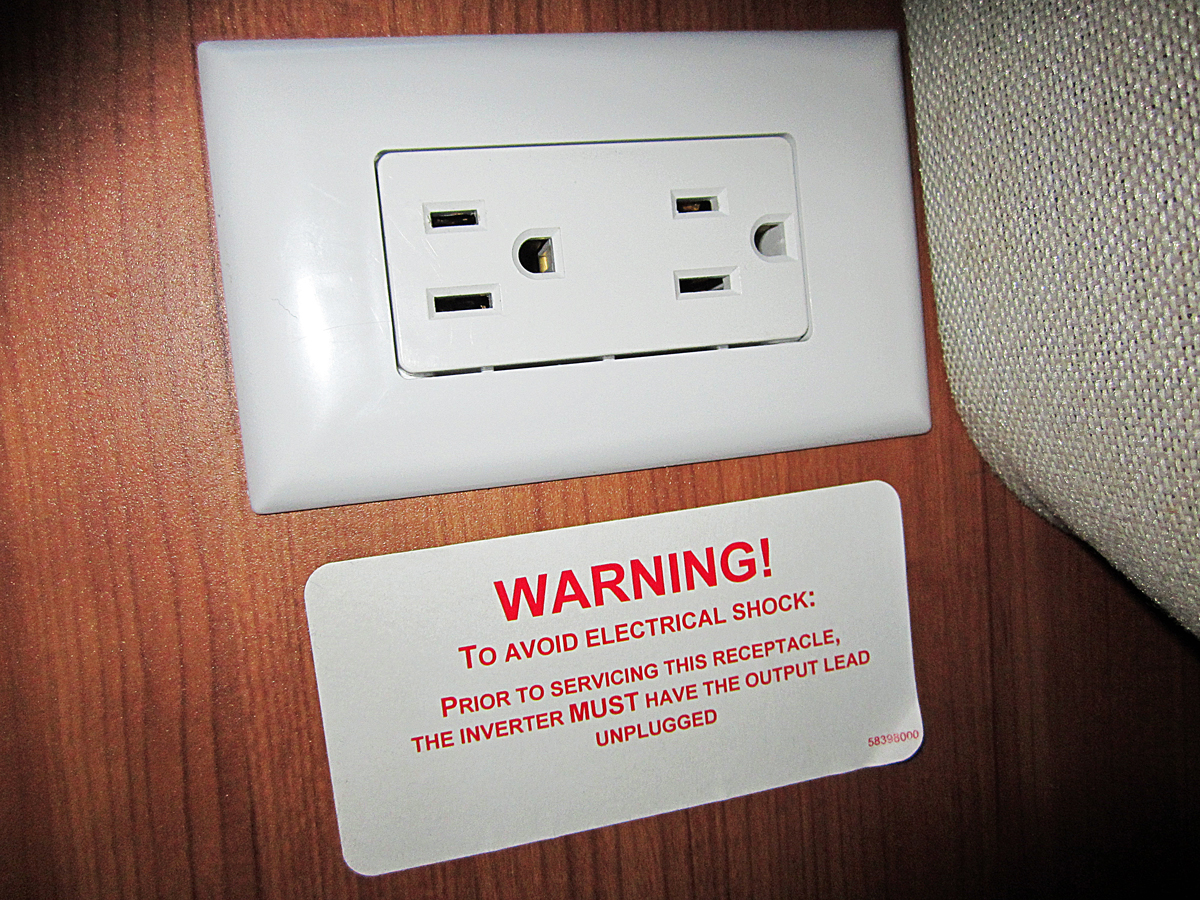
The inverter function changes 12 volt DC power into 110 volt AC power.  600 watts and 750 watts is not a lot of wattage and will not power a lot. Because of the limitation Roadtrek only connects three or four outlets to the inverter function on the TrippLite. These outlets also work normally when plugged in or running the generator. But if you have cannot plug in or run the generator (lots of campsites have noise restrictions after a specified hour at night) and you want AC power to watch TV – plug in your laptop, charge your cell phone – you can turn on the inverter wall switch and plug in. The outlets most commonly connected to this are the outlet the TV and home entertainment center is plugged into, the outlet over the kitchen counter, and the outlet the optional coffee maker is plugged into or would have been plugged into. They all work on DC. Roadtrek put this sticker above or next to the outlets connected to the inverter function in my 2011 190 Popular.


What does the Converter function do?

The converter is the opposite of an inverter. It changes 110 volts AC into 12 volts DC. Plugged in or running the generator and you have lights, the water pump, the furnace, the hot water heater, etc. working!


What does the Charger function do?  


The charger charges your coach battery(ies) when you are plugged in or running the generator.  It us putting 12 volts DC into the battery(ies) to charge them.

 The TrippLite wants the battery switch on BEFORE you plug in or run the generator. In Roadtrek put a sticker saying this in some Roadtreks.


So, before you plug in, turn on the battery switch.  You need the battery switch on anyway to start the generator.


The TrippLite has a cooling fan on the front. When the TrippLite needs to cool itself down so that it does not overheat – the fan starts. The question so many new Roadtrek owners ask – and I asked also – What is that humming noise coming from below the bed? Getting the answer is like being accepted into the ‘club’! It IS the FAN running when it has to. It is not constant. It is intermittent. Over time in the Roadtrek you will get so used to it you will not even notice it. Can it be turned off – NO! It will turn itself off when it is cooled down. I asked a service tech at the dealer I bought the Roadtrek at new – he laughed and said, “Every one asks that! – and he laughed. He told me the answer and smiled. Now, you know the answer too!  I am not familiar with the converter/charger Roadtrek used before the TrippLite but I suspect it too has a fan.


Where is the TrippLite – it generally is close to where the battery(ies) is/are outside. Mine is behind the passenger side cargo door.  Rather than go through the story of my search for it – I will link that article here. 

https://roadtrek190popular.blogspot.com/2013/02/in-search-of-elusive-roadtrek-inverter.html

 On the front of the TrippLite there is a slide switch on the upper right front.  There are three positions – left – AUTO/REMOTE --- center – DC OFF -  right – CHARGE ONLY.


AUTO/REMOTE - Enables the inverter function switch on the wall to work. By turning the wall switch on when it is enabled the inverter function puts 110 volts into the outlets it is connected to. In this position the battery(ies) do charge – just as they would in Charge only.


DC OFF – This position disconnects the TrippLite from the coach battery(ies). This is how to turn off the TrippLite if you want to. The batteries are directly connected to the TrippLite and the TrippLite bypasses the battery wall switch. More about this later. In DC OFF – when plugged in or running the generator THE BATTERY(IES) DO NOT CHARGE. 


THIS IS SURE TO RAISE THIS QUESTION – IF IT IS IN DC OFF WILL MY COACH BATTERY(IES) CHARGE WHEN DRIVING AND THE ENGINE IS RUNNING.  YES – YES, THEY WILL STILL CHARGE- It is the battery separator or battery isolator that is charging them when you are running the engine or driving.


IF YOU ARE REMOVING THE ROADTREK COACH BATTERY(IES) OR REPLACEING TRIPPLITE SAYS TO DISCONNECT IT FROM THE BATTERY(IES) – PUTTING IT IN DC OFF ELECTRONICALLY DOES THIS! THIS IS SIMPLER THAN REMOVING THE BATTERY CABLES FROM THE TRIPPLITE. ONCE THE BATTERY(IES) ARE BACK IN PLACE AND INSTALLED –  TAKE THE TRIPPLITE OUT OF DC OFF!


CHARGE ONLY – Disables the inverter function wall switch. If you put the TrippLite into this setting the inverter wall switch NO LONGER WORKS until you set the slide switch back to Auto/Remote. Why would you want to do this?  If you forgot to turn the inverter wall switch OFF the inverter outlets are LIVE – and even with the battery switch off and nothing plugged into any of the inverter function outlets – the batteries in the Roadtrek will drain as if something was plugged in using the inverter function. If you tend to put that switch on by accident – in some Roadtreks (like mine) the porch light switch is below it – your coach battery(ies) will drain. If you have a 2005 this is how you can turn off the inverter function when you have no remote inverter function switch on the wall.


Back to DC OFF - The TrippLite has a small consistent drain on the Roadtrek coach battery(ies).  I had the mechanic who works on my Roadtrek check this and confirmed that yes there is a drain. I then put my TrippLite into DC OFF and had him check for a drain again – NO DRAIN!  When I got my Roadtrek new I was finding the coach batteries were down to half charge in 30 day. I then would plug in and recharge the batteries regularly at the end of each month. Over the years and the batteries got older,  the time between needing to charge was becoming less and less – to about half a month or less.  When I got new coach batteries I decided to keep the TrippLite in DC OFF while it sat on the driveway. When I need to plug in or run the generator I first go to the TrippLite and slide the switch over to Auto/Remote – so that the batteries will charge. Then once the TrippLite is on I put on the battery switch and plug in or start the generator. After we are done doing whatever we are doing inside the Roadtrek or outside the Roadtrek on the driveway DC OFF is turned on again.  When we are leaving on a trip – I put the TrippLite to Auto/Remote and it stays on that the entire trip.  TO BE SURE I DO NOT FORGET TO SET IT TO AUTO/REMOTE WHEN IT NEEDS TO BE IN THAT SETTING I MADE A LABEL AND  PUT IT UNDER MY BATTERY SWITCH TO REMIND ME.


SLIDE SWITCH IS ON THE UPPER RIGHT

Looking at the above photo you can see the label below that says Auto/Remote, DC OFF, and Charge Only. When you slide the switch into one of these positions it should CLICK into place - listen for the click. If you do not hear it then the switch is between two positions - even if it looks like it is where it is supposed to be. 

You also see in this photo the blue plug cable. This is the cable that runs through the walls of the Roadtrek to the front passenger side to the Inverter Function Wall Switch. The back of that switch is a matching socket with a matching plug in it. The cable is the same as used for wired computer networks - called a LAN cable.

The TrippLite has a variety of settings.  All of these settings were set in by Roadtrek when it left the Roadtrek factory to where they should be. The most common setting to change is Battery Type. If your Roadtrek came with wet cell deep cycle batteries the battery type DIP Switch is set to wet cell (there are no labels for the DIP switches – all needs to be looked up in the TrippLite manual). If you change to AGM batteries you must change the battery type DIP switch to AGM – the manual says this setting is for GEL batteries – TrippLite has confirmed that the same position applies to AGM batteries.


IF YOU DO NOT HAVE A TRIPPLITE MANUAL – AGAIN, CONTACT ME BY EMAIL WITH THE EMAIL US!  LINK ON THE RIGHT COLUMN NEXT TO THIS ARTICLE AND I WILL EMAIL THE MANUAL I HAVE TO YOU. IT IS A 750 MANUAL BUT THE 600 HAS THE SAME SETTINGS AND POSITIONS.

 The manual is very good to have as the LEDs on the front of the TrippLite can be used to troubleshoot electrical problems and how to reset the TrippLite if it overloads.


It is also important to know is that the TrippLite does not like being plugged into shore power in a GFCI outdoor or indoor outlet. This applies to plugging the Roadtrek at home. I have never had a problem plugging into any 30 amp outlet at a campground – I have never come across one that was obviously GFCI so either they are not or the GFCI reset is not visible.  While building codes frown on it – change the outlet you plug the Roadtrek into at home to a standard home non-GFCI outlet.

As we are on GFCI outlets - the outlets that Roadtrek connected to the TrippLite’s inverter function are all on one shared GFCI circuit. One of the outlets has the TEST and RESET buttons on it. Often this is the outlet that the TV is plugged into – inside the cabinet over the TV in my Roadtrek.  If you plug into one of these outlets – whether on the inverter function OR plugged in or running the generator does not work – then all of the inverter function outlets do not work. Find the outlet with the reset button – press the TEST button first and then press and hold the RESET button and let go to reset the GFCI circuit. Then all of the outlets on that circuit will work! THIS MUST BE DONE WITH ELECTRICITY IN THE SYSTEM – PLUG IN IF YOU CAN.  YOU PROBABLY COULD DO THIS IF THE INVERTER FUNCTION WALL SWITCH IS ON. IF THERE IS NO AC POWER IN THE OUTLETS THE RESET WILL NOT WORK!


WHAT CAN GO WRONG WITH THE TRIPPLITE?


I have not had problems with the TrippLite and we bought our 2011 new. When we had problems with the new batteries we bought – which I have written about – and I took it to the Roadtrek dealer we bought the Roadtrek from because I can trust them – they did check the TrippLite thoroughly and found no problems with it (what they found was one of the new batteries was defective and had to be replaced – which they handled under warranty for me – even though I did not get the batteries from them (I should have!)

 Like any piece of technology there can be problems but I have found that in must cases that I am told about or read about, it is due to some change done in the Roadtrek that was not followed with changes to the settings on the TrippLite or some wiring issue, etc. Or trying to match the TrippLite with lithium ion batteries (same with the battery separator). There is no mention at all about Lithium Ion batteries in the TrippLite manual. Some claim there are things to do to make it work – but hook up to lithium ion batteries and thinking the TrippLite is just going to work and then get surprised that it doesn’t. In my experience with the company, I have found when I did contact TrippLite to ask them a question was that the company responded to my email request quickly and were very responsive.

 SOMETHING TO BE AWARE OF WITH THE TRIPPLITE:

The TrippLite has a problem with being plugged into a GFCI shore power outlet. It will trip the GFCI switches on that outlet cutting off all power from that outlet. For example- you plug the Roadtrek's shore power cord into a home outdoor GFCI outlet using a 30 amp socket to 15/20 amp plug adapter and what will happen is the GFCI circuit in the outlet will TRIP and there will be no AC voltage power going into the Roadtrek.  If you push the RESET switch on the GFCI outlet with the Roadtrek still plugged into it - it will NOT RESET.  This mostly happens with home outdoor outlets which commonly are GFCI outlets. We have never had this problem plugging the Roadtrek into a campground outlet. We have never come across a 30 amp campground outlet that is GFCI with test and reset switches on the outlet. There may be a central GFCI circuit for that outlet that is common to that and other campsite power outlets  - but none have ever failed to provide voltage to our shore power cord and the Roadtrek.  So what do you do?  The simplest solution is to replace that home outside outlet with a standard 15 or 20 amp home outlet with no GFCI on it. This has been found to be so by many Roadtrek owners who have the TrippLite inverter/converter/charger.  "SOME" have said that if they turned the inverter function switch on the wall in the Roadtrek on FIRST before plugging the Roadtrek's shore power cord into the GFCI outlet, the GFCI did not trip.  I cannot say if this is true or not. When we first plugged the Roadtrek into our home outside outlet that was a GFCI outlet and the GFCI tripped in the outlet, we replaced that outdoor outlet with a standard 20 amp home outlet - the breaker in the house connected to that outlet is 20 amps.

PUTTING IT ALL TOGETHER!  


The only interconnection between the battery separator system and the TrippLite is with the Bidirectional Sure Power Battery Separator when the TrippLite and the coach battery(ies) with the Roadtrek plugged in and running the generator. 

 There are clearly two charging systems in the standard Chevy based Roadtrek models and years. The two are designed to interact with each other.  

 Even with all that I know about these systems – I still have some questions myself. This article has been in the planning since 2018.  Every time I thought to sit down and start writing it, those questions kept me from writing.  Back in 2018 my Roadtrek was having some problems and I was not sure if it all did not come down to the battery separator. I contacted two Roadtrek/Internet friends who have a lot more understanding of this type of technology than I did at the time.  The three of us went back and forth over email figuring this all out - together.  Well this article is written now. I have written so much of this article so many times in answer to questions I get by email and by questions asked to all in Facebook Roadtrek Chevy groups and on forums. It was time to put it all down an in one place so I can refer back to this article when questions come.

Thanks for reading the whole thing and getting down to here.  I am always happy to answer questions that get emailed to me. I have mentioned the Email Us! link on the column to the right of this page. As soon as I see the email I tend to just respond to it right then.  Be patient – I am not online all day - though sometimes it feels like I am, but that is OK! And if you take anything away from this article I hope that it is that you will no longer refer to the TrippLite as "the inverter".