Roadtrek

Roadtrek
Showing posts with label Class B. Show all posts

Wednesday, April 22, 2026

WHAT TO KNOW ABOUT BUYING A PRE-OWNED ROADTREK

 A lot of new buyers go looking for a Roadtrek that is in their budget (of course) and are attracted by low prices regardless of the year of the Roadtrek. They see ads and they go out to look at the Roadtrek that is being sold - sometimes traveling a long distance away from where they live - only to get to see it and realize that they do not know how to determine if what they are seeing is good or not so good. Another article on this site goes into some of what potential owners should be aware of. This is a link to that article. 

This article is going to go into more detail about what every potential buyer should be prepared to do when they find a Roadtrek that they have come to the decision that this is the one they will buy. This does not only apply to Roadtreks - the same applies to any pre-owned RV one is looking to buy.  

 What you must know before buying that "I want that Roadtrek" is what true condition is it in.  Some sellers will be right up front and let you know what works and what does not work - and needs repair. But some will not say anything as they feel that if they do - then you will not buy it or expect them to pay for the repair or deduct that from the selling price. If you have never owned any RV or have no experience with a Roadtrek - how will you determine on your own is it really in good condition?   More than likely you won't know.  The thing to do is bring in professionals of your choosing (and paying for) to do this for you.  There are independent vehicle mechanics and independent RV service technicians who offer their expertise to be hired by a potential RV/Roadtrek buyer to completely inspect the Roadtrek. They will come up on a Google search in which you specify the location of the Roadtrek. I had thought that there were none where I am and when looking for an RV service tech to come to fix something on my Roadtrek I discovered that there were several in this area. 

What you want each of them to do is focusing on each pro's area of expertise to inspect the Roadtrek completely inside and outside and provide you with a detailed report of what works and what does not work. What can be repaired and what must be replaced. Are there parts available to repair what needs to be repaired and are there units to replace what needs to be replaced. 

Do not assume that they exist. The Chevy chassis Roadtrek was discontinued with the 2019 models - and when the original Roadtrek went out of business and went bankrupt it was purchased by a European company that took the name and the took over the factory. The first thing that they did was discontinue all support for the Chevy chassis Roadtreks. Parts specific to the Chevy chassis Roadtreks were sold off at a bankruptcy auction in 2020 and these two companies bought what was left and the RV dealer who got the parts has limited inventory - as when they are gone - they are gone. Since - some Chevy dealer/service centers have stated that they will not service or have parts for any Chevy vehicle over 10 years old.  That does not mean that there are not alternative parts but it is better to know upfront before you invest in a pre-owned Roadtrek than find out after it is yours. 

Let's get back to our two experts inspecting the Roadtrek we want to buy. If the parts and units needed ARE available - then you would like an estimate from the pros of what the parts, units, and labor would cost. You want them to go over everything - for the Roadtrek side - the entire water system, the entire electrical system, all of the appliances and fixtures inside and outside -  water pump, sink, inside and outside showers, toilet, inverter/converter/charger, refrigerator, fresh and waste tanks, macerator or gravity dump system,  hot water heater, A/C,  generator, TV, home entertainment center, plumbing under the the van and inside the van, TV antenna, outside storage cabinets, no leaks inside in the ceiling and/or the walls, and more.  On the chassis side - rust under the chassis, heat shields in place and not bent, muffler, signs of rubber pipes rotting (gas tank fill to gas tank - as well as rubber vacuum tubes in the engine compartment, dash A/C, all dash works, radio works, speakers work, etc, etc.  The report will be extensive but you will know before even a dollar changes hands with the seller that it is in good condition and you could drive away with it as soon as it is yours and all will work as expected!

Then it is essential that you test drive the Roadtrek.  If you are a couple buying it both need to test drive it. Is it comfortable to drive? How comfortable is the ride? I recall one senior aged woman who bought a Roadtrek sight unseen. It was a distance away from her and she sent a relative local to where it was located to look it over and he said it looked OK. She told him OK buy it, He bought it and drove it the several states to her. She got into it to drive and was so uncomfortable driving it she contacted me to ask how does she sell it because after driving it she did not want it! 

I have heard from so many new owners of a pre-owned Roadtrek who did not get pros to inspect the pre-owned Roadtrek that they bought - some also sight unseen or having seen it had no idea what they were looking at and were not shown where things are inside and how to work them.  They found out once the keys were in their hand - a lot did not work and wound up putting thousands of dollars into it just be able to take even a nearby trip in it. I can always tell when a new pre-owned owner is asking on a forum or one of the two Chevy Roadtrek Facebook groups that the water pump is not pumping water or there is no hot water - even after following our article her about the hot water tank - that they did not get the Roadtrek inspected and did not even tell the seller that they wanted to see EVERYTHING working and shown how each works. 

 If one were spending a few hundred bucks - I guess it would be no big loss, but buying a pre-owned Roadtrek for multiple thousands of dollars is a big deal and a big loss (at least for most of us)! 

I leave you with this one last for this article piece of advice ---  

WHEN YOU TELL THE OWNER THAT YOU MUST GET THE ROADTREK INSPECTED BY INDEPENDENT PROS BEFORE YOU CAN BUY IT - AND THE OWNER SAYS "NO!" ---

RUN!!! 

 As always - if you have a question email us at the link in the right column of this page where it says

Email Us! 

Please be specific in your question - the more details the better my response! 


Wednesday, April 16, 2025

ROADTREK TIRE PRESSURE

 When we first got our Roadtrek 2011 190 Popular new I was curious about the tire pressure that should be used. Inside the driver's door frame there is a sticker that says 50 psi front tires and 80 psi rear tires.  It sounded to me to be a big difference between the front and the rear psi - so I called Roadtrek's factory number and spoke with a Roadtrek service technician that I was connected with. 

I am going to share what he told me - as this comes up often on the Roadtrek Facebook groups and Roadtrek forums. He was very clear that the 80 psi in the rear is a MUST - do not go higher and do not go lower. He then said that the 50 psi in the front is a suggested starting point for the front tires. He said that by varying this number up in increments of five the ride of the Roadtrek changes. 

He said to drive with the tires at 50 psi in the front and evaluate how the ride feels. Then go to 55 psi in the front tires and do the same. Do this for each more 5 psi until you get to 65 psi - and stop. He said that after 65 psi in the front the ride starts to degrade - so do not go over 65. 

We did this - and found that the best ride (for us) was at 60 psi in the front.  We have kept the tires in the front at 60 psi since then. I have read that others also have preferred the feel of the ride at 60 psi - but this does not mean that you will like it there - so you should do the changes by 5 psi from 50 to 65 psi and see what you like. 

One more thing that we learned right away with the Roadtrek and the front tires, was when Meryl drove the Roadtrek home from the dealer in Pennsylvania with me following in our car (yes - Meryl was the first to drive our Roadtrek) she found that the Roadtrek was not holding straight in the lane of the highways we were on to get home. She felt it moving all over the road.  When we got home she told me about this and we both got into the "new" Roadtrek and I drove it on a local expressway - and sure enough it was all over the road. (I did not doubt that it was doing this when she drove it home - but if we were going to call the dealer - etc. I wanted to be able to describe it myself.)

 We thought it needed an alignment and we called Roadtrek who told us to call Chevy - and show them the papers we were given showing the warranty started on the Chevy chassis when we took delivery of the converted  Chevy Express 3500 van a couple of days before when we picked up the Roadtrek.  When we got to the local Chevy dealer they said that they do not do alignments but send them out to a local alignment shop and they sent us there. When we got there the manager looked at the Roadtrek and told us that it would not fit into his shop and his alignment rack would not hold the weight of the Roadtrek. He suggested a local truck service shop that could do the alignment - but he said wait a minute and let him check the front tire pressures. (This was before we set the fronts to 60 psi - what was in the tires at this point was what the Roadtrek left the factory in Canada with in the tires which was driven to the dealer in Pennsylvania by a Roadtrek driver.) 

The tire alignment manager checked the two front tires. They were over 20 psi apart from each other. He got the tire hose from his compressor and put the two tires at 50 psi (which is what they should have been when they left the factory). He said take it out for drive and see how it is now. He also said watch to see that they don't go down in case there is a leak that caused this. 

We took it out on the expressway and drove for a distance and it was perfectly holding the road and centered in the lane! Driving and days went by and the tires never lost any air - there was no leak.  It needed no alignment! It made us wonder why the Roadtrek driver who drove from Canada to PA did not report to the dealer that the van was all over the road... (but this was typical of Roadtrek at that time in 2011!) 

So the point of this little tale -  make sure that both front tires are exactly the same psi - or the van will go all over the road and not hold straight in a lane.  

What to know about the PSI when you are driving:

When any vehicle - van, car, truck, RV, Roadtrek is driven the friction between the tires and the road cause heat to build up inside the tire and that results in the tire pressure increasing. This is normal and tires are manufactured to allow for this to happen. SO while you are driving the Roadtrek and if you have tire pressure monitors on the tires (my Roadtrek came standard with this - and the readout is shown with the push of a button to the left on the dash) you may see the back tires not at 80 psi but close to or over 90 psi - not a problem - this is expected.  You might see your 60 psi in the front tires reading 70 psi  - again this is expected - and one of the reason's why the Roadtrek tire size has an E at the end of the tire size - E rated for high pressure in the tires. Don't get excited if you see this. Don't panic! 


Wednesday, July 10, 2024

Chevy Express Van Tire Pressure and some things to know about the Roadtrek tires

 This article applies only to Roadtreks that are built on the Chevy Express van chassis. This does not apply to Dodge, Sprinter, Dodge Pro Master or any other chassis that Roadtrek has built an RV on.

When I got my 2011 190 Popular built on the Chevy Express 3500 van new from the factory, I had questions about what the best tire pressure would be for the van.  There is a sticker on the driver's door frame toward the bottom that says the tire pressure should be 50 psi in the front tires and 80 psi in the rear tires, but I was reading in the various RV forums that other Chevy Roadtrek owners were varying the front tire pressure.  I contacted Roadtrek's customer service at the time and was able to speak with a Roadtrek factory service technician.  I asked him what the best tire pressure was and why would owners be varying the front tire pressure.  

His answer was this - 

The rear tire pressure must always be filled cold (meaning before the Roadtrek has been driven for that day) to exactly 80 psi as shown on the door sticker, BUT the front tires can be varied. He explained that by varying the front tires in 5 psi increments from the suggested 50 psi that is shown on the sticker, the feel of the ride of the Roadtrek can be changed.  Each change again needs to be done when the Roadtrek has not been driven. 

1)  Start with the two front tires at 50 psi and drive the Roadtrek and evaluate for yourself the feel of how the van drives.

2) Next day  or days later  increase the psi in the two front tires to 55 psi (again when cold).  Again go for a drive and evaluate and compare the feel of the drive to what it was like when the tires were at 50 psi in the front.

3) Next day or days later increase the psi in the two front tires to 60 psi (again when cold).  Again go for a drive and evaluate and compare the feel of the drive to what it was like when the tires were at 50 psi  and at 55 psi in the front.

4) Next day or days later increase the psi in the two front tires to 65 psi (again when cold).  Again go for a drive and evaluate and compare the feel of the drive to what it was like when the tires were at 50 psi  and at 55 psi and 60 psi in the front.

5) STOP the process.  Do not increase the tire pressure in the front tires over 65 psi as he explained that over 65 psi the ride of the Roadtrek's feel will start to degrade. 

6) Decide which psi you liked the ride at most after having driven at each of these psi for the two front tires. 

7) Put the tire pressure of the two front tires (filled cold) at the psi you liked the best. That is the pressure they should be kept at for that feel of the ride you preferred. 

We liked the feel of the front tires at 60 psi and have kept that from when we did this evaluation to today. I have read others say that they also like 60 psi front. This does not mean that you will like 60 psi front - you may like one of the other increments of 5 psi over 50 psi - or you might like the 50 psi that Roadtrek starts you off at for the front tires.

+++++++++++++++++++++

Some things about the Roadtrek tires -    

As you are driving all vehicle tires get hot from friction against the road and the psi increases in the tires in this process. This is normal and the tires are made to be able to hold that increase in tire pressure.  The Roadtrek tires are no different and the tire size and designation that Roadtrek puts on the Roadtreks are made to accommodate these changes in pressure as you drive.  The tires on the Roadtrek Chevy Express van are light truck tires.  They also need to have an "E" rating - not all tires do.  This is what allows the tires to be filled at high pressure to start with.  The tire size that came with my Roadtrek 2011 190 Popular is LT245/75R16/E.  LT - light truck     R- Speed rating     /E - what I have just referred to.

These are tires for a commercial light truck - a vehicle heavier than a car or regular van. This tire size is not limited to any one make of tires. What is important to know is if you go to a tire retailer's website and are looking at tires  - they often ask you fill in what year, make and  model is the van - in my case that would be a 2011 Chevy Express 3500 van.  Then they ask what tire size you want - and I put in LT245/75R16/E - as that is the size that was on my Roadtrek coming from the Roadtrek factory - and the correct tire for the Roadtrek.  What will come up on the tire website is "THAT TIRE IS NOT FOR THIS VEHICLE" and if I was buying tires for a regular, not a Roadtrek, Chevy 3500 or 2500 passenger or cargo van that would be correct. BUT we do not have a regular, passenger or cargo van - we have a converted Chevy 3500 or 2500 van that is now a Class B motorhome. And this size tire with all of its designations is what the Roadtrek needs to have. 

Now just to make this a little more confusing - (don't ya just hate when that happens?) - when I put in the size including the /E at the end - some tires came up with the right size BUT WITHOUT THE /E! So I had to make doubly sure that the tires I was looking to select and buy had the /E on the end. 

Everyone has their preferences about what brand of tires they like and I am not going to get into what brand I like and why - or why this one is better than that one. So I leave brand up to you! The other decision to make when looking at these tires in this size is some are "All Season" tires - and they are good in different weather conditions - rain, snow, ice.   Other tires in this size are "All Terrain" tires - these are tires that are made for off road driving and may or may not be best when it comes to different weather conditions - some are and some may not be. When I was looking to get new tires for my Roadtrek I found a tire that I liked that was All Terrain - and since in the mud the Roadtrek is heavy and can sink (don't ask), I thought it would be a good idea to have that type of tire.  When I went to buy the tires and I was speaking with the tire shop manager and said I was interested in those tires he asked me how much off road driving do you do - and do you do more highway driving than off road driving.  Well, honestly, the extent of off road driving my Roadtrek has done is driving on gravel roads in campgrounds and onto gravel campsites, and an occasional grass field - which I will no longer drive onto if it has been recently raining. I told him 95% of the driving my Roadtrek does is on paved roads and highways. His advice was buy the All Weather tires instead of the All Terrain tire because the All Terrain tire will be a rough ride on a paved road and the All Season tire will be a much smoother ride.  There was a model of the tire I was looking at that was All Season - and less money - and that is what I bought and had put on. So far they have been good. 

The other thing to know about the Roadtrek tires is that the two front tires MUST be the same PSI.  We found out about this when we got our Roadtrek home from the dealer we bought it at two states away.   When we picked up the Roadtrek at the dealer we drove our car to the dealer and when we got the Roadtrek and were coming home (a day later)  Meryl wanted to drive - and that was fine with me. Meryl has been driving our passenger vans for years and she has no problem driving the Roadtrek - so I followed her in the Roadtrek in our car going home.  When we got home she asked me if I felt the Roadtrek was pulling to the right when driving it. I had been driving it locally the night before while we stayed close by to the dealer just in case anything was wrong with the Roadtrek - which there was - but that is in a very early article- and on the small farm roads I was driving it on I had not noticed. So the next day we got into the Roadtrek and I drove it on a local limited access expressway to see if it was pulling - not that I did not believe Meryl - and, of course, it was pulling to the right. (Meryl is always right and I do mean that.) So now we had to find out what to do. We called Roadtrek at the factory and they said call Chevy. We called Chevy and when we told Chevy it was converted to a Class B RV they sent us back to Roadtrek - who contacted Chevy corporate and Chevy said to bring it to the local Chevy dealer's service and they would do an alignment under warranty. (This little tale becomes an epic. 😏 ) So we went to the Chevy dealer's service and they said "we don't do alignments we send them out to a local alignment shop and they are expecting you and we went there. At the chain company alignment shop they looked at the Roadtrek and said - we don't have a rack or the height in our shop to do an alignment on a van that is that tall and that heavy - and recommended a truck shop. The service tech could see I was more than a little disappointed and said wait let me see something. He went over to the Roadtrek with a tire gauge and asked me what way was it pulling - "to the right" I said- and he got out his tire gauge and checked the right front tire. He then went to the left front tire and checked that tire. The right tire was a LOT less psi than the left front tire.  He filled the right front equal to the left - and said drive around for awhile before you go to the truck shop to get an alignment and see if it still pulling to the right - or anywhere.  We went right over to the expressway and drove - the Roadtrek drove straight as an arrow! And it still does.  The unfortunate part of this story is that to deliver the Roadtrek from the factory in Canada to the Roadtrek dealer in Pennsylvania, it was driven by a Roadtrek driver. A driver who never said anything to the Roadtrek dealer that is was pulling - as when we spoke to the dealer about all of this they were surprised. This was the state of Roadtrek in 2011 - which is another story that I have not written about.

Anyway - the moral of the tale is if your Roadtrek is pulling when you are driving check the two front tires and make sure they are the same psi! 

One last thing -   I keep the Roadtrek's spare tire at 80 psi. If a tire had to be changed and the spare put on, it is easier to take the 80 down to 60 for a front tire replacement than to have to fill from 60 to 80 for a back tire. When you check the air in the tires - don't forget to check the spare!  

If you have any questions contact us by using the Email Us!  link on the right column of this page!


Monday, July 8, 2024

THE COOL CAT AIR CONDITIONER AND HEAT PUMP

 Early Chevy and Dodge Roadtreks had a home air conditioner installed.  Roadtrek then in the Chevy - and some later Dodge models changed to using the Dometic Cool Cat air conditioner and heat pump instead. The Cool Cat shares a thermostat and controls with the Furnace and this is a separate panel on the passenger side wall near the Cool Cat near the rear of the Roadtrek.  Some refer to the Cool Cat just as a "heat pump" but the Cool Cat is a combination A/C and heat pump.  The Cool Cat is 10.5 K BTUs of cooling. 

For the size of the interior of the Roadtrek this should be more than enough as there are room air conditioners that cool a room and more with 10.5K BTUs. The difference in a Roadtrek, however, is a room in a house is much better insulated that the walls and roof of the Roadtrek. 

The COOL CAT and is Cool and Heat Pump functions to work, the Roadtrek MUST be plugged into SHORE POWER OR have the GENERATOR RUNNING.  It will not work on the inverter. It will not work on battery(ies). It will not work on Solar. IF YOU ARE RUNNING THE A/C on the generator and you run the microwave at the same time it is going to overload the electrical system in the Roadtrek which will shut down to not result in damage.

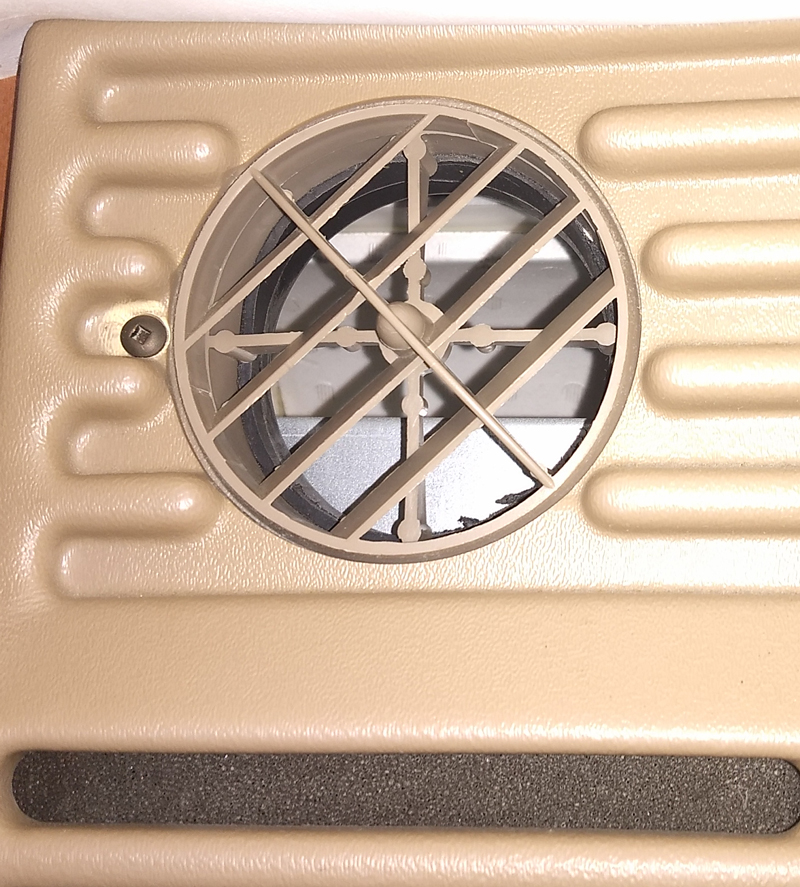
Here is a photo of the Cool Cat --- 

Notice that there are no controls on the unit - they are on the thermostat panel on the wall. The three round vents on the front above the grill turn around and you can point the slots in each grill up, down, to the left and to the right and at any angle. They may feel stiff to turn. Turn them, they will turn and stay where you put them. 

Under the Cool Cat above the bed on the lowered ceiling over the bed there are also vents. These vents have two knurled round wheels to direct the air from the Cool Cat where you want it coming down on the bed.  Turn the wheels with the Cool Cat running and you will find what turn of the wheels and combination of the turn of the wheels direct the air where.  These vents are black in color - some don't are not even aware that they are there. 


This is the analog thermostat panel for the Cool Cat - and the furnace. Newer Cool Cats will have a digital panel on the wall. 

Take a look at the switches and slides.  These turn on and turn off the Cool Cat - AND the furnace. 

Here is what the newer digital thermostat and control panel looks like -  

Both the analog and the digital control panels have the exact same functions and settings. 

Using the analog panel - 

COOL - turns on the Air Conditioner in the Cool Cat.

OFF - shuts off the Air Conditioner, the Heat Pump, and the Furnace.

FURNACE - The Roadtrek furnace is turned on (this runs on propane - there is no propane used for any other function on this panel.

HEAT PUMP - This turns the HEAT PUMP on inside the Cool Cat. (I will get into what that is later in this article.)

UNDER the word FAN - The ON and AUTO slide switch. This is an important switch. If you turn the Cool Cat on Cool or Heat Pump - and set that switch to ON- all the Cool Cat will do is blow room temperature air at you - all you have done is turn on the FAN inside the Cool Cat when the function slide switch is set to COOL  - NO COLD AIR COMES OUT!  For COLD AIR to come out of the Cool Cat - this must be in AUTO!  The same for the Heat pump in the Cool Cat -  Set the function slide witch to Heat Pump and with this set to ON - no heat comes out of the Cool Cat.  And also as with Cool - this Fan switch must be set to AUTO.  AUTO also acts like a power saver on a home A/C - on AUTO - when the set temperature is reached the compressor of the Cool Cat goes off and the Cool Cat goes to "sleep" waiting for the temp to get warm and then the A/C compressor comes back on and starts blowing cold again.  This same thing happens with the Heat Pump - and the FURNACE.  Often owners of Roadtreks with the Cool Cat will say it keeps going on and off. This is why. (More about this coming later.)

BELOW On/Auto is the speed of the blower in the Cool Cat - HI and LO - obviously HI - fast - LO - slow. 

The thermostat setting is on the right slide up for 90 degrees and above - that is the temp that is coming OUT of the Cool Cat  - NOT the temperature you are trying to cool down or heat up from. Slide down for down to 40 degrees.  NOTE - Fahrenheit settings on the right side and Celsius settings on the left side.  

HOW TO TURN ON THE AIR CONDITIONER FUNCTION OF THE COOL CAT - 

This is the best way to get the COOL CAT A/C blowing COLD! 

1)  FAN SWITCH ON AUTO.

2/ FAN SPEED ON HI.

3) SET THERMOSTAT SLIDE TO COLDER THAN YOU WANT IT TO BE INSIDE THE ROADTREK -  BELOW 60 UNLESS THE TEMP INSIDE IS NEAR 60 - IF SO, THEN COLDER!

4) SLIDE THE FUNCTION TO COOL. 

 The Cool Cat should come on. It will NOT blow cold right away and how long it will take to feel cold will depend on how hot it is inside the Roadtrek. If the inside of the Roadtrek is 100 F or above, it is going to take a little while for you to start feeling cook air coming out and then blow cold.  This could take 15 minutes maybe.  If the temp inside is 80F it will take less time to feel cold air coming out. 

 I recently ran the A/C with the inside of the RT in the upper 90s - it took 30 minutes to bring the inside of the Roadtrek to 80 degrees - standing in front of the A/C I felt cold. (My thermometer is near the driver's end of the kitchen counter.) In an hour it was 70 degrees inside.  We have been in the RT sitting at night in the front seats swiveled to watch the TV in the rear with the Cool Cat blowing cold and get too cold in the front. 

5) When the temp inside is near where you want it - turn the thermostat down to the temperature you want it to be. Let it run and enjoy the cold. 

6) When you want to shut off the Cool Cat A/C  slide the function switch down to OFF. 

THE HEAT PUMP  

The heat pump is an electric heater that is built into the Cool Cat. This is becoming popular  in home A/Cs.  The important thing to know about the heat pump is that it DOES NOT WORK if the temperature inside the RT or outside the RT at 40F degrees or lower (I have also found it not go on at 45F inside.) This is how it is designed - it is not a defect. It is meant to be used when it is cool inside the Roadtrek - not COLD inside the Roadtrek. When it is cold - 40 or just above - turn on the FURNACE instead. It works in the Spring and the early Fall - I had it on in early Spring - and it was cool at night and just enough to want a little heat. It got cold overnight and I was awakened by COLD air hitting me from the Cool Cat.  I jumped up to get to the panel and start the furnace.  It is so limited that we rarely use it. 

STARTING THE HEAT PUMP  

1)  FAN SWITCH ON AUTO.

2) FAN SPEED ON HI.

3) SET THERMOSTAT SLIDE TO WARMER THAN YOU WANT IT TO BE INSIDE THE ROADTREK -  ABOVE 80. 

4) SLIDE THE FUNCTION TO HEAT PUMP - NOTE - FURNACE IS ABOVE HEAT PUMP - DO NOT PAUSE WHEN YOU GO PAST FURNACE GETTING TO HEAT PUMP -  THE FURNACE WILL START (OR TRY TO START IF PROPANE IS NOT TURNED ON IN YOUR ROADTREK) When the furnace starts when you don't want it, it is a pain to get it off as it must cylce though trying to ignite the furnace and at the same time turn on the furnace's fan which keeps running (as it is supposed to) when the furnace is turned on. 

5) When it is warm enough for you inside the Roadtrek slide the thermostat to the temp you want it to stay at. 

PROBLEMS THAT CAN HAPPEN WITH THE COOL CAT THAT ARE NOT THE COOL CAT'S FAULT!

 Here are two photos - First is the location of the Thermostat panel --- 


Notice how close it is to the Cool Cat just above and to the right! 

This is the photo of the Cool Cat we started with! Look closely at the left round vent! What direction is it pointing in? DOWN AND TO THE RIGHT! And what is down and to the right in the photo above -  the thermostat!   As I had said - the Cool Cat shuts down when the thermostat  temperature is reached. The thermostat gets COLDER before any other place inside the Roadtrek - so the Cool Cat shuts down waiting for it to get hot inside again - at the thermostat! The Cool Cat keeps going ON and OFF!

Roadtrek has a few design flaws and this is one of them!  The thermostat should NOT be next to the air conditioner! 

SO WHAT DO YOU DO ABOUT THIS?!    

Simple - 

TURN THE LEFT VENT AWAY FROM THE LEFT SIDE OF THE VAN. 

It can be pointed up to the ceiling - or straight ahead with a little slant to the right.  


ANOTHER PROBLEM THAT CAN HAPPEN!  

When we first got our Roadtrek new, I did not know about setting the Fan speed to HI. I did not want it blowing heavy on us so I would set it to LO.  Makes sense, right? Well we got the RT in early Spring. I would run the A/C because it was warm enough inside the RT to need it - but outside it was not that warm.  I started hearing a noise coming from the Cool Cat when it was running like marbles in a can being shaken around. It turned out that the noise was ice balls forming inside the Cool Cat and hitting the fan inside and bouncing around.  I did not know at the time that this was what was happening. 

We took a trip that year in late September and it was warm enough for the A/C at night and it was running when we went to bed.  Early that morning I woke up hearing a loud bang - coming from the Cool Cat!  And it stopped working and would not turn on again. As it turned out, we were an hour and a half from the dealer we bought the Roadtrek at - it was a weekday and I called them when they opened that morning. They said bring it right now and we will look at it. We did  - and they did. They found inside the Cool Cat it was solid ice!  They put down a tarp and melted the ice. When they told us it was ready - they said never put the fan speed on LO.  If it had been on HI this would not have happened. Lesson learned - I was sure the Cool Cat was a goner - it was fine once the ice was gone.  I keep it on HI from then on! 

**********

You should know that there are no accessible parts inside the Cool Cat while it is mounted in the Roadtrek other than the filter. If you remove the front grill - held in place with Robertson screws (square hole screws) - there is nothing you can get at inside that is mechanical. The  Cool Cat must be removed from the Roadtrek - not a job you want to even consider unless you have a great deal of hands on experience in RV repairs - for any repairs. There is also no built in way to recharge its coolant - that is a closed system. I am told that if the Cool Cat is out a professional A/C shop MAY be able to cut in a port-  which does require the Cool Cat to be removed from the Roadtrek - and unless this pro A/C shop is not a RV service shop they are not going to take the Cool Cat out and reinstall it! 

What you can do yourself and is easy is change the filter and this does not involve removing a single screw. Here is a link to our article on how to change the Cool Cat filter. 

https://roadtrek190popular.blogspot.com/2024/04/removing-filter-from-cool-cat-air.html

 As is our new policy - if you have any questions - use the Email Us! link on the right column of the page.


Friday, May 26, 2023

Even Whe You Know What You Are Doing , Things Go Wrong

 Weather here has been jumping from warm to hot and back to cold this Spring. We usually de-winterize in early May but waited until just now - the end of May to de-winterize.  As I have said in my de-winterizing and sanitizing articles, what you have to do takes very little time but de-winterizing and especially sanitizing the tanks involves a lot of waiting.  We de-winterize on one day and other than pouring the bleach water mix into the two fresh tanks on our 2011 Roadtrek 190 Popular, the sanitizing happens over night, the plumbing and tanks are flushed of bleach on the next day. 

De-winterizing went well.  Like many of our readers, I print out my own article on de-winterizing and sanitizing and follow along to make sure I have not left out any steps.  And I do go back and refer to it throughout the process. Nothing out of the ordinary happened -  other than my deciding to wait until the last minute to buy the bleach. Bleach goes bad over a year in the bottle. It turns to salt water and loses all of its disinfectant properties. We don't use bleach much in the house and we buy the bottle just for sanitizing the Roadtrek - so I knew that the bleach we had was from a year ago when we last de-winterized and sanitized the tanks - and kept putting off buying the bleach.  I decided that we would start de-winterizing and when we got to the point that we would pour the bleach into the Roadtrek, we would stop and go out and buy a small bottle of  bleach.  What I had not thought about was stopping meant putting everything away - the fresh water hose, unplugging because I did not want to use the battery to run the water pump, and just get ready to go.  So we went. Still all was OK. 

 We got home and got out the gallon water jug that we keep that says "BLEACH WATER" on the side and a measuring cup and the new bottle of bleach.  Out on the driveway next to the Roadtrek I took the hose and filled the water jug half way with water. I measured out a half cup of bleach and there was no odor from the bleach.  We checked the date on the bottle - it was good to some time in 2024.  I smelled the open bottle - no smell. Meryl smelled the open bottle - no smell. We stop and wonder what now.  Was the bleach bad because we remember the bleach smelling like bleach all the other times we measured it out. It was the correct bleach - it was disinfecting bleach - full strength. I poured the bleach into the water and filled the bottle the rest of the way with water. I put the cap on the bottle and gave it a shake to mix the bleach in the water.  Still no smell.  What's wrong? If you can't smell the bleach how will you know the bleach is out of the plumbing?

I was not going to stop - I took the funnel with the plastic tubing attached to it - that we made just for this purpose and started pouring the water/bleach into the front exterior fresh tank through the door fill in the driver's door frame.  I then could smell the bleach. It needed the water and to hit the air as it went into the fill hole through the funnel.  The bottle go to about 3.4 empty when the water and bleach came pouring up and out of the fill hole - all over the driver's door steps. What was wrong? Then I realized that just running the RV antifreeze out of the plumbing until only clear water came out of the sink, showers, and toilet was really not enough to take that much out of the front fresh tank - and combine that with the rear tank refilling the front tank as the water is pumped out into the fixtures, the front tank was fairly full. Was there a step I missed - no, but there should have been. Before pouring the bleach and water into the fresh tanks, let some water out of the tanks through the low point drain in the front exterior tank to make room for the gallon of water with the bleach in it that has to go into each of the two tanks.  I had a quarter of a gallon of bleach water that was not going to fit into the front tank. 

 I said something that I can't write here, and got the bleach bottle and the quarter filled water jug and poured in the one quarter cup of bleach for the rear interior tank, topped of the gallon jug with water, capped it, shook it to mix it, and took the funnel over to the rear cargo door with the water fill in the door frame. The funnel went in and the entire gallon of water and bleach poured into the rear tank - which had been refilling the front tank, as it is supposed to do. I got the hose and topped the back tank up with water.

I got into the Roadtrek, started the engine, and backed it down the driveway stopping short every few feet and then going back forward doing the same to mix the bleach and water inside the two tanks. That was it for the day. We just had to put everything away again. 

This brings us to the next day. The bleach and water sat in the tanks for just under 24 hours. According to the Clorox company when we called them years back, bleach and water after a number of hours turns to water but the bleach smell remains.  We could have drained the bleach after about four hours but we were not coming out in the middle of the night to start a process that has the most waiting.  This day was warmer than the day before which was supposed to be warmer but was fairly chilly. It was also maybe supposed to rain (which did not happen until the night). 

First thing to do was drain the bleach/water out of the two fresh tanks.  Our low point drain on the front tank - the only fresh water low point drain on our Roadtrek - has a screw off and screw on cap. Taking it off means lying on the ground next to the back corner of the driver's door, reaching under the chassis to the cap and unscrewing it which means bleach water pours out all over your hands.  We got the cap off - put it where we would not lose it and let the water drain while we had lunch. 

After lunch, the first thing to do is put the  cap back on the drain - and do that in the puddle that resulted from the water and bleach pouring out. So far no surprises.  They would start soon enough. 

The fresh water hose was hooked up and I filled the front tank with fresh water. We then went to the back of the Roadtrek to fill the rear tank. I pulled on the orange push in plug that caps off the water fill holes- it was off yesterday - no problem.  It was not coming out. I pulled on it. Meryl pulled on it. We tried lifting the edge around the cap.  No it was not budging.  I went to the garage to get a pair of pliers. The cap came right out.  On ward!  Ha! Ha!

 What happened next is something that has happened in the past at this same point in the sanitizing process - not regularly but has happened.  The hose with its RV water fill nozzle went into the fill hole for the back tank with the water running slowly. A few minutes later the water was pouring back out of the fill hole - the tank was empty - but something was preventing the water from going in . 

We have figured that since this mostly happens after the fresh tanks have been filled with bleach and water, a chlorine gas bubble forms inside the smaller rear tank and prevents the water from going down into the tank - pushing it back out the fill hole. There have been times when the water comes out in a gush. This time it was steady stream pouring out. It was time to get out the "gizmo". I made the gizmo years back when this first happened. The gizmo is a hose nozzle with a small diameter. long  tube that  is fed down the water fill hole to the bottom of the tank so that it will fill the tank with water from the bottom up - under the bubble - pushing the gas bubble up and out and not the water. Up until this time it has always worked. (Here is an article about first "The Gizmo" and this article shows what happened to that gizmo one winter with a photo of the new gizmo I made to replace it which is what I use now.)

The Gizmo was screwed onto the hose, the water pressure at the outside faucet at the hose was set  low and the tube went down into the tank. I opened the valve on the gizmo and the water started pouring out of the fill hole again. I shut off the gizmo's valve, pulled the tube out of the tank - fed it back in again - tried again - still water was coming out. This was one of those "OH BOY!" moments. If the water did not go into the rear tank we were not going to be able to get the bleach smell out of the tank. 

I stood back and starting thinking, perhaps I was going about this the wrong way by putting a slow flow of water down into the tank through the gizmo. Maybe it was not enough pressure to burst the bubble. I went to the faucet on the house and turned it all the way up.  The gizmo's tube went back into the tank, the valve was turned on and the water did not come back up into the tank. The tank filled and we were ready to flush the water tanks and pipes of bleach.

There was still a smell of bleach in the water as it came out of the sink and the showers. We drained the tanks and went for the third flush. Just an aside - it takes 25 minutes to drain the two tanks through the low point drain on the front exterior tank. It usually takes three flushes.   Meryl suggested that we fill the back tank first this time. It sounded like a good idea. 

I was not taking any chances and left the gizmo on the hose to fill the rear tank again.  This time no water came back up the fill hole but it seemed like it was taking much too long to get the tank full. Meryl was inside the Roadtrek at the monitor panel.  She would check the level of the tank every few minutes. The rear tank was at 2/3 but the front tank was also filling and was at 1/3 full - before we put any water into that tank from the front fill hole.  The water system in Summer mode was doing what it is supposed to do - the water was running from the rear tank into the front tank. This was going to take forever. I could have just changed the water valves to Winter mode and that would have cut off the front tank but I was not going to start playing with valves in the cabinet. I pulled the tube out of the back tank, took it to the front tank and started filling the front tank with the gizmo. Water in the Roadtrek in Summer mode does not flow from the front tank to the back tank. The front tank filled quickly. I then went back to the back tank and filled that to the top. 

The third flush resulted in no bleach smell in the water from the tanks. Hooray! The tanks were sanitized!  We put everything related to sanitizing and fresh water away. Now, I wanted to dump the RV antifreeze that I put in the black tank when we winterized out of the tank.  It could have been left in, but for the first trip I wanted to start with an almost empty tank (almost empty because I always keep a gallon of fresh water in the black tank so that the tank and its seals do not dry out). I also wanted to see the macerator work before we took a trip so that there would be no unwanted surprises on the road! 

We got out the pail that we use to dump the tanks at home. We have no outside sewer connection - they are not permitted in this area. I pulled the macerator hose out (the SaniCon retractable hose we had put on three years ago) and went to take the cap off the nozzle. This is a nozzle that I made for the SaniCon hose as the nozzle the RV shop put on it was a pain to use and the nozzle made by Thetford for this hose would not fit into the opening of the storage compartment where the hose is stored in the Roadtrek. (Here is the nozzle.) The nozzle has a PVC cap that screws on and off. Meryl took the hose as she holds it into the pail while I push the macerator button. I said to hold the nozzle pointing up as she removed the cap so that anything in the hose would not pour out on her as she removed the cap. The cap would not budge.  So I came over and took the nozzle and grabbed hold of the cap and took my turn to unscrew it. The cap would not budge! I tried a few times. It was not coming off. I don't know why. I was last off this past November when we winterized.  I went into the garage and came back with a pair of pliers and the cap came right off.  We dumped the black tank and finally we were done!

It was a really good thing that I wanted to dump the black tank because if we were at a campground - and we generally dump on the last day before we leave, there would have been a lot more panic if the cap would not come off. I said this to Meryl later and she agreed! 

So - what you think should go easily and quickly (well, never think or say "quickly" because nothing ever goes quickly when it should), things don't always cooperate and they go wrong! 

It happens! And it is better for it to "HAPPEN" when you are home rather than when you are out having a nice trip in the Roadtrek!


Friday, October 1, 2021

HOW TO SANITIZE THE FRESH TANKS, PLUMBING, AND HOT WATER TANK

This article is a copy of the procedure to sanitize the fresh water tanks, plumbing, and hot water tanks as it appears in our article - THE DEFINITIVE DEWINTERIZING AND SANITIZING - STEP BY STEP.  I have put it in its own article for those who just want to know how to sanitize the the water system in the Roadtrek. 

THIS IS WHAT YOU WILL NEED BEFORE YOU START:

Fresh Water Hose
Water Pressure Regulator
Liquid Chlorine Bleach (Clorox or off brand is fine) PLEASE NOTE: There is something called "Splash-Less" Bleach. DO NOT BUY THIS FOR SANITIZING YOUR TANKS. It does not have disinfectant properties and will not disinfect surfaces." BUY REGULAR BLEACH. (Thanks to one of our readers, "Tom" for bringing this to our attention!)
Funnel with hose on the end
Measuring Cup (for Bleach)
Small paper cups
Hot Water Tank FLUSH  Wand
Ratchet wrench handle
1-1/16" Socket
Plumbers silicone pipe tape to put on threads of the anode rod when putting it back in.

Drain and flush the hot water tank before you start.  

TO DRAIN THE HOT WATER TANK (click here)

TO FLUSH THE HOT WATER TANK (click here)


SANITIZING THE FRESH WATER TANKS

  1. TURN HOT WATER BYPASS VALVES TO HOT WATER FLOW. 
  2. CONNECT A FRESH WATER HOSE WITH A WATER PRESSURE REGULATOR ONTO THE CITY WATER FILL CONNECTION. 
  3.  USE CITY WATER LINE TO FILL HOT WATER TANK BY RUNNING CITY WATER INTO THAT TANK. (NOT CITY WATER FILL - REGULAR USE OF CITY WATER) GO TO THE SINK, TURN ON HOT WATER AT SINK. AIR WILL COME OUT - AND THE TANK WILL FILL. WHEN IT IS FULL THE WATER WILL RUN STEADILY FROM THE FAUCET. DO NOT TURN ON HOT WATER SWITCH. THIS WILL BE COLD WATER AND THAT IS WHAT NEEDS TO BE.
  4. DISCONNECT CITY WATER CONNECT FROM HOSE.
  5. PUT ONE HALF CUP BLEACH INTO THE FRONT EXTERIOR FRESH TANK. (PRE-MIX THE BLEACH IN A GALLON JUG OF WATER BEFORE PUTTING IT INTO THE FRESH TANK - DO NOT PUT PURE BLEACH INTO THE TANK.) A FUNNEL WITH A HOSE ON THE END IS EASIEST TO GET THE BLEACH/WATER MIX INTO THE FRESH TANK THROUGH THE DOOR FILL HOLE.
  6. PUT ONE QUARTER CUP BLEACH INTO THE REAR INTERIOR FRESH TANK. (PRE-MIX THE BLEACH IN A GALLON JUG OF WATER BEFORE PUTTING IT INTO THE FRESH TANK - DO NOT PUT PURE BLEACH INTO THE TANK.) IF YOUR ROADTREK HAS ONLY ONE FRESH TANK - SKIP THIS STEP.
  7. TOP OFF WATER IN TANKS WITH HOSE.
  8. DRIVE BACK AND FORTH TO MIX THE BLEACH INTO THE WATER.
  9. TURN ON BATTERY SWITCH AND WATER PUMP.
  10. TURN ON EACH FAUCET HANDLE PLUS INSIDE AND OUTSIDE SHOWER ONE HANDLE AT A TIME SMELLING FOR BLEACH TO COME THROUGH WITH EACH. NOT THE TOILET.
  11. NOW YOU WAIT. 
  12. LET BLEACH SIT IN TANKS FOR AT LEAST FOUR HOURS. LONGER IS OK!
  13. DRAIN WATER TANKS.
  14.  NOW WE REMOVE THE BLEACH FROM THE HOT WATER TANK FIRST. 
  15.  1) The hot water tank should NOT be in bypass while sanitizing and it should remain NOT bypassed for this process. DO NOT HAVE ANY SINK FAUCET OR SHOWER FAUCET ON DURING THIS PROCESS EXCEPT WHERE AND WHEN NOTED FOR THE OUTSIDE SHOWER HOT WATER HANDLE. DO NOT TURN ON THE HOT WATER HEATER!

    2) Water pump OFF.

    3) Attach a fresh hose WITH A WATER PRESSURE REGULATOR to the city water inlet and a spigot outside. Turn on the water.

    4) Turn on the outside shower hot water handle and open fully - step back!  Only the hot water handle on the outside shower should be open. No other faucet or shower handle should be on.  As the water comes rushing out of the shower (hose optional) you should smell bleach in the water.

    5) Allow to run for at least 15 minutes. THIS WILL FILL AND  EMPTY THE TANK AT THE SAME TIME - ABOUT THREE TO FIVE TIMES.  YES THE WATER IS FLOWING DOWN THE DRIVEWAY FLUSHING THE HOT WATER TANK.

    6) After a steady flow of water for 15 minutes you should no longer smell bleach in the water coming out. (To test, take a small paper cup , slow the flow of water by turning back the handle and put the cup under the streaming water coming out. Step away from where the water has been flowing and smell the water in the paper cup. You should not smell bleach.)

    7) If you still smell bleach allow the water to continue to flow longer until there is no longer any smell of bleach in the water. (Use a new paper cup if you test again.)

    8) Shut off the hot water outside shower handle.

    9) You have now exchanged all of the water inside the 6 gallon hot water tank several times with fresh water, flushing that tank as many times.

    10) Remove the hose from the city water connection.

    11) PUT THE HOT WATER HEATER INTO BYPASS! You do not want to
    put bleach back into the hot water tank.
  16.  FILL FRESH WATER TANKS AGAIN.
  17.  GO INSIDE THE ROADTREK.
  18.  TURN ON BATTERY SWITCH AND WATER PUMP.
  19.  **TURN ON EACH FAUCET HANDLE PLUS INSIDE AND OUTSIDE SHOWER ONE HANDLE AT A TIME SMELLING FOR BLEACH TO COME THROUGH WITH EACH. NOT THE TOILET - YOU NEVER WANT ANY BLEACH TO GO INTO THE TOILET.
  20. IF YOU DO NOT SMELL BLEACH (GOOD!) SKIP TO #23
  21.  DRAIN TANKS THROUGH THE LOW POINT DRAIN.
  22.  FILL FRESH TANKS AGAIN.
  23.  IF BLEACH SMELL REPEAT FROM STEP #16 AFTER DRAINING FRESH TANKS.
  24.  DRAIN TANKS OR LEAVE FULL FOR TRIP. 
  25. PUT YOUR HOT WATER TANK OUT OF BYPASS NOW SO THAT THE TANK WILL FILL AND YOU WILL HAVE HOT WATER WHEN YOUR TANKS ARE FULL OR ARE USING CITY WATER. 

  DONE

 
IF YOU WOULD LIKE TO CONTACT US TO ASK A QUESTION ABOUT ANYTHING YOU READ IN THIS ARTICLE PLEASE EMAIL US USING THE LINK IN THE RIGHT COLUMN OF THIS PAGE.


Wednesday, August 11, 2021

THE HIDDEN FUSE BOX

 Most know that the Roadtrek fuse box containing the fuses and circuit breakers for the Roadtrek RV appliances and components is on the wall of the Roadtrek next to the passenger side door into the Roadtrek. This is where you will find the main 30 amp circuit breaker for the coach, the breakers for various other 110/120 volt electrical components like the air conditioner, the television, etc.. Also in this box on the wall are all of the fuses for the 12volt components  of the Roadtrek such as the hot water heater, the furnace, the water pump, the lights, etc..  In the photo below it is the large black panel below the generator switch, the hot water heater switch and the monitor panel with the battery disconnect switch, the test switch, and the water pump switch.  You open this panel by pulling up on indentation in the center, pulling toward you and out.  On the back of that panel is a diagram that shows what circuit breaker and which fuse goes to what. (Some Roadtreks do not have that diagram. It is in the manuals of some Roadtreks and apparently in most recent Chevy Roadtreks it was not put into the manuals (why is a good question).)

That box contains everything for the Roadtrek part of the van. Nothing in this box is connected to anything in the Chevy part of the van. 

There are two fuse boxes that have the fuses for the Chevy. One is in the engine compartment. The second fuse box is hidden. The hidden fuse box is under the driver's seat. If this were just a Chevy Express van it would not be hard to find and get to that fuse box, but when Roadtrek removed the stock Chevy seats, installed swivel mechanisms under them to allow them to swivel around to be lounge seats for the Roadtrek, and then put in Roadtrek's own front passenger and driver's seat, accessing the hidden fuse box becomes a mystery. Like some other parts of the Roadtrek it is a puzzle that is a challenge to solve. 

We have solved that puzzle for you and will give you the steps for you, too, to be able to get to and into that hidden fuse box.  Some Roadtrek manuals will tell you that to get to the fuse box all you have to do is turn the driver's seat counterclockwise. That sounds very simple, but it is not quite that simple. 

HOW TO GET TO THE HIDDEN FUSE BOX:

1) Put the back of the driver's seat straight up. Pull the large handle on the right side of the bottom of the seat. 

2) Remove or move anything you might have behind the seat. In the "Popular" models of the Chevy Roadtrek  there is a wardrobe cabinet right behind the driver's seat that is fairly close to the back of the driver's seat. We keep a small folding table behind the seat and I removed that before I did the following steps. The "Versatile" models of the Chevy Roadtrek have a seat behind the driver's seat. If there is nothing on the floor between that seat and the driver's seat, then you should not have anything to remove or move.

3) Using the bar below the front of the seat cushion, move the seat about half way back on the slide so that it is in the position the seat is in the photo below. You can be sitting in the driver's seat of you can be standing outside the open driver's door, just pull up on that bar and slide the seat to where it needs to be. 

4)  Look again at the photo above.  Leave the armrest down. The black handle in the center below the side of the seat facing you looking from the open door inside is the handle that swivels the seat. This handle is on a spring and also is connected to a latch that locks the seat in place so that it will not swivel while you are driving. With one hand or two, pull that handle UP. You will hear the latch unlatch and you will be able to now swivel the seat COUNTERCLOCKWISE -  do that the front of the seat comes toward you.  If it gets stuck on the curtains that hang down from behind the door post, just move the curtains.  Below you see the front of  seat facing you! 


5) In the photo above you can see the slide handle for the seat right below the seat cushion. With one hand pull that handle up and with the other hand push the seat back as far as it goes on its slide. Let go of the handle and the seat locks into that position.  If you look to the left on the floor at the black box on the floor - YOU HAVE REVEALED THE HIDDEN FUSE BOX!

6) The box cover has two clips that keep it closed. They are on the sides at the top - on facing the driver's door and the other facing the passenger side.  Reach in under the seat and  feel for them. It is a simple move and release clip. They are hard to see and it was not possible to photograph them in place. Release each clip and the cover will come right off. Putting it back on is just as easy. line up the edge of the cover with the front of the box and put it on top and it just gently pushes down and clips into place.


7) The photo above is the extent of what you can see in the hidden fuse box. You pretty much have to reach in from the open driver's door getting your head and eyes around to see the inside of the fuse box from the floor below the steering wheel.  It is far from convenient and very awkward.  There is some reaching and eye straining to see and get the the fuses further back in the box. The Chevy Express owners manual will identify what each of the fuses in the box are. There is NO chart on the cover of the box.  There are also no labels other than the amps on each fuse. These are "MINI FUSES". There are also what the manual calls "J CASE FUSES". These are You should be able to find them in any auto parts store. These are smaller than the fuses that are in the "Roadtrek side" fuse box. There are also 6 relays and 2 circuit breakers. One of the circuit breakers is for the power seats and the other circuit breaker is for the power windows. Some fuse spaces are left empty.  

8) To put it all back together again just reverse the steps.  Use the slide handle to pull the seat back to where you started in Step 3. When the set is swiveled it will continue to swivel until it is facing front to the steering wheel again. To do that all you have to do is swivel the seat back to the front without pulling up on the swivel handle again. The seat will lock in facing the steering wheel. Move the seat forward or back to where you like it when you drive. That is it!

If you do not have a Chevy Express Manual for your year Chevy Express van - and remember that the Chevy Express is not always the same year as your Roadtrek is, so you go by the Chevy year and not the Roadtrek year as far as the Chevy Express manual is - there are a several websites that have manuals for all cars and vans of various years and they will let you download the manual for free. It is a good idea if you only have a downloaded manual to put the PDF file for the manual in your smart phone or other device you have with you on trips. 

So now you too can find the hidden fuse box and get to it whenever you need it. Let's hope you never have to get to it. 😃

IF YOU WOULD LIKE TO CONTACT US TO ASK A QUESTION ABOUT ANYTHING YOU READ IN THIS ARTICLE PLEASE EMAIL US USING THE LINK IN THE RIGHT COLUMN OF THIS PAGE.


Saturday, June 19, 2021

Another Generator Tale and Some Basics to Know When the Generator is Not Working

 Our Roadtrek has been sitting on the driveway for over a year and a half because of Covid-19. We live in an area that was hard hit by the virus and we pretty much stayed indoors only going out once every several weeks for essentials. Trips that we had hoped to be able to take in 2020 were not possible. Places that we wanted to go to - if we could have gone away had canceled all of their events or just closed. I have been going out to the Roadtrek and starting the engine every week. We took it for a few local two hour drives - out and back to keep it running, charge the batteries, besides plugging in to charge the batteries. I also had to keep exercising the generator for its monthly two hour continuous run with a half load which is either the air conditioner running or in the cold weather an electric radiant home portable heater plugged into one of the Roadtrek outlets. I did this diligently until February 2021 when it snowed here every week and the snow piled up around the Roadtrek and we could not get into it. It ran fine when it was exercised in January and shut off fine as well.

The second week in March 2021, the weather was getting better. Most of the snow had melted and I went out to exercise the generator. I started the van engine to boost the batteries that are needed to start the generator, put the battery switch on, and pushed the generator start button on the wall inside the Roadtrek. What should have happened was the generator starting to crank, catch, and run. I should have seen the amber light on the switch come on. None of that happened. What did happen was the light did not come on with the switch held in, there was no noise at all - there was no cranking, and when I took my finger off the switch, the switch light did flash on and off once, and I could hear a noise toward the back of the van (where the generator is under the chassis) that went clunk - once. Oh boy!  I tried several times more. 

I went into the house to get Meryl as I was going to try to crawl under the back of the can to the generator - something I am not supposed to do because of a physical issue - and try to start the generator from the switch that is behind the access panel on the front of the generator.  She came out with me - basically to pull me out if I could not get out from under the van - and I crawled under. I opened the access panel - two push up tabs on the bottom of the panel releases it which is easy to do if you are not lying under the van on your side trying to reach up while still supporting yourself on your elbows. I looked inside and the start switch is right there. I pushed the switch and nothing. This switch has no light but when I released the switch I did here the single clunk.

There is a 5 amp fuse inside the generator. This fuse is there to protect the generator starting electronics.  If this fuse is blown, the generator will NOT start. If I could get to the fuse and see if it has blown, then replace it, the generator MIGHT start. The problem was the fuse is down and behind other components and I could not see it. I could not even feel it when I tried to get my finger down to where I thought it should be.  At that point, I could stay under the van any longer and I put the generator access panel back on and crawled backwards to get out - with Meryl's help. 

It was March. Covid-19 was still very much present and we had not been able to schedule appointments for the Covid vaccine. We decided to just leave it alone until we were fully vaccinated and it was warmer to deal with. And we knew it had to be brought into a Cummins/Onan authorized service center. 

By the end of May we were both fully vaccinated and we were trying to get the Roadtrek ready for hopefully being able to start to travel again. I called the generator shop which is in the next county about a 45 minute drive.  They gave me a morning appointment to bring the Roadtrek for them to work on the generator. 

We took the Roadtrek to the Onan shop the morning of the appointment. The appointment was for 10am. We arrived at 9:45. Since we were not sure how long they would need it to work on, Meryl drove the Roadtrek there and I followed in the car.  We parked in the back of the building where the entrance to the shop is and we walked around the building to the office entrance and let them know we were there. We were told just to wait with the Roadtrek in the back as the service tech was finishing a job offsite and would be back very soon. At about 10:20 or so, he arrived. I explained that it would not start and what it did when not starting. He asked where the generator is and I told him and he said, "I was afraid of that!".  He did not like working lying on the ground either.  I showed him the start button inside and turned on the battery switch.  I also told him that the last time they worked on it, it also did not start which was 2018 and the paperwork I have from that repair said the fuse had come loose. He went to the switch inside the Roadtrek and tried to start it - and it did exactly what I had been doing for me  - not start. We told him we would wait or if he thought it would be long we could go and come back. He said either way and we stayed but we had to leave the shop and watch through the open garage door. He went under the van with a work light and in about five minutes I hear the generator start. It has not done that in three months.  He shut it off and started it twice more. As he crawled out I shouted into the garage - "Was it the fuse?" He said it was - it was loose.  I asked why would it go loose and he told me that is what he would have to find out now.


If you have ever been concerned about the Roadtrek being put up on a lift - what he did next (and I knew this is what this shop does as they did it with my Roadtrek in the past) - would make you cringe as I do every time I see them do this.  He got into a forklift and drove it behind the Roadtrek. He centered the fork with the center of the bumper, lowered the fork down and drove under the back of the Roadtrek and raised the fork until it made contact with the bottom of the chassis and lifted the back up about two feet off the  ground.  Then he went back under.  I could not really see what he was doing from that point so I went to sit in the car with Meryl to read an ebook on my phone.

The car was parked on the other end of the parking lot and after awhile I moved the car and parked it facing the open garage door and the Roadtrek. About an hour went by and he looked like he was finishing and then he put the back of the Roadtrek down  with the  forklift.  I went over and asked him if it was done. It was. This all was just less than an hour including the regular maintenance that I asked be done on the generator. I asked him about the loose fuse and what did he do about it so that it would not go loose again. He told me then that it turned out not to be the fuse. He thought it was at first because when he put his fingers in around the fuse, he was pushing around and thought he felt the fuse seat back in, and  then then the generator was able to start. When he looked closer with the Roadtrek lifted up he found a plug and socket that are supposed to be tightly snapped together and not come apart and it is right behind the fuse. When he touched the fuse earlier he had actually pushed the plug and socket close enough together for the generator to be able to start. OK, but I had to ask why would this have come apart. What he told me I don't really accept,but it was working and there was no reason to question further. He told me that when it was all put together originally this was not snapped tightly together as it should have been. I said that was ten years ago and he just shrugged. BUT the Onan started.  

Now, back in 2016 when I first brought the Roadtrek to this same shop to work on the generator, they had to take it down to repair it and took it apart. It is possible that this plug and socket were not tightly snapped back together then and over time with all the vibrating the generator does when it runs, it is possible that finally in January 2021, this connection shook loose. I don't know. As long as it works now - I am fine with it.  

He also did as I had asked them to do, an oil change, a fuel filter change, and a spark plug change. That was all done.  I then asked him - and this is the important part of this story, if he tested it under load. He had not. What this means is did he test the generator running with a load - something running inside the Roadtrek powered at 110 volts by the generator - like the air conditioner. He said I could do that while he stood by but he wanted me to bring the Roadtrek outside the shop to do so as he did not want to fill the shop with exhaust. Fair enough, 

I baked the Roadtrek out of the garage, went to the switch and the generator started right up. Then I let it run for three minutes - I usually let it warm up for five minutes before putting on a load but I did not want to make him wait around too long for me to do that so I let it run for three minutes this time, then I turned on the A/C. NOTHING! I knew exactly what was wrong. We called him outside and let him know and he went under the van to the generator and clicked the circuit breaker back up. 

When there is no power coming from the Onan the circuit breaker is tripped - and any work done inside the small space in the generator, a hand will surely find the circuit breaker switch and accidentally knock it down to off. He was under and I thought he had already reset the breaker but had not. I tried the A/C and again nothing. The generator was still running. I plugged in the microwave which I keep unplugged over the winter (just to not overwhelm the Onan when I exercise it every month and in the cold it is harder starting it). The microwave had power. I slid the A/C switch to ON and it started. He had by then reset the circuit breaker. 

SO - the point here is  - if you have work done on the generator, even just an oil change, or you do work on the Onan - if there is no power inside with the Onan running -  the service tech or you hit the circuit breaker handle and turned it off. That is fairly simple to get to and flip it back up.

This Onan shop which is a sales and service center for all types of generators from big house and really large worksite generators to as small as the Onan Microlite 2800. We have been there when they were working on a large Class A's generator. They charge $166 an hour labor plus parts. Our job took just less than an hour and we were charged $170. total. This included the labor time, the oil, the fuel filter, and the spark plug.  This was a LOT less than we were anticipating.  

The Onan now runs with the push of the switch and we  know that if we need it, it is ready.  In the next few days I will exercise it for its usual two hours a month with the A/C running to get it back to its usual exercise routine.
 

A FEW THINGS TO TAKE AWAY ABOUT THE GENERATOR FROM THIS TALE:

How this service tech went under the Roadtrek - without it lifted up  - was interesting and maybe it is how others do it.  He went under with a creeper and went in from the side and not straight in under  the bumper (as I go under). This might give a little more ability to move under the low van and if I have to go under I will try it that way.  It seems a lot better than going head in from under the bumper and the hitch.

MORE IMPORTANT:

1)  If your generator does not start, the first thing to try to check is the fuse. The fuse if blown will prevent the generator from starting as no 12 volt power is getting to the generator's starter.

2) If your generator is running BUT there is NO POWER coming from it to the inside of the Roadtrek 110 volt appliances plugged in, the first thing to check is the circuit breaker INSIDE the Onan at the front looking in. Reset that breaker by flipping it UP and you should now have power inside the Roadtrek from the generator. 

Of course with both of these - IF NOTHING MORE IS WRONG!  


Here is a link to our general Onan Generator Article - for much more detail about how it works. 

 IF YOU WOULD LIKE TO CONTACT US TO ASK A QUESTION ABOUT ANYTHING YOU READ IN THIS ARTICLE PLEASE EMAIL US USING THE LINK IN THE RIGHT COLUMN OF THIS PAGE.


Tuesday, June 1, 2021

ON FACEBOOK - CHEVY Roadtrek 190, 170, 210 Support, Help, and Sharing

 Facebook has been a great resource for Roadtrek owners. I have been a member of a group on Facebook that focuses on the Chevy Roadtreks since it started. The group has gone by a couple of different but related names.  The group owner of this group recently announced that since he had sold his Roadtrek he wanted to stop being the administrator of the group and asked for someone to take over the group.  I have been the administrator of other Facebook groups for a long time and thought that taking on an additional group would not be a problem for me - so I volunteered. With a lot of thought, I renamed the group - "Roadtrek 190, 170, 210 Support, Help and Sharing" - as this really what the heart of the group is all about. The group welcomes all Chevy Roadtrek owners. The group also welcomes Chevy Roadtrek 200 model owners - a very brief Roadtrek model as well as Roadtrek Chevy Simplicity and Ranger owners (both versions of the Roadtrek 190. We also have members of the group who are looking to buy a Chevy Roadtrek or are just interested in learning more about them. 

I emphasize on the group that there is no relevant question that cannot be asked and that all of the members who can help with that question do so, and not say to just do a search to get help. On the group you will read about the good things and the not so good things that happen with members' Roadtreks. We share problems and ask how to resolve them. We talk about modifications we have made and how to do the things one needs to do when out traveling with the Roadtrek, maintaining the Roadtrek, and fixing the Roadtrek when it needs to be fixed. 

We have member/Roadtrek owners who are very knowledgeable about Chevy Roadtreks. We have members who are new owners and are just starting out who ask for guidance from the group. We also have members on the group who are looking to buy a Chevy Roadtrek and present to the group what they have seen, the condition one is in, and ask for opinions on whether it is a good buy or one to avoid. 

I am on the group just about every day and am happy to answer questions along with the other members. When I thought about taking on this group one of the thoughts that went through my mind was that the group would be a good resource for the readers of Meryl and Me Hit the Road and they will be able to come on the group and interact with me directly.  This rounds out how I can help our readers as an added benefit to direct emails from readers - which we love and answer diligently, and questions posted to article comment sections here on Meryl and Me. 

The group is now well established.  Most know but maybe not all do - Facebook is free to join.  The group is set to "Private" meaning no one who is not a member of the group can see anything on the group. This keeps away any trouble makers. Only members can see the group posts - even when asking to join the group, you will only see an introduction to the group. And once on the group you have access to all of the knowledge on the group including a FILES section of manuals, documents, and other related information files about Chevy Roadtreks. When I come across something useful, I put a copy into the Files section of the group - as do other members. When you apply  to join you MUST answer all of the membership questions in detail! 

SO - YOU ARE INVITED!

COME JOIN US!

The name of the Facebook group is - 
ROADTREK 190, 170, 210 SUPPORT, HELP, AND SHARING
 
THE GROUP ADDRESS IS - 


Wednesday, May 26, 2021

THE WATER PUMP KEEPS RUNNING!

The water pump is what pumps the water from your fresh tank(s) into the plumbing in the Roadtrek. THE water pump is 12 volts. It uses the coach battery(ies) to work. Before you turn on the water pump you must turn on the battery switch. 

Normally, when you turn on the water pump switch on the wall inside the Roadtrek you will hear the water pump turn on and then shut off right away. It should stay off until you either open a faucet handle, a shower handle, or flush the toilet. Then you will hear the water pump start to pump water to the faucet, shower, or toilet.   It will keep running - as it should - until you turn off the handle to the faucet or shower, or take you foot off the flush pedal on the toilet. Then the water pump shuts off and waits for the next open faucet, etc. There is a sensor in the water pump that starts the pump when there is a demand for water.  If your hot water tank is empty and you fill your fresh tanks, the hot water tank will fill the first time you turn on the water pump and open a hot water faucet handle.  What will happen then is the water pump will start and it will seem like it is running for a long time. First any water left in the sink hot water pipe will come out (cold) and along with it a burst of air. That burst of air is the water pump starting to pump cold water into the hot water tank to fill it and the air it is displacing in the tank is coming out through the open sink hot water side. The hot water tank holds 6 gallons of water and it takes awhile to pump that much water into the tank - and it must fill the tank. This is all normal and with an empty hot water tank being filled the wait for the water pump to shut off is normal. When the water starts coming out of the faucet steadily the tank is full and then you shut off the hot water handle and the water pump will shut off.  (Never turn on the hot water heater switch if there is an empty hot water tank - you will burn out the hot water heater. Wait until the hot water tank is FULL! -And it take awhile for the water to heat up - 6 gallons is a lot of water to heat.)

If something is wrong , however, the water pump might run when it shouldn't. First, understand that to for the water pump to run - correctly or not correctly -  THERE MUST BE POWER TO THE WATER PUMP  - SO - if the water pump wall switch is OFF - the water pump will be off and stay off. There are two things that you might find happening.

1) The water pump runs and runs and does not shut off.

2) The water pump runs for a few seconds, shuts off, starts running again, and repeats this cycle of runs, shuts off, runs, shuts off - and keeps doing that. 

 Each of these happen under different issues with the plumbing.  

Let's look at #1 first.  If the pump runs continually - not run, stop - run, stop - then there is a problem between the tanks and the pump.  This means the problem is on the INTAKE side of the pump. The pipes to the fresh tank(s) are on the intake side of the water pump. (Note - this does not include the hot water tank. The hot water tank is on the OUTPUT side of the water pump.) With the tanks in summer mode or in a one water tank Roadtrek, this means that the problem is between the exterior fresh tank in the front of the bottom of the van and the water pump. If a two fresh tank Roadtrek is in WINTER Mode - which is set to have water come from the rear interior tank directly to the water pump - then the problem is between the water pump and the rear interior tank plumbing. (See our article Summer Mode/Winter Mode to understand what this is.) 

What then should you do or look for? 

SHUT OFF THE WATER PUMP SWITCH - that cuts off the power and stops the pump while you try to diagnose or fix the problem.

 This can be caused by as simple as a dirty filter on the water pump or more complicated a kinked pipe or something blocking the fresh tank output - or, again, simple - the fresh tank is empty. 

 The filter is the first thing to look for. Go to the cabinet with the water pump and look around for a black connection in the pipe going into the water pump intake side. In the middle of that black connector on top of it there is a clear/whitish flat topped dome. That is the filter. Here is a photo of what to look for:


THERE ARE OLDER ROADTREKS THAT HAVE THE WATER PUMP FILTER ON THE OUTSIDE AND UNDER THE VAN NEAR WHERE THE FRONT EXTERIOR FRESH TANK LOW POINT DRAIN IS ON THE PIPE COMING OUT OF THE TANK AND HEADING INSIDE THE VAN TO THE WATER PUMP. IT MAY NOT LOOK ANYTHING AT ALL LIKE THIS AND YOU WILL HAVE TO LOOK UNDER THE VAN TO SEE WHAT IS THERE. SO IF YOU DO NOT FIND THE ABOVE IN YOUR ROADTREK NEAR THE WATER PUMP IT IS OUTSIDE. 

In my Roadtrek this is connected to the winterizing valve that I had installed to pump RV antifreeze directly into the water pump for winterizing the plumbing in the Roadtrek. This is what it all looks lime in my Roadtrek 190 - yours will not have the brass valve on the right side of the filter. It will have a white PEX pipe connected to that side that comes from the water tanks' connections. The pipe on the other side, not seen in this photo goes into the water pump. What you do see in this photo when compared to the photo above is that with use, the dome turns a milky white in color.

Shut off the pump. Open the sink to clear any water out of the line. Opening the filter will pour out some water so put a towel under it. The dome screws off. 

Inside around the inside edge there is a metal screen that goes all around. That metal screen pulls out. Do this where you can flush this all with water - and not let what is in the filter go down any drain - in the RT or in the house. Clean the metal screen and clean the inside of the dome. Look into the hole left open where the filter was and see if there is anything in there that is blocking it. Get this all clear of any debris that was inside (nicely filtered out as it is supposed to do -  yes, this gunk was in your fresh tank) and put the screen back into the dome.  Take the dome with the screen inside and screw the dome back on the filter base. Just that dome being loose can cause the pump to do this too. The pump is sucking air and that is why it runs and does not shut off unless you shut the pump off with the switch and putting the pump back on will start it doing it all over again.

We had the problem - and a pipe was kinked. This happened when the Roadtrek was about 6 months old new.  How did that happen? We don't know. We took it to the Roadtrek service and they cut the kink our of the PEX pipe and joined a new piece of PEX pipe to rejoin the pipe. 

 A kink or blockage or leak could happen anywhere in the pipes going to the fresh tank(s). A hole in a pipe from the fresh tank(s) will also cause the pump to suck air. If the pump sucks air it continues to run and not shut off.  The pump will keep running unless you  or an RV service technician fix it. AND while the Roadtrek plumbing is fairly basic, if you are not experienced with plumbing or have never worked with PEX pipe before, take the Roadtrek to an RV service shop to deal with this problem. 

The lucky solution is that you find that the filter was clogged or you thought the fresh tank had water in it and it was empty (or your summer/winter valves were turned the wrong way). 

Now, let's look at #2. The water pump runs, shuts off, runs and keeps doing this - always shutting off a little in between. 

What then should you do or look for?

If the pump was running and stopping repeatedly that is a leak on the output side of the water pump and that can be as simple as a clogged sink faucet end tip screen or a faucet handle that is not closed all the way. Those are the easy to fix things you hope to find. 

SHUT OFF THE WATER PUMP SWITCH - that cuts off the power and stops the pump while you try to diagnose or fix the problem.

The sink faucet is just like any that you have at home. There usually is a screw off tip at the end of the faucet where the water comes out into the sink. Inside that there is a small round screen - sometimes it is a plastic disk with holes in it. Like the pump filter this also stops gunk from the pipes going into the water coming out of the sink. If this gets clogged. water wants to flow - and doesn't. Unscrew the tip of the faucet and clean the screen. Screw it back on and hope for the best. The water pump when you turn it on now should act normally - run for a few seconds and stop - and not start again until you want it to. 

If the screen was not clogged and you still have the problem, the next thing to do is go to every faucet handle - shower handle (inside shower and outside shower) - check the toilet that there is no water or dripping into the toilet - and close the handle tight. If the handle was open even slightly it will cause the water to drip - you may not even notice the drop - but the water pump does. It senses some handle is open and it wants to make you happy and send water there. of this is the problem, tightening down the handle will stop the water pump from starting,stopping, and keep doing that. 

Worse cases - 

1) There is a leak in a pipe on the output side of the water pump somewhere in the Roadtrek.

2) There is a loose pipe connection between two pipes or a pipe and a plumbing fixture.

3) The toilet valve is broken and is leaking. Look around the toilet on the floor. If you see water it is likely coming from the toilet valve what is broken. The toilet valve is located on the back of the outside of  toilet under the rim against the bowl on the left side facing the toilet. This happened to us TWICE - once the valve had to be replaced and the second time the valve was able to be repaired - both times by an RV service shop. How did we know? The pump was running, stopping over and over. I went looking and found water collecting in the aisle in front of the toilet. The water was dripping from the valve and coming down from the toilet and found its way to the floor. We shut off the water pump and since we were in the Roadtrek we had no choice but to turn the water pump on when we needed water and shut it off right away to avoid flooding the floor which by then was covered in towels. 

WHAT HAPPENS IF NOTHING WORKS OR CAN BE FOUND TO EXPLAIN #1 or #2?

The water pump may be broken. Like any other appliance it wears out over time and needs to be replaced. It is also possible that the sensor inside is broken. Some might take the water pump apart and find parts to fix it themselves. Many - who are not so skilled or inclined - will take the RV to an RV shop and let them replace the water pump. I know there are many skilled who own Roadtreks that can do these things for themselves  - but like you and me, who do not have those skills and who need articles like this to figure out what might be wrong and they might be able to do - or not do - take it to an RV service shop to fix. The Roadtrek uses PEX pipe for its plumbing. This is pipe that is joined together using crimp connectors - not glued together like PVC pipe or welded together like copper pipe and mostly not screwed together. PEX plumbing work requires special tools to work with the pipe and the crimp connectors. 

Also do not figure that you will just shut off the water pump and connect to city water. If there is a leak, a broken toilet valve, a broken pipe - is is going to leak more connected to city water. 

And speaking of city water - if the city water fill valve is turned to fill - the water pump does not work and even city water will not flow into the plumbing.(But we have an article all about that!)

How does the water pump know to run when a water faucet is opened? The water pump senses a drop in pressure and sends water to increase the pressure in the pipe - and it comes out of the faucet.


HERE IS TO HOPING THAT IT IS ONE OF THE EASY FIXES THAT YOU CAN DO YOURSELF! 

😍