
Early Chevy and Dodge Roadtreks had a home air conditioner installed. Roadtrek then in the Chevy - and some later Dodge models changed to using the Dometic Cool Cat air conditioner and heat pump instead. The Cool Cat shares a thermostat and controls with the Furnace and this is a separate panel on the passenger side wall near the Cool Cat near the rear of the Roadtrek. Some refer to the Cool Cat just as a "heat pump" but the Cool Cat is a combination A/C and heat pump. The Cool Cat is 10.5 K BTUs of cooling.
For the size of the interior of the Roadtrek this should be more than enough as there are room air conditioners that cool a room and more with 10.5K BTUs. The difference in a Roadtrek, however, is a room in a house is much better insulated that the walls and roof of the Roadtrek.
The COOL CAT and is Cool and Heat Pump functions to work, the Roadtrek MUST be plugged into SHORE POWER OR have the GENERATOR RUNNING. It will not work on the inverter. It will not work on battery(ies). It will not work on Solar. IF YOU ARE RUNNING THE A/C on the generator and you run the microwave at the same time it is going to overload the electrical system in the Roadtrek which will shut down to not result in damage.
Here is a photo of the Cool Cat ---

Notice that there are no controls on the unit - they are on the thermostat panel on the wall. The three round vents on the front above the grill turn around and you can point the slots in each grill up, down, to the left and to the right and at any angle. They may feel stiff to turn. Turn them, they will turn and stay where you put them.
Under the Cool Cat above the bed on the lowered ceiling over the bed there are also vents. These vents have two knurled round wheels to direct the air from the Cool Cat where you want it coming down on the bed. Turn the wheels with the Cool Cat running and you will find what turn of the wheels and combination of the turn of the wheels direct the air where. These vents are black in color - some don't are not even aware that they are there.

This is the analog thermostat panel for the Cool Cat - and the furnace. Newer Cool Cats will have a digital panel on the wall.

Take a look at the switches and slides. These turn on and turn off the Cool Cat - AND the furnace.
Here is what the newer digital thermostat and control panel looks like -

Both the analog and the digital control panels have the exact same functions and settings.
Using the analog panel -
COOL - turns on the Air Conditioner in the Cool Cat.
OFF - shuts off the Air Conditioner, the Heat Pump, and the Furnace.
FURNACE - The Roadtrek furnace is turned on (this runs on propane - there is no propane used for any other function on this panel.
HEAT PUMP - This turns the HEAT PUMP on inside the Cool Cat. (I will get into what that is later in this article.)
UNDER the word FAN - The ON and AUTO slide switch. This is an important switch. If you turn the Cool Cat on Cool or Heat Pump - and set that switch to ON- all the Cool Cat will do is blow room temperature air at you - all you have done is turn on the FAN inside the Cool Cat when the function slide switch is set to COOL - NO COLD AIR COMES OUT! For COLD AIR to come out of the Cool Cat - this must be in AUTO! The same for the Heat pump in the Cool Cat - Set the function slide witch to Heat Pump and with this set to ON - no heat comes out of the Cool Cat. And also as with Cool - this Fan switch must be set to AUTO. AUTO also acts like a power saver on a home A/C - on AUTO - when the set temperature is reached the compressor of the Cool Cat goes off and the Cool Cat goes to "sleep" waiting for the temp to get warm and then the A/C compressor comes back on and starts blowing cold again. This same thing happens with the Heat Pump - and the FURNACE. Often owners of Roadtreks with the Cool Cat will say it keeps going on and off. This is why. (More about this coming later.)
BELOW On/Auto is the speed of the blower in the Cool Cat - HI and LO - obviously HI - fast - LO - slow.
The thermostat setting is on the right slide up for 90 degrees and above - that is the temp that is coming OUT of the Cool Cat - NOT the temperature you are trying to cool down or heat up from. Slide down for down to 40 degrees. NOTE - Fahrenheit settings on the right side and Celsius settings on the left side.
HOW TO TURN ON THE AIR CONDITIONER FUNCTION OF THE COOL CAT -
This is the best way to get the COOL CAT A/C blowing COLD!
1) FAN SWITCH ON AUTO.
2/ FAN SPEED ON HI.
3) SET THERMOSTAT SLIDE TO COLDER THAN YOU WANT IT TO BE INSIDE THE ROADTREK - BELOW 60 UNLESS THE TEMP INSIDE IS NEAR 60 - IF SO, THEN COLDER!
4) SLIDE THE FUNCTION TO COOL.
The Cool Cat should come on. It will NOT blow cold right away and how long it will take to feel cold will depend on how hot it is inside the Roadtrek. If the inside of the Roadtrek is 100 F or above, it is going to take a little while for you to start feeling cook air coming out and then blow cold. This could take 15 minutes maybe. If the temp inside is 80F it will take less time to feel cold air coming out.
I recently ran the A/C with the inside of the RT in the upper 90s - it took 30 minutes to bring the inside of the Roadtrek to 80 degrees - standing in front of the A/C I felt cold. (My thermometer is near the driver's end of the kitchen counter.) In an hour it was 70 degrees inside. We have been in the RT sitting at night in the front seats swiveled to watch the TV in the rear with the Cool Cat blowing cold and get too cold in the front.
5) When the temp inside is near where you want it - turn the thermostat down to the temperature you want it to be. Let it run and enjoy the cold.
6) When you want to shut off the Cool Cat A/C slide the function switch down to OFF.
THE HEAT PUMP
The heat pump is an electric heater that is built into the Cool Cat. This is becoming popular in home A/Cs. The important thing to know about the heat pump is that it DOES NOT WORK if the temperature inside the RT or outside the RT at 40F degrees or lower (I have also found it not go on at 45F inside.) This is how it is designed - it is not a defect. It is meant to be used when it is cool inside the Roadtrek - not COLD inside the Roadtrek. When it is cold - 40 or just above - turn on the FURNACE instead. It works in the Spring and the early Fall - I had it on in early Spring - and it was cool at night and just enough to want a little heat. It got cold overnight and I was awakened by COLD air hitting me from the Cool Cat. I jumped up to get to the panel and start the furnace. It is so limited that we rarely use it.
STARTING THE HEAT PUMP
1) FAN SWITCH ON AUTO.
2) FAN SPEED ON HI.
3) SET THERMOSTAT SLIDE TO WARMER THAN YOU WANT IT TO BE INSIDE THE ROADTREK - ABOVE 80.
4) SLIDE THE FUNCTION TO HEAT PUMP - NOTE - FURNACE IS ABOVE HEAT PUMP - DO NOT PAUSE WHEN YOU GO PAST FURNACE GETTING TO HEAT PUMP - THE FURNACE WILL START (OR TRY TO START IF PROPANE IS NOT TURNED ON IN YOUR ROADTREK) When the furnace starts when you don't want it, it is a pain to get it off as it must cylce though trying to ignite the furnace and at the same time turn on the furnace's fan which keeps running (as it is supposed to) when the furnace is turned on.
5) When it is warm enough for you inside the Roadtrek slide the thermostat to the temp you want it to stay at.
PROBLEMS THAT CAN HAPPEN WITH THE COOL CAT THAT ARE NOT THE COOL CAT'S FAULT!
Here are two photos - First is the location of the Thermostat panel ---

Notice how close it is to the Cool Cat just above and to the right!
This is the photo of the Cool Cat we started with! Look closely at the left round vent! What direction is it pointing in? DOWN AND TO THE RIGHT! And what is down and to the right in the photo above - the thermostat! As I had said - the Cool Cat shuts down when the thermostat temperature is reached. The thermostat gets COLDER before any other place inside the Roadtrek - so the Cool Cat shuts down waiting for it to get hot inside again - at the thermostat! The Cool Cat keeps going ON and OFF!
Roadtrek has a few design flaws and this is one of them! The thermostat should NOT be next to the air conditioner!
SO WHAT DO YOU DO ABOUT THIS?!
Simple -
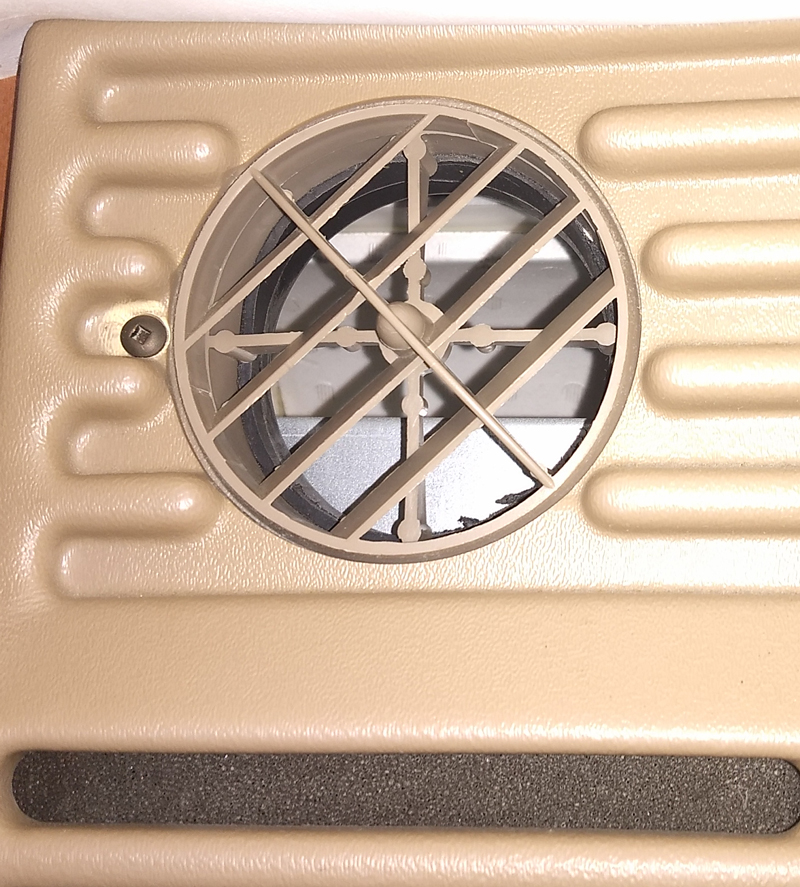
TURN THE LEFT VENT AWAY FROM THE LEFT SIDE OF THE VAN.
It can be pointed up to the ceiling - or straight ahead with a little slant to the right.
ANOTHER PROBLEM THAT CAN HAPPEN!
When we first got our Roadtrek new, I did not know about setting the Fan speed to HI. I did not want it blowing heavy on us so I would set it to LO. Makes sense, right? Well we got the RT in early Spring. I would run the A/C because it was warm enough inside the RT to need it - but outside it was not that warm. I started hearing a noise coming from the Cool Cat when it was running like marbles in a can being shaken around. It turned out that the noise was ice balls forming inside the Cool Cat and hitting the fan inside and bouncing around. I did not know at the time that this was what was happening.
We took a trip that year in late September and it was warm enough for the A/C at night and it was running when we went to bed. Early that morning I woke up hearing a loud bang - coming from the Cool Cat! And it stopped working and would not turn on again. As it turned out, we were an hour and a half from the dealer we bought the Roadtrek at - it was a weekday and I called them when they opened that morning. They said bring it right now and we will look at it. We did - and they did. They found inside the Cool Cat it was solid ice! They put down a tarp and melted the ice. When they told us it was ready - they said never put the fan speed on LO. If it had been on HI this would not have happened. Lesson learned - I was sure the Cool Cat was a goner - it was fine once the ice was gone. I keep it on HI from then on!
**********
You should know that there are no accessible parts inside the Cool Cat while it is mounted in the Roadtrek other than the filter. If you remove the front grill - held in place with Robertson screws (square hole screws) - there is nothing you can get at inside that is mechanical. The Cool Cat must be removed from the Roadtrek - not a job you want to even consider unless you have a great deal of hands on experience in RV repairs - for any repairs. There is also no built in way to recharge its coolant - that is a closed system. I am told that if the Cool Cat is out a professional A/C shop MAY be able to cut in a port- which does require the Cool Cat to be removed from the Roadtrek - and unless this pro A/C shop is not a RV service shop they are not going to take the Cool Cat out and reinstall it!
What you can do yourself and is easy is change the filter and this does not involve removing a single screw. Here is a link to our article on how to change the Cool Cat filter.
https://roadtrek190popular.blogspot.com/2024/04/removing-filter-from-cool-cat-air.html
As is our new policy - if you have any questions - use the Email Us! link on the right column of the page.


