
The Roadtrek 190 has two fresh water tanks - one in the front located outside under the driver's side and the other is inside in the rear of the passenger side (you cannot see the tank it is not in the living area). The Roadtrek 210 has the same two tanks. The Roadtrek 170 and the Roadtrek's built on Sprinters have one fresh water tank and these are tanks outside the van like the front tank on the 190s and 210s. If your Roadtrek has only one tank, as you read through this disregard what I write that involves the rear or interior tank. The water capacity of the two tanks together is not larger than the capacity of the one tank models. The water is just split between the two tanks. The purpose of this is to enable water use in freezing weather if only the interior tank is used and the inside of the van is kept consistently above freezing. This would also involve putting anti-freeze into the two waste tanks so that they would not freeze. When the Roadtrek is set up for use only with the rear, interior tank - this is called "Winter Mode". When the two tank Roadtreks are set up to use both tanks - this is called "Summer Mode".
I am going to step through all of this so that you can get the water all working. Keep in mind that even though you may have a different plumbing layout, the valves are all the same but in different locations.
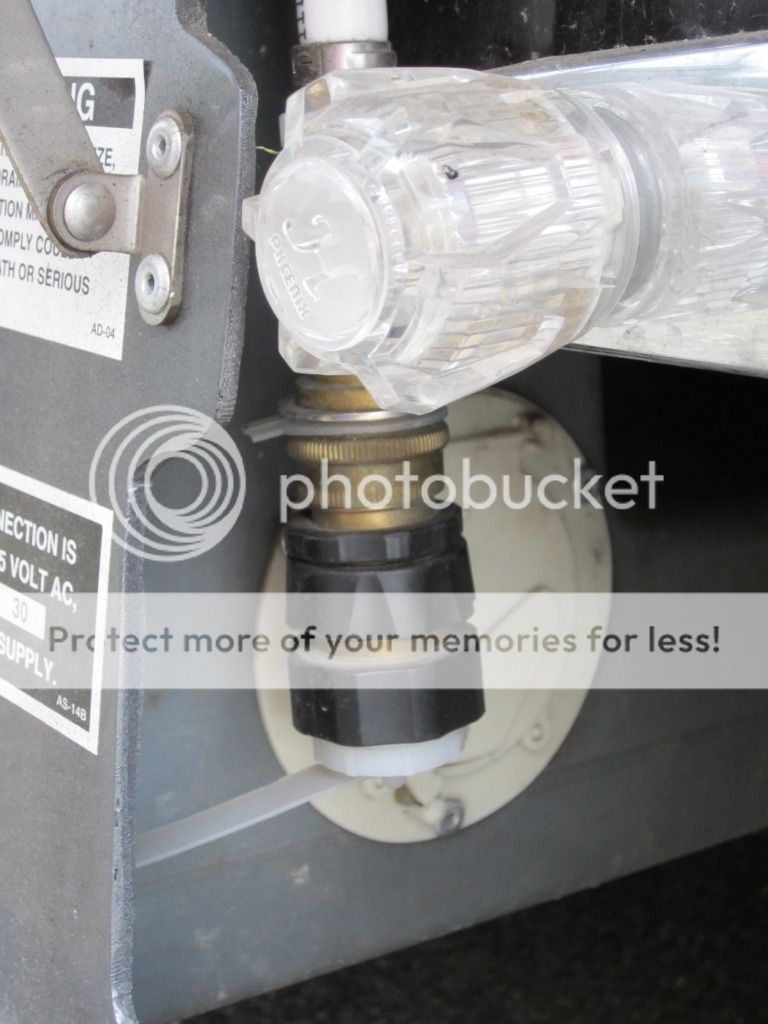
First - we are going to focus on getting everything flowing with your tanks. Outside at the city water valve - turn that down pointing to the ground. If this is open you will draw air into the system so you want it closed. Then - The so-called summer mode requi
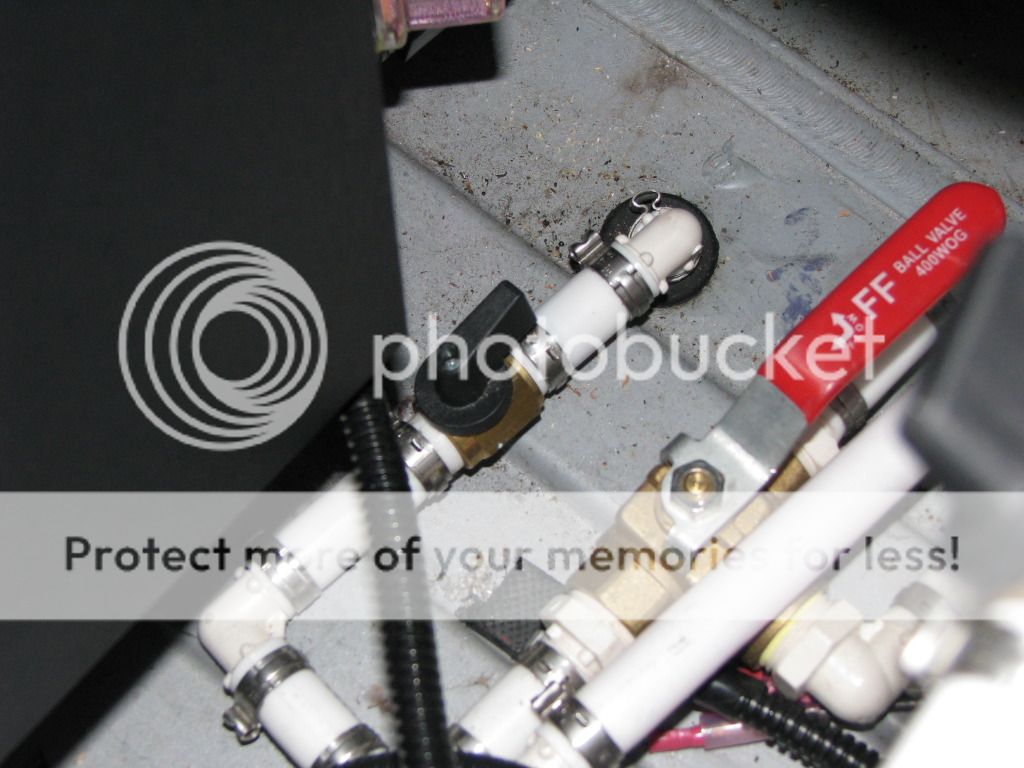 res that two valves be open - one is the red handle valve inside and the other is the small black valve that sits next to it. The little black valve sends water from your rear tank to your front tank. The red handle selects which tank the water is coming out of and you want the water to come from the outside (front) tank. So this handle must be turned so that the handle is inline with the pipe (and not across the pipe). The black valve handle needs to be in line with the pipe also - so that that water from the rear tank flows directly into the front tank. With this you are now set to run water from the two fresh water tanks to all of the faucets and the toilet.
Next - let's get your hot water tank set up. You must have all valves pointin
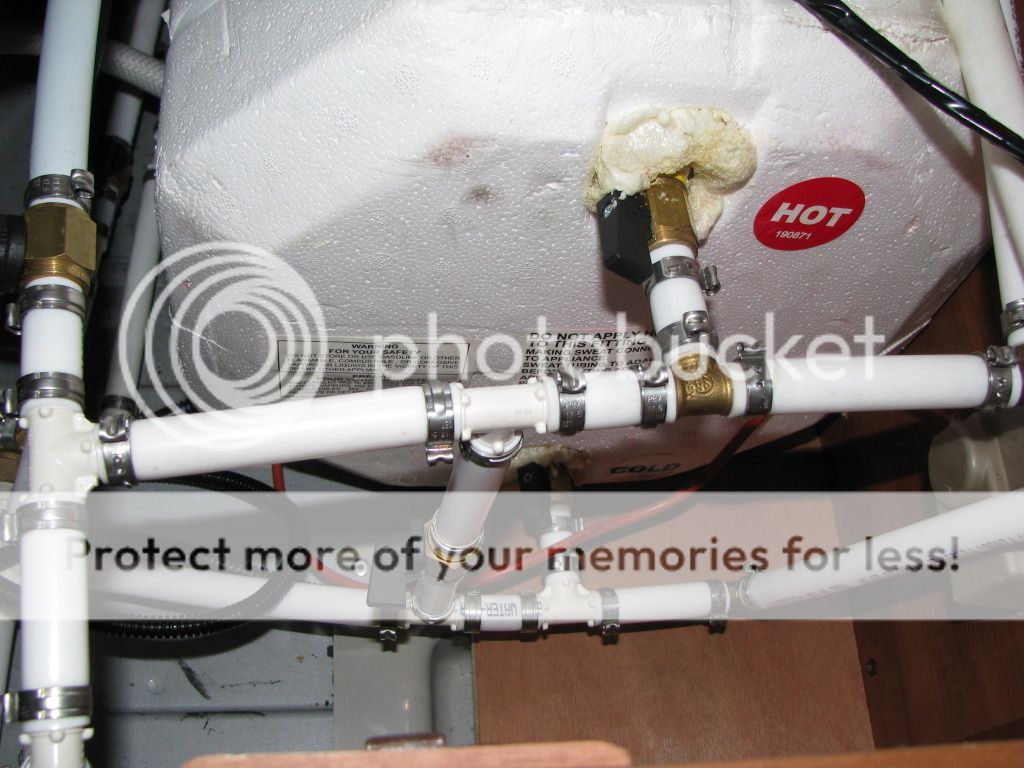 g toward the aisle - they look like they are all pointing the same way - though actually the top and bottom one are open and the middle one is closed. Yes, it is confusing. The top and bottom are open for the water to go into the hot water tank and come out of the hot water tank and the middle one is closed so that water does not flow between the top and bottom pipe (which you only want to happen when the hot water is bypassed). If you read our article on Winterizing you will see what you do to BYPASS the hot water tank for the winter.
You should now be ready to get water through your tanks. Fill your rear tank and your front tank through the door frame holes. Just for the heck of it, make sure your exterior drain valve is closed just to make sure water will not pour out of the tanks when you put water in. My Roadtrek does not have a valve, but has a screw cap. Take off the screw cap and the water in the tanks pours on the ground. My drain is located right under rear corner of the driver's door underneath the Roadtrek. I understand that some Roadtreks have an actual valve to turn -and not all models have the drain in the same location. Look at your panel monitor and you should see two full tanks. You are now ready to go.
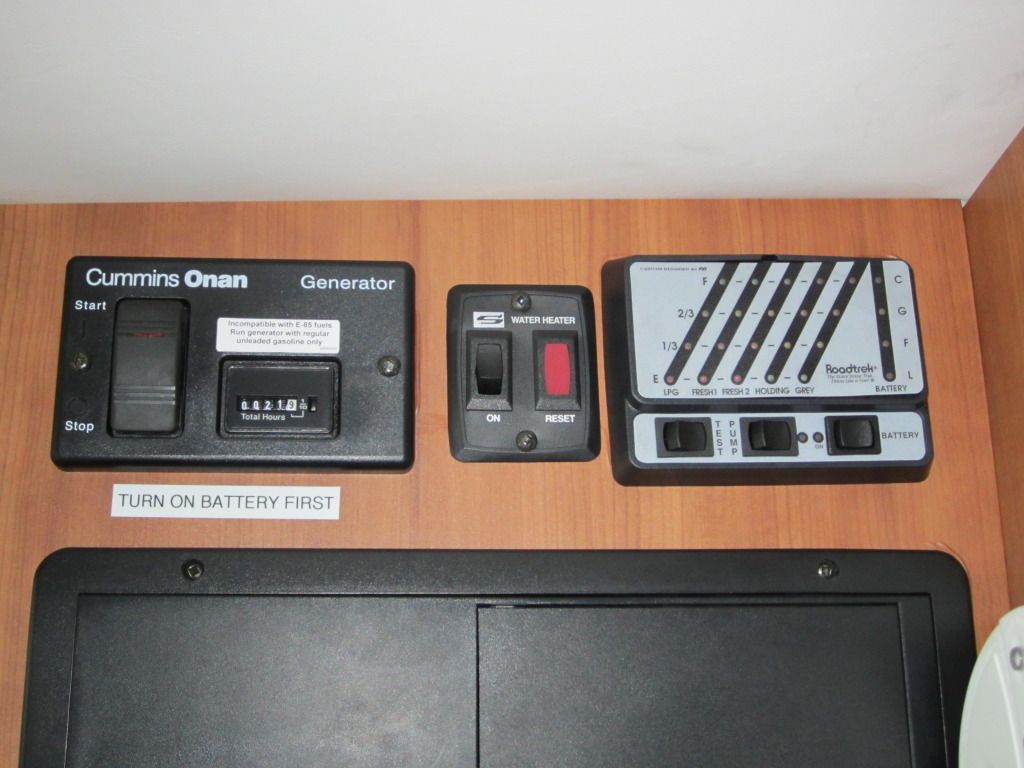
Go inside. Turn on your battery disconnect switch - make sure you have battery power because you are going to need it. Turn on a light just to make sure or you can just push the test button on the monitor panel and you will see the battery level. When the battery disconnect switch is ON there is a red LED light on the switch that comes on.
TURN ON THE WATER PUMP - switch is next to the Battery Disconnect Switch. A light should show that it is on.
Go outside and turn on your Propane. It helps to light the stove for a minute just to see that propane has filled the lines.
Now, open the kitchen sink to cold water, a lot of air will come out and you will hear the water pump start. The hot water tank should fill itself using the water pump and that pump will remain on until it is full even if the sink is off. Give it sometime - it is six gallons going in. After a short amount of time, if you turn on the hot water on the faucet you will get more air and then water coming out - cold water. Do NOT turn on the hot water heater switch YET. Only do so
when the hot water heater is full of water. You will know it is full when the water pump stops running. (You can also know if it is full by going outside, opening the side panel of the van for the hot water heater, open the pressure relief valve on the top (it is on what looks like a faucet pipe) by pulling the silver handle gently towards you and stand back when you do this. IF water is in the top of the tank it will start pouring out. Close the valve right away or you will lose all that water. The pump will come on and refill what you let out. Close the side of the hatch outside the van. Go back inside. If there is this much water in the tank, you can turn on the hot water heater switch - BUT first, turn on your propane (and keep your battery on). You should see the red light next to the switch come on - and it will go off shortly after. If you go outside to that hatch you will hear the burner running and heating the water - this get real hot so don't touch. Even the vent screen outside gets hot.
It takes awhile for the water to get hot - you are heating six gallons of COLD water. Come back in fifteen minutes and you should feel a difference now between the hot and cold water in your sink - even if the hot is not yet really hot. You now have hot water!
And you have cold water. Flush your toilet. Turn on the shower - inside and outside if you want. Water should flow - hot and cold. Try the sink in the bathroom (if you have one - I don't). All should be flowing water on both the hot and cold handles. This is a properly working water system and yours should be working as it is supposed to.
NOW - if you want to run the city water with a hose at a campground. First - TURN OFF THE WATER PUMP. Leave the electric on as you need this for your hot water heater. DO NOT TOUCH THE CITY WATER VALVE OUTSIDE - IT IS IN THE POSITION THAT YOU NEED TO HAVE WATER INSIDE FROM THE HOSE.
NEXT - connect a water pressure valve to your fresh water hose, connect that to the water source - house or campground. DO NOT CONNECT TO A HOSE FOR A CITY WATER CONNECTION WITHOUT A WATER PRESSURE REGULATOR. This is something that is standard to all RVs and I am not sure why RV plumbing does not come with one built in at the City Water connection. You can purchase one for less than ten dollars at any RV supply store and Walmart sells one in their RV section. These limit water pressure to no greater than 40 to 50 psi. There are simple water pressure regulators for sale and their are ones with dials and adjustments. I am sure these more sophisticated ones are better than the simple ones, but the simple ones - just connect the end of the hose to the outflow of the regulator and the water faucet (or anywhere in between if you have other hoses connected to reach your Roadtrek) . The end of the hose that is past the outflow of the regulator is the end that gets connected to your Roadtrek.
You connect the other end of the hose to the Roadtrek city water intake connection. (We use the quick connect that Roadtrek supplied on this connection but you can just screw the hose directly on.
Turn on the water at the campground faucet to full or almost full pressure - the water pressure regulator that you put on the hose will protect your plumbing (again, never connect to city water without one when connecting the hose to the city water inlet).
I have recently learned that inside the Roadtrek in the cabinet where the water valves and hot water tank are located there are two other valves - mine are at the top rear of the cabinet. These shut water off to the outside shower. I have been told by the service tech at the dealer that we should never touch these - and leave them as they are. I have learned that if these two valves are CLOSED no city water will flow into your plumbing! How nice to learn this and now I know why I was told never to touch these. Just leave them on - we winterized with them on and had no problems.
Next - LEAVE THE WATER PUMP OFF - turn on the sink. You should have running water everywhere. If you start with empty water lines you will again get air coming out. If there is no water in the hot water tank it needs to fill again. It will do so from the water pressure alone.
It will fill much faster this way. Again, the water needs to heat so make sure to wait patiently for hot water. Make sure to follow the same directions as above to have hot water.
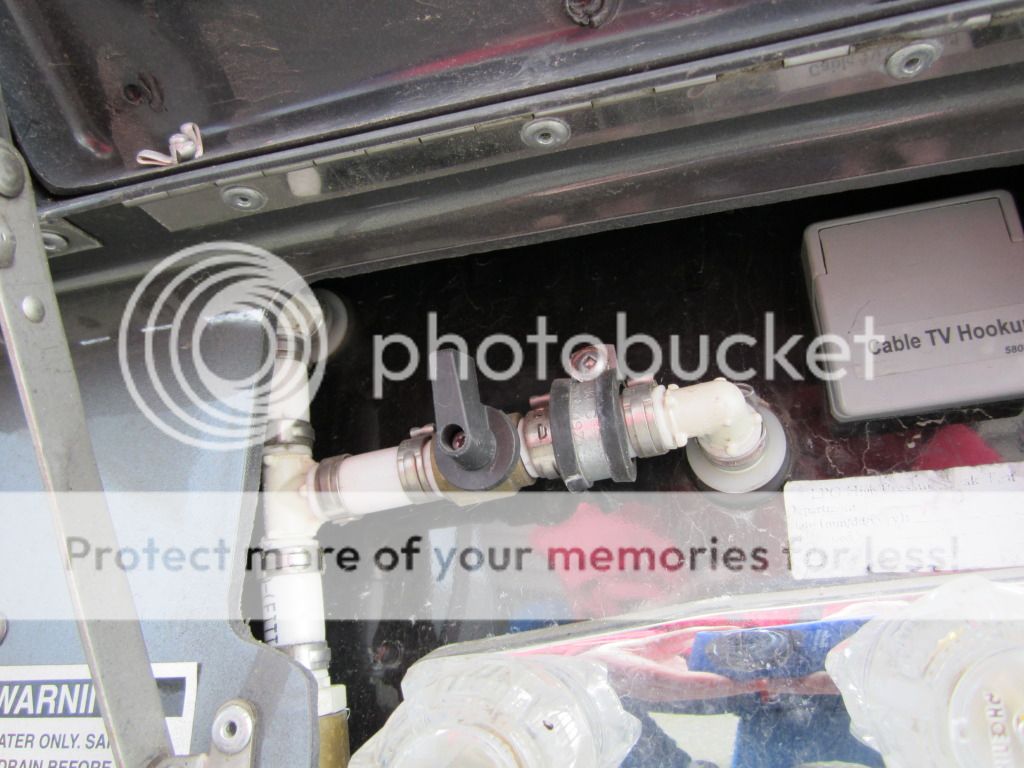
REMEMBER - that city water valve outside is only pointing in line with the pipe when you want to use it to fill your fresh water tanks. Basically - forget about it. Set it pointing down and leave it that way and fill your tanks with a hose put into the holes in the two door frames. There is a way to fill your water tanks with the city water hose connected to the same place by turning that valve but it is just as easy to fill your tanks one at a time through the holes plug in the door frames. Every time we have tried to use the city water inlet to fill the tanks we have had problems.
This is it. If you follow these steps you will have flowing hot and cold water when you need it.
ADDENDUM:
If your water pump runs continuously and does not shut off there is a leak somewhere on the intake side of the water pump or a blockage or the City Water Valve is set to FILL or the water filter that is attached to the water pump on the intake side - between the pump and the fresh tank - needs to be cleaned out as the gunk in it is blocking the water from getting to the tank. The pump runs and does not stop because it is sucking for water and getting air.
If the water pump stops and stops, starts and stops over and over and does not stop, there is a leak on the outtake side of the plumbing from the pump. The water pump senses the need for water somewhere - the leak - and wants to send water there - a small leak or drip and it starts and stops with a longer space between repeats. If there is a big leak it keeps starting and stopping faster. First thing to check is that all faucets are closed tight - including shower handles inside and outside. Also if the toilet valve is leaking this will happen. If it is not a faucet handle - check everywhere for water dripping.
IN BOTH OF THESE SITUATIONS SHUT OFF THE WATER PUMP!
ALWAYS SHUT OFF THE WATER PUMP IF YOU ARE NOT INSIDE THE RV.
Added information - the exterior water tank (the one in the front) is 14 gallon capacity. The interior water tank (the one in the back) is 11 gallons capacity. Total fresh water capacity is 25 gallons BUT you can add an additional 6 gallons of fresh water by filling the hot water tank and then adding back to the other tanks.
ReplyDeleteDid you get my message about the macerator hose that was drooping down? Thanks for your detailed information. Just curious, why did you find it "necessary" to have the Roadtrek?
ReplyDeleteYes, I got it and it just got published - we were out all day. As to why we have our Roadtrek, please see this article -
Deletehttp://roadtrek190popular.blogspot.com/2011/03/why-rv.html
It explains all!
I just purchased a 2004 Roadtrek 190. I have spent hours with the water system but find that the summer valve position only feeds from the front tank. I do not see the 2nd valve (the black one) pictured above. The winter position only draws from the rear tank as the manual explains.. Am I missing something?
ReplyDeleteIt is possible that the 2004 190 had a different water configuration, but it makes no logical sense that there would not be a way to set the two tanks for use one flowing into the other as there is in later 190s (and 210s). See our article entitled "Summer Mode/Winter Mode" - http://roadtrek190popular.blogspot.com/2013/02/summer-modewinter-mode-two-water-tanks.html
DeleteThis shows and explains the summer mode/winter mode valve positions better - there may be a valve that is located differently to enable flow from the back tank to the front tank that you may have to locate on your own or find out its location from another 2004 190 owner - if doing what is possible later is possible in the 2004.
What sort of problems did you have after a city water fill and how did you resolve them? What happens if you neglect the water pressure regulator when hooking up to city water? Mea culpa.
DeleteWe have not really had problems after a city water fill. Filling two fresh tanks this way - the 190 has two fresh tanks - takes a long time - and the back tank seems to take forever. When the system is overfull when filling from the city water connection, the excess will shoot out the rear tank overflow drain which brings the water down over the rear passenger tire to the ground.
DeleteThe WATER PRESSURE REGULATOR is very important. It reduces the water pressure from the spigot down to about 40 psi. More pressure than that and you run the risk of bursting pipes and breaking valves - the toilet valve in particular as this is a mechanical part that flows water into the toilet when you step on the pedal. IF you have not used a water pressure regulator - once - chances are your plumbing is fine. You would know pretty quickly as water would be leaking somewhere. If all is dry you lucked out and nothing is wrong - but don't gamble that all will be well the next time that you don't put on a water pressure regulator. Connect it to the hose - at the spigot or between two hoses if you need two hoses to reach the city water connection. There is not enough room to put it directly on the city water connection - my city water connection points down and putting a water pressure regulator directly on it would come do close to the ground you could not put a hose on the end. They are inexpensive for a basic one. You can buy on in the RV section of the auto dept in Walmart. Get a brass one rather than the plastic one. A better one can be found in RV shops or plumbing supply shops that has a pressure gauge on it and some have a knob to change how much pressure can be allowed to pass through.
I have a leak under the sink on my 190 popular (2004) after connecting to city water ( no pressure valve) it does not leak when using the tank although the pump runs continuously while tap is running. How do I find the problem?? Any help would be good
DeleteBy connecting a high pressure water hose to the city water line without a water pressure regulator you burst one of the pipes, a pipe junction, or one of the sink faucet valves. The leak must be small if the water pump's limited pressure is not enough to show the leak - but the break is still there - causing the pump to keep running more than it would with the sink tap on. The way to find the leak is to have water pressure high enough ONLY in that general area of plumbing to show the drip and locate the source. You DO NOT want to do this by attaching a water hose to the city water line again without a water pressure regulator as you stand the chance to burst more plumbing in other locations. This is something that an RV shop needs to troubleshoot - perhaps by taking apart connections and having pressurized water go through just that section. I would NOT recommend doing this on your own or you may find a much bigger repair will be necessary if you do. And get yourself a water pressure regulator - less than $10 at an RV shop or Walmart in the RV section of the Auto Dept. Get the brass one and not the plastic one.
DeleteHi - I have done each step as indicated above yet my water is now running. Both tanks are filled - valves are in the right place. Propane is on batter switch is on and pump is on. I have opened the faucet in the sink and a few drops come out now and then. Also, if I turn the faucet off for a while and then back on it will run but will stop shortly after, as if it just drained something. Any suggestions? Thanks!
ReplyDeleteIt sounds like your City Water valve is set to FILL - with that valve in Fill position - no water runs inside with the pump or with city water. Turn your city water valve the other way and see if this helps. Contact me through the Contact Us link on the side of the page by email and we can troubleshoot together more directly. Try this and email me if it does not work.
DeleteMy reset button is red for the water heater. Does anyone know how to reset it?
ReplyDeleteHere is a manual link for the Suburban Hot Water Heater. https://www.google.com/url?sa=t&rct=j&q=&esrc=s&source=web&cd=6&ved=0ahUKEwiyi7f_xqnOAhUIeCYKHYipAXMQFghCMAU&url=https%3A%2F%2Fwww.rexandsonsrvs.com%2Fmanuals%2FSuburban_Water_Heater_Service_Manual.pdf&usg=AFQjCNG_28jApoj5qcJuig-IvSd8SiZirw&sig2=74eCf5l0FohKWa--6iZHqw&cad=rja If you shut off the hot water heater button does the red light on the reset go out? Try pulling the fuse in the fuse panel for the hot water heater and then putting it back again. As I understand it the reset is a thermostat that shuts down if the temperature goes to high. Are you absolutely sure that there is water in the hot water tank? Make sure that your hot water bypass valves are in position to fill the tank. If that tank is empty and you turn it on you will trip the reset - and can ruin the hot water heater. If all else fails, you may need to have the reset unit replaced - which is apparently not a big job. Take a look at the manual linked here about the reset switch. It is normal for that light to go on when you turn on the hot water heater switch - and then it should go off soon after. This is a gas unit - not an electric and gas and not an electric only unit - as will be seen in the manual which is for three different types of units. It ignites itself when the on button is turned on. Are you sure that your propane is on - and that there is propane in all the lines - light the stove first to make sure. Most important - and I say this again - make SURE that there is water in the hot water tank.
DeleteTo get this link to work - copy it and paste it into your browser's address box - where URLs go. Then hit enter. It will open a window to download or view a pdf file which is the manual.
DeleteI just bought a 2004 roadtrek anniversary edition and I have been reading your posts vigilantly. today I made the back bed into a full on bed so my 17 year old dog could be safe and not fall in the center. the smell of mold an hour later coming from under the bed nearly knocked me over he has been hacking for the week we have been camping. WHAT the heck so I look and pull the door to where the hot water tank is under the driver side bed and the smell nearly knocked me over. We are both auto immune and ill from mold in our home the whole reason we bought it in two months I have replaced the three upper windows that the last owner used silicone and the water was running in. He did not take good care of my baby and now i Have a serious issue do you know should I turnt he hot water tank off and seal up the compartment? It reeks of mold and the tank is hot. I do not shower or use the sink in the RV thanks so much
ReplyDeleteFrom what I know about mold, just turning off the hot water tank and then sealing up that cabinent is not going to do anything. All the water goes through that cabinet. If you hot water tank is actually leaking you can bypass it with the winter bypass valves, but there are opening for pipes to come through their and you are going to have to deal with the mold. Since you are aware of taking care of mold in your home, you need to go to a pro that eradicates mold and completely have it removed. Then take your new to you Roadtrek to an RV center and have them check for leaks and have them all sealed properly. Then you are starting off fresh and healthy in your RT. I am guessing that you did not have your Roadtrek professionally inspected by an RV Tech to look at all systems and for any problems inside or out. You would have known before purchase about this rather serious problem. Don't risk your health - have it fixed right. If no leaks are found in your hot water tank - sanitize your entire water system - bleach and water going through your fresh tank(s), hot water tank, all pipes, and plumbing fixtures. See my dewinterizing article for how to do this. But still get it to an RV service tech and a mold pro.
DeleteThank you so much for your very informative blog! I just bought an immaculate 2004 Roadtrek210 Wide Body Popular two months ago with just 68K and the Onan Generator only had 127 hours on it. I just de-winterized it. I sold my older Roadtrek 190 Popular before I bought the " newer" ( For Me) Roadtrek. The water heater procedure for filling it up and other functions are way different between the two Roadtrek Models. Thanks to your article, I now figured out how to fill my hot water heater with water! It drove me nuts for days to figure it out. It didn't really explain if fully and clearly on their manual. Thanks again!
ReplyDeleteGlad that we could help! Take a look at our specific article explaining how the hot water heater system works from April 2016!
DeleteHelp! We are borrowing my parents 2007 Popular 190. We have owned bumper pull trailers in the past, so my husband has experience. We could not get water to work with the tanks or with the city water connection. With the city water on, we began to have a leak inside the trailer where the valves are. A piece of plastic with a mesh insert had broken. Can you help us?
ReplyDeleteThe piece of plastic with the mesh insert is part of the top dome of the filter that filters water coming from the fresh tank to the water pump. This is a screw on top of the filter. If this is off when using the water pump you will have a leak, the pump will not turn off on its own as is is sucking air and not water from the tank, and no water is going to flow from the fresh tank. This explains why you cannot use tank water. My suggestion about city water is go and look outside at where the hose connects to the city water connection. There will be a valve there. In one position the valve allows the city water to flow into all of the plumbing (no water pump turned on). In the other position this valve sends city water to fill the fresh water tanks. Make sure that this is positioned so that it is set to send water into the plumbing and not to fill the tanks. I can't tell you what position that is on a 2007 190 as Roadtrek has varied that valve over the years - but there is always a valve out there for this function. ALSO - regarding using the tanks - You have two fresh water tanks - one inside and one outside under the van. Go to my article called Summer Mode/Winter mode to see how the valves for the water tanks must be set to have water flow in the pipes. There will be a chart in that article with the positions for tank settings. ABOUT THE FILTER mentioned - the filter is in a junction between two pipes right before the intake of the water pump. The filter is standard to this water pump's manufacturer's pumps - go to this link to see what the filter looks like - I used the same filter for this different application - http://roadtrek190popular.blogspot.com/2014/05/adding-filter-to-toilet-water-line.html
DeleteI have read your article on the water system & have gleaned good pointers. Thank you. I am having a problem, though, and can't figure out why. I am connected to city water & my city water valve is in the vertical position, but my external water tank continues to fill & the excess water drains out the hole in the orange plug in the driver's door. Is this indicating a defect in the city water valve?
DeleteCarol Ann - there may be nothing wrong with your city water valve other than it is in the wrong position. Turn it horizontal and see if that solves your problem. The City Water Valve has been changed by Roadtrek over the years - some years it has to be turned vertical, some years it has to be turned horizontal. Some years the color of the valve handle is red and some years the valve handle is black. The colors and positions have no consistency. It is very possible that vertical for your valve means that is is set to fill the tanks. The reason the water is coming streaming out the fill hole in your door is that it is overflowing from all of the water going into it from the city water line. Turn the valve the other way, turn on the hose, leave the water pump OFF and go inside and see if the water flows from the faucets - and is not longer overfilling your fresh tank. Now, if the problem happens with the valve in both positions then there is a defect in the valve. Any RV shop should be able to replace that valve for you. BUT - I suspect - as I say, that you have nothing wrong with the valve but your year Roadtrek needs the valve in the horizontal position to let the water flow to the plumbing and not fill the tanks.
DeleteHi All, this article was a lifesaver! My wife and I recently bought a 2007 Roadtrek Popular 210. On our first outing we connected to city water and we had no water inside the vehicle from sink, toilet or shower. After hours of research and reviewing the Roadtrek manual we had NO resolution. After finding this article, we discovered that you must have the two small black valves turned on ( inline with the water pipe) that are located inside the vehicle in the left rear storage area where the water pump is located. If these two valve are turned off (as they were in our vehicle without our knowledge) you will not have water flow throughout your vehicle.
ReplyDeleteHi there. I have acquired a 2015 Popular 210, and reading the above, about the hot water tank, "Go outside and turn on your Propane. It helps to light the stove for a minute just to see that propane has filled the lines"...I am a little confused. Go outside where? Thank you! Also...what about never using the hot water tank and simply using the stove to heat water for washing dishes? (Is the hot water tank really mostly about showering?)
ReplyDeleteIt is easiest to look at the article on propane - but - go to the back bumper. In the middle of the bumper under the license plate there is a cover with two white clips - one on each side - turn the clips and remove the cover (don't lose it). Inside is the propane tank and the propane knob to turn the propane on. Turn the knob slowly to the left - left (counterclockwise) is ) ON, Turn it all the way until it stops - don't overturn it as you have to be able to shut it off later. This is also where a propane supplier will connect the hose from his tank to the Roadtrek propane tank to fill it when it needs filling. Put the cover back on and turn the clips to hold it on. Go back inside the RT - wait a few minutes to give the propane a chance to fill the propane pipes inside. Then go to the stove to check that the propane has filled the system. Open a window (this helps the stove light) and with a match or lighter or a long reach lighter (best option) there is a tiny copper or brass pipe that sticks up from the side of each burner. Press the handle for the burner down and turn and light the lighter and put the flame at the tiny pipe and light the burner. It will go whoosh and the flame will circle the burner. Stop pushing down on the knob and adjust the flame to a usual height. Do the back burner first to not have to lean over a lit burner in the front to light the one in the back. Next do the same with the front burner. Both burners lit - shut them off. There is propane in all of the propane pipes - because the stove is the last propane appliance on the pipeline. The hot water heater is the easiest way to have hot water for washing hands, washing dishes, or showering. If you want boiling water for cooking, coffee, tea - either boil water on the stove or fill a microwave safe glass cup (measuring cups are good for this) in the microwave and boil water with the microwave. The hot water tank water is not hot enough for coffee, etc. as it would burn you when washing, etc. The hot water heater needs propane on. It self-ignites when you turn it on with the switch on the wall - no matches or lighters - the igniter and flame are outside inside the vent that is in front of the hot water heater. The furnace also needs propane and also self-ignites when you turn it on. Hot water heater. stove, and furnace and the fridge set on propane are the three propane appliances. Before you drive - go back to the back bumper and turn off the propane knob - turn to the right clockwise - all the way. It is dangerous to drive with the propane on inside the Roadtrek. Set the fridge on DC when driving and it will keep cold with your batteries - and since the engine charges the batteries as you drive - the batteries will be full when you get to where you are going. So the hot water heater is for anything you want hot water for - except cooking (as it is not boiling water).
DeleteHi, me again--I'm finding it so hard to wrap my brain around the differences between boondocking and being hooked to city water & power! Main Q: is the water pump only for boondocking? Is there any need for it when hooked up?? Thanks!
ReplyDeleteFirst - Boondocking - the Roadtrek is out in the middle of the woods or overnight with you in it with no place to hook up to anything. The opposite is the Roadtrek is in a campground site that you pay to stay in and in your site you can plug into electricity (110 volts AC - just like in your house, you can connect a hose (if you want to) to the site water spigot - and in some sites you can connect to a cable TV connection from the Roadtrek to watch cable supplied TV. Next - if you want to use the water from your fresh tank in the campground you do not connect a hose to the spigot in your site (connecting the hose is connecting to "city water"). Anytime you want to use water that is in your fresh tanks (that you have filled before you left or when you got to the campground) you must turn on the water pump which pumps the water out of your fresh tank(s) into the plumbing of your Roadtrek and into the sink, showers, or toilet. If "boondocking" there is no spigot to connect a hose to SO - if you want water in the sink, shower, or toilet you must turn on the water pump and get the water from your fresh tank(s). If you are in a campground and do not want to use the water from your fresh tank(s) - you can connect a fresh water hose (a white hose that is marked as drinking water safe or for potable water - meaning there is no lead in the metal connections on the hose) to the spigot in the campsite. You then do not turn on the water pump - the pressure of the water from the spigot will push it through the Roadtrek plumbing to the sink, showers, and toilet. In a campsite why choose one over the other? Here is why - if you use the water from your tanks, if you are taking the Roadtrek out of the campground each day to go sightseeing - you have one less thing to unhook and put away each morning - THE HOSE, and get out when you get back at night and hook up again. We fill our tanks AT HOME before we leave on a trip. I know that the water in the tank is from the water in my house. I have no concern that the water at the campground came out of a well, does not taste good to us, etc. When we have hooked up a hose to 'city water', I put a carbon filter on the hose - found in RV stores and also Walmart in the RV section of the auto aisles. The filter filters the water from the campsite into my tanks when I am refilling the tanks at a campground. One important thing about connecting a hose to city water - you MUST put a water pressure regulator that limits the water pressure coming into the Roadtrek plumbing from the hose to 40 psi and no higher. High water pressure will burst the pipes in the Roadtrek. The water pressure regulator also can be found in an RV accessories store or again - Walmart in the RV section. A simple one to get is the brass Camco pre-set RV water pressure regulator. If you would like to discuss this with me easier use the Email Us link on the right column of this page and we can interact back and forth easier.
Delete