Roadtrek

Roadtrek
Showing posts with label fresh water. Show all posts

Wednesday, May 26, 2021

THE WATER PUMP KEEPS RUNNING!

The water pump is what pumps the water from your fresh tank(s) into the plumbing in the Roadtrek. THE water pump is 12 volts. It uses the coach battery(ies) to work. Before you turn on the water pump you must turn on the battery switch. 

Normally, when you turn on the water pump switch on the wall inside the Roadtrek you will hear the water pump turn on and then shut off right away. It should stay off until you either open a faucet handle, a shower handle, or flush the toilet. Then you will hear the water pump start to pump water to the faucet, shower, or toilet.   It will keep running - as it should - until you turn off the handle to the faucet or shower, or take you foot off the flush pedal on the toilet. Then the water pump shuts off and waits for the next open faucet, etc. There is a sensor in the water pump that starts the pump when there is a demand for water.  If your hot water tank is empty and you fill your fresh tanks, the hot water tank will fill the first time you turn on the water pump and open a hot water faucet handle.  What will happen then is the water pump will start and it will seem like it is running for a long time. First any water left in the sink hot water pipe will come out (cold) and along with it a burst of air. That burst of air is the water pump starting to pump cold water into the hot water tank to fill it and the air it is displacing in the tank is coming out through the open sink hot water side. The hot water tank holds 6 gallons of water and it takes awhile to pump that much water into the tank - and it must fill the tank. This is all normal and with an empty hot water tank being filled the wait for the water pump to shut off is normal. When the water starts coming out of the faucet steadily the tank is full and then you shut off the hot water handle and the water pump will shut off.  (Never turn on the hot water heater switch if there is an empty hot water tank - you will burn out the hot water heater. Wait until the hot water tank is FULL! -And it take awhile for the water to heat up - 6 gallons is a lot of water to heat.)

If something is wrong , however, the water pump might run when it shouldn't. First, understand that to for the water pump to run - correctly or not correctly -  THERE MUST BE POWER TO THE WATER PUMP  - SO - if the water pump wall switch is OFF - the water pump will be off and stay off. There are two things that you might find happening.

1) The water pump runs and runs and does not shut off.

2) The water pump runs for a few seconds, shuts off, starts running again, and repeats this cycle of runs, shuts off, runs, shuts off - and keeps doing that. 

 Each of these happen under different issues with the plumbing.  

Let's look at #1 first.  If the pump runs continually - not run, stop - run, stop - then there is a problem between the tanks and the pump.  This means the problem is on the INTAKE side of the pump. The pipes to the fresh tank(s) are on the intake side of the water pump. (Note - this does not include the hot water tank. The hot water tank is on the OUTPUT side of the water pump.) With the tanks in summer mode or in a one water tank Roadtrek, this means that the problem is between the exterior fresh tank in the front of the bottom of the van and the water pump. If a two fresh tank Roadtrek is in WINTER Mode - which is set to have water come from the rear interior tank directly to the water pump - then the problem is between the water pump and the rear interior tank plumbing. (See our article Summer Mode/Winter Mode to understand what this is.) 

What then should you do or look for? 

SHUT OFF THE WATER PUMP SWITCH - that cuts off the power and stops the pump while you try to diagnose or fix the problem.

 This can be caused by as simple as a dirty filter on the water pump or more complicated a kinked pipe or something blocking the fresh tank output - or, again, simple - the fresh tank is empty. 

 The filter is the first thing to look for. Go to the cabinet with the water pump and look around for a black connection in the pipe going into the water pump intake side. In the middle of that black connector on top of it there is a clear/whitish flat topped dome. That is the filter. Here is a photo of what to look for:


THERE ARE OLDER ROADTREKS THAT HAVE THE WATER PUMP FILTER ON THE OUTSIDE AND UNDER THE VAN NEAR WHERE THE FRONT EXTERIOR FRESH TANK LOW POINT DRAIN IS ON THE PIPE COMING OUT OF THE TANK AND HEADING INSIDE THE VAN TO THE WATER PUMP. IT MAY NOT LOOK ANYTHING AT ALL LIKE THIS AND YOU WILL HAVE TO LOOK UNDER THE VAN TO SEE WHAT IS THERE. SO IF YOU DO NOT FIND THE ABOVE IN YOUR ROADTREK NEAR THE WATER PUMP IT IS OUTSIDE. 

In my Roadtrek this is connected to the winterizing valve that I had installed to pump RV antifreeze directly into the water pump for winterizing the plumbing in the Roadtrek. This is what it all looks lime in my Roadtrek 190 - yours will not have the brass valve on the right side of the filter. It will have a white PEX pipe connected to that side that comes from the water tanks' connections. The pipe on the other side, not seen in this photo goes into the water pump. What you do see in this photo when compared to the photo above is that with use, the dome turns a milky white in color.

Shut off the pump. Open the sink to clear any water out of the line. Opening the filter will pour out some water so put a towel under it. The dome screws off. 

Inside around the inside edge there is a metal screen that goes all around. That metal screen pulls out. Do this where you can flush this all with water - and not let what is in the filter go down any drain - in the RT or in the house. Clean the metal screen and clean the inside of the dome. Look into the hole left open where the filter was and see if there is anything in there that is blocking it. Get this all clear of any debris that was inside (nicely filtered out as it is supposed to do -  yes, this gunk was in your fresh tank) and put the screen back into the dome.  Take the dome with the screen inside and screw the dome back on the filter base. Just that dome being loose can cause the pump to do this too. The pump is sucking air and that is why it runs and does not shut off unless you shut the pump off with the switch and putting the pump back on will start it doing it all over again.

We had the problem - and a pipe was kinked. This happened when the Roadtrek was about 6 months old new.  How did that happen? We don't know. We took it to the Roadtrek service and they cut the kink our of the PEX pipe and joined a new piece of PEX pipe to rejoin the pipe. 

 A kink or blockage or leak could happen anywhere in the pipes going to the fresh tank(s). A hole in a pipe from the fresh tank(s) will also cause the pump to suck air. If the pump sucks air it continues to run and not shut off.  The pump will keep running unless you  or an RV service technician fix it. AND while the Roadtrek plumbing is fairly basic, if you are not experienced with plumbing or have never worked with PEX pipe before, take the Roadtrek to an RV service shop to deal with this problem. 

The lucky solution is that you find that the filter was clogged or you thought the fresh tank had water in it and it was empty (or your summer/winter valves were turned the wrong way). 

Now, let's look at #2. The water pump runs, shuts off, runs and keeps doing this - always shutting off a little in between. 

What then should you do or look for?

If the pump was running and stopping repeatedly that is a leak on the output side of the water pump and that can be as simple as a clogged sink faucet end tip screen or a faucet handle that is not closed all the way. Those are the easy to fix things you hope to find. 

SHUT OFF THE WATER PUMP SWITCH - that cuts off the power and stops the pump while you try to diagnose or fix the problem.

The sink faucet is just like any that you have at home. There usually is a screw off tip at the end of the faucet where the water comes out into the sink. Inside that there is a small round screen - sometimes it is a plastic disk with holes in it. Like the pump filter this also stops gunk from the pipes going into the water coming out of the sink. If this gets clogged. water wants to flow - and doesn't. Unscrew the tip of the faucet and clean the screen. Screw it back on and hope for the best. The water pump when you turn it on now should act normally - run for a few seconds and stop - and not start again until you want it to. 

If the screen was not clogged and you still have the problem, the next thing to do is go to every faucet handle - shower handle (inside shower and outside shower) - check the toilet that there is no water or dripping into the toilet - and close the handle tight. If the handle was open even slightly it will cause the water to drip - you may not even notice the drop - but the water pump does. It senses some handle is open and it wants to make you happy and send water there. of this is the problem, tightening down the handle will stop the water pump from starting,stopping, and keep doing that. 

Worse cases - 

1) There is a leak in a pipe on the output side of the water pump somewhere in the Roadtrek.

2) There is a loose pipe connection between two pipes or a pipe and a plumbing fixture.

3) The toilet valve is broken and is leaking. Look around the toilet on the floor. If you see water it is likely coming from the toilet valve what is broken. The toilet valve is located on the back of the outside of  toilet under the rim against the bowl on the left side facing the toilet. This happened to us TWICE - once the valve had to be replaced and the second time the valve was able to be repaired - both times by an RV service shop. How did we know? The pump was running, stopping over and over. I went looking and found water collecting in the aisle in front of the toilet. The water was dripping from the valve and coming down from the toilet and found its way to the floor. We shut off the water pump and since we were in the Roadtrek we had no choice but to turn the water pump on when we needed water and shut it off right away to avoid flooding the floor which by then was covered in towels. 

WHAT HAPPENS IF NOTHING WORKS OR CAN BE FOUND TO EXPLAIN #1 or #2?

The water pump may be broken. Like any other appliance it wears out over time and needs to be replaced. It is also possible that the sensor inside is broken. Some might take the water pump apart and find parts to fix it themselves. Many - who are not so skilled or inclined - will take the RV to an RV shop and let them replace the water pump. I know there are many skilled who own Roadtreks that can do these things for themselves  - but like you and me, who do not have those skills and who need articles like this to figure out what might be wrong and they might be able to do - or not do - take it to an RV service shop to fix. The Roadtrek uses PEX pipe for its plumbing. This is pipe that is joined together using crimp connectors - not glued together like PVC pipe or welded together like copper pipe and mostly not screwed together. PEX plumbing work requires special tools to work with the pipe and the crimp connectors. 

Also do not figure that you will just shut off the water pump and connect to city water. If there is a leak, a broken toilet valve, a broken pipe - is is going to leak more connected to city water. 

And speaking of city water - if the city water fill valve is turned to fill - the water pump does not work and even city water will not flow into the plumbing.(But we have an article all about that!)

How does the water pump know to run when a water faucet is opened? The water pump senses a drop in pressure and sends water to increase the pressure in the pipe - and it comes out of the faucet.


HERE IS TO HOPING THAT IT IS ONE OF THE EASY FIXES THAT YOU CAN DO YOURSELF! 

😍


Thursday, July 23, 2020

CITY WATER CONNECTION AND THE INFAMOUS CITY WATER FILL VALVE

One of the most asked questions that comes up with Roadtreks is, "I have no water running in the sink, showers, or toilet. My fresh tanks are full, and no water is coming out! Why?" Just about 95% of the time the answer is the City Water Valve is set in the wrong direction. After reading this article you will understand all about the city water valve and the city water connection.


The city water valve and the city water connection is located on the driver's side of the van in the small compartment under the flip up door. Unlock that door and you will find it. In the photo below - here it is open on my 190.


This is what you will see when you look in -


BUT WHAT IS CITY WATER?  -  City water is water connected by a hose to a water spigot that is attached to a city water system's water (or a country well).  It is fresh drinking water that you will use in your Roadtrek to drink, wash your hands, shower with, or wash dishes.  It is just one of those terms in "RV Speak". 

On the left is the CITY WATER CONNECTION. This is where you connect a fresh water hose (white hose rated for drinking or "potable"water) with the other end of the hose connected to a fresh water spigot - either at a campground or at home.  We will talk about the city water connection first.

Before connecting a hose to the city water connection you MUST put a WATER PRESSURE REGULATOR on the hose. A water pressure regulator limits the pressure of the water that will flow into the pipes in the Roadtrek (or any RV).  There are different types of water pressure regulators and some have a pressure gauge on them, some have a valve to change the water pressure flowing through it, some have both a valve and a gauge, and some are preset at the factory and cannot be changed.  Below is one made by Camco and is easily found - many Walmart stores sell this in their RV section in the auto parts aisles.  This one is preset to  40 pounds which is a safe pressure for water in the Roadtrek and it sells for about only $10. Camco makes another version of this same one that is all plastic - blue plastic. I do not recommend the plastic one. Get the brass one if you are getting the Camco.


Because of the low clearance to the ground in the Roadtrek I find that this cannot be attached right on the hose connection on the Roadtrek. I attach it to the other end of the hose at the spigot. If I am using more than one hose I put it between the two hoses.

Let's look closer at the water connection on the Roadtrek.


There it is circled in red above. My city water connection came from Roadtrek with a quick hose connector. Both sides are seen in this photo - top and bottom. If you do not have one, Camco also sells these made for fresh water connections for RVs. To attach a hose with one of these you move the middle black ring and the bottom section will pull out. You screw that piece to the end of the hose. Then you push the connector and the end of the hose up into the bottom of the top half of the connector and the middle ring should pop into place and lock the two together with a "watertight" connection. (I put watertight in italics because this is not always water tight and can leak slightly. ) This makes it easier than getting down on the ground and screwing the end of the hose straight up into the base of the connector without the quick connect.  You do not have to use a quick connect. At the bottom of the connector in my photo you see a white ring. That ring is the side of a cap what we bought in Home Depot that fits the hose end of the connector and we keep that on when we do not have a hose attached to the Roadtrek. This keeps bugs from crawling into the connector and up into the pipe.

Once you have your hose connected, turn on the spigot outside at the other end of your hose to start water running to your Roadtrek.

NEXT - the more important part of this whole thing-

THE CITY WATER VALVE


In the photo above, circled in red is the CITY WATER FILL VALVE.   Over the years Roadtrek has played with this valve for some reason from years to years -  I have seen this valve handle in red color. I have seen this valve handle  in yellow color. You can see in my 2011 Roadtrek the valve handle is black. What is worse is that Roadtrek has changed the direction this valve must be turned in to select one of its TWO functions.

FUNCTION ONE - 

TO FILL THE FRESH TANK(S) WITH WATER FROM THE CITY WATER HOSE CONNECTED TO THE CITY WATER CONNECTION.  This is a second way to fill your fresh tanks. The other way is to use the city water fill holes in the driver's door frame and for the rear interior tank - if you have a 190 or 210 - the fill hole in the passenger side cargo door in the back's door frame.  I will share that I have found that using the door fill holes is much better than using the city water connection.  If you are in Summer Mode with a 190 or 210 - which generally is the best way to set your two fresh tanks (SUMMER MODE/WINTER MODE) - when filling the two fresh tanks with the city water connection the back tank will be filled first - and then once full it will start sending water to the front tank through the small pipes inside the Roadtrek (much smaller than a fresh hose) and this can take forever - if the front tank fills at all. If the water from the hose is running faster than the interior tank can move water out the interior tank will start to push water out of its water overflow valve which will pour water outside the van (thank goodness!) onto the ground just behind the passenger side rear tire. It is so much easier to fill each tank using the door water fill openings.  IN MY ROADTREK - AND MAYBE OR MAYBE NOT YOURS - as Roadtrek has played with the direction this must be turned - THE VALVE HANDLE IS TURNED TO THE RIGHT TO BE IN RIGHT WITH THE PIPE THAT GOES TO THE WATER TANKS. MORE IMPORTANT INFORMATION ABOUT THIS IS TO COME! 

 FUNCTION 2 -

TO RUN WATER FROM THE CITY WATER HOSE AND FROM THE WATER PUMP INTO THE PLUMBING  OF THE ROADTREK TO GO INTO THE SINK, SHOWERS, TOILET, AND HOT WATER HEATER TANK! Yes the city water system through this valve is connected in a way to allow WATER IN THE TANKS to run  into the water pump!  THE SETTING OF THE VALVE HANDLE FOR THIS FUNCTION IS (IN MY ROADTREK - AND MAYBE OR MAYBE NOT YOURS - IS STRAIGHT UP.  In this close up photo below you see the CITY WATER VALVE SET TO RUN WATER FROM THE HOSE AND YOUR TANK WATER INTO THE WATER PUMP! In the photo above you will see my city water valve is set to RUNNING WATER IN THE PIPES.

So why is the city water valve infamous? Well if you put the city water valve into the fill position and you try to use water from the city water hose OR the water pump to get water from your fresh tank(s) - NO WATER COMES OUT of your plumbing into the sink or showers or toilet or hot water heater. And you will - like many, including me, go into a panic that there is something terribly wrong - and you might (I didn't  (and this happened to us the first night ever that we were in the Roadtrek), but I know some who have) go to an RV service center and pay them to fix the problem and they will charge you for walking over to the city water valve and turning it the other way and say - see it is fixed! This valve is too easy to leave in the wrong position! Between this and that it is just easier to use the door fills for the fresh tanks, I never touch this valve.

 Now - as I have said here - the way to turn this valve to get each of the functions can be different between year Roadtreks - and you may have a red handle or a yellow handle or like mine a black handle. BUT IF YOU HAVE NOT WATER RUNNING INSIDE THE ROADTREK THE FIRST THING YOU DO IS GO TO THE OUTSIDE TO THE CITY WATER VALVE AND TURN IT THE OTHER WAY. SINCE THE OUTSIDE SHOWER IS RIGHT BELOW IT - TURN ON THE COLD HANDLE AND YOU SHOULD GET WATER POURING DOWN ON YOUR FEET.  AND IN THIS CASE THAT IS A GOOD THING BECAUSE YOU NOW HAVE WATER RUNNING IN YOUR ROADTREK. AND THIS IS WORTH REPEATING AGAIN - EVEN IF THERE IS NO WATER COMING AND YOU HAVE NO HOSE CONNECTED AND ARE USING WATER FROM YOUR TANKS - THIS VALVE HAS TO BE SET THE SAME WAY FOR RUNNING WATER - SO DO THE SAME AND GO TO CHANGE THE VALVE TO THE OTHER POSITION! 

You know it is just another one of those Roadtrek things that does not make sense. But now you know about it! 


Friday, June 26, 2020

ALL ABOUT THE HOT WATER HEATER AND HOT WATER TANK

This is an article that is a collection of links of all of our articles to date about the hot water tank.  There are always a lot of questions about how the hot water tank works and what needs to be done involving the hot water tank during a year of using the Roadtrek. The hot water heater is a Suburban 6 gallon propane heated hot water heater and tank.  Some early Roadtreks had electric and propane heating elements. It is installed from the inside and it is accessed outside and inside the van - outside is access to the hot water heater mechanism and tank drain. Inside in a cabinet at the floor is the tank and bypass valves.  The tank is covered in foam insulation. The inside of the tank is glass lined. The battery switch must be turned on when you want hot water as the propane is self-ignited by a 12 volt igniter.


THE ROADTREK HOT WATER HEATER AND THE WATER SYSTEM - HOW IT WORKS

THE HOT WATER HEATER AND PROPANE

HOW TO PUT THE HOT WATER HEATER TANK INTO BYPASS

FLUSHING THE HOT WATER TANK

DON'T LOSE YOUR WATER HEATER DOOR

SANITIZING THE HOT WATER TANK

DRAINING THE HOT WATER TANK

THE FOLLOWING ARTICLES ARE HOT WATER HEATER/TANK RELATED:


WINTERIZING - THE DEFINITIVE STEP BY STEP GUIDE

THE DEFINITIVE STEP BY STEP DEWINTERIZING AND SANITIZING

PROPANE


This is all fairly complete in what you need to know about the hot water heater and tank in your Roadtrek.

Saturday, June 20, 2020

DRAINING THE HOT WATER TANK

Roadtreks have a Suburban 6 gallon hot water tank and water heater.  At one time the hot water heater that Roadtrek used propane or electricity to heat the water. The more recent Roadtreks use only propane to heat the water. There is an automatic igniter to ignite the propane to heat the water and this requires that the battery switch be turned on to provide 12 volts DC. There is a switch on the wall of the Roadtrek - usually near the monitor panel - that when turned on starts the ignition of the propane at the hot water heater and the propane flame heats the water. The hot water tank is glass lined inside for insulation and the hot water tank is covered in Styrofoam to insulate it to keep the water hot to warm inside.  With 6 gallons of water to heat, it can take a number of minutes (longer on cold day)  to heat the water in the tank from cold to hot.

An important thing to understand is that once filled, the hot water tank will remain full. The tank is filled by cold water coming from the water pump or a city water connection through a hose from the Roadtrek to an outside spigot that flows into the bottom of the hot water tank. The water then fills the tank to the top. When a not water handle is turned on at the sink or shower, cold water will go through the water pump or hose and go into the hot water tank and PUSH the hot water at the top of the tank out of the tank and into a hot water pipe that will take the hot water to the sink faucet or shower head. Water cannot come out of the hot water tank unless there is water to push it out - from a fresh tank or an outside hose connection. As water in the tank comes out, more water goes into the tank to refill it. It is NOT POSSIBLE to empty the hot water tank by running hot water through the sink or the inside or outside shower.

The hot water tank must be drained. This is done outside the Roadtrek on the driver's side toward the rear of the van.  There is a vented metal panel that must be opened and removed to drain the hot water tank.


To open this metal panel you must turn the ring catch at the top middle. The white ring you see there in this photo is on an elastic cord. To open, turn the ring so that it is straight with the up/down slot that is under it. Pull the panel from the top edge toward you and once the top is clear pull it up. There are two small "pins" at the bottom that you will lift this off panel off of - and then out. Take the panel and put it someplace safe while you drain the hot water tank.


 THE OPEN HOT WATER HEATER/TANK


You will need a few things to drain the hot water tank:

1) A RATCHET SOCKET WRENCH

2) A 1 and 1/16" SOCKET - DEEP WELL OR REGULAR WITH EXTENDER

3) PLUMBERS TEFLON THREAD TAPE

4) A SCISSOR TO CUT THE PLUMBERS TAPE

Take a look at the photo just above. This is the workings of the hot water heater. The rest is just the tank that holds the hot water and that is directly behind what you see here and inside the Roadtrek. There are two things in this photo that are of interest to you right now in draining the hot water tank.

                                                                                 
PRESSURE RELEASE VALVE


ANODE ROD/DRAIN
 The Pressure RELEASE VALVE or PRESSURE RELIEF VALVE shown in the first photo releases any pressure built up in the hot water tank. This is a safety valve that will automatically open should pressure build too high in the hot water tank. This valve can be opened MANUALLY.
The ANODE ROD/DRAIN is the head of the ANODE ROD screwed into a threaded hole into the hot water tank. This is, when removed will open a hole into the hot water heater and the water will drain out.  The valve is located in the top middle of the hot water heater as shown in photo of the open hot water heater/tank above.
 ANODE ROD
The Anode Rod is a long rod of magnesium or aluminum that is used inside the hot water heater tank to prevent the inside of the metal tank from breaking down.  This rod breaks down instead of the metal of the tank. It will become pitted and then start to disintegrate - and it will also attach to mineral deposits that form in the water. The rod over time will become whitish grey and the surface full of these mineral deposits will become sharp - sharp enough to cut yourself if you grab hold of the rod tightly. The head of the rod is a hex head that you will use to unscrew the rod. Inside the rod is a thin metal rod that the magnesium or aluminum are molded around. That inner rod will become partly visible over time. When the all of the rod or a good portion of the rod is no thicker than a pencil it is time to replace the anode rod with a new one.  How long they last can range from a year to a few years. New ones can be purchased in either magnesium or aluminum - each have advantages and disadvantages which are personal preference. You can Google the differences.  Suburban sends the hot water heater out from the factory with a magnesium rod. (For this reason I have always replaced the rod with a magnesium one.)  The anode rod is located in the bottom middle of the hot water heater as shown in the photo of the open hot water heater/tank above.

TO DRAIN THE HOT WATER TANK:
1.  FIRST TURN OFF THE PROPANE. NEVER DO THIS WITH THE PROPANE ON!
2. NEVER START THIS PROCESS WHILE THE WATER IS STILL HOT INSIDE THE HOT WATER TANK. To test the water go inside - leave the hot water switch OFF. Turn on the hot water handle on the faucet on the sink and feel the water temperature. IF IT IS HOT WAIT UNTIL IT FEELS COOL!
3. YOU ARE GOING TO MANUALLY OPEN THE PRESSURE RELEASE VALVE.  TO DO THIS GENTLY TAKE HOLD OF THE HANDLE THAT YOU SEE IN THE PHOTO THAT IS DIAGONALLY SLANTED TO THE LEFT.  PULL THAT HANDLE TOWARD YOU AND WHILE DOING THIS STAND AWAY TO THE LEFT SIDE OF THE HOT WATER HEATER.  Water will shoot out from the opening that you see to the bottom right of the pressure release valve. It is going to get very wet all over the inside of this area - that is normal and it is OK for the hot water heater. WAIT UNTIL NOTHING MORE IS COMING OUT.
4. WITH THE SOCKET ON THE SOCKET WRENCH YOU ARE NOW GOING TO REMOVE THE ANODE ROD AND OPEN THE DRAIN HOLE.  A DEEP WELL SOCKET WILL ALLOW CLEARANCE AWAY FROM THE GAS IGNITION TUBE You can see the brass ignition tube in the photos as it crosses on top of the end of the anode rod.  YOU CAN ALSO USE A REGULAR SOCKET WITH AN EXTENDER WHICH WILL ALSO BRING THE SOCKET WRENCH OUT OF THIS TIGHT AREA AND CLEAR THE IGNITION TUBE. (My preference is is the regular socket with the extender as it seats more securely on the hex head of the anode rod.)
5. AS YOU DO THIS NEVER STAND DIRECTLY IN FRONT OF THE ANODE ROD AND CLEAR ANYONE AWAY FROM THE FRONT OF THE PATH OF THE ANODE ROD - PLUS ANYTHING BREAKABLE. PUT THE SOCKET ON THE HEX HEAD OF THE ANODE ROD AND TURN THE WRENCH TO THE LEFT (COUNTERCLOCKWISE).  IT MAY BE TIGHT - USE LEVERAGE TO LOOSEN IT AND UNSCREW THE ANODE ROD FROM THE THREADED HOLE.  ONCE IT IS VERY LOOSE YOU CAN FINISH UNSCREWING IT BY HAND.   
********WARNING********
THE REASON WHY YOU MUST NEVER STAND OR BE IN FRONT OF THE ANODE ROD WHEN REMOVING IT IS IF BY CHANCE YOU DID NOT GET ALL OF THE PRESSURE OUT OF THE HOT WATER TANK  THE ANODE ROD ONCE RELEASED WILL SHOOT LIKE A TORPEDO WITH GREAT FORCE FROM THE HOLE STRAIGHT OUT AHEAD OF IT. THE FORCE IS ENOUGH TO DO SERIOUS INJURY IF IT HIT YOU OR SOMEONE STANDING BY. 

ALSO - IF THE WATER WAS STILL HOT, YOU WOULD BE SCALDED AS IT CAME OUT - OF BOTH THE PRESSURE RELEASE VALVE AND THE ANODE ROD OPENING. 

6. WITH THE ANODE ROD UNSCREWED PULL IT STRAIGHT OUT OF THE HOLE. THE WATER IN THE HOT WATER TANK WILL COME OUT WITH THE ROD AND KEEP COMING OUT UNTIL THE TANK IS ALMOST EMPTY. WITH THE WATER COMING OUT YOU MAY SEE MINERAL DEPOSITS ALSO COMING OUT WITH THE WATER. THESE LOOK LIKE WHITE, GREY, AND BLACK ROCKS.  YOU WILL SEE THEM COLLECT ON THE GROUND WHERE THE WATER IS POURING OUT.  SOME OF THESE CAN BE SHARP.  THESE MINERALS FORM FROM HARD WATER SITTING IN THE HOT WATER TANK. 

7. AT THIS POINT YOU MAY WANT TO FLUSH THE HOT WATER TANK TO REMOVE ANY MORE MINERALS THAT MIGHT BE SITTING AT THE BOTTOM OF THE TANK. TO DO THIS FOLLOW THIS ARTICLE ON FLUSHING THE HOT WATER TANK.


8. BECAUSE THE ANODE ROD DRAIN HOLE SITS ABOUT ONE QUARTER OF AN INCH FROM THE BOTTOM OF THE TANK, NOT ALL OF THE WATER COMES OUT WHEN THE DRAIN IS OPEN. FOR MOST PURPOSES YOU CAN LEAVE THIS LITTLE AMOUNT OF WATER STILL IN THE TANK. IN THE WINTER THIS IS NOT ENOUGH TO CAUSE ANY DAMAGE TO THE TANK IF IT FREEZES.  THERE ARE WAYS TO GET OUT THE REMAINDER OF THE WATER IF YOU WISH TO.  YOU COULD USE A HAND PUMP OR AN ELECTRIC PUMP WITH A SMALL TUBE ON THE SUCTION END THAT YOU WOULD PUT INTO THE HOLE TO THE FLOOR OF THE TANK TO SUCK OUT THE REMAINING WATER. EVEN THEN NOT ALL OF THE WATER WILL COME OUT.  LEAVING THE DRAIN HOLE IN THE HOT WATER TANK OPEN FOR A FEW DAYS WILL LET SOME OF THAT WATER EVAPORATE OUT.  WHATEVER YOU DO - DO NOT - LET ANYTHING GO INTO THE DRAIN HOLE INTO THE TANK THAT CANNOT BE REACHED TO PULL OUT! 

9. NOW EXAMINE THE ANODE ROD TO SEE IF IT NEEDS TO BE REPLACED. IF A LARGE PORTION OF THE ANODE ROD HAS CORRODED AWAY - WHICH IS WHAT IT DOES WHEN IT IS DOING ITS JOB - OR THE ROD HAS BECOME AS THIN AS A PENCIL - IT IS TIME TO REPLACE THE ANODE ROD.  IT IS ALWAYS A GOOD IDEA TO HAVE ONE OR MORE SPARE RODS ON HAND - AND CARRIED IN THE ROADTREK - IN THE EVENT THAT IT NEEDS TO BE REPLACED. IF YOU ARE REPLACING THE ROD, DISCARD THE OLD ROD AND FOR THE NEXT STEPS USE THE NEW ROD.

10.  LOOK AT THE THREADS THAT ARE AROUND THE HOLE OF THE DRAIN HOLE. THERE MAY BE PLUMBERS TAPE THAT WAS LEFT IN THE HOLE WHEN YOU TOOK THE ANODE ROD OUT. USING A FINGER GENTLY SCRAPE THE PLUMBERS TAPE OUT AND AWAY FROM THE HOLE. IF YOUR FINGER CAN'T GET IT ALL USE A TOOTHBRUSH TO REMOVE THE TAPE FROM THE HOLE. DO NOT LET THE TAPE FALL INTO THE HOT WATER TANK.


11. WITH THE TANK DRAINED, YOU ARE READY TO PUT THE ANODE ROD BACK IN.  IF YOU ARE PUTTING THE ROD THAT CAME OUT BACK IN, REMOVE ANY OLD  PLUMBING TAPE THAT IS AROUND THE THREADS OF THE ROD. TO MAKE THE ROD EASIER TO COME OUT THE NEXT TIME, TAKE THE ROLL OF TEFLON PLUMBING THREAD TAPE AND WRAP ENOUGH AROUND THE ALL OF THREADS ON THE SCREW SECTION OF THE TOP OF THE ROD. WRAP THE TAPE IN A CLOCKWISE DIRECTION WITH THE TOP SCREW END OF THE ROD FACING YOU.  COVER THE THREADS BUT DO NOT PUT SO MUCH ON THAT IT MAKES IT HARD TO GET THE THREADS TO FIT INTO THE DRAIN HOLE.  CUT THE TAPE FROM THE SPOOL OF TAPE WITH THE SCISSOR. 


12. INSERTING THE ROD BACK INTO THE HOLE IS TRICKY. BECAUSE THE ROD IS HEAVIEST AWAY FROM THE END YOU WILL BE SCREWING IT DIPS DOWN INSIDE THE TANK. IT WILL NOT SCREW ON PROPERLY THIS WAY.  I FIND IT EASIEST TO HOLD THE ROD WITH TWO HANDS WHEN PUTTING IT INTO THE DRAIN HOLE AND SUPPORTING IT OUTSIDE THE HOLE FOR THE ROD INSIDE THE TANK TO REMAIN LEVEL WITH THE OUTSIDE  PUSH THE ROD INTO THE THREADS OF THE HOLE AND START TURNING THE END OF THE ROD CLOCKWISE WITH YOUR HAND.  TURN IT SEVERAL TURNS - LET GO - IF IT HAS NOT GRABBED THE THREADS CAREFULLY TAKE IT OUT AND TRY IT AGAIN. IT WILL GRAB THE THREADS IF IT IS NOT TIPPING DOWN INSIDE THE TANK. HOLD IT STEADY WHILE YOU DO THIS - KEEPING ONE HAND TO KEEP THE ROD FROM DIPPING DOWN INSIDE THE TANK AND SCREW IT IN WITH THE OTHER HAND. 


13. ONCE THE ROD IS IN BY HAND GET YOUR RATCHET WRENCH AND MAKE SURE THE SWITCH ON IT IS SET TO TURN CLOCKWISE.  PUT THE SOCKET ONTO THE END OF THE ANODE ROD (THAT YOU JUST TIGHTENED BY HAND) AND START TIGHTENING THE ROD WITH THE SOCKET WRENCH.  THE ROD DOES NOT SCREW IN ALL THE WAY TO THE END. IT WILL GET VERY TIGHT ABOUT HALF WAY DOWN. ONCE IT IS GIVING A LOT OF RESISTANCE TO TURN STOP. IT IS IN AND IT WILL NOT LEAK. IF YOU FORCE IT ANY FURTHER YOU WILL HAVE A LOT OF TROUBLE TAKING IT OUT NEXT TIME. 


14. GET THE METAL DOOR PANEL YOU TOOK OFF AT THE START. PUT THE BOTTOM OF THE PANEL IN FIRST AND GET THE TWO HOLES ON THE BOTTOM OF THE DOOR TO GO INTO THE TWO SMALL METAL PINS THAT ARE STICKING UP FROM THE BOTTOM.  PUSH THE TOP OF THE DOOR INTO THE OPENING AND IT SHOULD LINE UP WITH THE SLOT OF THE PLASTIC RING LATCH.  ONCE THE RING LATCH IS THROUGH THE SLOT, TURN IT TO LOCK THE DOOR IN PLACE. 

YOU HAVE DRAINED YOUR HOT WATER TANK!

YOU CAN NOW FILL THE TANK AGAIN - OR IF IT IS THE WINTER - LEAVE IT EMPTY.  NEVER TURN ON THE HOT WATER HEATER SWITCH ON THE WALL INSIDE THE ROADTREK WITH AN EMPTY HOT WATER TANK. YOU WILL BURN OUT THE HOT WATER HEATER. 

 WHAT PROBLEMS MIGHT YOU ENCOUNTER? 

IF THE ROD WAS PUT IN TOO TIGHT AND YOUR SOCKET WRENCH WILL NOT LOOSEN IT, ONE WAY - THAT ONE MUST USE A LOT OF CAUTION WITH - IS TO USE A SOCKET BREAKER BAR. THIS IS A LONG METAL BAR WITH A SOCKET CONNECTION ON THE END. THIS LONG HANDLE WILL PROVIDE A LOT OF LEVERAGE TO MOVE THE SOCKET TO LOOSEN IT.  ONCE IT STARTS TURNING, STOP.  TAKE THE SOCKET AND PUT IT BACK ON YOUR REGULAR SOCKET WRENCH AND CONTINUE WITH THE REGULAR SOCKET WRENCH. A LARGE ENOUGH SOCKET WRENCH WITH A LONGER HANDLE IS BETTER TO USE TO START WITH THAN A SHORT OR STUBBY SOCKET WRENCH AS YOU GET BETTER LEVERAGE WITH A LONGER HANDLED WRENCH. THAT COULD AVOID THIS PROBLEM ALL TOGETHER.  i HAVE ONLY HAD THE ROD NOT LOOSEN ONCE AND I WENT OUT TO BUY THE BREAKER BAR (HARBOR FREIGHT IS THE MOST ECONOMICAL PLACE TO DO THIS). I HAVE NEVER HAD TO USE IT SINCE THEN.  I MAKE SURE THAT I DO NOT OVER TIGHTEN THE ANODE ROD.

WHAT YOU MOST NEED TO BE CAREFUL OF IS TO NOT STRIP THE THREADS ON THE DRAIN HOLE IN THE HOT WATER TANK.  YOU WILL SEE THAT THIS HOLE RUSTS - NOT BADLY BUT MORE THAN ONE MIGHT EXPECT SOMETHING THAT INVOLVES WATER. IT IS NORMAL FOR IT TO RUST. WITH THE TYPE OF HOT WATER TANK THAT THE ROADTREK USES, THERE IS NO WAY TO REPLACE THAT HOLE SECTION. IF THE THREADS STRIP OUT OR THE HOLE IS DAMAGED THE ENTIRE HOT WATER HEATER/TANK MUST BE REPLACED.  THAT IS SOMETHING YOU WANT TO AVOID!  THE ANODE ROD IS EASILY REPLACED - AND YOU WILL DO THAT MANY TIMES OVER YOUR YEARS WITH THE ROADTREK BUT THE DRAIN HOLE IS PART OF THE TANK. 

THE ONE AND ONE/SIXTEENTH SOCKET IS NOT COMMON. IT IS RARELY PART OF A SOCKET SET. IT CAN BE FOUND IN HOME DEPOT OR LOWES WHERE THE INDIVIDUAL SOCKETS ARE. I BOUGHT MINE IN LOWES - AND AT THE TIME I BOUGHT THE DEEP WELL AS THAT WAS ALL THAT THEY HAD IN THIS SIZE.  AN EXTENDER WILL ALLOW YOU TO GET A REGULAR SOCKET IN AND NOT INTERFERE WITH THE WORKINGS OF THE HOT WATER HEATER RIGHT ABOVE THE ANODE ROD. I FOUND A REGULAR SOCKET IN THIS SIZE AT A HARDWARE/TOOL VENDOR AT A FARMER'S MARKET. 

SO - the process reads long - but does not take long to do. It is important to make sure you drain the hot water tank when you are winterizing the Roadtrek and when you are de-winterizing and sanitizing the fresh water and hot water tank. You want to make sure you get your sanitizing bleach and water mixture out of the tank before you put it into use for the season. If you are not going to use the Roadtrek for a period of time you also would want to get the water out of the hot water tank. Keep in mind the a glass enclosed tank that holds hot water than becomes warm is an excellent environment to grow bacteria.


Thursday, June 11, 2020

THE DEFINITIVE DEWINTERIZING AND SANITIZING - STEP BY STEP

I have written several articles over the years about how to dewinterize your Roadtrek and sanitize its fresh water tanks, including the hot water tank.  I am writing this article to put all of it together.  I have combined all of the steps and these include changes I have made over the years. As it would be a huge article if I included some of the articles that relate, I will use links to those articles that will offer more explanation for processes that are done not just for dewinterizing and sanitizing fresh tanks.  I will also indicate where you should copy the text of this article so that you can paste it into an easy to take to your Roadtrek document to be able to have all the steps in front of you as your dewinterize and sanitize your Roadtrek.  Please note that this article has the steps in the order I am using now to dewinterize and sanitize my Roadtrek - with the most recent change in 2019.

Here is what you will need:

Fresh Water Hose
Water Pressure Regulator
Liquid Chlorine Bleach (Clorox or off brand is fine) PLEASE NOTE: There is something called "Splash-Less" Bleach. DO NOT BUY THIS FOR SANITIZING YOUR TANKS. It does not have disinfectant properties and will not disinfect surfaces." BUY REGULAR BLEACH. (Thanks to one of our readers, "Tom" for bringing this to our attention!)
Funnel with hose on the end
Measuring Cup (for Bleach)
Small paper cups
Hot Water Tank FLUSH  Wand
Ratchet wrench handle
1-1/16" Socket
Plumbers silicone pipe tape to put on threads of the anode rod when putting it back in.

The process - though there are a lot of steps is easy - and can go quickly. There is a lot of waiting in the process - waiting for tanks to drain, standing and filling the tanks through the door fill holes, and waiting for the bleach to work.

Here we go!

START  COPYING HERE ON -

BEFORE YOU START --- IF YOU PUT RV ANTIFREEZE INTO THE BLACK AND/OR GREY WASTE TANKS, DUMP THOSE TANKS NOW. 
 

DEWINTERIZING STEP BY STEP
 
  1. KEEP THE HOT WATER TANK IN BYPASS WHEN STARTING.
  2.  SET TANK VALVES TO SUMMER MODE.
  3. IF YOU PUT RV ANTIFREEZE INTO YOUR FRESH TANK(S) WHEN WINTRIZING DRAIN THE A/F OUT OF THE TANKS NOW USING THE LOW POINT DRAIN ON THE FRONT EXTERIOR FRESH TANK
  4. FILL THE TWO FRESH WATER TANKS.
  5. AGAIN IF YOU PUT RV ANTIFREEZE INTO YOUR FRESH TANKS - DRAIN THE WATER YOU PUT IN STEP 4 AND FILL AGAIN TO FLUSH THE A/F OUT .
  6. TURN ON THE BATTERY DISCONNECT SWITCH.
  7. TURN ON THE WATER PUMP.
  8. TURN ON COLD SIDE OF SINK – RUN UNTIL ALL PINK (RV ANTIFREEZE) COMES OUT AND CLEAR WATER RUNS. TURN ON HOT SIDE OF SINK AND DO THE SAME.
  9. OPEN SHOWER DRAIN IN FLOOR OR POINT THE SHOWER HOSE INTO THE SINK.
  10. TURN ON COLD ON SHOWER UNTIL CLEAR, REPEAT FOR HOT.
  11. FLUSH TOILET. LET WATER RUN IN TOILET UNTIL YOU DO NOT SEE PINK WATER.
  12. TURN ON COLD OUTSIDE SHOWER UNTIL CLEAR, REPEAT FOR HOT.
  13. TURN OFF WATER PUMP AND BATTERY SWITCH.
  14. OPEN HOT WATER TANK AND FLUSH WITH FLUSH STICK*.
  15. REPLACE ANODE ROD. CLOSE HOT WATER HEATER DOOR.
  16. LEAVE WATER PUMP OFF.
  17. CONNECT HOSE TO CITY WATER LINE WITH PRESSURE REGULATOR.
  18. TURN ON HOSE AND REPEAT STEPS 6 TO 10.
  19. NEXT SANITIZE ALL FRESH TANKS.
 STOP COPYING - PASTE TO A DOCUMENT AND SAVE - YOU WILL BE PASTING MORE.

* GO TO THIS ARTICLE TO FAMILIARIZE YOURSELF WITH FLUSHING THE HOT WATER HEATER TANK USING A FLUSH WAND.


START COPYING AGAIN FROM HERE


SANITIZING THE FRESH WATER TANKS

  1. TURN HOT WATER BYPASS VALVES TO HOT WATER FLOW. 
  2. CONNECT A FRESH WATER HOSE WITH A WATER PRESSURE REGULATOR ONTO THE CITY WATER FILL CONNECTION. 
  3.  USE CITY WATER LINE TO FILL HOT WATER TANK BY RUNNING CITY WATER INTO THAT TANK. (NOT CITY WATER FILL - REGULAR USE OF CITY WATER) GO TO THE SINK, TURN ON HOT WATER AT SINK. AIR WILL COME OUT - AND THE TANK WILL FILL. WHEN IT IS FULL THE WATER WILL RUN STEADILY FROM THE FAUCET. DO NOT TURN ON HOT WATER SWITCH. THIS WILL BE COLD WATER AND THAT IS WHAT NEEDS TO BE.
  4. DISCONNECT CITY WATER CONNECT FROM HOSE.
  5. PUT ONE HALF CUP BLEACH INTO THE FRONT EXTERIOR FRESH TANK. (PRE-MIX THE BLEACH IN A GALLON JUG OF WATER BEFORE PUTTING IT INTO THE FRESH TANK - DO NOT PUT PURE BLEACH INTO THE TANK.) A FUNNEL WITH A HOSE ON THE END IS EASIEST TO GET THE BLEACH/WATER MIX INTO THE FRESH TANK THROUGH THE DOOR FILL HOLE.
  6. PUT ONE QUARTER CUP BLEACH INTO THE REAR INTERIOR FRESH TANK. (PRE-MIX THE BLEACH IN A GALLON JUG OF WATER BEFORE PUTTING IT INTO THE FRESH TANK - DO NOT PUT PURE BLEACH INTO THE TANK.) IF YOUR ROADTREK HAS ONLY ONE FRESH TANK - SKIP THIS STEP.
  7. TOP OFF WATER IN TANKS WITH HOSE.
  8. DRIVE BACK AND FORTH TO MIX THE BLEACH INTO THE WATER.
  9. TURN ON BATTERY SWITCH AND WATER PUMP.
  10. TURN ON EACH FAUCET HANDLE PLUS INSIDE AND OUTSIDE SHOWER ONE HANDLE AT A TIME SMELLING FOR BLEACH TO COME THROUGH WITH EACH. NOT THE TOILET.
  11. NOW YOU WAIT. 
  12. LET BLEACH SIT IN TANKS FOR AT LEAST FOUR HOURS. LONGER IS OK!
  13. DRAIN WATER TANKS.
  14.  NOW WE REMOVE THE BLEACH FROM THE HOT WATER TANK FIRST. 
  15.  1) The hot water tank should NOT be in bypass while sanitizing and it should remain NOT bypassed for this process. DO NOT HAVE ANY SINK FAUCET OR SHOWER FAUCET ON DURING THIS PROCESS EXCEPT WHERE AND WHEN NOTED FOR THE OUTSIDE SHOWER HOT WATER HANDLE. DO NOT TURN ON THE HOT WATER HEATER!

    2) Water pump OFF.

    3) Attach a fresh hose WITH A WATER PRESSURE REGULATOR to the city water inlet and a spigot outside. Turn on the water.

    4) Turn on the outside shower hot water handle and open fully - step back!  Only the hot water handle on the outside shower should be open. No other faucet or shower handle should be on.  As the water comes rushing out of the shower (hose optional) you should smell bleach in the water.

    5) Allow to run for at least 15 minutes. THIS WILL FILL AND  EMPTY THE TANK AT THE SAME TIME - ABOUT THREE TO FIVE TIMES.  YES THE WATER IS FLOWING DOWN THE DRIVEWAY FLUSHING THE HOT WATER TANK.

    6) After a steady flow of water for 15 minutes you should no longer smell bleach in the water coming out. (To test, take a small paper cup , slow the flow of water by turning back the handle and put the cup under the streaming water coming out. Step away from where the water has been flowing and smell the water in the paper cup. You should not smell bleach.)

    7) If you still smell bleach allow the water to continue to flow longer until there is no longer any smell of bleach in the water. (Use a new paper cup if you test again.)

    8) Shut off the hot water outside shower handle.

    9) You have now exchanged all of the water inside the 6 gallon hot water tank several times with fresh water, flushing that tank as many times.

    10) Remove the hose from the city water connection.

    11) PUT THE HOT WATER HEATER INTO BYPASS! You do not want to

    put bleach back into the hot water tank.
  16.  FILL FRESH WATER TANKS AGAIN.
  17.  GO INSIDE THE ROADTREK.
  18.  TURN ON BATTERY SWITCH AND WATER PUMP.
  19.  **TURN ON EACH FAUCET HANDLE PLUS INSIDE AND OUTSIDE SHOWER ONE HANDLE AT A TIME SMELLING FOR BLEACH TO COME THROUGH WITH EACH. NOT THE TOILET - YOU NEVER WANT ANY BLEACH TO GO INTO THE TOILET.
  20. IF YOU DO NOT SMELL BLEACH (GOOD!) SKIP TO #23
  21.  DRAIN TANKS THROUGH THE LOW POINT DRAIN.
  22.  FILL FRESH TANKS AGAIN.
  23.  IF BLEACH SMELL REPEAT FROM STEP #16 AFTER DRAINING FRESH TANKS.
  24.  DRAIN TANKS OR LEAVE FULL FOR TRIP. 
  25. PUT YOUR HOT WATER TANK OUT OF BYPASS NOW SO THAT THE TANK WILL FILL AND YOU WILL HAVE HOT WATER WHEN YOUR TANKS ARE FULL OR ARE USING CITY WATER.  

                                                                    DONE


** When you smell for bleach, run the water into a paper cup and smell the water in the cup. If you run it into the sink the bleach odor will be in the sink and you will smell bleach in the water when you go on to Step 19 after flushing with fresh water. 

 STOP COPYING AND PASTE WHERE YOU LEFT OFF IN YOUR CARRY OUT DOCUMENT

IF YOU DON'T KNOW HOW TO PUT YOUR HOT WATER HEATER INTO BYPASS LOOK HERE!

It seems like a lot but it is not. It is more waiting for the tanks to drain and the bleach to sit in the tanks than doing. The socket wrench and socket are needed to remove the anode rod from the hot water tank to flush it. If the anode rod looks as thin as a pencil REPLACE IT.   If you have never flushed the hot water tank before - copy out the article linked about flushing the hot water tank.  The flush wand is an important tool to have and worth the little it costs.


You can leave your grey and black tanks with the antifreeze and water that went into it in this process until you dump on your next trip. Or dump them now if they are almost full. 

IF YOU WOULD LIKE TO CONTACT US TO ASK A QUESTION ABOUT ANYTHING YOU READ IN THIS ARTICLE PLEASE EMAIL US USING THE LINK IN THE RIGHT COLUMN OF THIS PAGE.


Friday, April 26, 2019

A TRIP FOR REPAIRS AND THE MACERATOR'S TALE (DAY 1)

Back when we winterized in November, we discovered that the macerator was not pumping. It ran but nothing came out. At first when we tried its usual easily heard sound when it runs was barely audible. While we have run the macerator and dumped the tanks on the driveway before (one bucket at a time) and it has never been a problem, my overly, at times, over analytical mind started coming up with reasons why it was not pumping other than the obvious one - it was broken.  We put it lower down on the incline of the driveway - no difference. We got out the Andersen Levelers and made the Roadtrek level - no difference. On the last attempt I could smell a burning smell coming from the location of the macerator under the van - and then we stopped.

Since we have some readers who I know are not RVers or who are prospective but not yet RV owners, I will explain what a macerator is. It is a water pump installed in the RV - in the case of Roadtreks since the early 2000's permanently installed under the van in the front connected to the waste tank system. There are two waste tanks in most RVs - one is connected to the water drain in the toilet - called the "Black Tank", and one connected to the water drains in the sink and shower -called the "Grey Tank". There are two gate valves that connect the tanks by pulling a handle to the waste removal system - which can be as simple as a hose that uses gravity to take the waste out of each tank, through the hose, and into a sewer hole in the ground - at a campground or other "dump" site. The other system uses a pump - which is what the Roadtrek has - and this pump has sharp, stainless steel blades that spin at high speed and macerate - chop up really fine - any waste that comes out of the waste tanks and then pumps that through a small hose out to the sewer hole in the ground. The advantage of a macerator is that if for some reason the sewer hole was higher than gravity would work to get the waste to it - the macerator is an electric pump and can pump uphill. It is also a fast way to empty (dump) each tank.  The downside of a macerator is that if it breaks then you cannot get the waste out of the tanks and also - you must never put into the waste tanks anything that the macerator will not be able to chop up - so what comes out of you is fine, quick dissolving toilet paper - such as Scott's regular house one-ply is good, but never anything really solid, no drop in bags of chemical as those bags despite what they say don't dissolve, no cleaning wipes, no hair - wraps around the shaft - etc.  Well, ours - after almost 8 years broke.

Back in February I decided that I needed to contact the RV dealer/service center that we have gone for all of our repairs, and try to get an appointment when likely there would no longer be any snow or ice to make the trip to Pennsylvania. I emailed the service rep that we have come to know very well over the years and asked for an appointment in early April. The earliest appointment they had was April 24, 2019.  We had no choice but to accept it. I provided a list of problems which at the time included the macerator not working, a vent fan lid on the roof of the Roadtrek that was stuck and would not open, and that since we were making the trip, to change the oil in the electric generator that is installed under the Roadtrek chassis.  There was no problem - they could do it all when we came. BUT we had to get there early that day - no later than 8:00 am (which right before the date of the trip they agreed to could be 9:00 am when the shop opens to start working).  Since we bought the Roadtrek there, they have always been able to accommodate us to get there around 11:00 am - leaving that morning from NY to make the near 3 hour trip one way. Only once before had they said we had to be there early for the job that needed to be done. While it is possible to stay overnight right at the service center plugged into their 30 amp electrical outlet to run the RV overnight - we would have no toilet to use - as their dealer hours are to 8:00 pm to get into the restroom. This was not going to work out too well for us. I decided we had to find a nearby campground.

There were two campgrounds to consider - one was off in the woods not too far away - but on Google maps the roads in and out always seem to show a problem with road conditions on the map.  The other is a residential motorhome community - that also has RV sites that can be taken for one night or longer up to a month. What is nice about Google Maps is you can set it to satellite view and with this I could see the entire place from above - close up. It was all pavement and grass with paved spaces for the RVs which is always nice to have. They also had a restroom open 24 hours only for those staying who did not have toilet facilities in their RV - which at that moment would be us! I will write an article about this place on its own. We contacted them for a availability for the night of April 23, 2019 and found out - much to my surprise - that they had ONE site open on that night - and if we wanted it we had to confirm it quickly. We confirmed and sent them a check in advance - payment in full for one night. All set and done!

 From then it was wait anxiously to the date we would leave - and hope that everything would go smoothly getting there and having the work done without a glitch. We had not planned to dewinterize  before we went - and would just leave the antifreeze in the plumbing. As it turned out the temperatures started to rise and there were a few 70 degree days in early April. It seemed like there was no longer going to be any freezing nights - and we decided to dewinterize - but to expedite that we would dewinterize it all but sanitize only one of the two fresh water tanks and plumbing with bleach and water. We could easily sanitize the rest when we got back after the repair trip.

After dewinterizing, I took advantage of the several nice days - when it was not raining which it still was - and still is - doing regularly - and do a few things that are done before the traveling in the RV season starts. I pulled out the ladder - I don't like ladders - and went up to the Roadtrek roof to lubricate the crank up, directional antenna. While up there - and I am rarely up there, I decided to take a close look at the vent fan lid to see what was making it stick and not open. I moved the ladder to the other side of the van - had Meryl hold is securely on the inclined driveway while I went up - and reached over to the edge of the lid that I could barely reach in the middle of the roof. The side I got to was loose and seemed like it was not stuck at all. The opposite side is connected to a metal lift arm and that was solid.  Down the ladder, step by step, and I went inside the Roadtrek. I reached up for the manual knob that you turn to open the vent lid and I got to the point that it would stop turning and gave it a slightly stronger turn and it kept turning and the lid raised up on its hinge. I put it up and down several times and it seemed fine. Why had I not done this before (as it was stuck down since September)? I was concerned that if I could open it and then found it would no longer close we would have BIG trouble with a square foot hole in the roof and regular days of rain!  I was feeling brave - having been up on the roof anyway - and tried it. One less repair to have done at the dealer/service! Just for good measure, I used some silicone spray on a cloth to lubricate the lift arm. I could do this from inside the van.  I may write an article about that process soon.

The date to leave was coming up. I let the service shop know that the fan lid was no longer stuck and confirmed that all necessary parts would be there when we got there to start and finish the job that day. All was confirmed.

The weather for the trip down was going to be warm - much warmer than usual. We started out at 10:00 am and met up with the usual bumper to bumper traffic getting off Long Island and onto the mainland of the United States - which is New Jersey from our location heading to where we were heading. The trip generally takes about 45 minutes to one hour to get from home to Brooklyn, crossing a toll bridge and going to Staten Island where there is another toll bridge across to New Jersey. This particular morning it took more than TWO HOURS! We finally get on the highway in New Jersey and head for the New Jersey Turnpike entrance. The entrance ramp is moving - and we get halfway toward the toll booths along a winding entrance ramp - and then traffic stops. There is a cut off to a local industrial and business area along that ramp that all traffic was being directed into that. When we got up there we saw it - a large tractor trailer truck over completely on its side totally across and blocking the ramp that went to the turnpike tolls and actual entrance to the turnpike. There were four police cars and a their policemen all standing looking at the truck. Had just one of them been at the turn off to the exit from the highway that took us into the turnpike entrance - none of the cars and trucks - and us - even gotten off to get into this mess of where is this now taking us.  It is not an area that we have never been to before - though not in the Roadtrek and it is a labyrinth of roads around office buildings and factories - with no indications of which way to go and get out. And two GPS's that I had running - the one in the dash with no traffic routing - and the one in the CoPilot app with traffic kept trying to get us back to where the tractor trailer was blocking the useless entrance to the turnpike. We wasted a lot of time there. Meryl will tell you that she kept telling me to find a place to just park and we could figure it out - which I eventually did and she got out an old AAA real paper map of New Jersey and found that the next entrance to the New Jersey Turnpike was off Route 1 and she found the roads to get us there. All together we were just about past the time we should have ordinarily arrived at where we were headed in Pennsylvania.  Getting to US 1 was mostly streets and we finally got to the turnpike and we were then moving!  A call came to Meryl's phone - it was the campground. They wanted to make sure we were coming and if we did not get there before 4:00 pm they would leave a cone in our site so that we could find it on our own. It was after 2:30 pm when we arrived.

 We pulled into the  nice concrete and paved site but slightly uneven in the paving so it took a little moving the Roadtrek around in the site to find where it was most level -  more for comfort than anything else. We always mark where that level position is in relation to the tires (as I have written about in the past) and set the reflector markers down on the ground. We checked the power box to make sure the wiring for polarity was correct and the voltage was not too low or too high. All was fine. And with that we backed out of the pull in site and headed to the RV service shop just to check the route and the time it would take to get there the next morning. We timed that out and then headed for the fast food restaurant nearby for lunch.

While it was not as early as we had hoped it would be when we got there, we had figured to take a drive further north to spend some time in the Cabela's Store in Hamburg, PA and then after that have dinner in a restaurant that we know back to the east along Rt. 78 and Rt, 22.

On the way I looked at the gas tank which was below half and decided to stop for gas. I turned onto the street that the entrance of the gas station was on and as I went up the driveway cut into the station we heard a "ZING!" and could not figure out what it was. This was a new noise in the collection of noises we have heard while driving the Roadtrek. I looked at Meryl and said, "What was that!" She said she did not know - speculated that it might be one of the spring tension curtain rods we use to hold things in place - that sit on the floor and inside the fridge. I drove to the pump and went out to pump gas. Gas, in both New Jersey and Pennsylvania, was several cents and more higher than the prices in New York - just that morning.  Gas in and I got back into the van. Meryl had something in her hand and said - I found this on the floor back there.  It was a metal sleeve. I had no idea what it was - and then she showed me the rest of what she found - a black plastic knob with a screw coming through the middle. I knew exactly what it was then. It was the knob to turn to open the fan vent lid outside. And it was right below the fan where she found it all.  OK - no problem. I went to the middle of the inside under the fan and looked up -I set the sleeve over the screw and put the knob back into place and then realized that I needed a screw driver to put it in with - and while there are screwdrivers in my tool bag in the Roadtrek - this was not the time or the place to do this. So we put it all where it would be safe and headed back out on the road.

By the time we got to Cabela's it was closer to the time we had planned to have dinner but we were there and would spend a brief time at the store - always fun to see their local fish aquarium, their trophy animal displays, and look at things that relate to some of our interests. But before we went in, I got out the tool bag and a Phillips head screwdriver and put the fan knob back where it belonged. It was a good thing as without the knob in place nothing locked the fan lid closed to the roof and easily could have bounced or blown open. I realized then why this came off. The last time I had closed the fan I decided not to tighten the knob down very tightly to avoid it sticking again. It was just loose enough for the vibrations through the van driving to loosen the screw to the point that it would all fall out - as it did. Into the store -for an even briefer visit and then off to dinner.  After dinner we headed back to the RV Park to settle in for the night.

We had the advantage of the restrooms which were four lanes away from where our site was. After we would settle in for bed, we decided that we would put a camping "wag" bag into the RV toilet to use that during the night - as we would do for cold weather camping. We had running water in the RV from the fresh tank we sanitized for washing and drinking - but I did not want to put any waste down the toilet because the next morning the service tech did not need to have to encounter that when he removed the macerator.

This RV Park said it had wifi - but no cable television. We had the antenna and before we left I had an idea - which I wanted to try out. Recently I have been using a ROKU wifi device at home to use to get many free television channels on the TV.  Usually in a campground the wifi service is through a company that the campground brings in to connect your RV to - with a free account for the number of days you are staying - but the wifi from these companies is metered - use too much and they cut you back to barely usable speed. This wifi, I anticipated was from the campground directly - and long term residents arranged for local cable. We were in a site right at the office - and the wifi was strong. Just to see what would happen I brought the ROKU and set it up on the Roadtrek TV - it started up just as it does at home, asked me to connect to the wifi signal it found from the Park - and it worked beautifully. We used it for all of two and a half hours - but it was a nice diversion from the local over the air channels.  I am sure we can't do this at most other campgrounds we go to but it is a nice thing to have when it is possible.

THIS IS THE END OF DAY 1.

WE WILL CONTINUE WITH THIS TALE IN TWO WEEKS IN:

"TRIP FOR REPAIRS AND THE MACERATOR'S TALE (DAY 2)"


(When there is not a whole lot to write about any longer,  when you have something long that can work for two articles that is the way to go! 😀 )


Wednesday, October 18, 2017

PUTTING THE HOT WATER HEATER INTO BYPASS

This is an article that we have been asked to write a number of times and it is a common question that comes up on Facebook groups and forums. The Suburban Hot Water Heater in the Roadtrek has THREE (3) BYPASS VALVES to put the hot water heater into BYPASS MODE when winterizing or when you want to take the hot water tank out of the flow of water in the plumbing. The 210 valves and location are at the end of this article.

Here is a photo of the hot water tank inside my Roadtrek 190:


You can see the three valves that need to be set here against the foam insulation around the hot water tank. I will go into detail about these three valves but using this photo, I am going to explain the flow of water in and out of the hot water heater. The water source can be from the water pump or from city water - the water that comes into the plumbing when you connect a fresh water hose with an RV water pressure regulator connected to the hose that is connected to an outdoor water spigot.

Take a look at the pipes in front of the foam insulation around the tank. There is one that goes across the tank at the top. There is one that goes across the tank at the bottom. There is one that goes up and down between those two pipes.

When the hot water tank is in use - NOT BYPASSED - the cold water comes into the hot water tank in the bottom tank. You can see the COLD sticker there next to the valve.  Inside the tank the heating unit makes the water hot and the hot water stays in the tank until you turn on the faucet hot handle or the hot handle on either of the shower faucets. When water leaves the tank, water is instantly put back into the tank at the bottom filling it back up again. As I have written in another article - the hot water tank is never empty - unless you remove the anode rod that is in the compartment for the hot water heater outside on the driver's side of the van. Now knowing this - this is how the valves work.

The valve on the bottom of the tank when OPEN lets water flow into the tank. When it is closed, the cold water does not go into the tank. Here is a photo of the bottom valve closed. Note that this valve broke on my Roadtrek and the service at the Roadtrek dealer replaced it with a metal handled valve - your valve will have a black handle if it is the valve that came from Roadtrek (just like the other valves you see in the photo).


THIS VALVE IS IN BYPASS POSITION. This is how you want to set your valve when it is to be put in BYPASS MODE. Notice that the valve is turned ACROSS the pipe (side to side). THIS VALVE IS CLOSED.   (If this valve was turned in line with that pipe - going from front to back - this valve would be OPEN - allowing water to flow into the hot water tank.) IN BYPASS YOU WANT THIS VALVE TO BE CLOSED - JUST AS IT IS IN THIS PHOTO.

We look next to the valve on the pipe going into the tank at the top of the tank. There is a red sticker that says HOT next to that valve. This is where the hot water comes out of the tank.


THIS VALVE IS IN BYPASS POSITION. This is how you want to set your valve when it is to be put in BYPASS MODE. Notice that the valve is turned ACROSS the pipe (side to side). THIS VALVE IS CLOSED.   (If this valve was turned in line with that pipe - going from front to back - this valve would be OPEN - allowing water to flow OUT OF the hot water tank.) IN BYPASS YOU WANT THIS VALVE TO BE CLOSED - JUST AS IT IS IN THIS PHOTO.

These two valves open or close the pipes that put water into and out of the hot water tank. They are important parts of the BYPASS three valve system - and in BYPASS they must be CLOSED. But we have a third valve - the one on the pipe that goes up and down between the other two pipes. This is actually the main valve for BYPASS. What this VALVE IS OPEN cold water goes from the bottom pipe (where it cannot go into the hot water tank any longer because the bottom valve is CLOSED) and goes up the up and down pipe. Take a look at the valve on that pipe -

 THIS VALVE IS IN BYPASS POSITION. This is how you want to set your valve when it is to be put in BYPASS MODE. BUT TAKE NOTICE  that the valve is turned in line with the direction of the pipe pointing UP. THIS VALVE IS OPEN!   (If this valve was turned across the pipe and the end pointing toward the cabinet opening - pointing toward the aisle - going across the pipe - this valve would be CLOSED and water could not go up the pipe. IN BYPASS YOU WANT THIS VALVE TO BE OPEN - JUST AS IT IS IN THIS PHOTO.

So what happens in BYPASS - cold water comes in at the bottom pipe and goes UP that up and down pipe and goes into the top pipe and then continues along in that pipe to the sink. IF you have your hot water tank in BYPASS - no water ever goes inside the hot water tank - and if you turn on the hot water faucet at the sink or the showers you will get COLD water coming out of the sink - even though you turned the hot water handle on. That is exactly what you want it to do.

Why do you want to Bypass the hot water tank? When winterizing if you do not bypass the hot water tank will fill with RV anti-freeze before that anti-freeze will go into the sink or showers and their respective pipes. The hot water tank is SIX GALLONS! You will waste SIX GALLONS of RV anti-freeze before every putting the RV anti-freeze where it is needed. And since the hot water tank is always full - well that is a lot of wasted anti-freeze! Emptying the hot water tank will protect it just fine. These valves and these pipes will fill with RV anti-freeze in the process I describe in my articles to winterize your Roadtrek.

So let's go back over this step by step  -

1) Turn the bottom valve ACROSS the pipe - CLOSING THE VALVE.

2) Turn the top valve ACROSS the pipe - CLOSING THE VALVE.

3) Turn the middle valve - pipe going up and down - in line with the pipe with the handle pointing UP - OPENING THE VALVE.

YOU NOW HAVE A HOT WATER TANK IN BYPASS!


 In the Spring to put the hot water tank back into the water system to provide hot water reverse these steps. In working position, all the tips of the valve handles point toward the aisle. The top and bottom valves will be OPEN and the up/down pipe valve will be CLOSED.

There is one thing you may want to also do - and this is up to you.  I get concerned that if we are inside the Roadtrek or traveling with it when winterized, one of us might - by accident - turn on the hot water heater switch on the wall - with the hot water tank empty. That will do serious damage to the hot water tank and hot water heater. There is a fuse (the hot water heater is a 12 volt appliance) - not a circuit breaker - in the Roadtrek fuse box for the hot water heater and that is all that is on that fuse. By removing the fuse you cannot turn on the hot water heater - no matter how the switch is set. JUST REMEMBER when de-winterizing to put that fuse back or your hot water heater will not turn on.

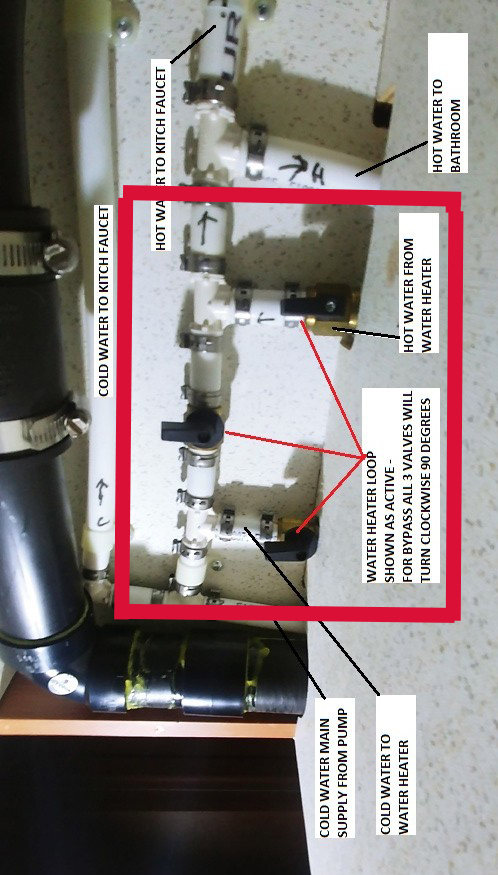
Thanks to a very gracious reader, Nick, we have been able to now include where these valves are in a Chevy Roadtrek 210.  Nick took the photos inside his 210 for us. These same valves are in a different location in the 210. Here is a photo of the cabinet they are located just below the sink -


The valves on the right side of the cabinet on the left wall of the second shelf section

The hot water tank is inside the cabinet to the left..

Here is a close up look inside this section of the cabinet -

You can see the valves pointed to with the red lines and labeled. To orient these to our article turn the photo counterclockwise:

The valves are turned just as they are in the 190 when putting the hot water tank into bypass or taking it out of bypass. 

Here is where the hot and cold water pipes go through the cabinet wall to the cold intake and hot output connections on the hot water tank: