Roadtrek

Roadtrek
Showing posts with label Bypass. Show all posts

Thursday, June 11, 2020

THE DEFINITIVE DEWINTERIZING AND SANITIZING - STEP BY STEP

I have written several articles over the years about how to dewinterize your Roadtrek and sanitize its fresh water tanks, including the hot water tank.  I am writing this article to put all of it together.  I have combined all of the steps and these include changes I have made over the years. As it would be a huge article if I included some of the articles that relate, I will use links to those articles that will offer more explanation for processes that are done not just for dewinterizing and sanitizing fresh tanks.  I will also indicate where you should copy the text of this article so that you can paste it into an easy to take to your Roadtrek document to be able to have all the steps in front of you as your dewinterize and sanitize your Roadtrek.  Please note that this article has the steps in the order I am using now to dewinterize and sanitize my Roadtrek - with the most recent change in 2019.

Here is what you will need:

Fresh Water Hose
Water Pressure Regulator
Liquid Chlorine Bleach (Clorox or off brand is fine) PLEASE NOTE: There is something called "Splash-Less" Bleach. DO NOT BUY THIS FOR SANITIZING YOUR TANKS. It does not have disinfectant properties and will not disinfect surfaces." BUY REGULAR BLEACH. (Thanks to one of our readers, "Tom" for bringing this to our attention!)
Funnel with hose on the end
Measuring Cup (for Bleach)
Small paper cups
Hot Water Tank FLUSH  Wand
Ratchet wrench handle
1-1/16" Socket
Plumbers silicone pipe tape to put on threads of the anode rod when putting it back in.

The process - though there are a lot of steps is easy - and can go quickly. There is a lot of waiting in the process - waiting for tanks to drain, standing and filling the tanks through the door fill holes, and waiting for the bleach to work.

Here we go!

START  COPYING HERE ON -

BEFORE YOU START --- IF YOU PUT RV ANTIFREEZE INTO THE BLACK AND/OR GREY WASTE TANKS, DUMP THOSE TANKS NOW. 
 

DEWINTERIZING STEP BY STEP
 
  1. KEEP THE HOT WATER TANK IN BYPASS WHEN STARTING.
  2.  SET TANK VALVES TO SUMMER MODE.
  3. IF YOU PUT RV ANTIFREEZE INTO YOUR FRESH TANK(S) WHEN WINTRIZING DRAIN THE A/F OUT OF THE TANKS NOW USING THE LOW POINT DRAIN ON THE FRONT EXTERIOR FRESH TANK
  4. FILL THE TWO FRESH WATER TANKS.
  5. AGAIN IF YOU PUT RV ANTIFREEZE INTO YOUR FRESH TANKS - DRAIN THE WATER YOU PUT IN STEP 4 AND FILL AGAIN TO FLUSH THE A/F OUT .
  6. TURN ON THE BATTERY DISCONNECT SWITCH.
  7. TURN ON THE WATER PUMP.
  8. TURN ON COLD SIDE OF SINK – RUN UNTIL ALL PINK (RV ANTIFREEZE) COMES OUT AND CLEAR WATER RUNS. TURN ON HOT SIDE OF SINK AND DO THE SAME.
  9. OPEN SHOWER DRAIN IN FLOOR OR POINT THE SHOWER HOSE INTO THE SINK.
  10. TURN ON COLD ON SHOWER UNTIL CLEAR, REPEAT FOR HOT.
  11. FLUSH TOILET. LET WATER RUN IN TOILET UNTIL YOU DO NOT SEE PINK WATER.
  12. TURN ON COLD OUTSIDE SHOWER UNTIL CLEAR, REPEAT FOR HOT.
  13. TURN OFF WATER PUMP AND BATTERY SWITCH.
  14. OPEN HOT WATER TANK AND FLUSH WITH FLUSH STICK*.
  15. REPLACE ANODE ROD. CLOSE HOT WATER HEATER DOOR.
  16. LEAVE WATER PUMP OFF.
  17. CONNECT HOSE TO CITY WATER LINE WITH PRESSURE REGULATOR.
  18. TURN ON HOSE AND REPEAT STEPS 6 TO 10.
  19. NEXT SANITIZE ALL FRESH TANKS.
 STOP COPYING - PASTE TO A DOCUMENT AND SAVE - YOU WILL BE PASTING MORE.

* GO TO THIS ARTICLE TO FAMILIARIZE YOURSELF WITH FLUSHING THE HOT WATER HEATER TANK USING A FLUSH WAND.


START COPYING AGAIN FROM HERE


SANITIZING THE FRESH WATER TANKS

  1. TURN HOT WATER BYPASS VALVES TO HOT WATER FLOW. 
  2. CONNECT A FRESH WATER HOSE WITH A WATER PRESSURE REGULATOR ONTO THE CITY WATER FILL CONNECTION. 
  3.  USE CITY WATER LINE TO FILL HOT WATER TANK BY RUNNING CITY WATER INTO THAT TANK. (NOT CITY WATER FILL - REGULAR USE OF CITY WATER) GO TO THE SINK, TURN ON HOT WATER AT SINK. AIR WILL COME OUT - AND THE TANK WILL FILL. WHEN IT IS FULL THE WATER WILL RUN STEADILY FROM THE FAUCET. DO NOT TURN ON HOT WATER SWITCH. THIS WILL BE COLD WATER AND THAT IS WHAT NEEDS TO BE.
  4. DISCONNECT CITY WATER CONNECT FROM HOSE.
  5. PUT ONE HALF CUP BLEACH INTO THE FRONT EXTERIOR FRESH TANK. (PRE-MIX THE BLEACH IN A GALLON JUG OF WATER BEFORE PUTTING IT INTO THE FRESH TANK - DO NOT PUT PURE BLEACH INTO THE TANK.) A FUNNEL WITH A HOSE ON THE END IS EASIEST TO GET THE BLEACH/WATER MIX INTO THE FRESH TANK THROUGH THE DOOR FILL HOLE.
  6. PUT ONE QUARTER CUP BLEACH INTO THE REAR INTERIOR FRESH TANK. (PRE-MIX THE BLEACH IN A GALLON JUG OF WATER BEFORE PUTTING IT INTO THE FRESH TANK - DO NOT PUT PURE BLEACH INTO THE TANK.) IF YOUR ROADTREK HAS ONLY ONE FRESH TANK - SKIP THIS STEP.
  7. TOP OFF WATER IN TANKS WITH HOSE.
  8. DRIVE BACK AND FORTH TO MIX THE BLEACH INTO THE WATER.
  9. TURN ON BATTERY SWITCH AND WATER PUMP.
  10. TURN ON EACH FAUCET HANDLE PLUS INSIDE AND OUTSIDE SHOWER ONE HANDLE AT A TIME SMELLING FOR BLEACH TO COME THROUGH WITH EACH. NOT THE TOILET.
  11. NOW YOU WAIT. 
  12. LET BLEACH SIT IN TANKS FOR AT LEAST FOUR HOURS. LONGER IS OK!
  13. DRAIN WATER TANKS.
  14.  NOW WE REMOVE THE BLEACH FROM THE HOT WATER TANK FIRST. 
  15.  1) The hot water tank should NOT be in bypass while sanitizing and it should remain NOT bypassed for this process. DO NOT HAVE ANY SINK FAUCET OR SHOWER FAUCET ON DURING THIS PROCESS EXCEPT WHERE AND WHEN NOTED FOR THE OUTSIDE SHOWER HOT WATER HANDLE. DO NOT TURN ON THE HOT WATER HEATER!

    2) Water pump OFF.

    3) Attach a fresh hose WITH A WATER PRESSURE REGULATOR to the city water inlet and a spigot outside. Turn on the water.

    4) Turn on the outside shower hot water handle and open fully - step back!  Only the hot water handle on the outside shower should be open. No other faucet or shower handle should be on.  As the water comes rushing out of the shower (hose optional) you should smell bleach in the water.

    5) Allow to run for at least 15 minutes. THIS WILL FILL AND  EMPTY THE TANK AT THE SAME TIME - ABOUT THREE TO FIVE TIMES.  YES THE WATER IS FLOWING DOWN THE DRIVEWAY FLUSHING THE HOT WATER TANK.

    6) After a steady flow of water for 15 minutes you should no longer smell bleach in the water coming out. (To test, take a small paper cup , slow the flow of water by turning back the handle and put the cup under the streaming water coming out. Step away from where the water has been flowing and smell the water in the paper cup. You should not smell bleach.)

    7) If you still smell bleach allow the water to continue to flow longer until there is no longer any smell of bleach in the water. (Use a new paper cup if you test again.)

    8) Shut off the hot water outside shower handle.

    9) You have now exchanged all of the water inside the 6 gallon hot water tank several times with fresh water, flushing that tank as many times.

    10) Remove the hose from the city water connection.

    11) PUT THE HOT WATER HEATER INTO BYPASS! You do not want to

    put bleach back into the hot water tank.
  16.  FILL FRESH WATER TANKS AGAIN.
  17.  GO INSIDE THE ROADTREK.
  18.  TURN ON BATTERY SWITCH AND WATER PUMP.
  19.  **TURN ON EACH FAUCET HANDLE PLUS INSIDE AND OUTSIDE SHOWER ONE HANDLE AT A TIME SMELLING FOR BLEACH TO COME THROUGH WITH EACH. NOT THE TOILET - YOU NEVER WANT ANY BLEACH TO GO INTO THE TOILET.
  20. IF YOU DO NOT SMELL BLEACH (GOOD!) SKIP TO #23
  21.  DRAIN TANKS THROUGH THE LOW POINT DRAIN.
  22.  FILL FRESH TANKS AGAIN.
  23.  IF BLEACH SMELL REPEAT FROM STEP #16 AFTER DRAINING FRESH TANKS.
  24.  DRAIN TANKS OR LEAVE FULL FOR TRIP. 
  25. PUT YOUR HOT WATER TANK OUT OF BYPASS NOW SO THAT THE TANK WILL FILL AND YOU WILL HAVE HOT WATER WHEN YOUR TANKS ARE FULL OR ARE USING CITY WATER.  

                                                                    DONE


** When you smell for bleach, run the water into a paper cup and smell the water in the cup. If you run it into the sink the bleach odor will be in the sink and you will smell bleach in the water when you go on to Step 19 after flushing with fresh water. 

 STOP COPYING AND PASTE WHERE YOU LEFT OFF IN YOUR CARRY OUT DOCUMENT

IF YOU DON'T KNOW HOW TO PUT YOUR HOT WATER HEATER INTO BYPASS LOOK HERE!

It seems like a lot but it is not. It is more waiting for the tanks to drain and the bleach to sit in the tanks than doing. The socket wrench and socket are needed to remove the anode rod from the hot water tank to flush it. If the anode rod looks as thin as a pencil REPLACE IT.   If you have never flushed the hot water tank before - copy out the article linked about flushing the hot water tank.  The flush wand is an important tool to have and worth the little it costs.


You can leave your grey and black tanks with the antifreeze and water that went into it in this process until you dump on your next trip. Or dump them now if they are almost full. 

IF YOU WOULD LIKE TO CONTACT US TO ASK A QUESTION ABOUT ANYTHING YOU READ IN THIS ARTICLE PLEASE EMAIL US USING THE LINK IN THE RIGHT COLUMN OF THIS PAGE.


Wednesday, October 18, 2017

PUTTING THE HOT WATER HEATER INTO BYPASS

This is an article that we have been asked to write a number of times and it is a common question that comes up on Facebook groups and forums. The Suburban Hot Water Heater in the Roadtrek has THREE (3) BYPASS VALVES to put the hot water heater into BYPASS MODE when winterizing or when you want to take the hot water tank out of the flow of water in the plumbing. The 210 valves and location are at the end of this article.

Here is a photo of the hot water tank inside my Roadtrek 190:


You can see the three valves that need to be set here against the foam insulation around the hot water tank. I will go into detail about these three valves but using this photo, I am going to explain the flow of water in and out of the hot water heater. The water source can be from the water pump or from city water - the water that comes into the plumbing when you connect a fresh water hose with an RV water pressure regulator connected to the hose that is connected to an outdoor water spigot.

Take a look at the pipes in front of the foam insulation around the tank. There is one that goes across the tank at the top. There is one that goes across the tank at the bottom. There is one that goes up and down between those two pipes.

When the hot water tank is in use - NOT BYPASSED - the cold water comes into the hot water tank in the bottom tank. You can see the COLD sticker there next to the valve.  Inside the tank the heating unit makes the water hot and the hot water stays in the tank until you turn on the faucet hot handle or the hot handle on either of the shower faucets. When water leaves the tank, water is instantly put back into the tank at the bottom filling it back up again. As I have written in another article - the hot water tank is never empty - unless you remove the anode rod that is in the compartment for the hot water heater outside on the driver's side of the van. Now knowing this - this is how the valves work.

The valve on the bottom of the tank when OPEN lets water flow into the tank. When it is closed, the cold water does not go into the tank. Here is a photo of the bottom valve closed. Note that this valve broke on my Roadtrek and the service at the Roadtrek dealer replaced it with a metal handled valve - your valve will have a black handle if it is the valve that came from Roadtrek (just like the other valves you see in the photo).


THIS VALVE IS IN BYPASS POSITION. This is how you want to set your valve when it is to be put in BYPASS MODE. Notice that the valve is turned ACROSS the pipe (side to side). THIS VALVE IS CLOSED.   (If this valve was turned in line with that pipe - going from front to back - this valve would be OPEN - allowing water to flow into the hot water tank.) IN BYPASS YOU WANT THIS VALVE TO BE CLOSED - JUST AS IT IS IN THIS PHOTO.

We look next to the valve on the pipe going into the tank at the top of the tank. There is a red sticker that says HOT next to that valve. This is where the hot water comes out of the tank.


THIS VALVE IS IN BYPASS POSITION. This is how you want to set your valve when it is to be put in BYPASS MODE. Notice that the valve is turned ACROSS the pipe (side to side). THIS VALVE IS CLOSED.   (If this valve was turned in line with that pipe - going from front to back - this valve would be OPEN - allowing water to flow OUT OF the hot water tank.) IN BYPASS YOU WANT THIS VALVE TO BE CLOSED - JUST AS IT IS IN THIS PHOTO.

These two valves open or close the pipes that put water into and out of the hot water tank. They are important parts of the BYPASS three valve system - and in BYPASS they must be CLOSED. But we have a third valve - the one on the pipe that goes up and down between the other two pipes. This is actually the main valve for BYPASS. What this VALVE IS OPEN cold water goes from the bottom pipe (where it cannot go into the hot water tank any longer because the bottom valve is CLOSED) and goes up the up and down pipe. Take a look at the valve on that pipe -

 THIS VALVE IS IN BYPASS POSITION. This is how you want to set your valve when it is to be put in BYPASS MODE. BUT TAKE NOTICE  that the valve is turned in line with the direction of the pipe pointing UP. THIS VALVE IS OPEN!   (If this valve was turned across the pipe and the end pointing toward the cabinet opening - pointing toward the aisle - going across the pipe - this valve would be CLOSED and water could not go up the pipe. IN BYPASS YOU WANT THIS VALVE TO BE OPEN - JUST AS IT IS IN THIS PHOTO.

So what happens in BYPASS - cold water comes in at the bottom pipe and goes UP that up and down pipe and goes into the top pipe and then continues along in that pipe to the sink. IF you have your hot water tank in BYPASS - no water ever goes inside the hot water tank - and if you turn on the hot water faucet at the sink or the showers you will get COLD water coming out of the sink - even though you turned the hot water handle on. That is exactly what you want it to do.

Why do you want to Bypass the hot water tank? When winterizing if you do not bypass the hot water tank will fill with RV anti-freeze before that anti-freeze will go into the sink or showers and their respective pipes. The hot water tank is SIX GALLONS! You will waste SIX GALLONS of RV anti-freeze before every putting the RV anti-freeze where it is needed. And since the hot water tank is always full - well that is a lot of wasted anti-freeze! Emptying the hot water tank will protect it just fine. These valves and these pipes will fill with RV anti-freeze in the process I describe in my articles to winterize your Roadtrek.

So let's go back over this step by step  -

1) Turn the bottom valve ACROSS the pipe - CLOSING THE VALVE.

2) Turn the top valve ACROSS the pipe - CLOSING THE VALVE.

3) Turn the middle valve - pipe going up and down - in line with the pipe with the handle pointing UP - OPENING THE VALVE.

YOU NOW HAVE A HOT WATER TANK IN BYPASS!


 In the Spring to put the hot water tank back into the water system to provide hot water reverse these steps. In working position, all the tips of the valve handles point toward the aisle. The top and bottom valves will be OPEN and the up/down pipe valve will be CLOSED.

There is one thing you may want to also do - and this is up to you.  I get concerned that if we are inside the Roadtrek or traveling with it when winterized, one of us might - by accident - turn on the hot water heater switch on the wall - with the hot water tank empty. That will do serious damage to the hot water tank and hot water heater. There is a fuse (the hot water heater is a 12 volt appliance) - not a circuit breaker - in the Roadtrek fuse box for the hot water heater and that is all that is on that fuse. By removing the fuse you cannot turn on the hot water heater - no matter how the switch is set. JUST REMEMBER when de-winterizing to put that fuse back or your hot water heater will not turn on.

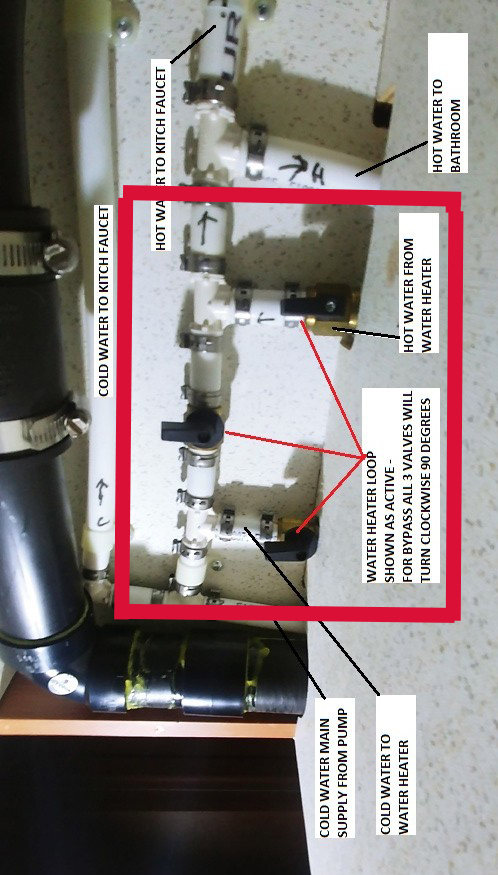
Thanks to a very gracious reader, Nick, we have been able to now include where these valves are in a Chevy Roadtrek 210.  Nick took the photos inside his 210 for us. These same valves are in a different location in the 210. Here is a photo of the cabinet they are located just below the sink -


The valves on the right side of the cabinet on the left wall of the second shelf section

The hot water tank is inside the cabinet to the left..

Here is a close up look inside this section of the cabinet -

You can see the valves pointed to with the red lines and labeled. To orient these to our article turn the photo counterclockwise:

The valves are turned just as they are in the 190 when putting the hot water tank into bypass or taking it out of bypass. 

Here is where the hot and cold water pipes go through the cabinet wall to the cold intake and hot output connections on the hot water tank: