Roadtrek

Roadtrek
Showing posts with label grey tank. Show all posts

Thursday, May 7, 2026

WHEN YOU HAVE TO GO - YOU HAVE TO GO ---> THE TOILET IN THE ROADTREK

 Toilets are everywhere. Toilets are in houses, in apartments, in stores, in schools, in restaurants, in places of worship, in hotels, in theaters, on street in some places, at rest stops, and in Roadtreks!  The toilet in Roadtrek is one of the big advantages of the Roadtrek when traveling or just taking the Roadtrek for a ride.  If you have to go, you do not have to start looking for a rest area or someplace to stop that has a restroom. All you have to do is pull over, park, and get out of your seat and walk halfway back into the van and there is a toilet! 

 The Chevy Roadtrek came with two different types of "bathrooms". One is what Roadtrek called the "aisle bath".  This consists of a door into an open space that is a little bit like a small closet in a house with a toilet inside facing the aisle and next to the toilet is a shower curtain that is pulled out along a track into the aisle for the shower that is there at the front corner near the ceiling of the aisle bath.  With this style bathroom you sit with your legs and feet into the aisle. If you are showering you stand in the aisle with the shower curtain pulled around you. On the fiberglass floor in the aisle the floor is slanted toward the front of the van where under a plate that is removable along a open slot on the floor there is a drain that connects below into the grey waste tank (grey meaning just water and soap goes into it). 


In the aisle bath there is no bathroom sink. Instead Roadtrek provided a heavy plastic molded bowl with wide rim that fits into the kitchen sink which is just opposite of the aisle bathroom that goes into the sink and lines up exactly and goes into the sink drain to use as a bathroom sink - designed in such a way that washing your hands from using the toilet kept all water and that which is washed off your hands so that it goes directly down the sink drain and never touches the inside of the sink - or the top rim of the drain. Since one is sitting in or showering in the aisle the door does open in such as way as to block the view to to your traveling companion in the front of the van.  In earlier Roadtreks there was a half cabinet door next to the aisle bath that opened and the top blocked and a curtain that hung down from the bottom of the door to block the view from the back - or any window without a closed curtain. Our 2011 190 Popular did not have that back half cabinet door with curtain. The half cabinet door is there above but no curtain to block below.  One can open the shower curtain. Meryl made a drape out of a black bed sheet cut down to size with magnets sewn into the top seam to attach to the shower curtains metal track on the ceiling with completely blocks the view from the back.  But if one is traveling with a very close significant other - as I have said in prior articles - there is zero privacy inside a Roadtrek anyway -  and you are not seeing anything that has not been seen before. 😉  

  
The other style of Roadtrek bathroom which was first coming out when we first started looking to buy a Roadtrek in 1990 is a "private or permanent bath" This bathroom has a much wider closet which not only contains the toilet and the shower but also a sink inside the bathroom with plumbing connecting to the shower.  It is possible to completely close yourself into the cabinet - though if one is claustrophobic it can be a bit UN-nerving. The door is hinged so that it can remain open. The private bath because it is longer along the aisle than the aisle bath does take away storage cabinet space resulting in less storage. I do not have a photo of the permanent bath (not sure why RT decided to call it a permanent bath as it is no more permanent than the aisle bath which is not going anywhere.
 
The toilets in an RV are not like the toilet you have in your home. The home toilet has a tank above the bowl to hold clean water that when flushed empties into the bowl and the bowl drain will carry the waste and the water in the bowl down into the house's septic system - either sewer  or septic tank or cesspool.  The RV toilet has no such tank above the bowl.  When you step on the flush pedal centered at the bottom of the toilet base, that opens a valve which runs water from either your water pump or city water (water from a connected hose to a spigot outside) and at the same time opens a drain flap at the bottom of the bowl and washes the contents down the drain and into the black tank. Take your foot off the pedal and the flap closes and the water shuts off.  Now - doesn't all of this SMELL??!!!  No, there is a vent that goes from the black tank up through the Roadtrek wall behind the toilet and up through the ceiling and out the roof to vent any sewer gas - odor - out above the Roadtrek roof and away! There is more that one can do about odor - that I will go into later in this article. 
 
OK so now you know about the two types of Chevy Roadtrek bathrooms but what about using them.  Of course you know how to use them, but there are some Roadtrek owners who will not use the toilet in the Roadtrek bathroom regardless of the type.  Some who use it will not flush toilet paper down into the black tank from the toilet bowl!   Why?   Older Roadtreks had a gravity dump system to dump (empty) the black (waste and water from the toilet - the black tank in the Chevy Roadtreks is 10 gallons) and water and soap from the grey tank. A gravity dump system relies on gravity to bring the waste from the waste tanks into a wide hose which is connected to a sewer hole at a campsite. The problem with a Class B RV like the Roadtrek is there is not much height off the ground for gravity to be strong enough to get the waste all out of the tanks. At some campsites the sewer hole is above on a small hill - there is not enough gravity to get the waste up the hill.  So what does Roadtrek do? They started using a macerator. A macerator is an electric motor which pumps waste from the black and grey tanks into a smaller - one inch diameter hose and that hose is put into the opening of the sewer drain of the campsite and the waste is ground up inside the macerator by spinning metal knife blades and out the hose into the sewer hole. It takes just a few minutes to empty a tank instead of waiting for gravity to take its course. The macerator can pump up hill if need be. Sounds great - so why will some not use the toilet? Because the macerator if the right toilet paper is not used can jam or clog,  Also the macerator can not cut up anything really solid - so one must be careful that objects are not dropped down into the toilet. The macerator can break - what breaks is the nylon impeller that spins to pump - and then it does not pump any more. It can be repaired but more often it is easier to just replace the macerator with a new one. One RV service tech at a dealer told me that the most common thing that they find inside macerators that have gone bad is hair.  Hair goes down the shower drain - or sink drain - and gets into the macerator and wraps itself around the impeller and as it collects it jams the impeller preventing it from turning and burns out the motor. This is very much like what happens with a vacuum cleaner's roller that picks up hair and it wraps around the brush roller under the vacuum cleaner head. 
 
Everyone can do whatever they please in this regard but I did not spend what I spent to buy the Roadtrek to not use the toilet or to collect dirty toilet paper in a plastic bag or a wood box on the wall (yes, I have read multiple times about the toilet paper box)! What goes into the toilet including toilet paper gets flushed into the black tank in my Roadtrek.  Our macerator lasted 9 years before it stopped working. If you use the right toilet paper there will be no problem. 
 
What is the right toilet paper.  One can buy special toilet paper for RVs - it is expensive and while most  does breakdown completely once in water, not all do.  What we do is use Scott's home single ply toilet paper. A few sheets off the roll are strong enough to do a good clean up- and once in water it breaks down completely in a few minutes. (We are not paid by Scotts to feature their toilet paper - it just works well!) There is a test that one can do to test toilet paper for use in an RV. Take one sheet of toilet paper and put it in a clear glass of water.  Stir a couple of times and wait. In a few minutes if the toilet paper is OK for your RV toilet the paper will have disintegrated to fibers in the water. If it does that use it. If it doesn't - don't use it!
 
To help breakdown the waste that goes into the black tank, there are RV toilet treatments that both break down waste and stop odors.  There are many different ones. With the Roadtrek's macerator do not use one that comes in dissolving packets - as they do not completely dissolve and it will jam the macerator.  You also do not want to  use tablets for the same reason. The best thing to get is the liquid in a bottle. The bottles usually have a measuring guide along the side - or you can get a measuring cup to use to measure out the amount needed. Then after you dump if you are going to continue to travel right then with your Roadtrek or before you leave on a trip, you put this down into the toilet and flush it down into the black tank. I have found that the one that has worked the best is Camco TST RV tank treatment. It comes in different scents. The easiest scent to find is Orange as this is sold in most Walmart stores on the shelves in the auto aisles where they have RV supplies.  There is also citrus - not as orange and there is "fresh scent". 
 
For some time it was popular called the GEO Method to use a home made mixture of  Borax powder dissolved in hot water and Dawn dish washing detergent followed down into the black tank with several gallons of water.  We tried this for one full RV season. The mixing became a pain. The water needed to be added down into the tank took away a significant volume of what the tank was supposed to hold - the waste and we were dumping the black tank much more frequently. It did not work any better than the Camco TST. It did not fix the black tank sensors to work accurately. It involved carrying more than the just one bottle of tank treatment that cost less than the borax and detergent. We went back to the TST. 
 
The one thing your RT black tank likes more than anything else is water. You should never allow the black tank to dry out. It must be kept moist as not all of the waste is going to get dumped out of the tank. If the tank is dry after dumping that waste builds up - dries out and will clog the opening into the pipe to the macerator and stay inside the tank.  The fix is simple - put in one gallon of water into the black tank after dumping the tank and leave it there.   I have a collapsible silicone gallon pail that is easy to fill up and dump into the toilet and down into the black tank. It is flat when not in use and fits easily into one of the RT storage cabinets. The other place to keep moist is the flap in the toilet bowl. That needs to be kept moist so that the rubber flap which seals the toilet bowl to hold water does not dry out - as if it does the toilet will not hold water and you are using the bowl dry which means some cleaning that you do not want to do.  To put water into the bowl after flushing just hold the foot pedal down only part way and the flap will stay closed and water will go into the toilet bowl. Once the flap is under water stop.  With both of these - when winterizing and there is no water - use RV antifreeze into the black tank to keep it moist and do the same over the flap. 
 
What can go wrong with the toilet? One thing that we experienced when our RT was winterized the first two years that we had it was that at that time the winterizing process started with using compressed air to clear out the plumbing before using the RV antifreeze. NOTE DO NOT DO THIS!  The compressed air pushed mineral deposits in the pipes into the toilet flush valve - the valve behind the left side of the back of the toilet - looking from the front of the toilet - and the mineral deposits jammed and broke the flush valve. This happened after dewinterizing on a trip and the water flooded the floor of the Roadtrek and the only way to stop it was to shut off the water pump - turning it back on caused the flooding to start again. Our RT was under warranty at the time and the dealer service replaced the flush valve. We were not aware that the compressed air did this and winterized the same way with the air the next year-  and the same thing happened when we de-winterized.  This time the service shop took the valve apart and rebuilt it.  What else can go wrong? Even with the flush flap moist with water in the bowl after 12 years the toilet bowl stopped holding water. I tried different recommended ways to fix this - none worked. Recommended was get a silicone plumbers gel lubricant and open the flap and smear the lubricant all around the bottom edge of the flap - it still leaked all water out and down the toilet drain in a day. There is a liquid lubricant for this - hard to find.  Got one local RV repair shop to order a bottle for me - did not work! We took the Roadtrek to that dealer who replaced the rubber flap and the rubber seal between the toilet drain and the black tank pipe. (The two seals are sold as set.) To do this the toilet had to be removed from the floor, plumbing disconnected, and the bottom seal is put onto the toilet from the bottom of the toilet - and the flush flap seal is also put in the same way. Some try to do this with the toilet in place - but the drain seal can only be put in with the toilet off the floor. If flush seal is bad so is the drain seal. 
 
Alternatives to a regular RV toilet -- 
Some look to replace the toilet with a composting toilet. Some years back when the original Roadtrek was still in business, Roadtrek was asked on a forum why they did not put a composting toilet into the Roadtrek. Their answer was - the inside of the van is so small that a composting toilet's odor will overwhelm the inside of the Roadtrek. That is not something you want to sleep with inside.  Also - RVs that have composting toilets are not only larger but there is an access panel from outside to inside where the toilet is to empty the compost out. Without this you are scooping and carrying compost through the Roadtrek and out - and finding a place to put it. More stench! 
 
Then there are cassette toilets. A cassette toilet collects the waste into a box which has to be removed and carried to a restroom and poured out into a toilet - hopefully not including it pouring on your legs and feet. Again RVs - and some Class Bs have an access panel through the RV wall form outside to get the box out and not have to carry it through the RV to get it out. I saw a very funny episode of a show from England where composing toilets are popular in RVs (there called Caravans).  The man in the show pulled the cassette out through the access panel and it started to spill on him and the ground and then he started off looking for a place to pour it out and getting there it emptied itself all over him. It was funny - and done for humor but oh so possible to happen. 
 
Is there something to use if your toilet is not working. Yes - this article shows that and explains it. Go to the end of the article and read about DOUBLE DOODIE  Toilet Waste Bags! 
 
 Well that is everything you either wanted to know or rather that you did not know about the Roadtrek toilet. 
 
If you have questions - email us with the link in the right column that says Email Us.  


Thursday, June 11, 2020

THE DEFINITIVE DEWINTERIZING AND SANITIZING - STEP BY STEP

I have written several articles over the years about how to dewinterize your Roadtrek and sanitize its fresh water tanks, including the hot water tank.  I am writing this article to put all of it together.  I have combined all of the steps and these include changes I have made over the years. As it would be a huge article if I included some of the articles that relate, I will use links to those articles that will offer more explanation for processes that are done not just for dewinterizing and sanitizing fresh tanks.  I will also indicate where you should copy the text of this article so that you can paste it into an easy to take to your Roadtrek document to be able to have all the steps in front of you as your dewinterize and sanitize your Roadtrek.  Please note that this article has the steps in the order I am using now to dewinterize and sanitize my Roadtrek - with the most recent change in 2019.

Here is what you will need:

Fresh Water Hose
Water Pressure Regulator
Liquid Chlorine Bleach (Clorox or off brand is fine) PLEASE NOTE: There is something called "Splash-Less" Bleach. DO NOT BUY THIS FOR SANITIZING YOUR TANKS. It does not have disinfectant properties and will not disinfect surfaces." BUY REGULAR BLEACH. (Thanks to one of our readers, "Tom" for bringing this to our attention!)
Funnel with hose on the end
Measuring Cup (for Bleach)
Small paper cups
Hot Water Tank FLUSH  Wand
Ratchet wrench handle
1-1/16" Socket
Plumbers silicone pipe tape to put on threads of the anode rod when putting it back in.

The process - though there are a lot of steps is easy - and can go quickly. There is a lot of waiting in the process - waiting for tanks to drain, standing and filling the tanks through the door fill holes, and waiting for the bleach to work.

Here we go!

START  COPYING HERE ON -

BEFORE YOU START --- IF YOU PUT RV ANTIFREEZE INTO THE BLACK AND/OR GREY WASTE TANKS, DUMP THOSE TANKS NOW. 
 

DEWINTERIZING STEP BY STEP
 
  1. KEEP THE HOT WATER TANK IN BYPASS WHEN STARTING.
  2.  SET TANK VALVES TO SUMMER MODE.
  3. IF YOU PUT RV ANTIFREEZE INTO YOUR FRESH TANK(S) WHEN WINTRIZING DRAIN THE A/F OUT OF THE TANKS NOW USING THE LOW POINT DRAIN ON THE FRONT EXTERIOR FRESH TANK
  4. FILL THE TWO FRESH WATER TANKS.
  5. AGAIN IF YOU PUT RV ANTIFREEZE INTO YOUR FRESH TANKS - DRAIN THE WATER YOU PUT IN STEP 4 AND FILL AGAIN TO FLUSH THE A/F OUT .
  6. TURN ON THE BATTERY DISCONNECT SWITCH.
  7. TURN ON THE WATER PUMP.
  8. TURN ON COLD SIDE OF SINK – RUN UNTIL ALL PINK (RV ANTIFREEZE) COMES OUT AND CLEAR WATER RUNS. TURN ON HOT SIDE OF SINK AND DO THE SAME.
  9. OPEN SHOWER DRAIN IN FLOOR OR POINT THE SHOWER HOSE INTO THE SINK.
  10. TURN ON COLD ON SHOWER UNTIL CLEAR, REPEAT FOR HOT.
  11. FLUSH TOILET. LET WATER RUN IN TOILET UNTIL YOU DO NOT SEE PINK WATER.
  12. TURN ON COLD OUTSIDE SHOWER UNTIL CLEAR, REPEAT FOR HOT.
  13. TURN OFF WATER PUMP AND BATTERY SWITCH.
  14. OPEN HOT WATER TANK AND FLUSH WITH FLUSH STICK*.
  15. REPLACE ANODE ROD. CLOSE HOT WATER HEATER DOOR.
  16. LEAVE WATER PUMP OFF.
  17. CONNECT HOSE TO CITY WATER LINE WITH PRESSURE REGULATOR.
  18. TURN ON HOSE AND REPEAT STEPS 6 TO 10.
  19. NEXT SANITIZE ALL FRESH TANKS.
 STOP COPYING - PASTE TO A DOCUMENT AND SAVE - YOU WILL BE PASTING MORE.

* GO TO THIS ARTICLE TO FAMILIARIZE YOURSELF WITH FLUSHING THE HOT WATER HEATER TANK USING A FLUSH WAND.


START COPYING AGAIN FROM HERE


SANITIZING THE FRESH WATER TANKS

  1. TURN HOT WATER BYPASS VALVES TO HOT WATER FLOW. 
  2. CONNECT A FRESH WATER HOSE WITH A WATER PRESSURE REGULATOR ONTO THE CITY WATER FILL CONNECTION. 
  3.  USE CITY WATER LINE TO FILL HOT WATER TANK BY RUNNING CITY WATER INTO THAT TANK. (NOT CITY WATER FILL - REGULAR USE OF CITY WATER) GO TO THE SINK, TURN ON HOT WATER AT SINK. AIR WILL COME OUT - AND THE TANK WILL FILL. WHEN IT IS FULL THE WATER WILL RUN STEADILY FROM THE FAUCET. DO NOT TURN ON HOT WATER SWITCH. THIS WILL BE COLD WATER AND THAT IS WHAT NEEDS TO BE.
  4. DISCONNECT CITY WATER CONNECT FROM HOSE.
  5. PUT ONE HALF CUP BLEACH INTO THE FRONT EXTERIOR FRESH TANK. (PRE-MIX THE BLEACH IN A GALLON JUG OF WATER BEFORE PUTTING IT INTO THE FRESH TANK - DO NOT PUT PURE BLEACH INTO THE TANK.) A FUNNEL WITH A HOSE ON THE END IS EASIEST TO GET THE BLEACH/WATER MIX INTO THE FRESH TANK THROUGH THE DOOR FILL HOLE.
  6. PUT ONE QUARTER CUP BLEACH INTO THE REAR INTERIOR FRESH TANK. (PRE-MIX THE BLEACH IN A GALLON JUG OF WATER BEFORE PUTTING IT INTO THE FRESH TANK - DO NOT PUT PURE BLEACH INTO THE TANK.) IF YOUR ROADTREK HAS ONLY ONE FRESH TANK - SKIP THIS STEP.
  7. TOP OFF WATER IN TANKS WITH HOSE.
  8. DRIVE BACK AND FORTH TO MIX THE BLEACH INTO THE WATER.
  9. TURN ON BATTERY SWITCH AND WATER PUMP.
  10. TURN ON EACH FAUCET HANDLE PLUS INSIDE AND OUTSIDE SHOWER ONE HANDLE AT A TIME SMELLING FOR BLEACH TO COME THROUGH WITH EACH. NOT THE TOILET.
  11. NOW YOU WAIT. 
  12. LET BLEACH SIT IN TANKS FOR AT LEAST FOUR HOURS. LONGER IS OK!
  13. DRAIN WATER TANKS.
  14.  NOW WE REMOVE THE BLEACH FROM THE HOT WATER TANK FIRST. 
  15.  1) The hot water tank should NOT be in bypass while sanitizing and it should remain NOT bypassed for this process. DO NOT HAVE ANY SINK FAUCET OR SHOWER FAUCET ON DURING THIS PROCESS EXCEPT WHERE AND WHEN NOTED FOR THE OUTSIDE SHOWER HOT WATER HANDLE. DO NOT TURN ON THE HOT WATER HEATER!

    2) Water pump OFF.

    3) Attach a fresh hose WITH A WATER PRESSURE REGULATOR to the city water inlet and a spigot outside. Turn on the water.

    4) Turn on the outside shower hot water handle and open fully - step back!  Only the hot water handle on the outside shower should be open. No other faucet or shower handle should be on.  As the water comes rushing out of the shower (hose optional) you should smell bleach in the water.

    5) Allow to run for at least 15 minutes. THIS WILL FILL AND  EMPTY THE TANK AT THE SAME TIME - ABOUT THREE TO FIVE TIMES.  YES THE WATER IS FLOWING DOWN THE DRIVEWAY FLUSHING THE HOT WATER TANK.

    6) After a steady flow of water for 15 minutes you should no longer smell bleach in the water coming out. (To test, take a small paper cup , slow the flow of water by turning back the handle and put the cup under the streaming water coming out. Step away from where the water has been flowing and smell the water in the paper cup. You should not smell bleach.)

    7) If you still smell bleach allow the water to continue to flow longer until there is no longer any smell of bleach in the water. (Use a new paper cup if you test again.)

    8) Shut off the hot water outside shower handle.

    9) You have now exchanged all of the water inside the 6 gallon hot water tank several times with fresh water, flushing that tank as many times.

    10) Remove the hose from the city water connection.

    11) PUT THE HOT WATER HEATER INTO BYPASS! You do not want to

    put bleach back into the hot water tank.
  16.  FILL FRESH WATER TANKS AGAIN.
  17.  GO INSIDE THE ROADTREK.
  18.  TURN ON BATTERY SWITCH AND WATER PUMP.
  19.  **TURN ON EACH FAUCET HANDLE PLUS INSIDE AND OUTSIDE SHOWER ONE HANDLE AT A TIME SMELLING FOR BLEACH TO COME THROUGH WITH EACH. NOT THE TOILET - YOU NEVER WANT ANY BLEACH TO GO INTO THE TOILET.
  20. IF YOU DO NOT SMELL BLEACH (GOOD!) SKIP TO #23
  21.  DRAIN TANKS THROUGH THE LOW POINT DRAIN.
  22.  FILL FRESH TANKS AGAIN.
  23.  IF BLEACH SMELL REPEAT FROM STEP #16 AFTER DRAINING FRESH TANKS.
  24.  DRAIN TANKS OR LEAVE FULL FOR TRIP. 
  25. PUT YOUR HOT WATER TANK OUT OF BYPASS NOW SO THAT THE TANK WILL FILL AND YOU WILL HAVE HOT WATER WHEN YOUR TANKS ARE FULL OR ARE USING CITY WATER.  

                                                                    DONE


** When you smell for bleach, run the water into a paper cup and smell the water in the cup. If you run it into the sink the bleach odor will be in the sink and you will smell bleach in the water when you go on to Step 19 after flushing with fresh water. 

 STOP COPYING AND PASTE WHERE YOU LEFT OFF IN YOUR CARRY OUT DOCUMENT

IF YOU DON'T KNOW HOW TO PUT YOUR HOT WATER HEATER INTO BYPASS LOOK HERE!

It seems like a lot but it is not. It is more waiting for the tanks to drain and the bleach to sit in the tanks than doing. The socket wrench and socket are needed to remove the anode rod from the hot water tank to flush it. If the anode rod looks as thin as a pencil REPLACE IT.   If you have never flushed the hot water tank before - copy out the article linked about flushing the hot water tank.  The flush wand is an important tool to have and worth the little it costs.


You can leave your grey and black tanks with the antifreeze and water that went into it in this process until you dump on your next trip. Or dump them now if they are almost full. 

IF YOU WOULD LIKE TO CONTACT US TO ASK A QUESTION ABOUT ANYTHING YOU READ IN THIS ARTICLE PLEASE EMAIL US USING THE LINK IN THE RIGHT COLUMN OF THIS PAGE.


Friday, April 26, 2019

A TRIP FOR REPAIRS AND THE MACERATOR'S TALE (DAY 1)

Back when we winterized in November, we discovered that the macerator was not pumping. It ran but nothing came out. At first when we tried its usual easily heard sound when it runs was barely audible. While we have run the macerator and dumped the tanks on the driveway before (one bucket at a time) and it has never been a problem, my overly, at times, over analytical mind started coming up with reasons why it was not pumping other than the obvious one - it was broken.  We put it lower down on the incline of the driveway - no difference. We got out the Andersen Levelers and made the Roadtrek level - no difference. On the last attempt I could smell a burning smell coming from the location of the macerator under the van - and then we stopped.

Since we have some readers who I know are not RVers or who are prospective but not yet RV owners, I will explain what a macerator is. It is a water pump installed in the RV - in the case of Roadtreks since the early 2000's permanently installed under the van in the front connected to the waste tank system. There are two waste tanks in most RVs - one is connected to the water drain in the toilet - called the "Black Tank", and one connected to the water drains in the sink and shower -called the "Grey Tank". There are two gate valves that connect the tanks by pulling a handle to the waste removal system - which can be as simple as a hose that uses gravity to take the waste out of each tank, through the hose, and into a sewer hole in the ground - at a campground or other "dump" site. The other system uses a pump - which is what the Roadtrek has - and this pump has sharp, stainless steel blades that spin at high speed and macerate - chop up really fine - any waste that comes out of the waste tanks and then pumps that through a small hose out to the sewer hole in the ground. The advantage of a macerator is that if for some reason the sewer hole was higher than gravity would work to get the waste to it - the macerator is an electric pump and can pump uphill. It is also a fast way to empty (dump) each tank.  The downside of a macerator is that if it breaks then you cannot get the waste out of the tanks and also - you must never put into the waste tanks anything that the macerator will not be able to chop up - so what comes out of you is fine, quick dissolving toilet paper - such as Scott's regular house one-ply is good, but never anything really solid, no drop in bags of chemical as those bags despite what they say don't dissolve, no cleaning wipes, no hair - wraps around the shaft - etc.  Well, ours - after almost 8 years broke.

Back in February I decided that I needed to contact the RV dealer/service center that we have gone for all of our repairs, and try to get an appointment when likely there would no longer be any snow or ice to make the trip to Pennsylvania. I emailed the service rep that we have come to know very well over the years and asked for an appointment in early April. The earliest appointment they had was April 24, 2019.  We had no choice but to accept it. I provided a list of problems which at the time included the macerator not working, a vent fan lid on the roof of the Roadtrek that was stuck and would not open, and that since we were making the trip, to change the oil in the electric generator that is installed under the Roadtrek chassis.  There was no problem - they could do it all when we came. BUT we had to get there early that day - no later than 8:00 am (which right before the date of the trip they agreed to could be 9:00 am when the shop opens to start working).  Since we bought the Roadtrek there, they have always been able to accommodate us to get there around 11:00 am - leaving that morning from NY to make the near 3 hour trip one way. Only once before had they said we had to be there early for the job that needed to be done. While it is possible to stay overnight right at the service center plugged into their 30 amp electrical outlet to run the RV overnight - we would have no toilet to use - as their dealer hours are to 8:00 pm to get into the restroom. This was not going to work out too well for us. I decided we had to find a nearby campground.

There were two campgrounds to consider - one was off in the woods not too far away - but on Google maps the roads in and out always seem to show a problem with road conditions on the map.  The other is a residential motorhome community - that also has RV sites that can be taken for one night or longer up to a month. What is nice about Google Maps is you can set it to satellite view and with this I could see the entire place from above - close up. It was all pavement and grass with paved spaces for the RVs which is always nice to have. They also had a restroom open 24 hours only for those staying who did not have toilet facilities in their RV - which at that moment would be us! I will write an article about this place on its own. We contacted them for a availability for the night of April 23, 2019 and found out - much to my surprise - that they had ONE site open on that night - and if we wanted it we had to confirm it quickly. We confirmed and sent them a check in advance - payment in full for one night. All set and done!

 From then it was wait anxiously to the date we would leave - and hope that everything would go smoothly getting there and having the work done without a glitch. We had not planned to dewinterize  before we went - and would just leave the antifreeze in the plumbing. As it turned out the temperatures started to rise and there were a few 70 degree days in early April. It seemed like there was no longer going to be any freezing nights - and we decided to dewinterize - but to expedite that we would dewinterize it all but sanitize only one of the two fresh water tanks and plumbing with bleach and water. We could easily sanitize the rest when we got back after the repair trip.

After dewinterizing, I took advantage of the several nice days - when it was not raining which it still was - and still is - doing regularly - and do a few things that are done before the traveling in the RV season starts. I pulled out the ladder - I don't like ladders - and went up to the Roadtrek roof to lubricate the crank up, directional antenna. While up there - and I am rarely up there, I decided to take a close look at the vent fan lid to see what was making it stick and not open. I moved the ladder to the other side of the van - had Meryl hold is securely on the inclined driveway while I went up - and reached over to the edge of the lid that I could barely reach in the middle of the roof. The side I got to was loose and seemed like it was not stuck at all. The opposite side is connected to a metal lift arm and that was solid.  Down the ladder, step by step, and I went inside the Roadtrek. I reached up for the manual knob that you turn to open the vent lid and I got to the point that it would stop turning and gave it a slightly stronger turn and it kept turning and the lid raised up on its hinge. I put it up and down several times and it seemed fine. Why had I not done this before (as it was stuck down since September)? I was concerned that if I could open it and then found it would no longer close we would have BIG trouble with a square foot hole in the roof and regular days of rain!  I was feeling brave - having been up on the roof anyway - and tried it. One less repair to have done at the dealer/service! Just for good measure, I used some silicone spray on a cloth to lubricate the lift arm. I could do this from inside the van.  I may write an article about that process soon.

The date to leave was coming up. I let the service shop know that the fan lid was no longer stuck and confirmed that all necessary parts would be there when we got there to start and finish the job that day. All was confirmed.

The weather for the trip down was going to be warm - much warmer than usual. We started out at 10:00 am and met up with the usual bumper to bumper traffic getting off Long Island and onto the mainland of the United States - which is New Jersey from our location heading to where we were heading. The trip generally takes about 45 minutes to one hour to get from home to Brooklyn, crossing a toll bridge and going to Staten Island where there is another toll bridge across to New Jersey. This particular morning it took more than TWO HOURS! We finally get on the highway in New Jersey and head for the New Jersey Turnpike entrance. The entrance ramp is moving - and we get halfway toward the toll booths along a winding entrance ramp - and then traffic stops. There is a cut off to a local industrial and business area along that ramp that all traffic was being directed into that. When we got up there we saw it - a large tractor trailer truck over completely on its side totally across and blocking the ramp that went to the turnpike tolls and actual entrance to the turnpike. There were four police cars and a their policemen all standing looking at the truck. Had just one of them been at the turn off to the exit from the highway that took us into the turnpike entrance - none of the cars and trucks - and us - even gotten off to get into this mess of where is this now taking us.  It is not an area that we have never been to before - though not in the Roadtrek and it is a labyrinth of roads around office buildings and factories - with no indications of which way to go and get out. And two GPS's that I had running - the one in the dash with no traffic routing - and the one in the CoPilot app with traffic kept trying to get us back to where the tractor trailer was blocking the useless entrance to the turnpike. We wasted a lot of time there. Meryl will tell you that she kept telling me to find a place to just park and we could figure it out - which I eventually did and she got out an old AAA real paper map of New Jersey and found that the next entrance to the New Jersey Turnpike was off Route 1 and she found the roads to get us there. All together we were just about past the time we should have ordinarily arrived at where we were headed in Pennsylvania.  Getting to US 1 was mostly streets and we finally got to the turnpike and we were then moving!  A call came to Meryl's phone - it was the campground. They wanted to make sure we were coming and if we did not get there before 4:00 pm they would leave a cone in our site so that we could find it on our own. It was after 2:30 pm when we arrived.

 We pulled into the  nice concrete and paved site but slightly uneven in the paving so it took a little moving the Roadtrek around in the site to find where it was most level -  more for comfort than anything else. We always mark where that level position is in relation to the tires (as I have written about in the past) and set the reflector markers down on the ground. We checked the power box to make sure the wiring for polarity was correct and the voltage was not too low or too high. All was fine. And with that we backed out of the pull in site and headed to the RV service shop just to check the route and the time it would take to get there the next morning. We timed that out and then headed for the fast food restaurant nearby for lunch.

While it was not as early as we had hoped it would be when we got there, we had figured to take a drive further north to spend some time in the Cabela's Store in Hamburg, PA and then after that have dinner in a restaurant that we know back to the east along Rt. 78 and Rt, 22.

On the way I looked at the gas tank which was below half and decided to stop for gas. I turned onto the street that the entrance of the gas station was on and as I went up the driveway cut into the station we heard a "ZING!" and could not figure out what it was. This was a new noise in the collection of noises we have heard while driving the Roadtrek. I looked at Meryl and said, "What was that!" She said she did not know - speculated that it might be one of the spring tension curtain rods we use to hold things in place - that sit on the floor and inside the fridge. I drove to the pump and went out to pump gas. Gas, in both New Jersey and Pennsylvania, was several cents and more higher than the prices in New York - just that morning.  Gas in and I got back into the van. Meryl had something in her hand and said - I found this on the floor back there.  It was a metal sleeve. I had no idea what it was - and then she showed me the rest of what she found - a black plastic knob with a screw coming through the middle. I knew exactly what it was then. It was the knob to turn to open the fan vent lid outside. And it was right below the fan where she found it all.  OK - no problem. I went to the middle of the inside under the fan and looked up -I set the sleeve over the screw and put the knob back into place and then realized that I needed a screw driver to put it in with - and while there are screwdrivers in my tool bag in the Roadtrek - this was not the time or the place to do this. So we put it all where it would be safe and headed back out on the road.

By the time we got to Cabela's it was closer to the time we had planned to have dinner but we were there and would spend a brief time at the store - always fun to see their local fish aquarium, their trophy animal displays, and look at things that relate to some of our interests. But before we went in, I got out the tool bag and a Phillips head screwdriver and put the fan knob back where it belonged. It was a good thing as without the knob in place nothing locked the fan lid closed to the roof and easily could have bounced or blown open. I realized then why this came off. The last time I had closed the fan I decided not to tighten the knob down very tightly to avoid it sticking again. It was just loose enough for the vibrations through the van driving to loosen the screw to the point that it would all fall out - as it did. Into the store -for an even briefer visit and then off to dinner.  After dinner we headed back to the RV Park to settle in for the night.

We had the advantage of the restrooms which were four lanes away from where our site was. After we would settle in for bed, we decided that we would put a camping "wag" bag into the RV toilet to use that during the night - as we would do for cold weather camping. We had running water in the RV from the fresh tank we sanitized for washing and drinking - but I did not want to put any waste down the toilet because the next morning the service tech did not need to have to encounter that when he removed the macerator.

This RV Park said it had wifi - but no cable television. We had the antenna and before we left I had an idea - which I wanted to try out. Recently I have been using a ROKU wifi device at home to use to get many free television channels on the TV.  Usually in a campground the wifi service is through a company that the campground brings in to connect your RV to - with a free account for the number of days you are staying - but the wifi from these companies is metered - use too much and they cut you back to barely usable speed. This wifi, I anticipated was from the campground directly - and long term residents arranged for local cable. We were in a site right at the office - and the wifi was strong. Just to see what would happen I brought the ROKU and set it up on the Roadtrek TV - it started up just as it does at home, asked me to connect to the wifi signal it found from the Park - and it worked beautifully. We used it for all of two and a half hours - but it was a nice diversion from the local over the air channels.  I am sure we can't do this at most other campgrounds we go to but it is a nice thing to have when it is possible.

THIS IS THE END OF DAY 1.

WE WILL CONTINUE WITH THIS TALE IN TWO WEEKS IN:

"TRIP FOR REPAIRS AND THE MACERATOR'S TALE (DAY 2)"


(When there is not a whole lot to write about any longer,  when you have something long that can work for two articles that is the way to go! 😀 )


Tuesday, September 4, 2018

The Worst Summer

This summer has been just terrible due to the weather. I realize this has been the case around most of the country but here on the East Coast for the way we travel it pretty much stopped us from traveling.

I am not sure I have said this before but we travel by habit. We tend to go to the same places and look to do the same things and do this year after year. We only have the Roadtrek because we will not stay in hotels - and have not done so since about three or four years before we got the Roadtrek in 2011. There is an article about that near the beginning of the articles of this site. What we needed was a hotel room on wheels or an extension of our home that we could take with us to stay in when we travel. An RV was the logical choice and a Class B was what we could deal with to be able to keep the RV on our suburban driveway at home with local ordinances about where an RV can be kept on one's property.  At times even before all of this we talked about a summer home in one of the places we would go to, but that never happened. The Roadtrek made that possible as a portable summer home. It is a bit like comfort food. Where we go makes us happy and comfortable - it is familiar. Maybe not exciting for most but when we don't do it we feel something is lacking. At times we add a few new places in along the way.

So anyway - back to the point. We have several places that we go to regularly in the summer and through the year either with the Roadtrek for an extended stay or when for a day and back the same day either with the Roadtrek or the car. Some of these places are reenacting related. Some are related to other hobbies (and businesses) that we have. This summer it was either too hot (temps in the mid to upper 90s) with heat indexes up to 105 dF or between when things cooled down, that brought in severe storms.  Many of the things we do in the places that we go to take place outdoors. When I was younger I could much more easily deal with the heat. Now being out and active in this type of heat all day has become difficult.

We have gone to the same place for Fourth of July week since we were married. When we got the Roadtrek we found out that to go to this area with the RV we needed to make a campsite reservation a year in advance - and we have done that - including this year. We avoid weekends and go during the week - to both avoid crowds and avoid tourists in general. We  had five days reserved to go this year. The weather where we were going was severe storms - not very good for outdoor events - and while we have traveled with the Roadtrek during trips in all types of weather conditions including an earthquake - I really don't like being inside the Roadtrek when there is a severe storm outside.  If the weather is going to be rain one day - sunny the next - maybe showers another day but primarily decent - fine. Five days planned with rain and "severe storms" every day. No. And this was the week of Fourth of July where we were going.  We decided that there was no way we were going to waste the money to be in the rain and whatever else that brought with it. We called the campground and asked if we could change the reservation for a week later - which seemed like a good idea at the time. They were accommodating - they had an opening for Fourth of July week and booked a week that is generally quiet. But there was one event that would only take place that week and we kept looking for a day that the weather might be better. By the end of the week - Saturday - it was going to be clear. This had not been a day we would have been there but it was clear and we were going just for the day - and we took the Roadtrek which was ready for travel. And needed the mileage. So off we went - drove with the usual traffic and the three hour trip took over four hours but that was fine because we got to where we wanted to be, had a great day at the event - and came back home in the Roadtrek that night.

We did not look to stay over as we had plans to come back the coming week - which also did not work out between more bad weather and a business problem my wife had to go to a client about. So, surprisingly accommodating, the campground changed the reservation for us the next week. That week there were only three days that were going to not have more severe storms and we decided to put up with the temperatures. We actually did get away for two nights and three days between the storms.  While we were there an event we attend was being held but we decided to skip it and spend the day around the area which turned out to be a great decision because we stopped in a musuem shop that we visit every so often and had not been there in a couple of years and found a reproduction of something 18th Century that I have been looking for for a long time. It was an expense we were not expecting but Meryl said "buy it!". I took a look at the size and did not see how we were going to fit it into the Roadtrek and get it home with damage. Meryl took some measurements and headed out the the Roadtrek and started doing her thing in arranging space where there is no space. She came back in to the shop five minutes later and said - I can fit it in - easy! And she did.

The week after that trip, there is another all outdoor event that we have taken the Roadtrek to overnight at a campground and to the event the next day. That week more severe weather is predicted and it hit this area bad. Not far away from this we are seeing streets flooded to rooftops, cars under water, and roads broken away.  Parking for this event is in a large open dirt field. I decided that there was no way I was taking the Roadtrek - even if the ground was not flooded - as having once gotten a passenger van stuck in the mud with four wheel drive (which only pulled it down into the mud deeper) I was going to avoid even the slightest possibility of that. So we decided we would still go but with the car just for the day and back. I called the day before and asked if they were or had been flooded. I was told - "Oh, no, we have been fine". When we got there half the field to park in was roped off and flooded. A number of exhibitors had not come at all because of the flooding.  The rest was soft. I was very glad we left the Roadtrek home.


At this point we are heading into August and we usually travel for a week to two weeks during August - and I was looking to get to Virginia for the majority of that. I started looking at forecasts and dates we could go. This started to get ridiculous as the weeks started to pass. I was down to looking at where is it not going to rain and have at least a week of travel and sightseeing weather.  I was looking out as far as the Mid-West where there seemed to be more good days than bad but by the time we got there - I really don't know where there would have been but it was west of Ohio - it would have been time to turn around and drive home back through the storms.

Another event that we attend annually - an 18th Century/19th Century folk life festival - is always the weekend near our wedding anniversary and this year it was right on our anniversary. I have never taken the Roadtrek to this event because it is another grass field to park in and this one is a lot of slopes and ruts when it has been a good summer. With the excess rain, I decided that there was no way that I would start bringing the Roadtrek this year - so again we took the car. While we were there - again an all outdoor event - there was a downpour mid-afternoon. We heard later that the next day, there was heavy rains there all day. 

It seemed that this pattern of severe storms and high heat was just not going to change (and it hasn't as it is still happening as I write this). We were at the last two weeks of August and decided we would try to get away for a week if we could - to one of the usual places which seemed to be a maybe as far as the weather. We decided that we would call for a campsite on the morning we would leave and see what happened. We had planned to leave on a Tuesday morning and it was raining where we were going. We had the Roadtrek packed and ready to go. We would try the next morning and when Meryl woke up that morning she felt sick. She had been going through all of this with a pretty bad cold with chest congestion and had started to feel better. She was much better the night before, but that morning she said she felt worse than she had the whole time with this cold - and by then I was starting to get it as well. This was Wednesday. She said that if she felt better by the afternoon we would call the campground and see if we could get a campsite for two nights - there Thursday and Friday and back Saturday (at night). Not what we had planned on but it was something and it was one of our comfort spots.

That afternoon she felt better and she called. The woman on the phone from the campground was a bit uncertain about booking a campsite and she did not say why. Friday was no good - they had nothing open. When we suggested just Thursday with hesitance she said yes - and there are just a few campsites in this campground that we know we can get level in, we asked for a specific site and was told yes - reservation made. It was sunny that day here. I saw on Facebook that night that there had been bad flooding in this area from Tuesday night into Wednesday. We called Wednesday afternoon and nothing was said about flooding so it must not be here. We set out the next day. This campground has a 3:00 PM check in time so we went around to some of our haunts and arrived at the campground around 4:30 PM. Nothing looked unusual. We went into the office and told the people at the desk that we had a reservation. The man behind the counter and the woman were saying something we could not quite make out and then the man handed us the map with the site (that we have been in many times) and said, "The site might be a bit soft. If it is too soft come back and we will give you another site." I was not happy at hearing that and asked why. They had been flooded for the past two days - really flooded. The campground was 3/4's empty - the reason there were no sites for Friday was because they had to move all of their reservations to sites that were usable. Had the woman on the phone said they were flooded we would have understood the hesitancy about making our reservation. On the drive from home, Meryl had suggested that we make a reservation when we got to the campsite for the next Monday and Tuesday - two days that were supposed to be dry but extremely hot. We made the reservation there in the office and the woman said, "The sites should mostly be dry by then!"
 
As we drove the Roadtrek to the campsite around the empty sites we could see that they were moving new gravel into many of the sites. We could see a lot of mud and big ruts where large tires had gone through the grass and the mud. It may have been RVs that had made the ruts or the small tractor that we heard the next morning moving gravel into more campsites. We got to our site and there was mud around in the dirt and grass that surrounded the gravel. I found a level spot well enough away from the edge of the gravel so that getting out there would be no mud to step into. Luckily the gravel was firm and the grass area between where we needed to bring the power cord over the grass to the campground power box was actually solid. The temps were cool those two days and we had a nice, but very short time, knowing when we were leaving Friday that we would be back Monday for another two days.

The Monday and Tuesday we were going back were predicted to be the hottest days of the summer so far - with temps in the high 90's and a heat index advisory over 105 due to the extreme humidity. We left early Monday morning trying,again to avoid the rush hour traffic. It was still stop and go. We spent the day in the van driving and then when we arrived in the area we went to the places we had not gotten to the Thursday/Friday before. With the dash A/C we were able to get some relief between stops. Tuesday was to be the hotter of the two days.  During one stop on Monday the temperature in the Roadtrek hit 105 degrees F.  And the campsite as almost dry - but there were many signs still evident of the flooding and my guess is that the big tire rut in the mud in the grass next to this site will stay there for a very long time.

We had not dumped the tanks on the Friday before when we left as we decided that it would just be easier to dump them before we left the campground on Tuesday. Dumping with the macerator went just too well - not complaining. I filled the black tank with fresh water to top it off by pouring water from the campsite spigot down the toilet from a collapsible bucket that we had found at the end of last year.  The bucket holds a little over a gallon and I topped the tank at 5 buckets of water on top of what was in the tank. The tank emptied to the point that the water just stopped coming out. None of the usual spurts to show it is just about empty. It was mostly liquid and that might be why. I got nervous that there was something wrong with the macerator and I went inside the Roadtrek to the monitor panel - and rare of rare occasions - the tank read EMPTY - actually empty!  I went back out and we dumped the grey tank - and this went the same way - and the water flowed out steadily - there is nothing wrong with the macerator. I never leave the black tank without water in it so that it does not dry out. I filled the bucket again with water and dumped that down the toilet. I checked the monitor and it still read empty - then flashed the 1/3 - which it should as the tank as soon as there is anything in it will start to show 1/3 full (per the RT manual).  Seeing the tank read empty was short lived.Later in the day it read 1/3 and still reads 1/3.

We headed over to a Farmer's Market that we like to go to and spent most of the day there in the heat - with no buildings air conditioned. Before we left the RT in the parking lot I opened the roof fan vent to allow hot air to escape out the vent (not running - just the open lid).  We usually buy lunch from one of the stands and eat outside but we were not going do that in that heat. We went back to the Roadtrek and started the generator and turned on the A/C and had lunch on the front table.  After I opened the fan vent again before we went back out. When we came back to leave later in the afternoon - despite the vent being opened and having run the A/C just a few hours before- the digital thermometer that we have inside the Roadtrek was reading 107 dF. So much for the vent helping to let the heat out.

A few days after we returned home, we learned that a sudden storm came up on the area that we had just been in where the farmers market is located and 11" of rain fell within a few hours. This caused serious flooding and damaging roads.  It is just unbelievable.

The summer is still not "officially" over though I started writing this article on Labor Day. I had thought about a trip up to Connecticut at the end of this week but it is going to rain - and we are currently in another heat wave with advisories until tomorrow night. I am sure there are some of you where this is all normal and usual. It has never been so here. During the summer we had a sudden and not expected severe thunderstorm and streets flooded that have never flooded - and we are beyond the flood zone - in the well over over 50 years that I have lived in this area.  Lightening hit the ground all over - not common here at all. I don't really remember when I have seen that.  And, of course, the power went out which I wish was not that common but tends to be. There are "usual" trips still to come and hopefully we can take them. Once September comes there are a lot of things that involve us that keep us from just taking off - if the weather did improve.

So was there a point to this ramble- only that the weather this summer stunk and still stinks! 😬   Go figure that my article in April - "Pre-Season Opener for My Roadtrek" was going to be typical of our travel for the whole summer!   😩

Wednesday, April 29, 2015

Lubricating the Waste Tank Seals and Macerator

I was certain that I had written about this before, but searching this entire site I can find no mention of it. It is very important to regularly lubricate the tank seals in the black and grey tanks - and for those with Roadtreks or any RV with a macerator, the added benefit of the process is that it lubricates the internal parts of the macerator at the same time.

When we got our Roadtrek in 2011, the recommended lubrication to do this was coconut oil. Coconut oil is expensive and has a problem - it reacts to temperature. If you go to buy coconut oil - I found it in a gourmet food store - it is sold in a bottle as a white paste. At 75 degrees F coconut oil liquifies and becomes a clear liquid. Below 75 degrees F that same coconut oil becomes a solid fat - thus the white paste. I also found that the Camco RV supplies company sells "Coco Lube" which is a 100% coconut oil lube in a bottle. I bought that at over $6 in an RV shop. I bought it in the summer and tried it in the summer and it seemed to be fine. Then in the Fall I decided to lube the tanks again and now that bottle was full of white paste. I could have gotten it out of the bottle and put it down into the tanks but it would have been a gunk going down and likely would have staid in a lump in the tank. This is not at all what you want.

I started researching what the alternative is and learned that many use mineral oil. Mineral oil is sold in pharmacies or pharmacy departments. It is sold as a laxative - yes, it is "food grade" and can be consumed which you don't want to do unless you wish the resulting effect. You should be able to find a bottle for about $2 or $3.

To use the mineral oil to lubricate your waste tanks (and macerator):

1) Measure ONE HALF CUP of mineral oil, open the toilet flush flap and pour it down the toilet.

2) Flush the toilet with water.

3) Measure ONE HALF CUP of mineral oil, and pour it down the open drain of the kitchen sink. (Take the drain stopper out first.)

4) Run some water down the drain in the sink. 

You have just lubed your tanks and macerator. Step 1 and 2 put the oil into the Black Tank. Step 3 and 4 put the oil into the grey tank.  You are DONE.

Simple. You can't get more simple than this.

The mineral oil in the tanks will lubricate the seals in the tank. The next time you dump and use the macerator that mineral oil will come through into internal workings of the macerator and lubricate those also.

Do this two to three times each year. I do this AFTER I De-winterize. I do this Mid-summer. I do this in the Fall. This is all that is needed.

Just as an aside - always keep the flap in the RV toilet covered with water to prevent it from drying out. In the winter when winterizing, use RV antifreeze instead of water.


NEED I SAY THIS? Never put mineral oil into the FRESH WATER TANKS. It will not harm the tanks but like Eveready batteries, you will keep going, and going, and going...


Wednesday, July 11, 2012

Living in the Roadtrek - Dumping the Waste Tanks

In this article we are going to talk about the pleasant subject of dumping your waste tanks. Some of what I will tell you about applies basically to all RVs and some applies only to Roadtreks since Roadtrek added the macerator dump system as standard equipment in all models. I will first start with the basics.

The Roadtrek has two separate waste tanks. One is called the Black Tank - and has "black water" in that tank. This is the tank that is connected only to your toilet. Everything that goes into the toilet is dropped down into the Black Tank. The other tank is called the Grey Tank and has "grey water" in it. This is the tank that is connected to your sink drain(s Roadtreks that have the enclosed bathroom option also have a bathroom sink) and your shower drain. This is water will be clean water that has flowed down the drain and also water from washing your hands, washing dishes, and taking a shower. This water is likely to have soap mixed in. The Roadtrek has a 23 gallon grey tank and a 10 gallon black tank - yes, the black tank holds only ten gallons of water mixed with waste. The grey tank size will vary with model. All models except the 170 have a ten gallon black tank (the 170 black tank is only 8 gallons).

Once those tanks fill up you need a way to empty them and that is called "dumping" your tanks. The traditional RV has a gravity dump system. With this system a three inch wide hose is connected to a connector that is part of two valves that open and close the tanks. The other end of that hose is put into a hole in the ground that leads to a sewer and by gravity, when the valves are opened one at a time the waste and water flow out through the hose from the tanks and go down into the sewer. The process can take a bit of time and requires that there be sufficient height from the bottom of the tanks where the valve enters each tank for gravity to be able to work to carry the waste and water out. Older Roadtreks have this system. Newer Roadtreks do not.

Newer Roadtreks have a MACERATOR. A macerator is an electric pump with a grinder attached. It is very much like a sink garbage disposal system. The macerator is connected to two pipes that each are connected to a valve that goes into the black tank and the grey tank. Inside the macerator is an impeller that spins pumping the water from the tank into the macerator and also a pair of stainless steel very sharp cutting blades. All of the waste the comes into the macerator with the water is ground up into liquid by the spinning cutting blades - think of a blender or food processor. That thin solution is then pushed through a flex hose that is about one inch in diameter and out a nozzle into the sewer hole. The process is quick and relatively odorless - unless you stick your nose into the sewer hole. There is a momentary switch that turns the macerator on and off - push the switch - on - let go of the switch - off. This switch is located inside the driver's door and on the newer Roadtreks it is a red button on the frame of the driver's seat facing out the door. The macerator enables the Roadtrek which is close to the ground to pump the waste and water out of the tanks with little gravity and it can even push the waste uphill if that is where the sewer hole is. Roadtrek felt that this is the better system for a Class B that is so close to the ground on the bottom.

Which system is better? There are a lot of strong opinions on this. There are positives to be said for both systems. The one reason that makes sense more than others about the traditional gravity system being better is that since it is not mechanical in any way, there is very little that can go wrong with the system. You don't need electricity (the macerator will work with either the coach battery(ies) or 120 volt hook up). Not much can clog a three inch hose. And you can always add a portable macerator to the end of a gravity hose to do the same job as the built in Roadtrek macerator. More importantly, you are not dealing with a motor that can break or an impeller that can get jammed from waste or hair that may have gone down the drain. It may sound like I don't like the macerator in my Roadtrek - and that is not true. I like how fast it empties the tanks and I also know that the way some campground sewer connections are and some dump stations can be, the fact that the macerator can move the water without gravity can be an advantage. I am not going to go into the things that people say about the macerator system in general. I will tell you that the macerator's number one enemy is HAIR. Put good hair screens on all of your drains and do not allow hair to flow down the drains. Think of a vacuum cleaner whose rotating brushes pick up hair on the floor and twist that hair around the brush until it cannot turn any more. This is exactly what hair COULD do to a macerator impeller. If you are careful you are fine.

It is important to understand one other thing that the difference between a macerator system and a gravity system effects. With a gravity system you could connect your dump hose to the sewer connection at the campground and open the grey valve (it is generally recommended not to do this with the black valve for the black tank) and let all of the grey water go into the tank and then right out again into the sewer. This permits endless showers, washing, etc. The grey tank never fills up and it empties all of the time when water goes in and you are hooked up. You will see RVs do this all the time at campgrounds. YOU CANNOT DO THIS WITH THE ROADTREK MACERATOR SYSTEM. With the macerator the tank only empties when you push and hold in the button. No water will flow through on its own. So you must rely upon your tank to hold the water that goes down the sink and shower drains and then empty it when it is full.

OK - now the fun part - the how to do it. Well, you know how to do it. You have been doing it since you were born. Now you will learn how to get rid of it in a Roadtrek.

Before you can dump the waste tanks, each tank must be at least 2/3 full. The 2/3 indicator for each tank is on the monitor panel inside your Roadtrek. It is the next to last light from the top - the top light is full (which is OK to dump at too). If you want to dump and you don't have that much in your tanks, put some more in. Open the faucet and let the water run into the grey tank and flush the toilet until you have enough water in the black tank. I use a gallon water jug that we carry and I go out to the hose faucet on the campground site and fill it and dump it down the toilet until we reach 2/3 or full. Once you get enough into the tanks you can start to dump them.

First, you must have electrical power on - either your coach batteries or 120 volt power (hookup or generator). Make sure your Battery Disconnect switch is ON - red light is lit. If I am not connected to 120 volt power I like to start the van engine just to give the macerator motor a little extra umpf to work.

Open the side compartment where your macerator is located. On my 190 it is a lift up door for the side storage compartment. Also open the door - on mine - next to the storage compartment to the front of the van - to access the grey and black tank handles.

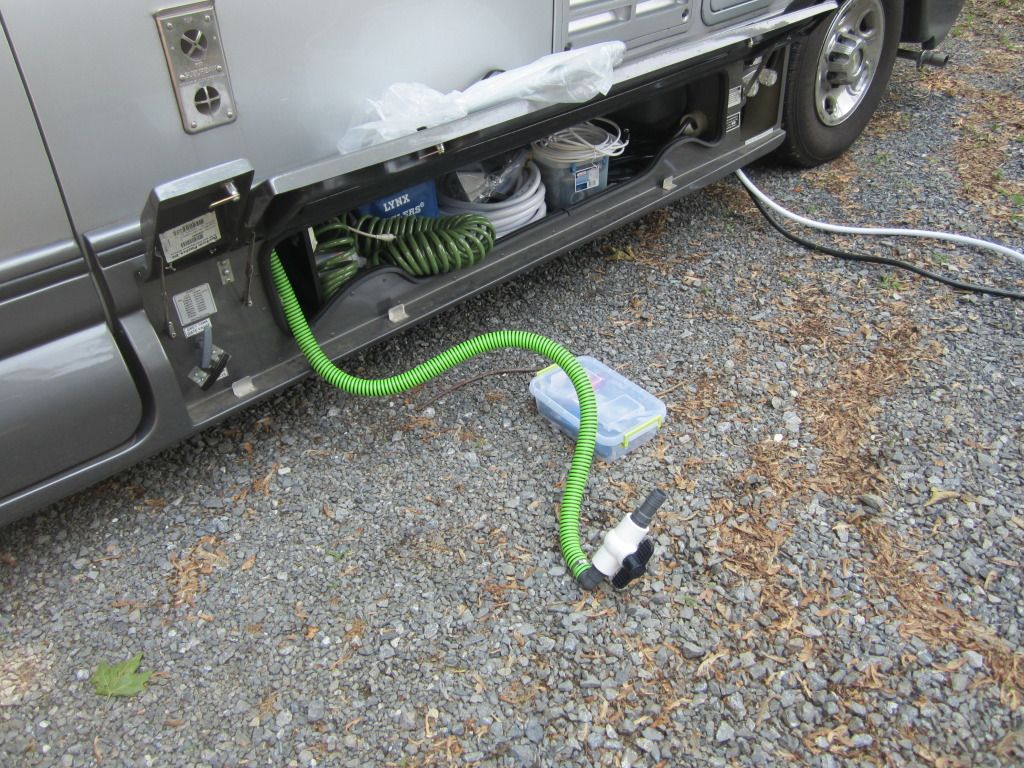
You pull the hose out of its compartment, nozzle first. It has worked best when the entire hose is removed from the compartment until it reaches its full length. This hose is connected under your Roadtrek to the macerator. Don't pull once the hose stops coming out! In the photo above you see the green hose with the white and grey nozzle. The black handle on the top is a valve to stop the water from coming out of the nozzle. Open the driver's door to get to the macerator power button.

The sewer connection is a four inch pipe in the ground - usually plastic pipe - with a screw on cap. Always keep a box of latex surgical gloves (or the non-latex gloves if you have an allergy to latex). You can get these in boxes of a hundred in many places. Put on a pair of the gloves - remember what you are dumping through that hose that you will be holding. If you don't have a sewer connection at your campsite then there will be a dump station at the campground (or at various other places) for everyone to use. Usually there is one - and you can expect to wait in line for your turn. At these there may be a large metal plate in the ground covering a large open hole. Don't fall in. (You are laughing but in the next county to us there is a free public dump station at a sewage disposal plant, and there are large open manholes in the pavement to dump into - and one wrong step and you are down and dirty and likely to drown or wish you did.) The sewer connection at your campsite is much safer and much more pleasant. It is well worth the extra few dollars a night to have a site with your own sewer connection. OK - go over to the sewer pipe, unscrew the cap, and put the cap on the side. Remember what everyone else has been pouring around this hole and mind where you step (at least be aware of the possibility that it is not necessarily the cleanest spot in the campground).

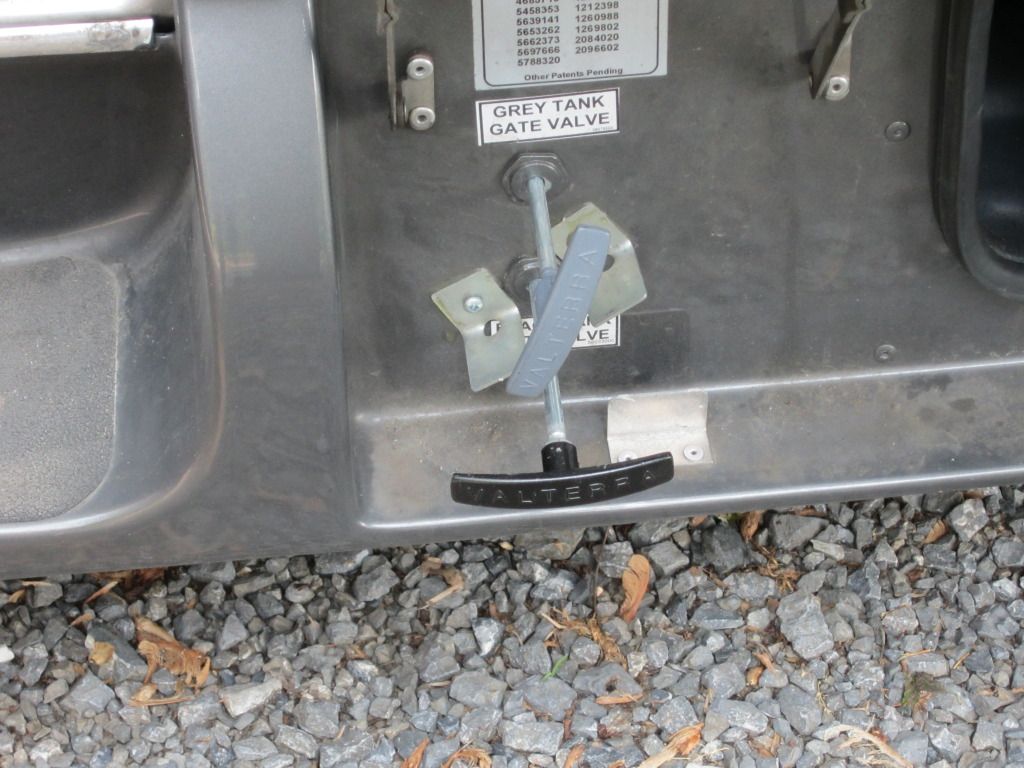
Now, it gets really fun. Go to your Roadtrek and open the black tank valve by pulling the black handle - a newer Roadtrek will have color coordinated handles. I have heard that there are some older ones that have handles that have no difference in color - both black, both grey. The handles are easy to change and you can buy ones in black or grey at RV supply stores. A newer Roadtrek also has a label printed next to each valve. So easy. Below is a photo of our valve compartment.


What you see in this photo is both valve handles open. I will explain this later. Now, you only want to pull the black handle to open the black tank. YOU ALWAYS DUMP THE BLACK TANK FIRST - no matter if you have a gravity system or a macerator.

Dumping a Roadtrek with a macerator is a two person process. I will explain how one person can do this later. For now let's assume you have a partner to do this. This is one of those togetherness things that couples enjoy. And in the tight quarters of a Class B RV you have a lot of togetherness moments.

One person is now going to take the nozzle connected to the green hose (some older Roadtreks have different color hoses and those hoses had problems breaking - Roadtrek has since about 2008 replaced the hose with a durable hose) and bring it over the the sewer hole. Hold the end of the nozzle into the hole - you do have to bend to do this (can't bend - don't worry - I can tell you what to do). Turn the black handle on the nozzle so that it points to the opening of the nozzle - open position - look at the photo a few paragraphs back to see the nozzle in the open position (we keep ours that way all of the time - I will tell you why later).

You now give your partner the GO signal that you are ready for the sh.. I mean waste to start to flow and your partner will press the red button that is inside the driver's door. Push and hold that button - for now.

The motor of the macerator will start and you will see the hose contort a bit as it fills up and then it all flows out the end of the nozzle into the hole - hold it down enough into the sewer hold to avoid splashing on you. (I know you are saying ycch! Really, it is not bad at all if you do it correctly. We really were pleasantly surprised the first time we did this. ) You will get a full flow at first - and generally it is almost clear water and then the water turns dark brown - you really don't have to look.


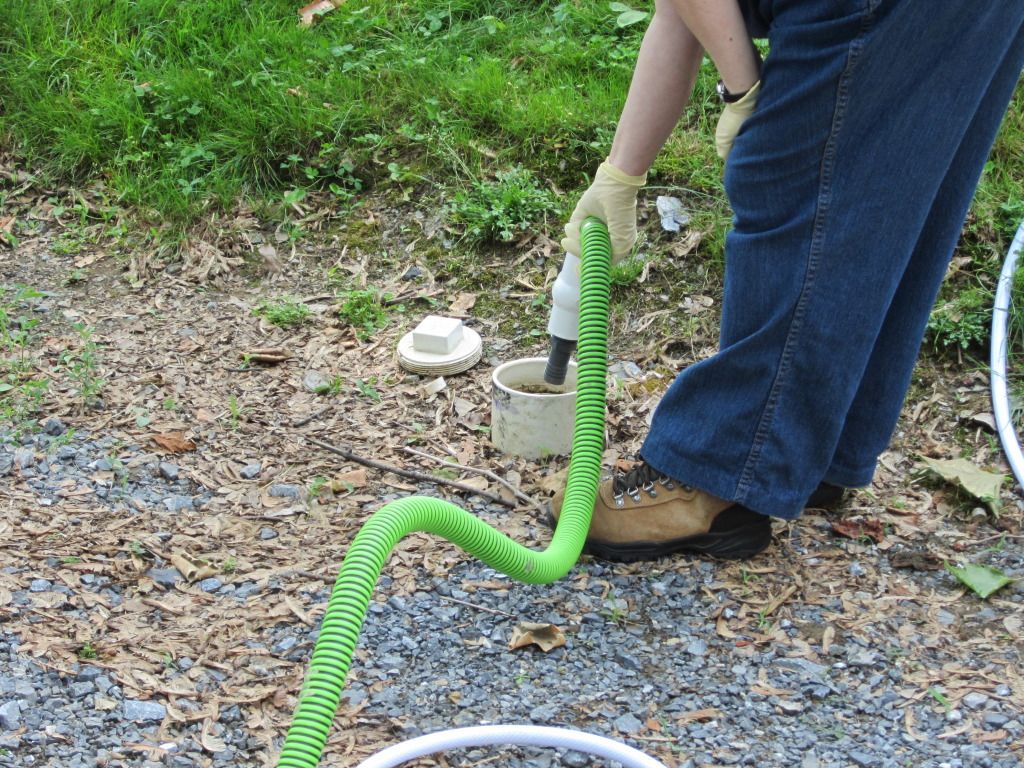
Here is Meryl with the nozzle in the sewer hole. Yes, this is her job. I am at the button. She is holding the nozzle a bit high and this is JUST for the photo so that you can see what to do. See, she is wearing rubber gloves. She also has on her "OK to get wet" shoes though she really does not want to get them wet here doing this. Keep the button pressed until only spurts are coming out of the hose. At this point the black tank is as empty as it needs to be. Roadtrek and the macerator company say that you will hear a change in sound made by the macerator motor when you should stop. It is supposed to make a high pitch whine - a change in tone from the regular sound. We don't really hear that. We have been told that it is definitely different in tone. As soon as water is down to those spurts stop. At this point we have been letting go of the button and then pushing it again and another stream of water will come out - but we have been learning that this is not a good idea - so AS SOON as you see the water flow slow down to spurts, STOP. If you run the macerator motor when it is dry you will burn it out! You have now emptied the black tank - one more tank to go!

The rest is simple. Have your partner at the button pull out the grey handle. There are a lot of varying opinions about closing the black handle now by pushing it back in, leaving it open while you dump the grey tank, or opening the grey handle, allowing a little water from the grey tank to back flow into the black tank and with the soapy water cleaning that tank a little. We have tried it all. At the moment we are leaving the black handle open (pulled out) while we are dumping the grey tank (grey handle pulled out). This is a common suggestion in this process and unless we encounter some problem after having done this for a year now, we will follow the common trend. Basically, you can dump the grey tank with or without the black handle open.

The reason that you are dumping the grey tank last is that you do want that soapy water to follow that black water and clean out the macerator and the hose - and almost three times the amount of water is going to come through the grey tank and out the hose.

With the grey handle pulled out - repeat what you did for the black tank exactly the same. Nozzle into the sewer hole, push the red button, and the grey water flows out into the sewer. The grey water looks either clear or grey depending upon how much soap went down the drain. It can also be bubbly from the soap - but not always. Again, hold the button down until the water starts to spurt and then stop. The grey tank is as empty as needed.

At this point push in the grey handle and push in the black handle. Your waste tanks are empty. But that is not always the end of the process I am sorry to say. You can stop here if need be. This is what the problem COULD be. The tank monitor sensors are notoriously inaccurate. They can be made inaccurate, particularly in the black tank if something has caught on one of them - like toilet paper and causes it to make incorrect contact and result in reading as if there was water on it and the tank is full to that level. You could have an empty tank that still reads 2/3 or even Full. You know it is empty - you just emptied to the point of nothing more coming out. But that monitor panel is saying something else. What a pain!

Here is what you can do - which sometimes works and sometimes doesn't and is recommended anyway. You are going to flush the black tank with clean water and empty it again. I have done this two ways. One way with my gallon jug and I fill and dump ten gallons of clean water down the toilet letting it rush into the toilet hole with a little force from gravity (it will splash a little as you do this). I also purchased a tank cleaning wand - for the Roadtrek you must have one with a FLEXIBLE HOSE END - that is a rigid wand with a flexible hose at the end about two feet long and the end of that has either multiple small hose for water to come out or a spinning brass end that swirls water around. You connect this wand to a garden hose - you can see my olive green coil hose in the first photo in the compartment (sold at all of the home stores and Walmart in the summer). NEVER USE A FRESH WATER HOSE FOR THIS! There is a shut off valve on your end of the wand. Turn the hose water faucet on full, wand valve OFF, and put the end of the hose into the toilet. Open the toilet valve with your foot and BE CAREFUL NOT TO LET THE TOILET VALVE CLOSE ON THE WAND OR YOU WILL DAMAGE THE TOILET! Snake the end of the flex hose all the way down into the black tank. Yes, when it come out it will not be very pleasant and you need to wear latex gloves for this job and have disinfectant cleanser and paper towels on hand to clean this wand before you put it away. The wand acts like a pressure washer and you move the wand around so that it gets to every part of the tank - up and down, around and around. Anything clinging to a sensor or the tank walls will be knocked off - and all of the water going in is clean. You want to fill the tank with this now until it is at least 2/3 full. When it is full completely, you will see water come up the drain pipe toward the toilet. Stop by shutting off the valve on your end of the wand. Get the wand outside to clean it so that you don't mess up anything inside your Roadtrek.

Now, go back outside and dump your black tank only all over again. Just as you did before. Roadtrek does recommend flushing the tank every time you dump it. When you are done, and you allow the tank to dry out a little you will actually see the monitor panel read empty - if you are lucky.

Now, it is time to put away your macerator hose and finish up. First, close the sewer hole by screwing the cap back on. Keep those gloves on! Next, leave the nozzle valve OPEN. This is to allow air to escape from the macerator hose when you bend it and cram it back into its compartment. This compartment is a TIGHT fit. A few more inches would have done wonders. Push the hose back in - back end first and just keep pushing and fitting the hose in until it is all inside. Now, take the nozzle and push that in with the nozzle opening facing UP. At this point you could turn that black nozzle valve closed, but we have found that it fits inside much better with the nozzle valve handle straight to the nozzle and not across as it is in the closed position. It is also much easier to get out this way. Clean your wand and put it away - ours is in a large plastic bag in the side storage compartment and it is a pain and always in the way- but this is the best place so far we have found to keep it.

You are almost finished. Go inside the Roadtrek and pour a gallon of clean water into the toilet and let it go down into the black tank. You might add the deodorizer/digester chemical of your choice to the water now too. YOU MUST ALWAYS HAVE WATER IN YOUR BLACK TANK! You never want it to dry out or you will have big problems. When it comes to your black tank, water is your best friend - and plenty of it. Now, you are finished. The whole process can take us about 45 minutes and that is only because of the time needed to flush the black tank. If we are not flushing - like at a public dump site - it takes us about 15 minutes to empty both tanks - or less. It really goes fast.

Now - some extras!

You say - "I don't want to stand and look into the sewer hole holding the nozzle!" or you say - "I can't bend over the hole to do this!" or you say - "I am all alone, now what do I do?!". Well you have a solution - the same one for all three - you use two donuts.

Uhhh? I eat two donuts and this solves all the problems. No. An RV donut is a small rubber plug with a hole in the middle. You can buy these at RV supply shops or ... yep! Walmart. You need two different sizes and Roadtrek is nice enough to include one that fits their macerator hose nozzle with your new Roadtrek. This is a hard rubber plug. The problem though, is that the one that comes with the Roadtrek is too small to fit into the usual sewer pipe opening. The one in the stores fits these sewer pipes perfectly. The one from Roadtrek fits inside that donut perfectly. I did find that once joined together it is hard to get them apart. You don't need to get them apart but you cannot fit the nozzle back into its compartment with one or both of these attached to the nozzle. The easy fix is get some KY jelly - a water soluble lubricant at your pharmacy or pharmacy department. Put a little on the nozzle and a little around the Roadtrek donut and then put the Roadtrek, smaller donut into the hole of the larger donut, and then put the nozzle into the center of the Roadtrek donut. Now, push the larger donut into the sewer hole - no lube needed. It should stick in easily and NOT fall in. Now, you can walk away from the sewer hole with your macerator nozzle attached to it and go push the button yourself. You are not near the sewer hole. You can't smell the sewer hole. You can't see into the sewer hole - which can be a good thing but is also a bad thing because you now have no visual on the water stopping when the tank is empty. Now, you must rely on the sound. As they say, a change to a high pitch whine and it is empty. You will just have to accept that. Once the donut comes out of the sewer hole, disinfect it with a disinfectant cleaner. Put it into something that will keep it away from your fresh water hoses. We have a plastic box for the "dirty" things that we want to keep separate in that side compartment. By the way, there are some campgrounds that require that you use a donut when dumping. It is simple to use - as I have described and you should always have one in your Roadtrek that will fit the standard dump pipe, in addition to the smaller one that Roadtrek gives you. (If you lose that smaller donut or need to buy one you will find them at shops at dealers who sell Roadtreks but they are not cheap. The larger one is just a few dollars. You need BOTH.)

OK - what can go wrong? A macerator is a machine and like any machine, some can come out of the factory defective, some can break down, and some last forever. There are some Roadtrek owners that report many problems with their macerators. There are many more Roadtrek owners who never have a problem at all with the macerator. I have spoken to Roadtrek-trained technicians who have said the problems that they see with macerators are the result of hair being caught in the impeller or people who have not put enough water into their tanks. But what happens if something does go wrong. First, there is a manual crank for the macerator that will unstick something that may be stuck inside that is keeping the impeller from turning with the motor. There is a handle that is located below the Roadtrek chassis - on mine it is below the driver's door. The handle is connected to a long bar that goes into the macerator. To use this handle you must go under the Roadtrek to get to it and to turn it. You push it in to engage a screwdriver type blade on the end into a slot inside the macerator's shaft. You then can turn that shaft to free it if it is stuck- you must always ONLY turn to the right.

I recently emailed Roadtrek customer service about something unrelated to the macerator and in the reply I was told that to keep the macerator in good working condition, the manual crank should be turned BEFORE EVERY DUMP to make sure that the impeller and shaft are turning freely. This is very likely a good idea, but this added step to dumping the tanks would require one to crawl under the Roadtrek and get to that crank handle each time you are about to dump the tanks. We have not yet done this - but we may. A little prevention may mean saving a lot of inconvenience. I did check about this with the service tech at our dealer-service and he did agree that it is a good idea. If you know that the shaft is turning freely, you know that there will be nothing that could jam and burn the motor.

There is also an emergency clean out on the macerator. This is a cap that must be opened (unscrewed) - again underneath the van - and then when you open the grey and black valves the tanks will gravity dump out the clean out. This can be very messy as it just dumps the contents of the tanks down on the ground below it - there is no way really to get this over a dump hole. Someone that I know with a Roadtrek has invented a way to connect a traditional gravity hose to this clean out, but the connections come too close to the ground and they cannot be permanently attached. This is a temporary solution only, but one that will allow a traditional gravity dump into a sewer hole in an emergency. It is nice to know that this is possible. Some people will not put toilet paper into their toilets believing that it is the toilet paper that jams the macerator. The company that makes the macerator insists that it can grind much more than toilet paper. Of course, you always must use toilet paper that will dissolve in water to a slurry in a very short time. Take a piece of toilet paper and put it in a glass of water. After a minute or less, swirl the water around and the toilet paper should be gone into miniscule shreds and then gone all together. You can use RV specific toilet paper which is expensive or you can use any toilet paper that passes the test that I have described. We use Scott single ply household toilet paper and it works fine. I did not pay what I paid for my Roadtrek not to put toilet paper down the toilet and to collect it in a bag hung on the bathroom door. Remember, as I said, use plenty of water in your black tank. Of course, there are things that cannot go down the toilet - leftovers, sanitary napkins, tampons, condoms, paper towels, sanitary toilet wipes, paper napkins - use common sense. If it does not dissolve it cannot be flushed.

That now is really all there is to it. It is a nasty job but it must be done. BUT it is not so nasty with the Roadtrek macerator. Oh, and when you are done. Throw away the gloves and wash your hands - really, really well.