Roadtrek

Roadtrek
Showing posts with label maintenance. Show all posts

Tuesday, March 11, 2025

A ROADTREK HAS TO BE DRIVEN

 There is not a lot new to learn from this article other than what its title states - a Roadtrek has to be driven.  Like any car, van, or truck if it is not driven it will not run well especially when you are ready to head off on a long trip. 

This winter the weather here has been a steady weekly snow storm - some small, some large and a lot of salt put down on the roads and the road salt is not something that you want to drive your Roadtrek over as it collects on the bottom of the chassis and will corrode what is under there. (There is a way to deal with this but it takes to waiting until the Spring and warm weather as it involves cleaning off the bottom of the chassis with a garden sprinkler placed under the chassis - between the middle and the front - let it run for a half hour or more, then move it to between the middle and the back of the chassis and let it run another half hour or more to clean the salt - but if it still going to freeze outside you don't want to turn on the water for the outside of your house.)  So what I have been doing each week - and I do this all year around is start the Roadtrek sitting on the driveway and let it run for half an hour. I sit in it the whole time and read a book. Generally this happens on Sunday afternoons.   This not only runs the engine but the engine battery keeps the Roadtrek house batteries charged.  In good weather we take the Roadtrek for a long drive. That has not happened in months - until this past Sunday.

In the past few weeks I have been noticing when starting the Roadtrek that it is getting hard to start. There is a hesitation between turning the key and the engine catching and starting. Usually, it starts right up.  So I have been getting concerned. My plan had been that a week ago Sunday we would take it out for a drive - but a week ago Sunday it was pouring and not a good day to drive the Roadtrek. I figured OK the next week the long range forecast was good so we would take the Roadtrek out then. 

When we take these drives I want to drive for at least two hours and drive as close to one hundred miles as I can.  We live on an island. The island is 100 miles long end to end, west and east and 23 miles wide, north and south.  We are closest to the south shore and about 80 miles from the eastern most end of the island.  The island is well developed and a mix of suburban and country. The drive we take is usually the same - 50 miles east which takes about an hour with the 55 mph speed limit  and 50 miles back west for about another hour.  There are only two limited access roads that the Roadtrek is allowed to drive on due to its height. The height limit on "parkways" here is 7 ft 10" -  the our Roadtrek is 8 ft 10". On the limited access roads we cannot go on there really are low overpasses. (More about this later.) One limited access road goes south to north. The other limited access road goes along the north shore west to east. So this was the plan for Sunday, March 10th! At least until we heard the news on Saturday that the high winds we were experiencing resulted in brush fires on he East End that was burning in four different areas - and moving.  In fact, it was burning very close to where we would be heading.  So we started figuring out an alternative destination and back that would cover almost 100 miles of driving - and would likely take longer than the usual two hours. 

Any time we have to back the Roadtrek out of our driveway it can take a half hour.  We live on a suburban avenue with two lanes each way - which is located just past a curve in the road north of us that is just past a traffic light. This avenue is a very busy avenue any day and any time - and many cars like to drive it as if it was a practice run for the Indy 500.  😉  Meryl stands in the parking lane (which is in addition to the four driving lanes - one parking lane on each side - with a walkie talkie and I have a walkie talkie in the Roadtrek. I turned the key to start the Roadtrek and it hesitated again and then started. The engine sounded a little rougher than usual and I was hoping that good long drive would get it back to its steady and strong engine sound (which during the trip is evened out to normal). I backed down the driveway to almost the sidewalk and wait for her to say, "IT IS CLEAR NOW - GO NOW!!!" . To which I hit the gas and get into the street and hope I don't hit the car that parks too close to our driveway cut from the house next door. This was a particularly busy Sunday on the avenue we live on and it took about 20 minutes to get it into the street and another 10 waiting for it to clear again to get into the lane and drive.  This is one reason why we don't take the Roadtrek out more often and use it locally.

SO we drove east on the nearest avenue that heads eat to the north/south expressway, got on there and  headed north to its end. It was quicker than I had figured it would be and did not put many miles toward the hundred into the trip We then headed east on a four lane road that goes from commercial to country and back to commercial. We got to a main north/south road - and I did not want to head north  as that would take us toward the direction of the fires which people were saying a number of miles from the fire zone the smoke was coming into. So we headed south which was far enough west from where the fires were burning. People in the fire zones were being told to evacuate. The wind was strong - even as we were driving I could feel the Roadtrek being pushed from the side by the wind as I drove - two hands on the wheel and attention to keeping the Roadtrek straight and not moved by the wind. We got to about where the miles driven were about 30 and I knew we were going to have to repeat the trip twice to get near 100 miles all together.  As we got further south the sky which was bright blue everywhere else we had driven was a brown color from the smoke which was many miles to the east of of us. I pulled into a Walmart  parking lot and turned around and headed back the way we came. Because we were driving on commercial road and there was traffic we had driven at that point almost two hours. We went north to the road we got of the expressway to, got back to the expressway and got on it going south. At where we got on when we stared,  we got off and I said "ONE MORE TIME!" and I turned toward the expressway north entrance and got back on and drove the whole thing again!  When we got back home - after almost four hours of driving - we had driven just under 88 miles - not 100 miles but good enough. On the news the three of the fires were out but a fourth was only half under control.  

 As to what happened with the fires - 600 acres were burned, one fireman injured and taken to the hospital,  two businesses burned to the ground, no one else hurt, no other property damage. An investigation has found that the fires started when a family was int their backyard making s'mores and the wind took the flame and set the ground and trees (which have been very dry due to lack of rain here - snow we get - rain not enough) on fire and the wind spread the fire. There was a fire alert warning put out by National Weather Service for the island.

 The Roadtrek used about an 1/8th tank of gas on this trip and had used 1/8th tank of gas running the engine every Sunday afternoon so I stopped for gas before we took it home. While I am putting gas in, a man from the pump on the other side of us came over and said. "Where do you drive that?" which we were not quite sure what he meant. We asked - you mean today? No, he said, "Where can it be driven?. OK - odd but I smiled and  said "Anywhere one wants to drive it!" which I realized later is not really true as around here there are many roads that you cannot drive it on and if you need to park it, it is too tall for any indoor parking garage.  Anyway, he kept asking - what's inside - I don't know why I was not giving straight answers - but around here one is safest if one does not provide too much information to anyone you don't know (I call this "healthy paranoia") - so my answer was "Everything is inside!" --- he asks - "a bed?" - "Yes and more!" Then he is looking all around it - where do you get one - is it custom built?. I told him that there is no place on the island to get one - we went to Pennsylvania to buy it. He asked how much - i said now they are a lot more than when I bought it and that they are no longer built on a Chevy chassis. And told him it is a Roadtrek  (there is no Roadtrek name on our Roadtrek)  and that he can find them online and if he searches Class B RVs he will find several makes and models.  By this time the woman in the car behind us at the gas pumps wanted to leave and I was blocking her in so we had a convenient way to end the conversation and we got into the Roadtrek and left. And since I had not tried to start the engine since we left on this must drive the Roadtrek drive - when I turned the key the Roadtrek started right up and the engine was steady, strong, and sounded as it should sound!

So - you came along for the ride on this trip! How exciting! Sometimes it is more fun to write an article like this than the usual "how to". What you should take away is not the trip but the need to take these trips when the Roadtrek has been sitting. The van has got to be driven to keep it in good condition to be able to take you on the real and important fun trips! I do plan on getting two cans of Seafoam and putting them into the gas tank to keep it running strong. While the temps have been good this week here. just a week ago they were freezing at night and in the 30s during the day - and that is likely to happen again before the weather stays warm! (Seafoam - one ounce per gallon of gasoline - one can is 16 oz. The Roadtrek gas tank is 31gallons. The extra ounce won't hurt.)  

Ah yes - I said more about the roads here the Roadtrek can be driven on. During the trip we saw a sign at a parkway entrance we have never seen before and then we saw more of them. It said "NO, BUSES, TRUCKS OR RVS ALLOWED ON THE PARKWAY" - usually there is a sign that says "No Commercial Vehicles" and the height limit. It seems that in New York they are cracking down on RVs getting on the parkways - and the Roadtrek is an RV -  is not allowed on the parkways! So it is Expressways only. 

ADDENDUM:

 A few days after we took this trip, we drove our car to the route that we take to leave the island with the Roadtrek. This includes a parkway that has had only a posting about no commercial vehicles and not even a height restriction. This parkway is run by the city and not the State so we always felt it was OK to take the Roadtrek on it. There are no overpasses that are posted at the Roadtrek's height or lower and we have always been fine - and even have been past by highway police that just go by. What we found when we got to the entrance that we take was that same sign we saw on Sunday.  "NO, BUSES, TRUCKS OR RVS ALLOWED ON THE PARKWAY". Now we cannot take any chances any longer going on there. The alternative route is on the north shore of the island which is often busier in the mornings with truck and car traffic but also will add about 45 minutes or longer to just the part of the trip that gets us to "the mainland".  Ugh!

Tuesday, April 2, 2024

REMOVING THE FILTER FROM THE COOL CAT AIR CONDITIONER/HEAT PUMP

 In the mid-2000s Roadtrek started installing the Dometic  Cool Cat RV  air conditioner/heat pump.  This replaced what had been used previously which was basically a home air conditioner that had a built in thermostat and controls.  The Cool Cat uses an external thermostat and control panel which not only sets the temperature for the Cool Cat's air conditioner but also the Cool Cat's heat pump, as well as the temperature for the furnace in the Roadtrek as well. The initial panel used was analog. Later Roadtrek used an updated by Dometic digital control panel and thermostat. The panel is also the on and off switch for the air conditioner, heat pump, and furnace along with a fan only setting for the Cool Cat - plus a      Hi/Low  speed setting and an Auto/Fan setting. The Auto setting is what is used to enable the Cool Cat to turn off when the temperature that is set is reached and come on again when the temperature drops or increases - depending on using the A/C or the heat pump. 

The Cool Cat like most other air conditioners has a filter in the front of the unit to keep dust and debris from entering the unit with the air that is brought into it.   The filter is foam - mine, as it came from the factory is foam backed with a thin plastic grid that gives the filter some rigidity to remove and put back in.  Some may have this or just a foam filter - replaced by a previous owner of the Roadtrek if your Roadtrek is pre-owned.  Because of how the Cool Cat is installed in the Roadtrek removing the filter can be awkward due to the close proximity of the two cabinets at the ceiling that are on each side of the Cool Cat. The filter does not slide up and out - as many home A/C filters do - but slides out to the side. 

You DO NOT have to remove the front grill to remove or replace the filter in the Cool Cat. If you look at the photo above there is a screw on the outer side of each of the two end round vents on the top of the front of the Cool Cat. These are the screws that hold the front grill panel on.  There is no need to remove those screws. There is a much better way to take out the filter.

1. The first thing to do is OPEN the door on the ceiling cabinet on the passenger side. With this door open you will have a lot more room to move around when sliding out the filter. The filter is going to slide out of the left side.  

2. With the open cabinet door you can get your elbow inside the cabinet to get your fingers onto the edge of the filter through the open slot on that side of the front Cool Cat panel and grab the edge of the filter. 

3. Just slide the filter out toward the open cabinet.  It is flexible and you can flex it out of the slot and completely out. 

4. The filter can be washed or vacuumed clean. If you wash it set it out to completely dry. If you vacuum the filter be careful that it has not become brittle and will disintegrate with the suction of the vacuum nozzle.  There should be no dirt behind where the filter has been in the Cool Cat if the filter has been doing its job. 

5. If you decide the filter needs to be replaced, you can use any of the cut it to size filters sold for air conditioners. I suggest getting one of the foam filters with the plastic grid on the back as it will go in and out of the filter much easier than an all foam filter.  Use the current filter as a template to cut the new filter to size. 

6. When you are ready to put the filter back in, it is going to slide in through the same place it slid out of from the same side BUT there is something to be aware of when putting the filter back in. There is a flexible plastic "clip" that holds the filter in place when it is in the Cool Cat. This does not get in the way of removing the filter but it will stop the filter from sliding back in if you do not follow the next step.


7.  Look at the photo above on the left side, inside the grill. You will see the clip that I am referring to. As you see it here, it is in place with the filter clipped down by it. When you start to slide the filter through the slot it came out of (again the open cabinet door next to it makes it easier to maneuver. Put your finger into the vent where that plastic loop is and move the loop toward the front of the vent cover to open the path for the filter to slide in on. The filter is sliding on a groove on the bottom of the cover. Once the edge is past that point it should slide along with the clip down and in place  and you can let go of the loop - but if there is resistance or the filter you have is just foam with no backing - keep that loop up until the filter is slid to the right side of the Cool Cat and stops.  if you are still holding the clip up, let it go.

8. The filter is now in place and the Cool Cat is ready for use. 

I clean the filter when we dewinterize and have used a vacuum to do it. I take the filter out of the Roadtrek, put it down on a flat surface and with a vacuum hose with a soft brush nozzle vacuum the front and back of the filter. 

If you decide that you are going to take the front cover off to remove the filter. When you remove the two screws on the front, it is not just going to come off. There are tabs on the bottom of the cover that fit into slots that hold the cover on. Because the Cool Cat is so close to the ceiling you cannot just pull the cover off when the screws are removed. You have to carefully pull the top of the cover slightly toward you and once you clear right above the cover move the cover up so that the tabs come out of the slots on the bottom holding them in. 

***********************************

Just for further information about the Cool Cat. The Cool Cat is a closed system. There is no way to recharge the refrigerant in the Cool Cat.  There is also no access to any of the mechanical parts of the Cool Cat from the front with the cover off. It is necessary to remove the Cool Cat from the Roadtrek to work on it. This is something not advisable to do yourself.  It may be possible for an A/C shop to cut a charging port into the coolant line for a way to recharge the A/C BUT this can only be done with the Cool Cat out of the Roadtrek and an RV shop would have to take it out for you to bring it to an A/C shop.  Reinstalling involves sealing certain places around the Cool Cat inside the the opening and where it sits on the pan behind. (per the Cool Cat installation manual). Also- The heat pump in the Cool Cat stops blowing hot or warm once the outside temperature approaches 40 degrees F.  If you put it on and the temps outside drop to near or below 40F - the Cool Cat blows COLD!  This can be a big surprise if going to sleep with the Cool Cat on at night and during the early morning ours the temp outside drops! 😦⛄

Friday, June 26, 2020

ALL ABOUT THE HOT WATER HEATER AND HOT WATER TANK

This is an article that is a collection of links of all of our articles to date about the hot water tank.  There are always a lot of questions about how the hot water tank works and what needs to be done involving the hot water tank during a year of using the Roadtrek. The hot water heater is a Suburban 6 gallon propane heated hot water heater and tank.  Some early Roadtreks had electric and propane heating elements. It is installed from the inside and it is accessed outside and inside the van - outside is access to the hot water heater mechanism and tank drain. Inside in a cabinet at the floor is the tank and bypass valves.  The tank is covered in foam insulation. The inside of the tank is glass lined. The battery switch must be turned on when you want hot water as the propane is self-ignited by a 12 volt igniter.


THE ROADTREK HOT WATER HEATER AND THE WATER SYSTEM - HOW IT WORKS

THE HOT WATER HEATER AND PROPANE

HOW TO PUT THE HOT WATER HEATER TANK INTO BYPASS

FLUSHING THE HOT WATER TANK

DON'T LOSE YOUR WATER HEATER DOOR

SANITIZING THE HOT WATER TANK

DRAINING THE HOT WATER TANK

THE FOLLOWING ARTICLES ARE HOT WATER HEATER/TANK RELATED:


WINTERIZING - THE DEFINITIVE STEP BY STEP GUIDE

THE DEFINITIVE STEP BY STEP DEWINTERIZING AND SANITIZING

PROPANE


This is all fairly complete in what you need to know about the hot water heater and tank in your Roadtrek.

Saturday, February 2, 2019

The Worst Summer Turns Into the Worst Year

It has been awhile since our last article and that pretty much has been the result of avoidance to just put all that has happened since September in writing. The last time we took the Roadtrek out of state was the last Saturday in September. We went to an event in Pennsylvania and took the Roadtrek to go there and back the same day.  That was fairly uneventful other a small thing at the location of the event which is something to share because when driving any van RV - not just a Roadtrek you need to be aware of what you are parking on if you have to park in a field or on the grass. This event was at a park and parking for the park was limited so the park opened up several grass fields to park on. The day was beautiful - sunny and pleasant but the days before it had rained hard and a lot - what else was new?!  We drove down the  entrance road in the park and was stopped by a gentleman who was directing where to park. He pointed into an open field and directed us to go into one of the spots toward the left. I looked ahead and saw that a good deal of the grass and dirt area was mud. I asked if the ground was solid - adding that if we go into the mud we will sink. That is not an exaggeration. With the weight and the ground clearance of the Roadtrek if get into the mud you will sink - and possibly not easily get out of the mud. He just shrugged his shoulders and said "Oh!" and pointed to the same area he pointed to before. I headed into that area and stopped where he had said to park. I could see as I pulled forward into the spot that I was going to be in trouble if we stayed there. The mud was deep and I did not even stop, I kept going through the open space in front and through onto the more solid ground of the area between the parked cars that served as a road. I drove around looking for a more solid place to park. I came across a grassy area that some cars had parked in and went there. I pulled through a soft spot forward onto solid ground. When we got out of the car I saw that the tires in the space just behind us that I just drove though made ruts about four inches deep. Where we stopped was solid and we hiked over to the location of the event - and while it was much smaller than we anticipated we spent about an hour going through it - twice.  We headed after that to our usual PA stomping grounds and had a pleasant day and a nice dinner before heading home that night.

Four days later I woke up with a pain in my shoulder that ran down my left arm. It was the worst pain I have ever felt - and since one hears that an unexplained pain in the left arm could indicate one is having a heart attack, Meryl said - we are going to the hospital - and we did. I spent 10 hours in the hospital - "being observed" and was told I was just fine  - no heart attack. I was told to go home and I said - "What about my shoulder?" which was still hurting A LOT.  To which they answered, we don't know, go see your doctor.  The doctor found a variety of minor things, gave me a couple of prescriptions and told me that for the pain, take Extra Strength Tylenol. I asked how long this would last and he said "6 to 8 weeks".  Great!  And, indeed, I was in pain of varying intensity for eight weeks. And during that time, I had a great deal of difficulty driving because of how the seat belt would pull on my shoulder no matter if I was the car, our passenger van, or when I tried sitting in the Roadtrek on the driveway. There was no way that I could drive on the few trips we had planned for October, much less be able to get by comfortably living inside even for a few days. That ended all plans for travel. And the worse part was we were not taking our usual end of RV season trip to get the Roadtrek ready by dumping the tanks at a campground sewer dump hole to be ready to winterize. Not good - but as it turned out in the end, maybe the best thing that could have happened.

Early in November it was bothering me that we had not driven the Roadtrek since the end of September and we really should take it out for a drive - whether far or near but it had to go out. I was even willing to try to go out of state with it - for a same day there and back trip, but still the weather was not cooperating. We settled for a trip out the the East End of Long Island - about 100 miles or so just to drive the Roadtrek - and that is what we did. Totally uneventful and just for the sake of driving.  At the end we filled the gas tank and I bought two bottles of Seafoam gasoline additive to put in the gas tank to run through the generator when I ran it two ours each month in the winter with an electric space heater running to put at least a half load on it. This is recommended by the generator company and I have been doing this monthly since the Roadtrek was new. Two cans is just a little more than is needed for the number of gallons in a full tank and I just put all of both cans in - a little more can't hurt.

Mid-November we had to winterize. I figured that the usual gallon of water that I put in the black waste tank to keep it wet when we last traveled in August (for couple of days) would get dumped into a bucket and carried into the house to flush down the toilet. (When we got the Roadtrek and were faced with the need to dump without having a place to dump the black tank, I bought a plastic pail and wrote on it "Doody Pail" so that it would not be used for anything else. 😉)  We were all set to winterize. We pulled the macerator hose out, I started the engine to put a little boost into the RV batteries, pulled the black tank handle, and with Meryl holding the nozzle over the pail, I pushed the red macerator button. I could hear it running but not as loud as usual. Nothing came out of the tank.  My first thought was that even though we had charged the batteries a few days before maybe the Roadtrek needed to be plugged in. There should be nothing in the grey tank as that was dumped completely and not filled back with any water on the last trip in August. We pulled out the power cord and plugged it into the 20 amp outlet outside the house as we always do. Again, we got set up to dump the tank, and again a running macerator - low volume - and nothing came out. We have dumped on the driveway before. We have never had a problem. The van is on an small incline front end up but that has never mattered. I thought that maybe the van had to be level this time for whatever reason. The Andersen Leveling ramps came out and I put the Roadtrek up on the ramps and level. Again - nothing came out of the macerator. Off the ramps, we tried again - and this time not only did nothing come out but I could smell a burning order from under the van - OH BOY!  Had we run the macerator dry to the point that we just burned out the motor. We stopped and put everything to do with dumping away.  We still had to winterize and if there was any water in the black tank I would overload the black tank with RV antifreeze and keep our fingers crossed that it would not freeze. We winterized the Roadtrek as we always do - following my own directions from this site - which I print out and keep with us while we do it just so we do it all and in the correct order. And we were doing this with my bad shoulder and arm which still hurt some.

Meryl is great! She is always willing - and able - to do what I cannot do. And she did a good deal of the winterizing - with my help as much as I could help.  If you know our winterizing process one of the things we have in our Roadtrek is the winterizing valve to connect the RV antifreeze bottle directly to the water pump. There is a large, brass cap nut on the connection for the hose that goes into the bottle on this winterizing valve and it requires a variable wrench that opens beyond an inch which means the usual 6" long wrench does not have jaws that open enough. An 8" wrench does, but is just slightly too long to work easily inside the cabinet that the water pump (and this nut) is located. She was struggling with it - and I got it to fit enough to get the nut loose enough to hand remove it. Meryl turned to me and asked why is there no wrench that fits this and I explained that we would need what is called a "stubby"wrench with jaws that open big enough for this nut which are not cheap. Meryl said - "That is what I want for Christmas!" And that is exactly what Meryl got for Christmas - her very own stubby wrench to use when winterizing the Roadtrek! She was actually very happy getting it.

So, I kept the idea of going even for one day that we would get the Roadtrek out of state for one day - out and back. By the beginning of December my arm and shoulder were better and I kept looking for a day that neither the weather or obligations would conflict with - and that never happened.

We decided that in the Spring we would make an appointment and take the Roadtrek to the dealer/service in Pennsylvania where we bought it and have them look at the macerator and if it is broken, burned out, whatever, have them fix it or repair it. We recalled that on our last trip in August the macerator worked but was a little odd - it seemed to empty the tanks too quickly - not as it usually does - but the grey tank read empty - and the black tank - which never reads empty was emptied first and the grey tank was dumped that day after it - so it was still dumping then.  During this period since August, we also discovered that the Fantastic Fan roof mounted exhaust fan lid was not opening. The mechanism looks fine. The knob to raise it would turn and then get tight - as if something was holding it down. The last time it was open and then closed was a very hot day in August - near 100 degrees F. My first thought was that when it was closed in that heat the seal and the lid stuck together. The easy way to try to fix this was to take off the fan screen inside so that I can reach up into the van and reach the bottom of the lid and while turning the knob before it gets tight to give the lid a push up - BUT I was not going to attempt this because if there is a mechanical problem I did not want an open vent in the roof until the Spring!  We just left it alone. When we go for the macerator we will ask the shop to take care of that too!

This is the way it has been - and unfortunately it was all of 2018 with the Roadtrek - not being able to travel - perhaps the short trips contributed to the problems with the macerator? I don't know. The topper on the cake was one day we went inside the Roadtrek to exercise the generator and I noticed that the molding that is on the edge of the wood panel that comes down along the end of the sink counter was coming off - but not just off at an end, but had come off forming a "U" off the edge, still connected at the ends of the "U" and down about four inches. Pushing up on it to get it back in place - it does not budge. It is cold and when the Spring comes hopefully the warmth will let it expand and will move and I will fix this myself. 

So other than a cold that came, went, and came back again and maybe is going away - again, we are looking toward 2019 to be much better than 2018!  I want to thank the kind reader who recently emailed us to ask if we are alright - since there has been no article since the beginning of September!  I did answer personally and said that I would get this article finally written. I am always happy to answer our readers questions - and we do get a lot of questions by email that I do answer as extensively as I can directly back to the reader.  Things are happening at Roadtrek but, until I have reliable details, I will not write about it as right now no one really knows what the outcome will be.


Friday, August 3, 2018

Replacing the Propane Detector Alarm

Way back after our last trip in 2017 in October we were not hearing the usual beeping that always happened when the battery switch in the Roadtrek was turned on that came from the propane detector near the floor on the front of the cabinet that has the internal water tank inside. This beeping was the alarm warming up and self-testing itself. As it beeped the little red LED on the front would flash at the same time and then after several beeps it would stop and the LED would go out - as it was supposed to. A power LED in green remains on to indicate that there are 12 volts going into the detector for it to operate.

The Propane Alarm is tested, simply, by using a butane cigarette lighter. The lighter is held up in front of the alarm unit and pointing the gas toward the vent opening in the alarm, the button on the back of the lighter is pushed without flicking on the ignition wheel. The gas goes into the alarm and the alarm starts to scream - loudly and continuously with the red LED flashing - until you clear the air of gas by opening a window and turning on the ceiling van to suck all the gas out of the van - and the alarm goes silent. This alarm is hardwired into the Roadtrek's coach 12 volt battery run electrical
 system.


After that trip I tested the alarm with the butane lighter and it was silent and no red LED came on. The green power LED was lit. These units have a life span from about five to a few more years. Unlike the CO Detector that has an audible signal that the life of the alarm has expired, the brand unit that Roadtrek used for the Propane Detector had no such signal. I decided to wait for the Spring to replace it - as we would not be traveling in it again until then.


At some point after 2011, Roadtrek stopped using a standalone propane detector alarm and a standalone CO detector alarm (that is located under the cabinet on the passenger side over the bed), and installed a single combination Propane/CO Detectors Alarm - in the same place that the Propane Detector is installed in my 2011.

When it was time to order a replacement I looked up who made this unit and found that it was a company in Canada by the name of Electro Systems, Inc.. I did a search for the propane detector to match the same one in my Roadtrek and found only two places that it existed for sale. One was the manufacturer and the other was an online retailer also in Canada. I decided I would order it from the manufacturer. I am not going to provide the model number - and you will understand why as I go along here.

I ordered the propane alarm from the manufacturer's website. We had to pay through Paypal with a credit card. The money exchange rate was automatically handled and we paid about $15 shipping. It took two weeks to arrive.

The unit looked exactly like the unit installed in my Roadtrek. This is a flush mount unit. The cabinet wall that this is installed in has a three inch round hole cut into it to mount the propane detector alarm unit into and the wiring comes up from under the floor of the cabinet through a thin slot along the wall below the hole. At first the installation looked simple. Remove the screws that held the old unit to the wall outside the hole. It was not quite that simple as the screws were under the face plate of the detector and two clips hold the face plate to the unit. The two clips are both pushed toward each other at the same time (several inches apart) and the plate is supposed to come right off. With the two clips pushed nothing happened. It appeared that after 7 years either heat or age caused the plate to adhere closely to the the back of the unit. It took a thin and sharp edge of a metal paint scraper to get into the crack that was barely visible and pry the face plate off while also holding the clips together. Eventually it came off.

I removed the screws and opened the cabinet door to follow the wiring. It went down below the floor inside, not through the slit that was there for the wiring but along the edge of the floor. The wiring did not pull up. It moved a little and then moved toward the side just a bit more and then stopped.

Note in the photo that the original install by Roadtrek was at an angle - that it should not have been at.

The wiring was not coming up and the connections were somewhere below. Looking around the floor edge in the cabinet it appeared that the floor panel might lift up and out. This cabinet also has a door on top that lifts up. Inside this cabinet is the interior water tank and a number of its electrical sensor connections above the floor. One must be very careful inside this cabinet to not damage this fresh water tank or the wiring connected to it which easily could be pulled off. I tried picking up the floor panel, found a few screws holding it down, removed those and it would move a little and then stop. This is all happening with me sitting cross leg in the narrow aisle between the cabinet I was working in and the cabinet on the floor on the other side.

I tried for quite some time to carefully remove the floor panel and then gave up when I realized that what was stopping it was the piano hinge that the front cabinet door opens out on. The inside of the hinge goes straight down to the floor all along this section of the floor and there was no way this floor board would come up without removing the hinge with a number of screws on the inside of the cabinet at the floor - where there is no room to turn even a slim screwdriver. No, I stopped there.

At this point I decided that I would cut the wire on the old detector unit right where it went into the back of the unit and attach a new wiring extending the length of the wiring that was under the floor. I would use end to end crimp connectors to do this. The instructions for the propane detector recommended these crimp connectors to attach the wiring of the detector to the 12 volt wiring of the RV. I had initially thought to attach the detector with the same plug and socket crimp  connectors that I had used for the CO Detector 5 years ago when I had to replace that unit (see article). Since the instructions were so definite about the end to end connectors I used those instead.

So I added about 10 inches of wire - just to have extra - to the wiring that was cut from the old detector and I attached end to end crimp connectors to the end of the extension wires that would be attached to wires on the new propane detector. It was then that I discovered that the hole in the back of the unit was too small to fit the connectors through - and this was necessary as the face plate and "guts" of the unit had to fit into the back plate that is screwed into the cabinet to hold it in place and the hole would be too small to pass the connectors through. I decided to just drill that hole in the mounting case larger. Then I got the wires out from inside through the hole, connected the connectors to the unit wires and got it all back together again. This was all easy, if it were not for cramped legs while doing this.  I thought I was done!

New install - using the same screw holes. You cans see the angle it is on from the original install.


I had Meryl turn the battery switch on and I saw the green power light light up on the unit. It quickly flashed red once and there was a half beep and then silent. This was certainly not working like the old unit - nor was it working the way the instruction sheet said it should which described the familiar several beeps and flashing red LED throughout as it warmed up and self-tested. I was not happy.

I got the butane lighter and decided to test the detector. I sprayed gas into the detector as I had done with the old one and it sat there silent. I repeated spraying gas. Still silent. I did it a third time and in about ten minutes of waiting it suddenly started to blare the alarm. Was this how it worked? I was even more not happy.

We cleaned up and shut the Roadtrek down and decided to let it sit for another day. The next day was cool outside. This was all in the Spring which here did not warm up very much each day. It was about 50 degrees F. I went into the RT - turned on the battery switch - no beeps, no red LED - only the green power LED was lit. Not only was I not happy. Meryl was also not happy. We both have never been fans of natural gas or propane. We don't use propane often in the Roadtrek - only when really necessary - but the tank still hangs under the back of the chassis - under the bed inside the Roadtrek - and we take the propane detector alarm very seriously. I tried a few more times on different days. I also contacted the manufacturer which turns out - at least in any contact - to be a one man operation.  I was told that perhaps the detector does not need to warm up. I questioned this because the temp inside and outside the RT was below 50 degrees most days at this point. I was told it was fine. I tested it a few more times with butane (also recommended in the written instructions with the propane detector). Each time it would take awhile for the alarm to go off. Meryl wanted it out! I emailed again - asking about why the unit does not beep when it is first turned on - per the instructions - and per our experience with the same unit for the past seven years. I was told that the beeps were silenced at start up (regardless of what the written instructions say) because they were annoying. I then asked then why no red LED either at start up. There was no answer for this. Then Meryl got involved in the emails because she wanted this unit out and returned. She did not want another (and I agreed) as this unit could not be trusted. That no one sells this unit any longer other than the manufacturer and one retailer and that Roadtrek stopped using this unit just after my 2011, should have told me something. Eventually he said to send it back (at my expense) and he would refund the purchase price. I pulled the unit out and sent it back.

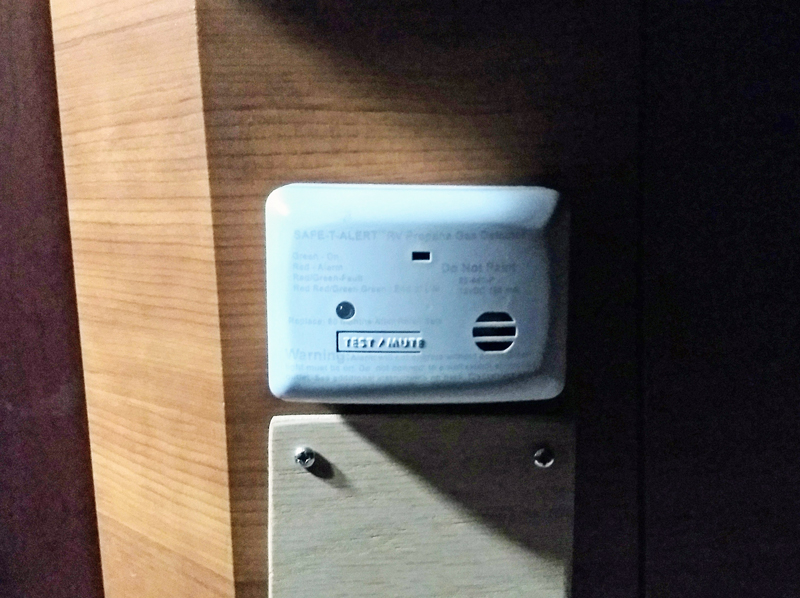
I now had to find a replacement. The new combo unit that Roadtrek uses is made by the same company that makes the CO Detector that RT used in my 2011, Safe-T-Alert.  Looking at that combo model I would have had to cut a new rectangular hole into the cabinet and with the large round hole already there this was not going to work out too well. Plus I had just replaced the CO Detector which had aged out at five years.  I looked to see what propane detectors that Safe-T-Alert has and there is a "mini" unit that is just a propane detector alarm that was a surface mount. This meant that it would stick out some into the aisle - which is generally under the bed when we travel so as long as storage under the bed did not interfere with it, it would work.

The model of this Safe-T-Alert mini propane detector is MTI Industries 20-441-P-WT Safe T Alert 20 Series Propane/LP Gas Alarm - White. I made sure that it had all the same specs as the larger units. It does. There was nothing different about it other than size from the full size propane detectors from Safe-T-Alert.  I was able to find it on Walmart.com with free shipping directly to the local Walmart where I could pick it up when it arrived and I had it in less than a week. And the price was decent - and less than the original.

I closed the hole in the cabinet with a quarter inch thick oak plywood board - furniture grade cut to a a square to cover the hole. I wanted the new propane detector mounted just above this and drilled a half inch hole into the cabinet so that the wiring would easily pass through. This unit is easily detachable from a mounting bracket that is what is screwed to the wall and the unit needs to be no higher than a specified height above the floor - which was no problem with the location I was mounting it. In the future when this needs to be replaced (the instructions say every five years - and this unit will sound an alarm when it is aging out - just as the CO detector from this company does) all that is necessary it to pull the detector up out of the snug mounting bracket, cut the wires at the crimp connector that I used for this as well (the wiring that I had done all remained in place), attach the new unit's wires to the wire in the cabinet and done!  I tucked all of the wires down the slot that is below this in the floor - and it all fit down and comes up easily because of the extended wire I added. The original wiring still comes up through the slit between the floor and the wall - and still does not budge.


I think you should also know the rest of the story - because I always have told it like it is. After over a month after the returned propane detector was received at the manufacturer, we still had not received a refund. We had asked for our credit card account to be credited back through Paypal - a simple process that we have done ourselves for returns in our own small business. We tried emailing - no response. An email from us saying that if we did not hear back we would file a claim with the credit card company finally got a response but when I asked for the refund to be processed by him back ot our credit card, I was told that he could not do that - I had to. ???  I had to process my own refund to my credit card?  I answered that the only way I could do that would be detrimental to his account - requesting a charge back on a disputed purchase - and I did not really want to do that to him. I got no reply back and we waited another two weeks and contacted the credit card company and Paypal. We did finally get the credit approved, processed, and closed - just a week ago. This went on from May.

If you need a new propane detector for your 2011 or previous Roadtrek do not get the same as is there. The Safe-T-Alert mini model works well- does everything it is supposed to - it starts and flashes for a specified length of time showing it is self-testing (just as their CO Detectors do) and goes steady green LED once it is ready. I have tested it with butane from the lighter and it immediately went off - very loudly! You will not sleep through this if there is a propane leak. Once the air was clear it resets itself and is ready again.

Things should be easier than they are. Sometimes with Roadtrek things that should be simple - like replacing parts that wear out every five years are not. The CO Detector wiring was also not accessible. This wiring is not accessible. Perhaps it is done in an effort to make business for the dealer shops.


Wednesday, May 24, 2017

Getting Ready, Always Another Surprise, Part II

Part II

See the previous article for Part I.


So we has two more surprises in getting the Roadtrek ready for the season! One involved the Roadtrek physically, and the other involved the Roadtrek's emergency roadside assistance coverage.

So - the Roadtrek's physical problem. During the process of dewinterizing and sanitizing we are in and out of the inside of the van. At one point I was outside the open driver's door and Meryl was inside standing between the driver's and passenger's seats and looked down at the driver's seat. She said look at the seat and pointed. There were three tiny tears in the upholstery of the driver's seat. One of the tears was along the edge of a seam and was larger than the other two - this one was a tear about a quarter of an inch long - basically a small flap. The other two were not much more than pin holes - one of them hardly that. But once there is a tear or hole, it is destined to get bigger if nothing is done about it.

I am not sure what the Roadtrek seats are made of. It has been implied that they are leather. They may just be a leather look vinyl. The seats are made by Roadtrek and installed - they are not stock seats. They swivel 360 degrees. They have the name Roadtrek across the front under the headrest. They also have an arm rest on each side. These are not stock seats.If you go to any site that sells custom seat covers they want to know what make, year, and model car or van you have. No choices on any of these sites is "Roadtrek". So we started on a quest to figure out how to fix or cover these seats - to stop the tears from becoming major tears.

I started researching fixing vehicle seat holes. The most common method uses a paste that is mixed to match the color of the upholstery and then set with heat or with some, left to dry after pressing a textured sheet over the paste to make it look like the upholstery. I have had some really poor experience with this stuff and I will not use it again. My first encounter with this was with one of my cars. I followed all of the directions and the resulting patch was a globby mess - that eventually peeled away.  My second experience was with a Chevy service using this to fix a tear in a passenger van arm rest. That peeled away within a year. I was not going to use this stuff to fix the Roadtrek seat.

I looked for other alternatives and the best I could find were vinyl/leather flexible glues specifically for upholstery. I have a lot of glues at home. None list vinyl. I have some good glues. As a long time leather worker, I have glues made for leather - but each of the really good glues all say to do the same thing which is not going to work tears this small - you need to coat both sides, put them together and then peel them apart, wait five minutes and push them together again. Peeling a quarter inch flap with glue on it apart would rip it apart. I went to Home Depot - they had no glue for vinyl and leather. Lowes did - a vinyl leather glue from Locktite. We bought that. With a toothpick I applied a little glue to hole in the seat under the flap and the flap and put them together - with the tip of a clean toothpick. Then I went around the edges with a very little more glue. I coated the tiny holes with a tiny dot of glue. The package says tape together to hold until dry. I used painter's removable tape which I place over the holes and to the sides and not on them to pull them, closed. This needed to dry for 24 hours. After that the flap was sealed but one small edge remained open. A small coating of glue on that edge and another 24 hours to dry. It looks like this will hold, but I really would like a seat cover to be sure - and that is another problem.

We went to the chain auto parts stores that are here. They pretty much all have the same seat covers and none are going to work as is on the Roadtrek seat. If they have a high back to go over the built in headrest then they have no slots for the arm rests. If they are sideless they cannot be used on a seat with a built in headrest. There are covers for just the seat part and not the back to be found on Amazon but there are no dimensions and the Roadtrek seat is unusually wide. I know this because I have looked at several seat pads - that just sit over the seat and are strapped on - and these are all too small to cover the Roadtrek seat.

So what to do? Right now we are working on an idea. To buy a truck full seat cover, cut off most of the back, create a section out of what remains of the back to push under the seat and anchor there in some way - and only use the seat part to cover the seat. We did find a cover for a truck size seat which we could buy and return if that it is too small. That is currently in consideration. It seems that we are not alone - and others have told me that they too are looking for a seat cover to fit a Roadtrek seat.

And so finally - the emergency roadside assistance plan. When we bought the Roadtrek - way back when - we received a free one year of Coach-Net Emergency Roadside Assistance Coverage. Coach-Net is an RV specific policy with technicians who know RVs and they will send out a truck to help with someone who also knows RVs - and not the kid from the corner gas station in a tow truck as plans like AAA or the policy thrown in with your vehicle insurance policy. For years they have had gotten good reviews from RVers. Before we found out that we were getting the plan for free for a year we had decided that this was the plan we would purchase. We have renewed the plan every year we have had the Roadtrek - until now.

Here is what happened. Last year we renewed the plan. We sent the check. Got an acknowledgement of the renewal and were all set to face any problem that might come up through the year - which hopefully we would not have - and didn't. Now comes April and it is time to renew. Meryl tells me that we should have received the renewal notice by now and didn't and that I should go to their website and see about renewing there - or getting an application to send with a check. I go to the site and try to log on with my user name and password and a message comes up across the screen that my policy has expired and it rejects my login. I could not get on the site. The next day Meryl called Coach-Net. She is told by the rep that our policy has been expired for more than six months. Since our renewal date was not until a week later from the date of this phone call, Meryl - who is a lot better with this type of thing than I am as she gets direct where I would just get mad and start yelling - let him know that we sent a check last year for coverage to X date and what is going on? She was told that yes he could find that we had paid, but the renewal was NEVER ACTIVATED. Essentially we had no coverage the entire year. Instead of his saying that he would activate the policy and extend it through the next year, he just said that he would activate the policy through the coming expiration date!  Totally unacceptable, but he would do nothing else. That was it for us with Coach-Net! The President of Coach-Net is getting a letter along with a complaint filed with the State Attorney General's Consumer Division. We have also learned that we were not the only ones that this happened to in 2016. But we then had to decide on a new company.

Again, I went to one of the better Roadtrek groups on Facebook to ask. About one or two years ago, Roadtrek stopped giving a year of Coach-Net but became involved in it's own ERS plan with one of the big ERS providers. This is what they now give free. This was recommended to me by a few who have it. They too will respond with a Roadtrek technician on the phone and also will send out someone who knows RVs - hopefully, the Roadtrek but that may be too much to expect in some areas. The price is a little more than Good Sam's ERS plan but that plan gets mixed reviews. One signs up by going to a special website or calling a number on the Roadtrek website. I wish I had called that number instead of going to the website - as my experience in applying was not the best - and I am hoping that this is not an indication of what the service will be. I want to say right here that I have since straightened everything out through a contact I was given directly to Roadtrek - who responded and resolved everything. There is only an enrollment website for this plan. There is no website that you can go to that will show you your account and expiration date, or the services that you are entitled to. All of the services need to be accessed by telephone through one number that has a menu of choices including one that goes to an emergency response operator to report that you need help. The other services that this plan entitles you to are all accessed on that menu. This was a surprise as with Coach-Net their website accessed mapping software and other services - in addition to the phone number that got help to you when needed. Perhaps a phone access solution is better as one generally has phone service but does not always have data service or a computer near by.  According to Roadtrek, they have trained all of the response technicians who will troubleshoot whatever problem you might have on the road in your Roadtrek. That seems like a good idea - and since they no longer have this relationship with Coach-Net, this seems to be the plan to have with a Roadtrek. I hope never to need this service. Like any insurance, a good day is when you don't need to use insurance.

Well, we are set and ready to travel. We just took the Roadtrek to our mechanic for its annual maintenance. He changed the oil, checked all of the fluids, and did the State Inspection. I also asked him to change the air filter in the engine - as I am not sure he has changed it in the past. I checked the air in the tires myself and found them low - though the temp her is just at 60 degrees F - and I filled them. Before we leave on a trip I will check them again - and likely if the temps go up, I will be letting some air out.  When de-winterizing take the opportunity to check the air in your tires - and don't forget the spare.

One more tip - When dewinterizing, check the battery in your Roadtrek's smoke detector. Unlike the CO and Propane Detectors, the smoke detector is just a house smoke detector that uses its own 9 volt battery. Push the test button if you hear nothing or you hear a dim beep, change the battery. The smoke detector should come off the wall with a twist and the entire unit comes off in your hand. The battery is on the back of the detector.

Now all we need is a place to go...

Wednesday, February 1, 2017

Camco Power Grip Electrical Protectant and Lube

For a long time I have been looking for some type of lubricant that will make the 30 amp power plugs and sockets come apart easier in the winter. The problem comes more from the plug and socket on the 30 amp RV extension cord than the Roadtrek plug on its power cord, but that has been a problem too.

When I hook up at my home in the winter to charge the batteries, I plug a 30 amp female to 15 amp male adapter into the socket of a 30 amp RV extension cord. The extension cord socket is plugged into the plug of my Surge Guard power protection unit and than then the Roadtrek power cord plug is plugged into the socket on the Surge Guard unit. Between the plugs and sockets I put Plug Dogs. (See my Plug Dog article.) This is done twice a month to keep my batteries charged.

In the summer months when it is time to put all of this away, the plugs and sockets pull apart with only a small amount of resistance. In the cold, it can be a real struggle to pull apart. The plugs stick in the sockets. Even with the Plug Dogs it can take a real heavy yank to get them apart - and there have been some days that some just do not come apart at all. So far, that has not been the power cord of the Roadtrek - and I can get that free with some effort and put the rest in the house and let them warm up enough to come apart. The socket on the 30/15 adapter can be very hard to come apart and I have had to pry that apart even after it has warmed. My concern all along has been if the Roadtrek power plug will not come out of the socket. I have thought that there must be something to use to prevent this.

I have asked on various forums and RV groups. I have been told dielectric grease will work for this by some, while others have said don't use dielectric grease. I have contacted two companies that make dielectric grease and have told that their product is not for this purpose. Yet, some have said it works with no problem. Some said just petroleum jelly. Others said WD-40. Others said never use anything petroleum based on electrical connections. I was about to either give up or take a chance when I found a product made by a well known RV supplies company that is made exactly for this purpose.

It is called Camco Power Grip Electrical Protectant and Lube - the lube part is what I want. Camco makes the RV 30 amp extension cord that I use. It has a big plug and socket each with a solid pull handle on them - "Power Grip" handles  - and this is "Power Grip" lube. The package and product description says that this is to lube the plug to come easily out of the socket (when you want it to). Other benefits are to protect from oxidation and to improve conductivity. It is for use with "all electrical adapters". It is made of a silicone grease mixture. No petroleum.  This may very well be dielectric grease - but it is not labeled as that.

I took a cotton swab and squeezed a small lump of grease unto the tip. A toothpick or a popsicle stick would work just as well. The label cautions about getting this on your skin, so while my inclination would have been to just put a dab on my finger and apply it, I was not going to ignore the warning. I took the swab and lightly coated the blades of the plugs including the ground post with the grease - each just before inserting it into the socket. I inserted the Plug Dogs where there were no plug/socket pull handles as I usually do. The plugs slipped easily into the sockets. When it is cold these take some effort to push them together - it was in the 20's degrees F while I tried the Lube. All lubed and connected. The 15 amp plug was plugged into the outdoor 20 amp socket on the house and power flowed. (The 15 amp plug was not coated - it never has been a problem pulling it out of the house outlet socket.)

I let the batteries charge for 24 hours. The next day was colder and snow was expected later in the afternoon. Without the lube I would have been very concerned about getting this all apart in this cold. I pulled the 15 amp plug out of the house outlet and proceeded to pull the plugs from the sockets. The one that has always been the hardest is the adapter socket from the extension cord plug and it came right apart. Great! Each plug pulled easily from the sockets. This stuff WORKS!

When the plug with the lube on the blades goes into the socket it is putting lube on the socket as well. I plan to put it on the next time I plug in as well. We will see how often it needs to be repeated. There are two more winter months to deal with and I don't want to find out the hard way that it needs to go on every time.

This product is NOT CHEAP. A ONE ounce tube cost me just under ten dollars on Amazon from a third party vendor. There were several vendors - some charging shipping and some not. I chose one that was about thirty cents higher in price than the lowest priced vendor offering free shipping because this vendor had a much quicker estimated delivery date than the lowest priced vendor. It was shipped the next morning and arrived three days later. Since this was coming halfway across the country that was pretty good!

If you have any problem with getting power plugs out of sockets, this works. It is Camco Electrical Protectant and Lube and its product number from Camco is #55013.


+++++

We have no connection with the Camco company or Amazon. We have not been asked to review this product. We paid in full for the product from an Amazon vendor - and we have no connection with that vendor in any way as well.  

Wednesday, June 22, 2016

Routine Maintenance

One of our readers emailed and said that they looked for a list of routine maintenance items on our site for their Roadtrek and could not find anything. She was correct - I have never put them all in one place - though they are scattered throughout various articles on this site. I responded with a detailed list and I am going to share that here with all of you. I will note on each if it does not apply to all Roadtreks - and some of these apply to all RVs and travel trailers. There is no particular order to these maintenance items. So here they are -

Routine Maintenance


1. For those with a Onan generator -> Change the oil in the generator every 150 hours or at least once every year. It takes one quart of oil.  In 2012 Onan came out with a new model with a few changes that don't apply to Onan generators from 2011 and earlier, and Roadtrek used the new one in later models - so the manual on their website now is for the newer model. If you are looking for the Onan manual for the older model - Microlite 2800 KV do a search on Google and it is out there. The manual shows how to change the oil.  There is a maintenance schedule in there plus diagrams and how tos. The new and the old manual have the same maintenance schedule and the oil is changed exactly the same way. You can do this yourself or have an RV service center do it. It involves being upside down under the van and doing most of the job by feel. You will need some way to get the oil from the bottle to the dipstick hole. There is a pump that attaches to oil bottles sold in marine stores and Walmart's fishing/marine aisle also has this. Connect the pump to the oil bottle, put the tube into the dipstick hole - after draining all of the oil and closing the drain plug securely - and pump. For the KV - one quart of oil only. For the newer model - up to 20 ounces of oil. Type of oil varies by usage - see the manual.

2. Again for Onan owners - Run the generator for two hours under half load once every month. Half load is anything that uses 1400 or more watts. The A/C while cooling does this. The A/C/Heat Pump while heating does this. (For both I turn the thermostat up or down to keep the compressor running.) When it gets too cold for the heat pump - 40 dF outside or colder - I bring in a house ceramic electric heater and plug that in and run it. So that I don't forget, it is on my calendar on my phone and computer with a reminder alarm for the 15th of every month.

3. Charge the batteries by plugging into shore power at least once a month - and keep an eye on battery level in case it falls to two LEDs and if so plug in then. This past year I started going to a twice a month schedule because the batteries were not making it through the month. The cold weather will drain the batteries faster even without use. I had set the schedule on my calendar for the 28th of every month and now I have added the 13th of every month. Plug in to shore power to charge. (Of course, if we are traveling on any of these days I don't do this - it is getting charged by driving and being plugged in every night at the campground.)  If you don't have AGM coach batteries which are maintenance free - always check the fluid level of deep cycle wet cell RV batteries regularly to make sure charging has not boiled the fluid too low or away completely. Always keep an eye on the battery level and charge when needed. You never wan to allow the batteries to go below half charge. If they are getting low, charge them! It is easy - plug in, run the generator, or drive (drive with a Roadtrek after 2005).

4. If you have a crank up, directional roof television antenna - Lubricate the crank up antenna once each year. Here is an article on how to do that (hard part is getting up to the antenna (I don't like heights and I need a big ladder to reach - never get on the roof or put any weight on it that is not evenly distributed - best to not put any weight on the roof) -  http://roadtrek190popular.blogspot.com/2013/01/lubricating-crank-up-roadtrek-tv-antenna.html

5. Lubricate the black tank and grey tank seals by pouring a half cup of plain mineral oil (found in pharmacies) down the toilet and down the sink. With the sink, follow with some water to push it past the drain trap. The next time you dump the tanks you will be lubricating the macerator also (if you have one) with the oil that is coming through from the tanks. Do this about three times during a season. I do this before the first trip. Then during a mid-summer trip and then again during a Fall trip.

6. Change the van oil either per what the percentage is on the van info panel says on the dash or at least once a year. Also rotate the tires if you feel it is necessary. I have a mechanic that changes the van oil. His garage is not tall enough to put the van up on a lift so he does the oil change and the tire rotation outside with the van put up on floor jacks. He has been really nice about doing this for me and we always wait for a dry day. We do this as soon as we can after we dewinterize. He also does the New York State vehicle inspection at the same time.

7. Winterize in late October/early November or as soon as it seems that there will be nights at 28 dF or below and days no longer in the upper 40's, low 50's. See my various articles on how to do this. Flush the hot water tank with a flush wand after you drain it in this process and also check the condition of the anode rod. Change the rod if necessary. When it gets to the thickness of a pencil or thinner, change it!

8. Dewinterize as soon as you believe there will no longer be any freezing weather. Watch the temps closely. I was going to do this in March when we were getting some really warm days and Meryl said not to - and good thing as we had two snows and a few freezes after that. We did it in late April. See my articles about how to do this.  Sanitize the tanks per my instructions when you do this. Sanitize anytime when you feel the water in the tanks is "funky".

9. Before every trip check the air pressure in the tires. The rear of the 190 should always be 80 in both tires. The fronts can vary between 50 and 65. I was told by Roadtrek to change the front psi if I wanted to improve the ride. They said start at 50, drive and see how it feels on the road, then increase in steps of 5 psi and test drive. Stop when the ride feels the best. They said never go over 65 in the front as the ride starts to worsen after that.  I like the fronts at 60. Make sure you have a tire pressure gauge that goes above 80 psi - car ones don't. I use a gauge and then compare to the dash tire readings. And also if you want to carry a tire compressor get one that goes to 120 psi so that it will not work so hard to put air in the tires. If you get a 12 volt one, always plug into the accessories socket in the dash with the engine running. Your tire psi may be different. Check with Roadtrek for your year and model or go by the sticker on the door frame if there is one from Roadtrek. Don't forget to check the spare tire. I keep the spare at 80 psi - easier to take out air for mounting on front than putting in air to mount on a rear wheel.

10. If you are not driving the Roadtrek during the winter, start the engine at least once every two weeks and let it run for a half hour to an hour.

11. At the end of my last trip for the year, I put an ethanol treatment into the van gas tank. Not for the van but for the generator. This gas and treatment will be used by the generator for all of the exercises during the winter months and into the Spring, cleaning the generator of any deposits. I use something called Lucas Ethanol Treatment. Some use Seafoam and some use Stabil. I like the Lucas because one bottle lasts two years - only need half a bottle for the Chevy Express size gas tank. I buy it at Walmart - each of these is sold at Walmart or any auto chain store.

12. After every time I dump the tanks, I put one gallon of clean water into the black tank down the toilet and then add tank chemical. I use Camco TST concentrate that has a waste digester, a deodorizer and a lube. There are many different ones other there - use any of your choice. Water is the most important thing. Always use a lot of water for the black tank. Flush solids with a good flush of a lot of water. If you put a lot of water in the black tank you should never have a problem with the macerator or even with a gravity system. Also dump when the tank is at least 2/3 full. If you are not sure (my black tank monitor has never worked) pour water down the toilet until you see the water coming up in the toilet drain pipe when the flap is open. That means the black tank is FULL. Then dump. Dump black tank first and then grey tank (which cleans out the hose).

13. You have a fire extinguisher in your Roadtrek (or RV). There is a dial on that fire extinguisher. Make sure that the arrow is fully in the good range. You don't want to find out too late that it will not work. If it is in the red, you can get it recharged or replace it.

There is a Baker's dozen. If I think of more or realize that I have forgotten something that I do, I will add it to this list in an addendum.  Seems like there should be more - and I have not gone into things like cleaning, washing, tightening screws and nuts that come loose from the vibrations of driving (just keep an eye out for those), etc.