Roadtrek

Roadtrek
Showing posts with label . Roadtrek. Show all posts

Wednesday, April 22, 2026

WHAT TO KNOW ABOUT BUYING A PRE-OWNED ROADTREK

 A lot of new buyers go looking for a Roadtrek that is in their budget (of course) and are attracted by low prices regardless of the year of the Roadtrek. They see ads and they go out to look at the Roadtrek that is being sold - sometimes traveling a long distance away from where they live - only to get to see it and realize that they do not know how to determine if what they are seeing is good or not so good. Another article on this site goes into some of what potential owners should be aware of. This is a link to that article. 

This article is going to go into more detail about what every potential buyer should be prepared to do when they find a Roadtrek that they have come to the decision that this is the one they will buy. This does not only apply to Roadtreks - the same applies to any pre-owned RV one is looking to buy.  

 What you must know before buying that "I want that Roadtrek" is what true condition is it in.  Some sellers will be right up front and let you know what works and what does not work - and needs repair. But some will not say anything as they feel that if they do - then you will not buy it or expect them to pay for the repair or deduct that from the selling price. If you have never owned any RV or have no experience with a Roadtrek - how will you determine on your own is it really in good condition?   More than likely you won't know.  The thing to do is bring in professionals of your choosing (and paying for) to do this for you.  There are independent vehicle mechanics and independent RV service technicians who offer their expertise to be hired by a potential RV/Roadtrek buyer to completely inspect the Roadtrek. They will come up on a Google search in which you specify the location of the Roadtrek. I had thought that there were none where I am and when looking for an RV service tech to come to fix something on my Roadtrek I discovered that there were several in this area. 

What you want each of them to do is focusing on each pro's area of expertise to inspect the Roadtrek completely inside and outside and provide you with a detailed report of what works and what does not work. What can be repaired and what must be replaced. Are there parts available to repair what needs to be repaired and are there units to replace what needs to be replaced. 

Do not assume that they exist. The Chevy chassis Roadtrek was discontinued with the 2019 models - and when the original Roadtrek went out of business and went bankrupt it was purchased by a European company that took the name and the took over the factory. The first thing that they did was discontinue all support for the Chevy chassis Roadtreks. Parts specific to the Chevy chassis Roadtreks were sold off at a bankruptcy auction in 2020 and these two companies bought what was left and the RV dealer who got the parts has limited inventory - as when they are gone - they are gone. Since - some Chevy dealer/service centers have stated that they will not service or have parts for any Chevy vehicle over 10 years old.  That does not mean that there are not alternative parts but it is better to know upfront before you invest in a pre-owned Roadtrek than find out after it is yours. 

Let's get back to our two experts inspecting the Roadtrek we want to buy. If the parts and units needed ARE available - then you would like an estimate from the pros of what the parts, units, and labor would cost. You want them to go over everything - for the Roadtrek side - the entire water system, the entire electrical system, all of the appliances and fixtures inside and outside -  water pump, sink, inside and outside showers, toilet, inverter/converter/charger, refrigerator, fresh and waste tanks, macerator or gravity dump system,  hot water heater, A/C,  generator, TV, home entertainment center, plumbing under the the van and inside the van, TV antenna, outside storage cabinets, no leaks inside in the ceiling and/or the walls, and more.  On the chassis side - rust under the chassis, heat shields in place and not bent, muffler, signs of rubber pipes rotting (gas tank fill to gas tank - as well as rubber vacuum tubes in the engine compartment, dash A/C, all dash works, radio works, speakers work, etc, etc.  The report will be extensive but you will know before even a dollar changes hands with the seller that it is in good condition and you could drive away with it as soon as it is yours and all will work as expected!

Then it is essential that you test drive the Roadtrek.  If you are a couple buying it both need to test drive it. Is it comfortable to drive? How comfortable is the ride? I recall one senior aged woman who bought a Roadtrek sight unseen. It was a distance away from her and she sent a relative local to where it was located to look it over and he said it looked OK. She told him OK buy it, He bought it and drove it the several states to her. She got into it to drive and was so uncomfortable driving it she contacted me to ask how does she sell it because after driving it she did not want it! 

I have heard from so many new owners of a pre-owned Roadtrek who did not get pros to inspect the pre-owned Roadtrek that they bought - some also sight unseen or having seen it had no idea what they were looking at and were not shown where things are inside and how to work them.  They found out once the keys were in their hand - a lot did not work and wound up putting thousands of dollars into it just be able to take even a nearby trip in it. I can always tell when a new pre-owned owner is asking on a forum or one of the two Chevy Roadtrek Facebook groups that the water pump is not pumping water or there is no hot water - even after following our article her about the hot water tank - that they did not get the Roadtrek inspected and did not even tell the seller that they wanted to see EVERYTHING working and shown how each works. 

 If one were spending a few hundred bucks - I guess it would be no big loss, but buying a pre-owned Roadtrek for multiple thousands of dollars is a big deal and a big loss (at least for most of us)! 

I leave you with this one last for this article piece of advice ---  

WHEN YOU TELL THE OWNER THAT YOU MUST GET THE ROADTREK INSPECTED BY INDEPENDENT PROS BEFORE YOU CAN BUY IT - AND THE OWNER SAYS "NO!" ---

RUN!!! 

 As always - if you have a question email us at the link in the right column of this page where it says

Email Us! 

Please be specific in your question - the more details the better my response! 


Tuesday, March 11, 2025

A ROADTREK HAS TO BE DRIVEN

 There is not a lot new to learn from this article other than what its title states - a Roadtrek has to be driven.  Like any car, van, or truck if it is not driven it will not run well especially when you are ready to head off on a long trip. 

This winter the weather here has been a steady weekly snow storm - some small, some large and a lot of salt put down on the roads and the road salt is not something that you want to drive your Roadtrek over as it collects on the bottom of the chassis and will corrode what is under there. (There is a way to deal with this but it takes to waiting until the Spring and warm weather as it involves cleaning off the bottom of the chassis with a garden sprinkler placed under the chassis - between the middle and the front - let it run for a half hour or more, then move it to between the middle and the back of the chassis and let it run another half hour or more to clean the salt - but if it still going to freeze outside you don't want to turn on the water for the outside of your house.)  So what I have been doing each week - and I do this all year around is start the Roadtrek sitting on the driveway and let it run for half an hour. I sit in it the whole time and read a book. Generally this happens on Sunday afternoons.   This not only runs the engine but the engine battery keeps the Roadtrek house batteries charged.  In good weather we take the Roadtrek for a long drive. That has not happened in months - until this past Sunday.

In the past few weeks I have been noticing when starting the Roadtrek that it is getting hard to start. There is a hesitation between turning the key and the engine catching and starting. Usually, it starts right up.  So I have been getting concerned. My plan had been that a week ago Sunday we would take it out for a drive - but a week ago Sunday it was pouring and not a good day to drive the Roadtrek. I figured OK the next week the long range forecast was good so we would take the Roadtrek out then. 

When we take these drives I want to drive for at least two hours and drive as close to one hundred miles as I can.  We live on an island. The island is 100 miles long end to end, west and east and 23 miles wide, north and south.  We are closest to the south shore and about 80 miles from the eastern most end of the island.  The island is well developed and a mix of suburban and country. The drive we take is usually the same - 50 miles east which takes about an hour with the 55 mph speed limit  and 50 miles back west for about another hour.  There are only two limited access roads that the Roadtrek is allowed to drive on due to its height. The height limit on "parkways" here is 7 ft 10" -  the our Roadtrek is 8 ft 10". On the limited access roads we cannot go on there really are low overpasses. (More about this later.) One limited access road goes south to north. The other limited access road goes along the north shore west to east. So this was the plan for Sunday, March 10th! At least until we heard the news on Saturday that the high winds we were experiencing resulted in brush fires on he East End that was burning in four different areas - and moving.  In fact, it was burning very close to where we would be heading.  So we started figuring out an alternative destination and back that would cover almost 100 miles of driving - and would likely take longer than the usual two hours. 

Any time we have to back the Roadtrek out of our driveway it can take a half hour.  We live on a suburban avenue with two lanes each way - which is located just past a curve in the road north of us that is just past a traffic light. This avenue is a very busy avenue any day and any time - and many cars like to drive it as if it was a practice run for the Indy 500.  😉  Meryl stands in the parking lane (which is in addition to the four driving lanes - one parking lane on each side - with a walkie talkie and I have a walkie talkie in the Roadtrek. I turned the key to start the Roadtrek and it hesitated again and then started. The engine sounded a little rougher than usual and I was hoping that good long drive would get it back to its steady and strong engine sound (which during the trip is evened out to normal). I backed down the driveway to almost the sidewalk and wait for her to say, "IT IS CLEAR NOW - GO NOW!!!" . To which I hit the gas and get into the street and hope I don't hit the car that parks too close to our driveway cut from the house next door. This was a particularly busy Sunday on the avenue we live on and it took about 20 minutes to get it into the street and another 10 waiting for it to clear again to get into the lane and drive.  This is one reason why we don't take the Roadtrek out more often and use it locally.

SO we drove east on the nearest avenue that heads eat to the north/south expressway, got on there and  headed north to its end. It was quicker than I had figured it would be and did not put many miles toward the hundred into the trip We then headed east on a four lane road that goes from commercial to country and back to commercial. We got to a main north/south road - and I did not want to head north  as that would take us toward the direction of the fires which people were saying a number of miles from the fire zone the smoke was coming into. So we headed south which was far enough west from where the fires were burning. People in the fire zones were being told to evacuate. The wind was strong - even as we were driving I could feel the Roadtrek being pushed from the side by the wind as I drove - two hands on the wheel and attention to keeping the Roadtrek straight and not moved by the wind. We got to about where the miles driven were about 30 and I knew we were going to have to repeat the trip twice to get near 100 miles all together.  As we got further south the sky which was bright blue everywhere else we had driven was a brown color from the smoke which was many miles to the east of of us. I pulled into a Walmart  parking lot and turned around and headed back the way we came. Because we were driving on commercial road and there was traffic we had driven at that point almost two hours. We went north to the road we got of the expressway to, got back to the expressway and got on it going south. At where we got on when we stared,  we got off and I said "ONE MORE TIME!" and I turned toward the expressway north entrance and got back on and drove the whole thing again!  When we got back home - after almost four hours of driving - we had driven just under 88 miles - not 100 miles but good enough. On the news the three of the fires were out but a fourth was only half under control.  

 As to what happened with the fires - 600 acres were burned, one fireman injured and taken to the hospital,  two businesses burned to the ground, no one else hurt, no other property damage. An investigation has found that the fires started when a family was int their backyard making s'mores and the wind took the flame and set the ground and trees (which have been very dry due to lack of rain here - snow we get - rain not enough) on fire and the wind spread the fire. There was a fire alert warning put out by National Weather Service for the island.

 The Roadtrek used about an 1/8th tank of gas on this trip and had used 1/8th tank of gas running the engine every Sunday afternoon so I stopped for gas before we took it home. While I am putting gas in, a man from the pump on the other side of us came over and said. "Where do you drive that?" which we were not quite sure what he meant. We asked - you mean today? No, he said, "Where can it be driven?. OK - odd but I smiled and  said "Anywhere one wants to drive it!" which I realized later is not really true as around here there are many roads that you cannot drive it on and if you need to park it, it is too tall for any indoor parking garage.  Anyway, he kept asking - what's inside - I don't know why I was not giving straight answers - but around here one is safest if one does not provide too much information to anyone you don't know (I call this "healthy paranoia") - so my answer was "Everything is inside!" --- he asks - "a bed?" - "Yes and more!" Then he is looking all around it - where do you get one - is it custom built?. I told him that there is no place on the island to get one - we went to Pennsylvania to buy it. He asked how much - i said now they are a lot more than when I bought it and that they are no longer built on a Chevy chassis. And told him it is a Roadtrek  (there is no Roadtrek name on our Roadtrek)  and that he can find them online and if he searches Class B RVs he will find several makes and models.  By this time the woman in the car behind us at the gas pumps wanted to leave and I was blocking her in so we had a convenient way to end the conversation and we got into the Roadtrek and left. And since I had not tried to start the engine since we left on this must drive the Roadtrek drive - when I turned the key the Roadtrek started right up and the engine was steady, strong, and sounded as it should sound!

So - you came along for the ride on this trip! How exciting! Sometimes it is more fun to write an article like this than the usual "how to". What you should take away is not the trip but the need to take these trips when the Roadtrek has been sitting. The van has got to be driven to keep it in good condition to be able to take you on the real and important fun trips! I do plan on getting two cans of Seafoam and putting them into the gas tank to keep it running strong. While the temps have been good this week here. just a week ago they were freezing at night and in the 30s during the day - and that is likely to happen again before the weather stays warm! (Seafoam - one ounce per gallon of gasoline - one can is 16 oz. The Roadtrek gas tank is 31gallons. The extra ounce won't hurt.)  

Ah yes - I said more about the roads here the Roadtrek can be driven on. During the trip we saw a sign at a parkway entrance we have never seen before and then we saw more of them. It said "NO, BUSES, TRUCKS OR RVS ALLOWED ON THE PARKWAY" - usually there is a sign that says "No Commercial Vehicles" and the height limit. It seems that in New York they are cracking down on RVs getting on the parkways - and the Roadtrek is an RV -  is not allowed on the parkways! So it is Expressways only. 

ADDENDUM:

 A few days after we took this trip, we drove our car to the route that we take to leave the island with the Roadtrek. This includes a parkway that has had only a posting about no commercial vehicles and not even a height restriction. This parkway is run by the city and not the State so we always felt it was OK to take the Roadtrek on it. There are no overpasses that are posted at the Roadtrek's height or lower and we have always been fine - and even have been past by highway police that just go by. What we found when we got to the entrance that we take was that same sign we saw on Sunday.  "NO, BUSES, TRUCKS OR RVS ALLOWED ON THE PARKWAY". Now we cannot take any chances any longer going on there. The alternative route is on the north shore of the island which is often busier in the mornings with truck and car traffic but also will add about 45 minutes or longer to just the part of the trip that gets us to "the mainland".  Ugh!

Monday, July 8, 2024

THE COOL CAT AIR CONDITIONER AND HEAT PUMP

 Early Chevy and Dodge Roadtreks had a home air conditioner installed.  Roadtrek then in the Chevy - and some later Dodge models changed to using the Dometic Cool Cat air conditioner and heat pump instead. The Cool Cat shares a thermostat and controls with the Furnace and this is a separate panel on the passenger side wall near the Cool Cat near the rear of the Roadtrek.  Some refer to the Cool Cat just as a "heat pump" but the Cool Cat is a combination A/C and heat pump.  The Cool Cat is 10.5 K BTUs of cooling. 

For the size of the interior of the Roadtrek this should be more than enough as there are room air conditioners that cool a room and more with 10.5K BTUs. The difference in a Roadtrek, however, is a room in a house is much better insulated that the walls and roof of the Roadtrek. 

The COOL CAT and is Cool and Heat Pump functions to work, the Roadtrek MUST be plugged into SHORE POWER OR have the GENERATOR RUNNING.  It will not work on the inverter. It will not work on battery(ies). It will not work on Solar. IF YOU ARE RUNNING THE A/C on the generator and you run the microwave at the same time it is going to overload the electrical system in the Roadtrek which will shut down to not result in damage.

Here is a photo of the Cool Cat --- 

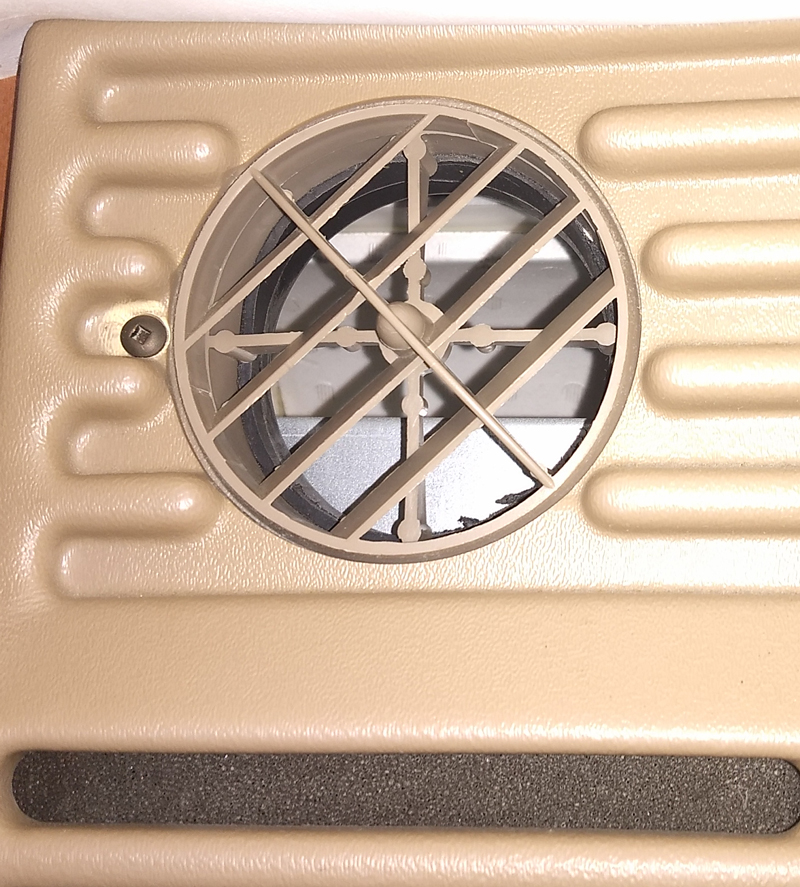
Notice that there are no controls on the unit - they are on the thermostat panel on the wall. The three round vents on the front above the grill turn around and you can point the slots in each grill up, down, to the left and to the right and at any angle. They may feel stiff to turn. Turn them, they will turn and stay where you put them. 

Under the Cool Cat above the bed on the lowered ceiling over the bed there are also vents. These vents have two knurled round wheels to direct the air from the Cool Cat where you want it coming down on the bed.  Turn the wheels with the Cool Cat running and you will find what turn of the wheels and combination of the turn of the wheels direct the air where.  These vents are black in color - some don't are not even aware that they are there. 


This is the analog thermostat panel for the Cool Cat - and the furnace. Newer Cool Cats will have a digital panel on the wall. 

Take a look at the switches and slides.  These turn on and turn off the Cool Cat - AND the furnace. 

Here is what the newer digital thermostat and control panel looks like -  

Both the analog and the digital control panels have the exact same functions and settings. 

Using the analog panel - 

COOL - turns on the Air Conditioner in the Cool Cat.

OFF - shuts off the Air Conditioner, the Heat Pump, and the Furnace.

FURNACE - The Roadtrek furnace is turned on (this runs on propane - there is no propane used for any other function on this panel.

HEAT PUMP - This turns the HEAT PUMP on inside the Cool Cat. (I will get into what that is later in this article.)

UNDER the word FAN - The ON and AUTO slide switch. This is an important switch. If you turn the Cool Cat on Cool or Heat Pump - and set that switch to ON- all the Cool Cat will do is blow room temperature air at you - all you have done is turn on the FAN inside the Cool Cat when the function slide switch is set to COOL  - NO COLD AIR COMES OUT!  For COLD AIR to come out of the Cool Cat - this must be in AUTO!  The same for the Heat pump in the Cool Cat -  Set the function slide witch to Heat Pump and with this set to ON - no heat comes out of the Cool Cat.  And also as with Cool - this Fan switch must be set to AUTO.  AUTO also acts like a power saver on a home A/C - on AUTO - when the set temperature is reached the compressor of the Cool Cat goes off and the Cool Cat goes to "sleep" waiting for the temp to get warm and then the A/C compressor comes back on and starts blowing cold again.  This same thing happens with the Heat Pump - and the FURNACE.  Often owners of Roadtreks with the Cool Cat will say it keeps going on and off. This is why. (More about this coming later.)

BELOW On/Auto is the speed of the blower in the Cool Cat - HI and LO - obviously HI - fast - LO - slow. 

The thermostat setting is on the right slide up for 90 degrees and above - that is the temp that is coming OUT of the Cool Cat  - NOT the temperature you are trying to cool down or heat up from. Slide down for down to 40 degrees.  NOTE - Fahrenheit settings on the right side and Celsius settings on the left side.  

HOW TO TURN ON THE AIR CONDITIONER FUNCTION OF THE COOL CAT - 

This is the best way to get the COOL CAT A/C blowing COLD! 

1)  FAN SWITCH ON AUTO.

2/ FAN SPEED ON HI.

3) SET THERMOSTAT SLIDE TO COLDER THAN YOU WANT IT TO BE INSIDE THE ROADTREK -  BELOW 60 UNLESS THE TEMP INSIDE IS NEAR 60 - IF SO, THEN COLDER!

4) SLIDE THE FUNCTION TO COOL. 

 The Cool Cat should come on. It will NOT blow cold right away and how long it will take to feel cold will depend on how hot it is inside the Roadtrek. If the inside of the Roadtrek is 100 F or above, it is going to take a little while for you to start feeling cook air coming out and then blow cold.  This could take 15 minutes maybe.  If the temp inside is 80F it will take less time to feel cold air coming out. 

 I recently ran the A/C with the inside of the RT in the upper 90s - it took 30 minutes to bring the inside of the Roadtrek to 80 degrees - standing in front of the A/C I felt cold. (My thermometer is near the driver's end of the kitchen counter.) In an hour it was 70 degrees inside.  We have been in the RT sitting at night in the front seats swiveled to watch the TV in the rear with the Cool Cat blowing cold and get too cold in the front. 

5) When the temp inside is near where you want it - turn the thermostat down to the temperature you want it to be. Let it run and enjoy the cold. 

6) When you want to shut off the Cool Cat A/C  slide the function switch down to OFF. 

THE HEAT PUMP  

The heat pump is an electric heater that is built into the Cool Cat. This is becoming popular  in home A/Cs.  The important thing to know about the heat pump is that it DOES NOT WORK if the temperature inside the RT or outside the RT at 40F degrees or lower (I have also found it not go on at 45F inside.) This is how it is designed - it is not a defect. It is meant to be used when it is cool inside the Roadtrek - not COLD inside the Roadtrek. When it is cold - 40 or just above - turn on the FURNACE instead. It works in the Spring and the early Fall - I had it on in early Spring - and it was cool at night and just enough to want a little heat. It got cold overnight and I was awakened by COLD air hitting me from the Cool Cat.  I jumped up to get to the panel and start the furnace.  It is so limited that we rarely use it. 

STARTING THE HEAT PUMP  

1)  FAN SWITCH ON AUTO.

2) FAN SPEED ON HI.

3) SET THERMOSTAT SLIDE TO WARMER THAN YOU WANT IT TO BE INSIDE THE ROADTREK -  ABOVE 80. 

4) SLIDE THE FUNCTION TO HEAT PUMP - NOTE - FURNACE IS ABOVE HEAT PUMP - DO NOT PAUSE WHEN YOU GO PAST FURNACE GETTING TO HEAT PUMP -  THE FURNACE WILL START (OR TRY TO START IF PROPANE IS NOT TURNED ON IN YOUR ROADTREK) When the furnace starts when you don't want it, it is a pain to get it off as it must cylce though trying to ignite the furnace and at the same time turn on the furnace's fan which keeps running (as it is supposed to) when the furnace is turned on. 

5) When it is warm enough for you inside the Roadtrek slide the thermostat to the temp you want it to stay at. 

PROBLEMS THAT CAN HAPPEN WITH THE COOL CAT THAT ARE NOT THE COOL CAT'S FAULT!

 Here are two photos - First is the location of the Thermostat panel --- 


Notice how close it is to the Cool Cat just above and to the right! 

This is the photo of the Cool Cat we started with! Look closely at the left round vent! What direction is it pointing in? DOWN AND TO THE RIGHT! And what is down and to the right in the photo above -  the thermostat!   As I had said - the Cool Cat shuts down when the thermostat  temperature is reached. The thermostat gets COLDER before any other place inside the Roadtrek - so the Cool Cat shuts down waiting for it to get hot inside again - at the thermostat! The Cool Cat keeps going ON and OFF!

Roadtrek has a few design flaws and this is one of them!  The thermostat should NOT be next to the air conditioner! 

SO WHAT DO YOU DO ABOUT THIS?!    

Simple - 

TURN THE LEFT VENT AWAY FROM THE LEFT SIDE OF THE VAN. 

It can be pointed up to the ceiling - or straight ahead with a little slant to the right.  


ANOTHER PROBLEM THAT CAN HAPPEN!  

When we first got our Roadtrek new, I did not know about setting the Fan speed to HI. I did not want it blowing heavy on us so I would set it to LO.  Makes sense, right? Well we got the RT in early Spring. I would run the A/C because it was warm enough inside the RT to need it - but outside it was not that warm.  I started hearing a noise coming from the Cool Cat when it was running like marbles in a can being shaken around. It turned out that the noise was ice balls forming inside the Cool Cat and hitting the fan inside and bouncing around.  I did not know at the time that this was what was happening. 

We took a trip that year in late September and it was warm enough for the A/C at night and it was running when we went to bed.  Early that morning I woke up hearing a loud bang - coming from the Cool Cat!  And it stopped working and would not turn on again. As it turned out, we were an hour and a half from the dealer we bought the Roadtrek at - it was a weekday and I called them when they opened that morning. They said bring it right now and we will look at it. We did  - and they did. They found inside the Cool Cat it was solid ice!  They put down a tarp and melted the ice. When they told us it was ready - they said never put the fan speed on LO.  If it had been on HI this would not have happened. Lesson learned - I was sure the Cool Cat was a goner - it was fine once the ice was gone.  I keep it on HI from then on! 

**********

You should know that there are no accessible parts inside the Cool Cat while it is mounted in the Roadtrek other than the filter. If you remove the front grill - held in place with Robertson screws (square hole screws) - there is nothing you can get at inside that is mechanical. The  Cool Cat must be removed from the Roadtrek - not a job you want to even consider unless you have a great deal of hands on experience in RV repairs - for any repairs. There is also no built in way to recharge its coolant - that is a closed system. I am told that if the Cool Cat is out a professional A/C shop MAY be able to cut in a port-  which does require the Cool Cat to be removed from the Roadtrek - and unless this pro A/C shop is not a RV service shop they are not going to take the Cool Cat out and reinstall it! 

What you can do yourself and is easy is change the filter and this does not involve removing a single screw. Here is a link to our article on how to change the Cool Cat filter. 

https://roadtrek190popular.blogspot.com/2024/04/removing-filter-from-cool-cat-air.html

 As is our new policy - if you have any questions - use the Email Us! link on the right column of the page.


Saturday, November 25, 2023

THE ONAN GENERATOR

 My 2011 Chevy based Roadtrek 190 Popular has the Onan Microlite 2800 KV model generator. Since this model, starting in 2012, Onan introduced a changed generator model  -  the Microlite 2800 KY generator. Since that model there have been two other model Onan Microlite 2800 generators. The most current - that was never used in a Chevy based Roadtrek - is the Onan QG 2800i. It was not used as it did not exist when RT stopped building Chevy based Roadtreks. It can be installed in a Chevy Roadtrek to replace an older model or as a new install.  I am not familiar at all with the Onan that came between the KY and the OG2800i.  All are gasoline powered generators. The only Roadtreks that have a propane generator - installed by Roadtrek - are the diesel engine Roadtreks - none of which are on a Chevy chassis.

In earlier Roadtreks the generator was installed in a cabinet on the outside of the Roadtrek with easy access.  Later, Roadtrek mounted the generator under the chassis of the Roadtrek in the rear driver's side of the van. This location is very difficult to access and requires crawling under the van with very low clearance, reaching up on your arms to open an access panel to the inside of the case, and then craning your neck up to try to see inside the generator to check the oil, change the oil, and reset a circuit breaker and replace a fuse - both of which will be covered later in this article. I have watched Onan service technicians get under the van to work on the Onan much easier by rolling under on a mechanic's creeper. This raises them up enough to better reach in and see inside a little better and not be too high to fit under. They roll in from the side behind the driver's side rear tire.

The position of the generator is rather precarious for the low ground clearance van.  A pot hole and bottoming out can hit the generator. A flooded street can submerge the generator. A steep inclined (or declined) driveway can bottom out the rear of the van and hit the generator. Of course, none of these things are good for the generator. Always be aware of the road and what you are going over when driving a Chevy based Roadtrek with the generator on the bottom. 

The differences between the Onan Microlite 2800 KV and KY models are these. The KV model has an owner accessed altitude adjustment for the motor. The owner can do this easily on their own - following the instructions in the KY manual. The KY model has an owner non-accessible altitude adjustment that -  per Onan - requires a technician to adjust and the addition of a part.  The KY model has a troubleshooting lamp system. The power light on the KY's wall switch flashes a code sequence if there is a problem with the generator. The code sequences are defined in the KY manual. There is NO troubleshooting lamp in the KV model Onan.  The KY also has a priming button to prime the generator before starting. To do this the bottom of the start button is pushed in once or twice to prime the motor with gasoline. The KV model does NOT have ANY priming function. Pushing in of the start button of the KY model only shuts the motor off if it is running.

 The new OG generator model is stated to be much quieter than previous Onan generators. It has a different motor than previous Onan models that is not supposed to require the same exercise schedule of the previous generator which was once a month for two hours of continuous runtime under half a load (the A/C in summer or a plugged in electric space heater in cold weather. The installation of the OG model using the same mounting holes under the chassis that the KY, KV used, requires an adapter plate sold by Onan to make the new case holes match up with the previous drilled  holes under the chassis.

The basics of starting the Onan are covered in our article THE GENERATOR found here. The Onan KV manual may be downloaded here.   For the KY manual, I am not finding a current link any longer for this manual. If you would like a copy of the PDF file of the KY manual that I have, please contact me using the Email Us link in the right column of this page. 

 There are maintenance items that are listed in the manual that are not to be ignored. They include changing the fuel filter, changing the oil (minimum once every year or per hour schedule in manual), changing the air filter, and changing the spark plug. On RV shop that I took my Roadtrek to for the fuel filter change would not do the job without taking the generator down off the bottom of the van. I did not have them do the job. I then took it to an authorized Onan service center that changed the fuel filter with the generator still attached under the van.  If any shop tells you that there is an oil filter - there is NO oil filter.  Some authorized Onan shops will do all of these items when they do an oil change. Can you change the oil yourself - yes. The grade oil to use depends on the area you drive the Roadtrek in the most - and there is a chart in the manual that specifies which oil for which type of environment. Changing the oil means doing this on the ground with you on your back reaching up - or on your elbows if you are on your stomach. Checking the oil means removing the oil cap which has a small dip stick on it. Take out the dipstick and wipe it off. Put it back in BUT leave it on the top - do not screw it back down. The oil is checked with the stick on the top of the oil fill rim.  To drain the oil there is a drain plug under the Onan. There is a specific torque that MUST be used when screwing this plug back in. Only use a torque wrench when doing this set to the correct torque which is in the manual.  I had a shop that did not do this and they stripped threads on the pan. The pan had to be replaced. 

When any work is done inside the Onan inevitably hands working in this tight space are going to hit the circuit breaker handle that is inside the Onan. This circuit breaker is connected to the control board and if tripped or off -  when you start the Onan it will start and run just fine bur NO POWER will come out of it into the Roadtrek. The AC outlets will not work, The air conditioner will not start. The TV will not start. The microwave will not start - in fact the microwave is a good place to see if the breaker is tripped or not. If the breaker is tripped and the generator is running the display screen that is always on when there is power to the microwave will be dark  and off!.  This can happen if you checked the oil or if you changed the oil - or any work was done inside the generator by you or a service tech. The service techs rarely check to see if the breaker is on when they finish working on the Onan.  Below is a diagram from the Onan manual of where the breaker is.  


I have made this big because this diagram should be better and it is not. There is an open space in the area the arrow is pointing at. If the breaker is on you will see a small black handle pointing to the passenger side in that  space.  If the breaker is off or tripped, you will not see anything looking up from the ground to inside this area. The handle will be hidden when pointing down. Reach in with a finger and feel for it!  Avoid the fuse which is also in this open space.  When you feel the handle. push it down and then pull it up with your fingertip.  Close up the Onan. Go in and start the Onan and check that there is power - look at the microwave display!  This is the first thing to do if your Onan is running and there is no AC power inside  the Roadtrek!

The fuse is even harder to see. It is a regular auto blade fuse - not hard to replace. You just have to find it and pull it out. There is a sticker (sometimes) on the side of this open area with an arrow pointing to the passenger side that says FUSE. If the fuse lined up with that it would be great - it doesn't. Feel for the fuse - be certain before you pull it out.   WHAT DOES THE FUSE DO?  If the fuse is BLOWN the generator DOES NOT START. It does not crank. It does nothing when you push the switch inside which does not light. IT IS DEAD!  First thing to do if this happens is check the fuse inside the Onan. If it is the fuse it saves a lot of money and trouble to get the Onan fixed or trying to fix it yourself. 

 The Onan uses one half to a third gallon of gasoline in one hour of runtime. The generator will automatically shut down if the gas tank in the van goes below 1/4 tank. This is to prevent you getting stuck with no gasoline running the generator all night.  The generator will also shut itself down if the oil level in the generator falls below full.  This prevents the generator motor burning itself out. 

If you own a Roadtrek with an Onan you already know that it is loud and it vibrates when it is running. You can feel the vibration in the floor. There is an Onan resonator that you can buy that will quiet the motor noise some.  It still vibrates.  Some have added rubber cushioning to above the Onan and where it is bolted into the bottom of the chassis and that can lower the vibration.  I have not done either.

Some may have Roadtrek's later generator system - the "underhood engine generator". This is a SECOND high power alternator installed by Roadtrek under the hood and run by a longer and different belt. The belt is not standard to the Chevy and if you have an engine generator it is advised to buy a spare belt and always have it with you in the Roadtrek.  What this does is provide generated AC power to the Roadtrek by starting and running the engine. The engine is running at idle which Chevy will tell you is not good over a span of hours but Roadtrek insisted it was not a problem. Is this quieter - only if your engine is running is quiet. There are no vibrations - that is a plus. This does use a good amount of gasoline.  Much more than the 1/2 to 2/3 gallon the Onan uses - plus there is a great deal more exhaust that will come from running the engine with more CO to come inside or drift to a neighboring RV. Roadtrek started offering the engine generator to Chevy based Roadtreks around 2015 along with some other advanced electrical system components that previously were tested and sold only on Sprinter based Roadtreks. 

Please get the manual for your Onan, print it out and keep it in the Roadtrek - or put the USB file on your phone or a USB stick to access on your computer when traveling. It goes into much more detail than I have here and it has a troubleshooting chart written out inside.