Roadtrek

Roadtrek

Wednesday, March 28, 2012

Living in the Roadtrek - Towels

Small things that you would ordinarily not give much thought to, in a Class B RV, because of its size, you really need to give some consideration to selecting. When you are at home you can have lots of towels and when they get wet there are usually a lot of places that are available to hang them to dry. In the Roadtrek with limited cabinet space, you have to limit the number of towels that you carry or do without something else. As to what to do with wet towels, space is even more limited. Most towels sold are not made to dry very quickly. The plusher they are the wetter they stay. Before we got the Roadtrek we started researching what type of towels to buy.

The most common answer to this question is micro-fiber camping towels. These are sold in some camping stores and online. We looked in two local large chain stores, one a camping store and the other an outdoor sports store. Everywhere we looked we saw the same small micro-fiber towels. There was certainly nothing very useful if one took a shower or went swimming. What are considered hand towels in what we saw were more the size of wash cloths.

The "Sham-Wow", as seen on TV, was suggested. We had one of these that we had purchased at a farmer's market for a dollar. I was told that to make this stiff towel feel soft to the skin, soak it in water and let it dry. We tried that and what we got was a wrinkled Sham-wow that was not really soft. I tried at home using it to dry my hair. It felt terrible to use. That idea was put aside. I should say that these are good in the Roadtrek for drying the floor after you have taken a shower in the aisle. While most of the water does goes down the drain in the floor, the floor does remain wet and these will do a good job at drying the floor - and drying the shower curtain.

Micro-fiber towels are basically the same no matter what their purpose. You can find them in the automotive departments to use to wash and dry your car. You can find them in the housewares departments to use as kitchen towels. They are all pretty much the same - and a bit heavier than the special "camping" towels that are sold for a lot more money - plus they come in a variety of sizes.

Our first purchase of towels were micro-fiber towels found in Wal-mart's auto department. There we found large bath size towels and medium sized hand towels. Of course, they were not called bath towels or hand towels. They are all purposed there for your car, but the sizes were close. These towels are soft to the touch, easy on the skin, absorb water and dry relatively quickly. The drying time is the most important part. On our first trips, these were the towels that we used.

In the Roadtrek there are three towel rods. One on the bathroom door, another on the large kitchen cabinet below the sink,and the third is on the clothes closet behind the driver's seat. As you can see none of these towel rods is very long and only the rod on the bathroom door (above) has any room for a thick towel to fit through. Micro-fiber towels tend to be thinner than the towels that you would get for your home bathroom so they don't have a problem fitting onto the rod, but there is not very much room across to put more than one or two towels depending upon their size. These three rods are all you have in the Roadtrek for drying anything on. You can hang a clothes line across the aisle, but no matter where you put this, it is going to be in the way. The best idea for this is behind the driver and passenger seat across the width of the van, but if this is there and you want to sit in the front seats to watch TV, you are not going to see anything but whatever is hanging from the line. It is a good place to dry things after you go to bed.

A short while after we had the micro-fiber towels, I read on an RV forum about quick drying, home bathroom towels that are sold in J.C. Penney. The towels have the label. "Linden Street" and the sign in the store says "Quick-dri". These are just like the towels that one uses at home, but they dry much faster. The come in the standard home towel sizes and there is a wide variety of colors including colors with stripes. The towels sell for $3 to $20 depending upon size. They are all cotton. Here is a link to the towels on J.C. Penney's website, but you can find them in your local Penney's store in the towel department. We tried a few of these first and they are great. They feel as comfortable as any home bath towel and they really do dry quickly. According to the store they dry 33% faster than regular towels. I am not paid by anyone to tell you about these, but they really are good for RV travel. We now use these for all hand and body use and the micro-fiber towels are now used for cleanup and drying dishes. Of course, we carry paper towels and when not needed, they are stored inside the microwave.


*************************************************

Wednesday, March 21, 2012

Living in the Roadtrek - The Kitchen


The Roadtrek 190 Popular, along with all of the other Roadtrek models, has a kitchen. The kitchen in the 190 Popular consists of a stove, a sink, a microwave oven, and a refrigerator. It is possible to cook a full meal or make a fast snack in your Roadtrek.


The sink in the Roadtrek is a single handle control sink with hot and cold running water. The fresh water in the sink is supplied through either the fresh water storage tanks - in the 190 Popular there are two fresh water tanks. One of the tanks is located in the interior of the van to help keep it from freezing in the winter while traveling. The other tank is below the van and is subject to all climate changes. There is an insert for the sink that is stored when not in use in the cabinet below to put into the sink to convert it to a bathroom sink. That sink has a downspout that mates with the sink drain so that water flowing through the insert will not touch the inside of the kitchen sink. There is also a top that goes over the sink to make it part of the granite counter top to increase cooking preparation space. In this picture, you also see the glass lid that covers the stove when not in use which also increases counter space. The sink drains into the "grey" water tank which is under the van.


The stove in the Roadtrek is a two burner propane stove. To turn the stove on, the propane must be turned on. The propane valve is located outside the van in a compartment located above the rear license plate. The pilot light on the stove must be lit by hand. It does not have an auto lighter. Both burner's pilot lights must be lit separately if you wish to use both burners. To light the burner you use a long reach butane lighter or a match. Simply turn on the knob for the burner while pushing it in and put the flame to the pilot light hole. If the propane has not been on previous to lighting the stove, it may take a few seconds for the gas to reach the pilot light and ignite it. When you turn off the burner, you put out the pilot light. There is a small burner and a larger burner. Pots must be selected based on the area you have on the stove. When you are using the stove, allow a few minutes for the burners to cool down BEFORE closing the glass lid. There is a cabinet below to store pots and cooking utensils. Keep in mind that storage is limited.


The microwave oven in the Roadtrek 190 Popular is a 700 w, 20 L/ 0.7 cuft. microwave. It is bolted to the opening that it sits in and cannot fall out while traveling. Larger Roadtrek models include larger microwaves that have a convection oven feature. The 190 Popular DOES NOT have a convection oven feature. The microwave runs off of 120 volts and requires that you be hooked up to a campground power outlet (referred to as "shore power") or that you are running the generator. When running on the generator, you should not turn on the microwave at the same time the air conditioner is running. If you do you will trip the circuit breaker. There is no problem running both at the same time when on shore power. The microwave is made by the Dometic company which makes a variety of appliances for RVs. As you can see in the photo, the microwave is just like one that you would have in your home. There are one touch controls, timer controls, and power controls. Like all microwaves, inside there is a glass plate that turns on a rack to cook your food evenly.


The refrigerator in our Roadtrek is not the refrigerator that you will get in your Roadtrek. We had the refrigerator switched before we took delivery. I thought that I had written about this before but I am not seeing an article about it. Perhaps, I mentioned it in the body of another article. If so, then forgive the repeat of this story. In the middle of our shopping for the Roadtrek, I learned that my Type 2 Diabetes was not in control and that I would need to start taking insulin once a day. The insulin that I take does not need to be refrigerated all of the time. Regular insulin that is taken with meals does need to be. It does need to be refrigerated if it has not been started. As it would be necessary to travel with spare insulin - just in case - we would need to keep it in the refrigerator. So, this caused some concern.

A standard refrigerator in most RVs is not like the fridge that you have at home. At home your fridge has a condenser to create the cold inside the refrigerator. An RV fridge is much like the early invented refrigerators and cools with heat. Don't ask me how this works. The standard RV fridge has three power sources to create that heat - gas (propane), battery power (DC), or 110 volt AC current. Each of these is used - one at a time - to heat what needs to be heated inside the mechanism that cools the inside of the box. This is called a three way refrigerator - Propane/DC/AC. Because of the way this works, the refrigerator must be kept level at all times while it is running. As a result, RVers are using a variety of methods to level the RV when parked. It is not just for comfort. Newer 3-way fridges are more tolerant of being off level and many RVers say that if the interior of your RV is leveled to a point of comfort for you, it is fine for the fridge. The refrigerator that Roadtrek installs is a Dometic 12V/110V/propane 3.0 cu. ft. with auto source selection which means that if the propane is on it will run on propane, if only battery power is available it will switch automatically to DC, and if 110 volt power is present it will switch automatically to 110 volts. I do not have this refrigerator.

I could foresee two problems with this refrigerator. One is that it would need to be running all of the time while we were traveling. This would mean that when we were parked while on a trip and away from the Roadtrek, the propane would be on and the pilot light and gas for the fridge would be running. This does not bother most RVers who have been around these units. It bothered me. I do not like the idea of leaving the Roadtrek unattended with the propane on. This may be just me. There may be no need for concern at all, but I know that I would not be comfortable traveling and doing this. And since we are out for a good time, there is no need to have concerns. The other problem that I could foresee is that we park in some places that we travel to regularly that are in no way near level and to have to park in a field for a festival amongst all of the other vehicles trying to get in, and then starting to level the Roadtrek with blocks that must be put under the wheels on a trial and repeat basis, just was not going to work. We needed a solution to keeping the insulin cold. I looked at small auto battery powered ice chests, but these cool only to a certain amount below the outside temperature. You cannot set one to 36 degrees and expect it to get there if the temperature inside the van is 90 degrees (or above). Then I found out that there are compressor refrigerators made for boats and RVs. After a lot of questions on an RV forum I learned about the Nova Kool R4500.


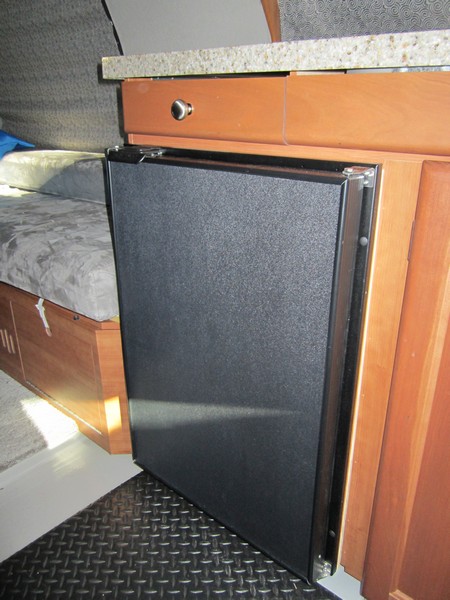
The Nova Kool R4500 is a compressor fridge that runs on battery or 110 volts. No propane. The fridge does not have to be kept level. The batteries in the Roadtrek will run the fridge for several days - and this is not an issue as we plug in every night and the batteries recharge in addition to recharging while driving. This refrigerator is 4.5 cu. ft. - a cubic foot and a half larger than the stock fridge in the Roadtrek. The best thing was that it is exactly the same size with the exception of a small fraction of an inch in a direction that would not matter and would fit right into the opening.

Roadtrek would not install this refrigerator for us in place of their standard fridge. When we started on this idea and talked to the dealers, the dealers said that we would have to purchase the fridge ourselves, and they would install it. The stock fridge would be traded to them or we could keep it. (What would we do with it?) This was what we wanted and we were making sure that whoever we purchased our Roadtrek from would install this fridge.

Our dealer told me that he could not make the purchase of the Nova Kool as the company did not have an account with Nova Kool. After some searching and finding few convenient places to purchase this fridge, I contacted Nova Kool directly. This company has been nothing but nice all along the process. They told me that they would sell the fridge to our dealer and gave me the details to give him to order it. The dealer told me that he would do that and he would install it. The price would be added to the Roadtrek, but he was able to get Roadtrek to agree to deliver a 190 Popular with no refrigerator but with all of the fittings for the standard fridge including the propane connections (in case down the line if we ever sold it, the fridge could be replaced with the more common 3-way unit. The price of the Roadtrek was adjusted for all of this and I did not pay anymore than getting the Roadtrek with the standard fridge. The dealer did a perfect job of installing it. We took delivery of our Roadtrek with a Nova Kool R4500 compressor refridgerator installed and we love it.

This refrigerator switches automatically between 12 volt power and 110 volt power. The only control is the on/temperature control inside. A compressor fridge cools down faster than the 3-way. When we are leaving on a trip, I turn on the battery switch for the Roadtrek, turn the temperature knob up and in a few hours the inside of the fridge is cold. Too cold or too warm inside and you can adjust the knob. We have a indoor/outdoor thermometer that has a transmitter unit that goes inside the fridge and we can see the temperature outside the fridge. We leave the fridge on the whole trip until we get home again. The freezer is like any non-frost free freezer. It has kept ice cream semi-hard for a few hours. Of course, in a freezer this small, we are talking about individually sized ice cream cups. It does make ice cubes.

Above the kitchen counter there is a window and the walls are covered in a stainless steel back splash. We keep the curtains on the window closed all of the time but you can easily open them. There is also a screen on this window. There is a 110 volt outlet next to the light under the cabinet over the sink. That light has a full on setting and a nightlight setting. There is no exhaust fan just for the kitchen but the Roadtrek has an exhaust fan in the ceiling right above.

It is possible to plug electric kitchen appliances into the outlet next to the light. When we first got the Roadtrek we bought a two slice toaster. The first night we tried making toast for a snack, it set the smoke alarm off. I decided that toast was not that important, and we returned the toaster. But I know of Roadtrek owners who have electric frying pans, coffee makers (we do not have the optional built in coffee maker), toaster ovens, and other small kitchen appliances.

Storage for food is above the microwave. There are two long cabinets there. There is also the cabinet under the sink as I have mentioned. Many find the microwave as a useful bread box. Since you are outdoors in your Roadtrek, keep all food in air-tight plastic containers to not encourage little critters to come for an uninvited meal.

Of course, there are two tables to eat on. One in the front that swings out of its own cabinet and locks in place without the need for a leg. You turn the driver and passenger seats around to sit at the table. The other is in the rear of the Roadtrek between the two sides. You put the table top on a post and the post goes into the floor. You sit on the rear seat/bed cushions. We have used the front table and since then I have modified it. I will do an article about that modification. We have never set up the rear table as we travel with the bed made up.

So there you have it. Plan and cook a banquet or make a late night snack.


Wednesday, March 14, 2012

Living in the Roadtrek - Quieting the Ride Part II

In our last article we started talked about quieting down the inside the Roadtrek. This article continues with Part II of Quieting the Ride.

With the cabinets in the back secured, there was a noticeable difference in noise but there were still a lot of noises that had to be dealt with. It is helpful if you drive with someone sitting on the floor in the middle. Yes, this is not the safest thing to do but that person will be able to pinpoint where the noises are coming from - and since some of the noises may be coming from the seats, it is necessary to do this and not be on those seats that will not be occupied when you are usually traveling.

One big source of noise comes from the metal plate that sits inserted into the metal floor and covers the floor drain for the shower. This plate is not attached in anyway and is metal on metal that bangs with every bump. The solution to this was told to me on one of the forums and is simple to do. Go to a home store and purchase rubber weather stripping. At Home Depot we found Frost King Epom Rubber Weatherseal Self Stick Tape - 3/8" wide, 1/8" thick Ribbed. It is self-adhesive and is easy to cut to size with a scissor. The tape is double width and splits down the middle. You are only using one half strip for each edge. Take the plate out of the floor. Cut a strip, peel off the backing paper, and put it along the length of each edge of the plate that contacts the floor. You are putting this on the plate and not the floor. You have now added a noise cushion on the plate. NOW - there is a problem that you have created by doing this. You have disabled one of the functions of this plate and that is to allow water to flow through the edges where it meets the floor and down to the drain. The solution is to just remove this plate when you use the shower and return it when you are done. There is no drawback to doing this and the noise saving is well worth this minor inconvenience. This quieted one of the most significant noises inside the Roadtrek.

In the Roadtrek 190 Popular you have one passenger seat in the front. Because this seat is designed to turn into a third bed with an optional cushion, the seat is made so that the seat back is removable. There is a lot of clearance and movement around the knob that holds the seat back against the cabinet that it sits in front of,the seat back, and the cabinet. This seat back bounces around a lot when you drive. The only way that I could see to stop the movement was to use foam to wedge the seat back cushion tightly in place against the cabinet. You can see the yellow foam. this is a piece of three inch foam that tightly folded and wedged. The white cord is an electric power strip that is attached to the outlet in the door well next to this seat.


One of the biggest culprits creating noise is the television wall bracket in the rear of the Roadtrek. The bracket has a locking knob but the screen still vibrates and wobbles making a racket as you bump along the road. This was easily solved with elastic Velcro belts - sold in pairs and both are used for the TV. Here is how it is done. Of course, these are removed each time the set is used and replaced again before driving. This takes a few minutes to do but is worth it. Just make sure you do not put the plastic buckles over any part of the screen. You do need to pull tight to get this secured.


Another thing to check on the television bracket is that all of the screws and nuts on the moving parts of the bracket are as tight as possible without interfering with their movement. We had one nut that continually vibrated loose. I used Locktite washer glue (non-permanent) on that nut to get it in place and not open.

The glass plate inside the microwave makes a lot of noise while driving and may also break if bumped to hard. Someone on one of the forums suggested sewing a case for this to ride in made from two quilted placemats with a third sewn to the front in half to make a pocket for the plastic stand that it sits on inside to protect that as well. Meryl made a variation of this. It does well to protect the pieces but it still banged around inside. I found another quieting material to use to solve this problem. A pool noodle - a plastic foam float sold for a few dollars in the summer all over.


This is just a small piece that I have left from several uses inside the Roadtrek.

And here it is being used inside the microwave to hold the glass plate in place as we drive. Cut a piece just slightly larger than the distance between the plate and the top of the microwave. You want to have some pressure exerted by the foam BUT not enough to break anything if there is a real hard bump. It works very well.


I have found a lot of uses for this foam noodle. If you put cans in the fridge they will rattle around on the shelves in the door. A few can sized pieces of foam noodle will quiet those right down.


I am also using it to keep the front table that stores hanging down inside a slim cabinet in the front side of the Roadtrek from banging around. We modified this table, so the swing is a lot more drastic now than it had been, but even before this table made noise swinging inside the cabinet. (More about the modification in another article.) 


This is a noise that I am not certain about. It has always seemed that there is an noise coming from inside the bathroom that was still there when everything was taken off of the shelf inside there. I think that it is the toilet seat bouncing. To secure this we used something that we bought in Camping World that is supposed to secure things in a cabinet or inside the refrigerator, but did not work well for any of that. It does work on the toilet.
It is a rubber tube with a suction cup on each end. The suction cups are attached to the sides and the tube stretches over the top holding the seat down. Now, I am not certain that this is necessary, as we have forgotten to secure it and did not notice any noise. The toilet seat is just light plastic and any noise that it makes should not be very loud, but we still use this when we remember to secure it. The rubber tube does have a tendency to pull the suction cups off depending on the humidity. I may replace the rubber tube with just a length of rope attached to the suction cups.

The floor in the middle of the Roadtrek is metal. The rest is carpeted. Other than the shower drain plate there is nothing about the metal floor that will make noise, but it does reflect noise. To help quiet the Roadtrek down even more and to give us a nice comfortable and warmer floor to walk on in the middle, we got a rubber mat that fits perfectly. We found this in Sears in the tool department. It is made to go on a garage or workshop floor. It also makes the floor easy to clean if mud gets trekked inside, as all you need to do is pull the mat outside and wash it off. As you see in the photo, all is covered with the exception of a small area that is under the bed cushions when the bed is made up.


BASKETS

Baskets not only hold things in place on shelves but they keep things from moving around. We found these baskets in a craft supply store. These are fabric but any baskets that fit on the shelves will help
not only keep things quiet but organized too. This is the shelf in the bathroom. It was not easy to find baskets to fit it.


Addendum - 2019

Finally - there are two noises that we have never found the source of - one is a heavy banging inside toward the passenger side mid-way back and when on rough roads that noise is a banging rattle. The other noise is a harmonic sound which I have a feeling is coming from air moving over the open black tank vent on the roof - as the sound is similar to the sound you get when blowing across the top of an open bottle. That sound comes and goes - and has no relation to road surface.

Wednesday, March 7, 2012

Living in the Roadtrek - Quieting the Ride Part I

From the test drive we knew that when the Roadtrek is driven there is going to be noise from the interior of the van while driving. It is important to understand that you are driving a house - and not just a van. A van does not normally have cabinets, a toilet, a TV, shelves, a refrigerator, etc. Your Roadtrek does. If you put your house on wheels there are going to be all types of noises that you are going to hear as you roll and bump down the road. This is no different. But with a little study of where the noises come from and a bit of modification, you can eliminate almost all of the noises that result in the rattle, bang, and knock that you might hear as you drive in your Roadtrek (or any Class B or RV).

At first I received a lot of suggestions reading the Class B and Roadtrek forums. I always look to what others have done to resolve a problem as there is no sense in re-inventing the wheel over and over again. Some of the tips that I am going to share I got from those forums and some we came upon on our own. How we approached and resolved quieting the inside of our Roadtrek may be different from how others have gone about doing this - but the bottom line is whatever works if fine.

The obvious way to start is to walk around the inside and find whatever moves. Check all of the simple things first. Do you have the counter top insert sitting in top of the sink. Take it out when you are traveling and put it in a cabinet under something that will hold it securely down. Check the glass lid on the stove. There should be rubber bumpers on the corners of the glass. Look in every cabinet at what you have on the shelf. Can these things move or rattle around? You can buy a bar made for RV refrigerator shelves to hold things in place. These work just as well in cabinets. Also, a tension curtain rod works just as well and costs less than half. If it can move it will make noise unless it is made of something soft and silent like fabric or foam.

Most cabinet doors have latches and do not move or vibrate while the Roadtrek is in motion, so they remain quiet, but there are some less obvious doors that do not have any latches. In our Roadtrek without the power bench/bed in the rear, our bed is made up on top of cabinets that run on each side of the third rear of the inside of the van. There are doors on those cabinets both on the top and the bottom. The tops do not have anything holding them down, except the weight of the cushions - and on a bumpy road, those cushions, even when made up into the king bed, are not heavy enough to keep those doors from bumping up even slightly. We bought a few packages of Velcro ties to secure things like these doors. Here is a photo of what we purchased.
They should be cheaper than they are but they are well worth what you pay for them. They can be doubled together to make them. They are sold in two sizes. These are the longer ones which are 10 inches long and there are six in a package. We found them in Walmart in the electrical department.
The doors in the rear under the bed have a hole in them to grab to open them. We used these holes to secure the doors closed using these strips. Two strips joined together were needed for the length. This is a photo of one of those cabinets and it is next to the refrigerator.
  Inside this cabinet is water valves and the hot water heater. You are seeing the bed/seat cushion above. The white is the rear table in storage and the yellow below that is another quieting device - a foam pad. Go around the back and secure the doors like this. What you are securing is actually the door on the top and not the one you are seeing in the photo which closes with a latch. We used that door to hold the other door down with the Velcro strap. This is a photo of the cabinet opposite that shows the upper door attached. This is the cabinet that contains the electric inverter.


The foam that we put under the table is a piece of one inch thick foam that can be purchased in a fabric store for upholstery. We had a small quantity of foam bought years ago. At this point we have just about run out of it. When I went to a store to buy more, I was surprised to see how expensive it is. It does resolve a number of noise problems around the inside of the Roadtrek, so it is worth getting - and we used two different thicknesses. The table sits on top of the cabinet and under the cushion. There is a hole in the top of the cabinet for the round metal dish that attaches to the table's upright support pole. I put the foam on top of the table and drew the outline of the metal dish and cut that out, so that the table would still lie flat and not be pushed up by the foam.


There is a lot more to do and that will be covered in Part II - next week.

End of Part I.