Roadtrek

Roadtrek
Showing posts with label kitchen. Show all posts

Wednesday, September 17, 2014

The Water Bandit and Household Sink Hose Adapter

A few days before our most recent trip we had a problem with the outdoor water faucet at our house. There was no way to rectify the problem before the trip and I wanted to leave, as we always do, with our fresh water tanks full. I remembered something that I saw at the RV accessories shop at our Roadtrek dealer that would allow me to attach a fresh water hose to any faucet. There was no way we could get to that shop three hours away so I decided to take a chance that a nearby travel trailer shop might have this.  The problem is I could not remember the name.

We went to the trailer shop and looked on the wall of accessories for water hook up. There on a peg was a shopworn package that was it - the only one they had - and it is called the Water Bandit. We bought this - $7.99 - at this shop which was actually higher priced than it should have been but as they say " a bird in the hand is worth two in the bush" and we bought it.

The Water Bandit is made by Camco, that makes many other RV accessories. There is another company that puts the exact same thing out except in a different color and that one is called the Water Thief. It sounds like these are made for stealing water but what they are made for is attaching a water hose to an unthreaded faucet or a threaded faucet with broken threads.


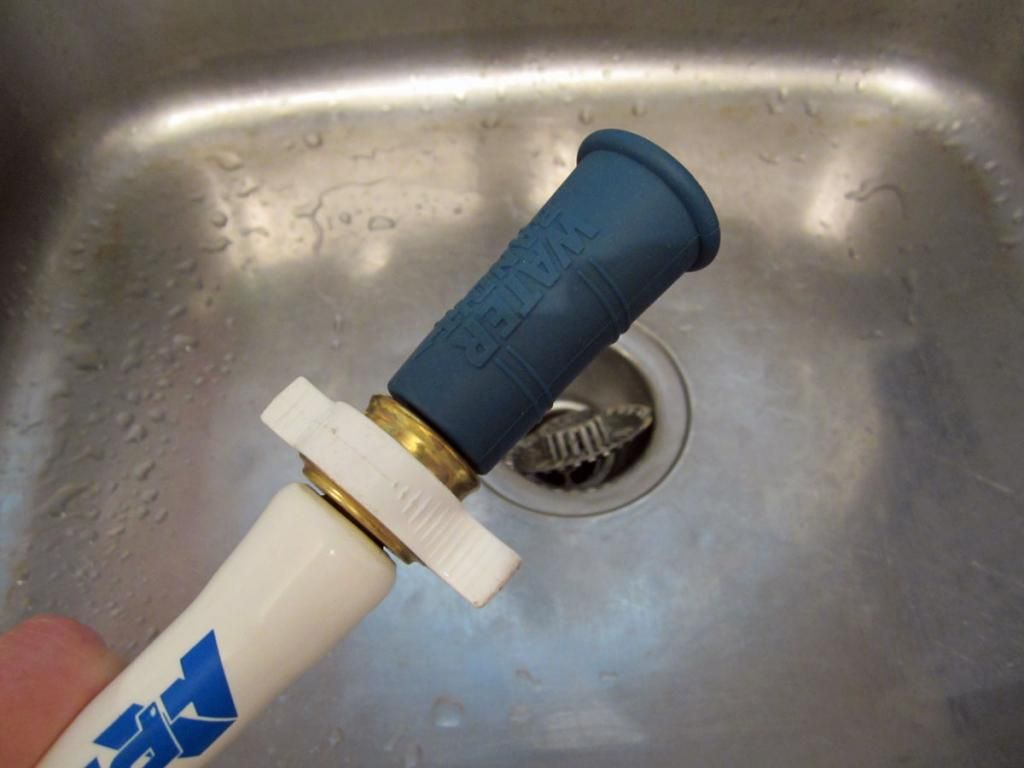
The Water Bandit is a flexible but firm rubber sleeve with a brass water hose connection on the end. The inside of the top of the water bandit has rubber threads to screw onto a damaged, threaded hose faucet, and this is followed below with a smaller open for a friction fit on a non-threaded faucet. It can be used on any faucet. The instructions are VERY CLEAR to NEVER close the end of the hose that the water is coming out of as it will cause too much pressure at the connection and the Water Bandit will come shooting off the faucet. Complaints in reviews that I have read about this since purchasing it all focus on the user using a nozzle on the end of the hose or a water cut off and the Water Bandit ballooning and shooting off the faucet. This is not how this is to be used and this also makes this for filling tanks only. You cannot connect the end of the hose to the city water connection and then not have an open faucet for the water to flow through inside.

When we were getting ready to leave, we tried it and it worked. You first screw the hose onto the Water Bandit -


Next you push the water bandit over the end of the faucet -
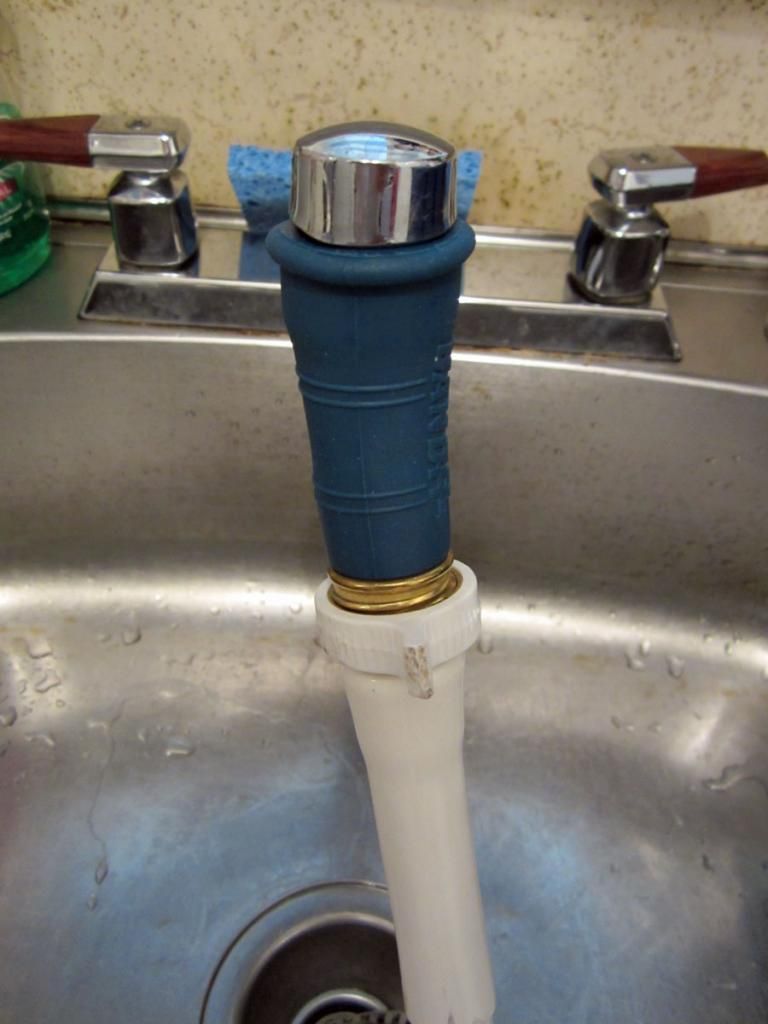

Try to push it up as far as it goes. Positive user reviews of the Water Bandit suggest to use a screw tightening hose clamp on the Water Bandit to lock it onto the faucet. We did not want to do that on the kitchen faucet so Meryl held it in place while I had the hose outside to fill the front tank. Since the water cannot be shut off at the exit end of the hose, we used our back up the Roadtrek walkie-talkies to communicate when to turn on the water and when to shut it off. The Water Bandit ran with no leaks held in place by Meryl at the faucet. The water pressure did back up a little in the faucet and there was a small leak at the bottom of the faucet where the faucet turns. This was not a problem as the water just ran into the sink. I should add that our kitchen sink is about three feet away from our house's side door so the hose only had to go through the house a few feet, in case you thought we dragged the hose through the house.

As I have been reading about those who use the Water Bandit, I have learned that there are some State, Federal, and Regional campgrounds that have water spigots at the campsites with no threads for a hose. Unless you know the campground, this is a big surprise when you get there and find out you can't connect your water hose. The Water Bandit is ideal for this and will enable a connection to a spigot where one was not intended. For this I would use the clamp - easily found at any home or hardware store.

NOW - after we bought the Water Bandit I remembered another way to connect a hose to a household faucet. There are adapters sold in plumbing departments of home stores that will do this. Just in case the Water Bandit would not work on our kitchen faucet, I went to Home Depot to see if they had one. There were various types and I asked the salesman in the plumbing aisle what to buy. He gave me this one -
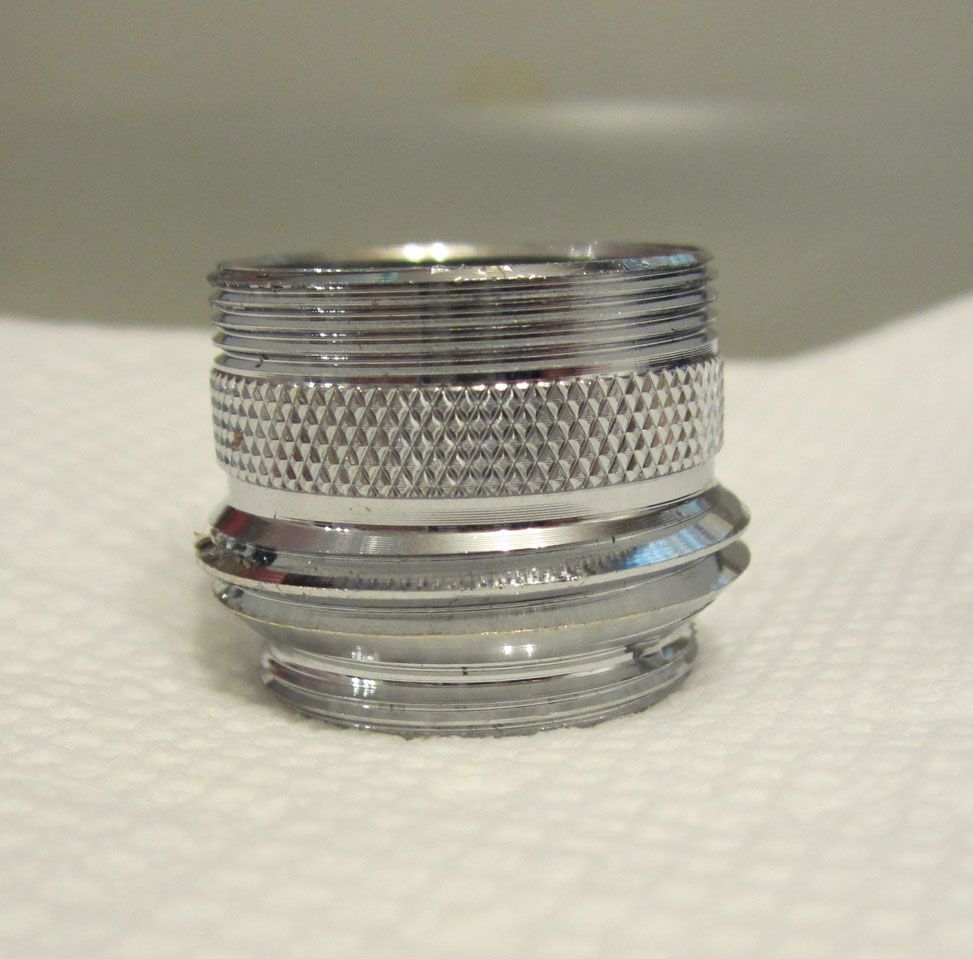

This is made by Neoperl and is just called "Faucet Adapter". It is lead free. The part number on the package is 571493. This connects a male 15/16" - 27 thread or a female 55/64" -27 thread household faucet to a female 3/4" hose (standard garden and fresh water hose size) and a female 55/64" -27 threaded end. The package will say male 3/4" hose as that is what the end is on the adapter. Why so many dimensions. This adapter is made to replace the water aerator/strainer on the end of a household faucet. On some faucets these are male attached and on the rest these are female attached. This will fit both. On the outlet end, you can put this on the sink and leave it installed all of the time. It allows you to screw the aerator/strainer back on the faucet when a hose attachment is not needed and then just remove that when you are going to attach a hose. These are made for portable dishwasher and portable washing machine attachments to sinks. It cost about $6.

To use this, you unscrew the aerator/strainer end off the sink, set it aside, screw this on and attach a hose just like you would screw the hose onto an outdoor faucet. When you are done, unscrew the hose, unscrew this adapter from the sink - unless you want to leave it there - and screw sink's the aerator/strainer back on.
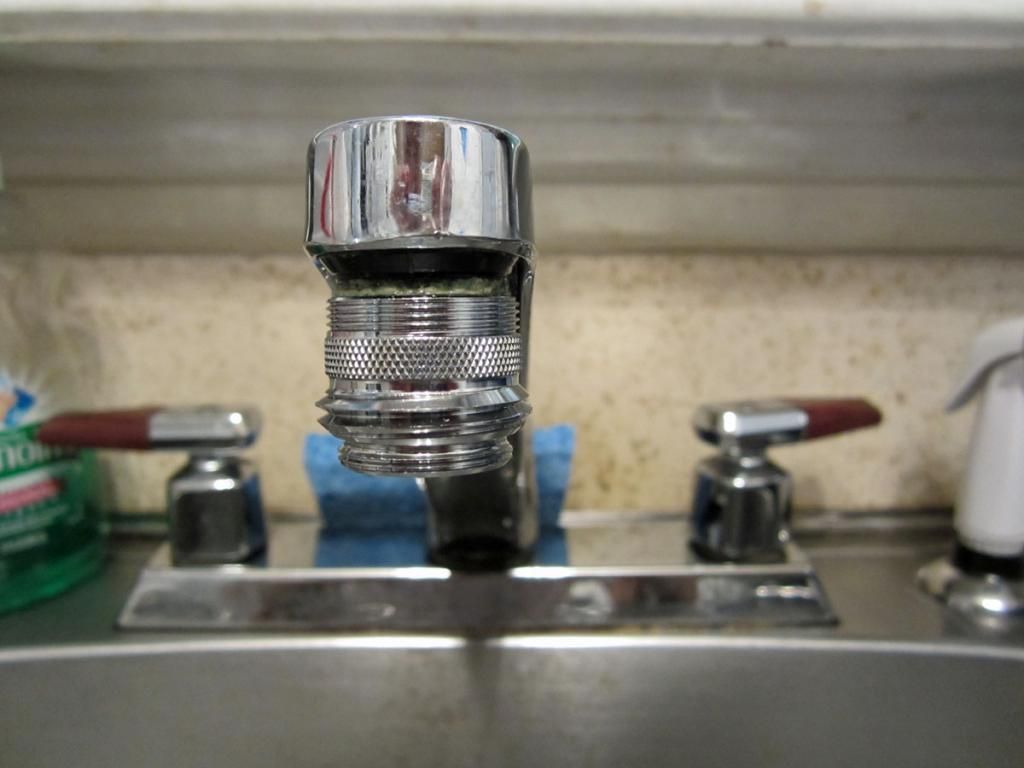


This was fast and easy and the best part is that the end of the hose can be shut off with the water at the sink still on - as long as the adapter is screwed onto the sink tightly - there is a washer inside to prevent leaks. In fact, there are two washers included - one tall and one short to fit different sinks. The short washer fit our sink.

This was even better than the Water Bandit. It allowed us to both be outside at the Roadtrek - me with the hose in the door fill and Meryl inside the Roadtrek checking the water level on the monitor panel. I had my water fill nozzle on the hose that allows me to shut off the water flow as soon as the water starts to backup into the fill opening and could that caused no problem inside at the sink.

With the kitchen sink closer to the Roadtrek on the driveway than the outdoor water faucet on the other side of the house in the backyard, this was easier than filling the Roadtrek the way we usually do.  The Water Bandit is now in the "water box" that we keep in the outside compartment of the Roadtrek that holds all we use for hooking up to water. It will be there with us in the event of a water connection problem on the road. The sink adapter will stay at home ready for the next time we need to - or want to - fill the Roadtrek from the kitchen sink.

Both are good to have if you ever find yourself with a problem outdoor faucet at home, and the Water Bandit is definitely good to have if you encounter a campsite water spigot with no hose threads.

Wednesday, March 21, 2012

Living in the Roadtrek - The Kitchen


The Roadtrek 190 Popular, along with all of the other Roadtrek models, has a kitchen. The kitchen in the 190 Popular consists of a stove, a sink, a microwave oven, and a refrigerator. It is possible to cook a full meal or make a fast snack in your Roadtrek.


The sink in the Roadtrek is a single handle control sink with hot and cold running water. The fresh water in the sink is supplied through either the fresh water storage tanks - in the 190 Popular there are two fresh water tanks. One of the tanks is located in the interior of the van to help keep it from freezing in the winter while traveling. The other tank is below the van and is subject to all climate changes. There is an insert for the sink that is stored when not in use in the cabinet below to put into the sink to convert it to a bathroom sink. That sink has a downspout that mates with the sink drain so that water flowing through the insert will not touch the inside of the kitchen sink. There is also a top that goes over the sink to make it part of the granite counter top to increase cooking preparation space. In this picture, you also see the glass lid that covers the stove when not in use which also increases counter space. The sink drains into the "grey" water tank which is under the van.


The stove in the Roadtrek is a two burner propane stove. To turn the stove on, the propane must be turned on. The propane valve is located outside the van in a compartment located above the rear license plate. The pilot light on the stove must be lit by hand. It does not have an auto lighter. Both burner's pilot lights must be lit separately if you wish to use both burners. To light the burner you use a long reach butane lighter or a match. Simply turn on the knob for the burner while pushing it in and put the flame to the pilot light hole. If the propane has not been on previous to lighting the stove, it may take a few seconds for the gas to reach the pilot light and ignite it. When you turn off the burner, you put out the pilot light. There is a small burner and a larger burner. Pots must be selected based on the area you have on the stove. When you are using the stove, allow a few minutes for the burners to cool down BEFORE closing the glass lid. There is a cabinet below to store pots and cooking utensils. Keep in mind that storage is limited.


The microwave oven in the Roadtrek 190 Popular is a 700 w, 20 L/ 0.7 cuft. microwave. It is bolted to the opening that it sits in and cannot fall out while traveling. Larger Roadtrek models include larger microwaves that have a convection oven feature. The 190 Popular DOES NOT have a convection oven feature. The microwave runs off of 120 volts and requires that you be hooked up to a campground power outlet (referred to as "shore power") or that you are running the generator. When running on the generator, you should not turn on the microwave at the same time the air conditioner is running. If you do you will trip the circuit breaker. There is no problem running both at the same time when on shore power. The microwave is made by the Dometic company which makes a variety of appliances for RVs. As you can see in the photo, the microwave is just like one that you would have in your home. There are one touch controls, timer controls, and power controls. Like all microwaves, inside there is a glass plate that turns on a rack to cook your food evenly.


The refrigerator in our Roadtrek is not the refrigerator that you will get in your Roadtrek. We had the refrigerator switched before we took delivery. I thought that I had written about this before but I am not seeing an article about it. Perhaps, I mentioned it in the body of another article. If so, then forgive the repeat of this story. In the middle of our shopping for the Roadtrek, I learned that my Type 2 Diabetes was not in control and that I would need to start taking insulin once a day. The insulin that I take does not need to be refrigerated all of the time. Regular insulin that is taken with meals does need to be. It does need to be refrigerated if it has not been started. As it would be necessary to travel with spare insulin - just in case - we would need to keep it in the refrigerator. So, this caused some concern.

A standard refrigerator in most RVs is not like the fridge that you have at home. At home your fridge has a condenser to create the cold inside the refrigerator. An RV fridge is much like the early invented refrigerators and cools with heat. Don't ask me how this works. The standard RV fridge has three power sources to create that heat - gas (propane), battery power (DC), or 110 volt AC current. Each of these is used - one at a time - to heat what needs to be heated inside the mechanism that cools the inside of the box. This is called a three way refrigerator - Propane/DC/AC. Because of the way this works, the refrigerator must be kept level at all times while it is running. As a result, RVers are using a variety of methods to level the RV when parked. It is not just for comfort. Newer 3-way fridges are more tolerant of being off level and many RVers say that if the interior of your RV is leveled to a point of comfort for you, it is fine for the fridge. The refrigerator that Roadtrek installs is a Dometic 12V/110V/propane 3.0 cu. ft. with auto source selection which means that if the propane is on it will run on propane, if only battery power is available it will switch automatically to DC, and if 110 volt power is present it will switch automatically to 110 volts. I do not have this refrigerator.

I could foresee two problems with this refrigerator. One is that it would need to be running all of the time while we were traveling. This would mean that when we were parked while on a trip and away from the Roadtrek, the propane would be on and the pilot light and gas for the fridge would be running. This does not bother most RVers who have been around these units. It bothered me. I do not like the idea of leaving the Roadtrek unattended with the propane on. This may be just me. There may be no need for concern at all, but I know that I would not be comfortable traveling and doing this. And since we are out for a good time, there is no need to have concerns. The other problem that I could foresee is that we park in some places that we travel to regularly that are in no way near level and to have to park in a field for a festival amongst all of the other vehicles trying to get in, and then starting to level the Roadtrek with blocks that must be put under the wheels on a trial and repeat basis, just was not going to work. We needed a solution to keeping the insulin cold. I looked at small auto battery powered ice chests, but these cool only to a certain amount below the outside temperature. You cannot set one to 36 degrees and expect it to get there if the temperature inside the van is 90 degrees (or above). Then I found out that there are compressor refrigerators made for boats and RVs. After a lot of questions on an RV forum I learned about the Nova Kool R4500.


The Nova Kool R4500 is a compressor fridge that runs on battery or 110 volts. No propane. The fridge does not have to be kept level. The batteries in the Roadtrek will run the fridge for several days - and this is not an issue as we plug in every night and the batteries recharge in addition to recharging while driving. This refrigerator is 4.5 cu. ft. - a cubic foot and a half larger than the stock fridge in the Roadtrek. The best thing was that it is exactly the same size with the exception of a small fraction of an inch in a direction that would not matter and would fit right into the opening.

Roadtrek would not install this refrigerator for us in place of their standard fridge. When we started on this idea and talked to the dealers, the dealers said that we would have to purchase the fridge ourselves, and they would install it. The stock fridge would be traded to them or we could keep it. (What would we do with it?) This was what we wanted and we were making sure that whoever we purchased our Roadtrek from would install this fridge.

Our dealer told me that he could not make the purchase of the Nova Kool as the company did not have an account with Nova Kool. After some searching and finding few convenient places to purchase this fridge, I contacted Nova Kool directly. This company has been nothing but nice all along the process. They told me that they would sell the fridge to our dealer and gave me the details to give him to order it. The dealer told me that he would do that and he would install it. The price would be added to the Roadtrek, but he was able to get Roadtrek to agree to deliver a 190 Popular with no refrigerator but with all of the fittings for the standard fridge including the propane connections (in case down the line if we ever sold it, the fridge could be replaced with the more common 3-way unit. The price of the Roadtrek was adjusted for all of this and I did not pay anymore than getting the Roadtrek with the standard fridge. The dealer did a perfect job of installing it. We took delivery of our Roadtrek with a Nova Kool R4500 compressor refridgerator installed and we love it.

This refrigerator switches automatically between 12 volt power and 110 volt power. The only control is the on/temperature control inside. A compressor fridge cools down faster than the 3-way. When we are leaving on a trip, I turn on the battery switch for the Roadtrek, turn the temperature knob up and in a few hours the inside of the fridge is cold. Too cold or too warm inside and you can adjust the knob. We have a indoor/outdoor thermometer that has a transmitter unit that goes inside the fridge and we can see the temperature outside the fridge. We leave the fridge on the whole trip until we get home again. The freezer is like any non-frost free freezer. It has kept ice cream semi-hard for a few hours. Of course, in a freezer this small, we are talking about individually sized ice cream cups. It does make ice cubes.

Above the kitchen counter there is a window and the walls are covered in a stainless steel back splash. We keep the curtains on the window closed all of the time but you can easily open them. There is also a screen on this window. There is a 110 volt outlet next to the light under the cabinet over the sink. That light has a full on setting and a nightlight setting. There is no exhaust fan just for the kitchen but the Roadtrek has an exhaust fan in the ceiling right above.

It is possible to plug electric kitchen appliances into the outlet next to the light. When we first got the Roadtrek we bought a two slice toaster. The first night we tried making toast for a snack, it set the smoke alarm off. I decided that toast was not that important, and we returned the toaster. But I know of Roadtrek owners who have electric frying pans, coffee makers (we do not have the optional built in coffee maker), toaster ovens, and other small kitchen appliances.

Storage for food is above the microwave. There are two long cabinets there. There is also the cabinet under the sink as I have mentioned. Many find the microwave as a useful bread box. Since you are outdoors in your Roadtrek, keep all food in air-tight plastic containers to not encourage little critters to come for an uninvited meal.

Of course, there are two tables to eat on. One in the front that swings out of its own cabinet and locks in place without the need for a leg. You turn the driver and passenger seats around to sit at the table. The other is in the rear of the Roadtrek between the two sides. You put the table top on a post and the post goes into the floor. You sit on the rear seat/bed cushions. We have used the front table and since then I have modified it. I will do an article about that modification. We have never set up the rear table as we travel with the bed made up.

So there you have it. Plan and cook a banquet or make a late night snack.