Roadtrek

Roadtrek
Showing posts with label gizmos. Show all posts

Wednesday, March 30, 2016

Table for One

There are two tables in my Roadtrek - one dining table for the back which fits in the rear aisle where the bed gets made up and one in the front that slides out of and flips up from a slim cabinet that is there just to hold this table. The rear table is held up by a post that sits in a hole in the floor. The front table is held up by a slide that comes out from the outside wall of the clothes closet behind the drivers seat and sits under the table to hold it. The rear table is useless and we have never used it. When it is in place it sits so close to one side of the aisle that anyone would want to sit on the cushion seat there does not fit - no matter how thin that person may be. One person could slide though on the other side and get to the cushion and platform that makes up the head of the bed but once there, if someone sits on the side where they just slid through, they are trapped back there unless the other person gets out to allow them through. Useless. We keep the bed made up all of the time that we are traveling and have never used the rear table. (We actually still carry it with us - I am not sure why - though it is better there than finding a place for it in the house to store it.)  The front table since I modified it to half its size is more usable and that is the table that we use if the two of us are having a meal inside the Roadtrek. Once open it is also not very convenient to move around. After we eat the table is folded back into its cabinet and stays there.

We found early on that there are times at night when one of us needs a table - either to use a laptop on or for whatever reason. We went out and looked at the usual folding tables and kept looking until we found one that is small, but usable, light in weight, folds and unfolds easily, and that we could find a convenient spot to keep it in for quick retrieval and use. We found one, that turns out to be a very common table to find, at a summer clearance sale at an Ace Hardware store. This is the table that we found -


The only color they had was pink but it was just what we were looking for and for the price it was not too hard to get used to it being pink.

The table folds flat and I keep it behind the driver's seat. It just happens that there is an indention between the cabinet wall and the door post of the van that this slides into perfectly.  To keep it from unfolding if it should fall out - which it has never done - I wrap an elastic strap that closes with Velcro around the table (found in Home Depot or Lowes with other Velcro utility products). 


The table is made of a molded plastic and opens very quickly and closes just as fast. It is made for the outdoors so it can be taken outside to use as well as being used inside the Roadtrek. It fits next to the third seat in the aisle or in front of the front seats swiveled around. If someone needs to get by, just pick it up and move it out of the way.


Since we purchased this table we have also seen it at Camping World - sold for RVs! They want more for it than it sells for in home stores and discount stores. They do have it in brown, green, and tan - so you don't have to get it in pink. During the Spring and Summer when stores start to get their garden and patio furniture and yard accessories, you will start to see these tables. They sell for between $12 and $15.00.

It comes in handy if you need a folding table and most important it is easy to store when storage space is at a premium.  Need a table for one (or a cozy two)  - take a look at this one.


Wednesday, September 2, 2015

MAKE IT DARK...

We are "night" people. It is just how we are. We go to bed late and tend to get up later in the morning, even when traveling, unless there is somewhere that we plan to be that we must be at early. For some time now, I have been trying to find some way to block out the morning daylight that comes through both the Fantastic Fan cover in the roof and the spaces around the poorly fitting and warped night covers over the three "opera" windows in the front ceiling.The windows all around are pretty well covered by both the curtains that came with the Roadtrek and the insulating Reflectix bubble foil that I fit into the inside frames of some of the windows.

This article will focus on the light coming through the Fantastic Fan, as we have still not come up with an effective way to deal with the three ceiling windows, which Meryl and I are still working on. When I first started asking around the forums about what others do, the first suggestion was a commercially sold foam insert that goes up into the vent frame - and I bought one of these, even though I knew that on the Fantastic Fan with its control knobs shallow to the frame it would not work. Several said, "Oh yes! It works!". It doesn't. This insert is made for a vent with no motor which has a frame that is much deeper than the Fantastic Fan. That went back the next day.

Another suggestion was to cut a piece of Reflectix and use small bungee cords to hold it in place inserting the small wire tips of the six inch, thin cord, bungee cords in between the edge of the frame and the padded ceiling. This actually worked, but I cringed every time I pushed the wire tip of that bungee cord between the frame and the ceiling.  I even covered the wire with heat shrink tubing but even with that there was still a point and I was certain that doing this every night in the RV, sooner of later it would cut into the padded ceiling and the ceiling would rip. This was only a temporary solution.

I started to design a foam insert of my own design. We bought foam and took measurements, drew a pattern, test fitted the paper pattern and cut the foam. The foam was an inch thick and the knobs and controls come down less than that. I cut around the knobs to friction fit the foam up into the frame of the fan - it stayed up for about ten seconds and then came down. The foam had no support to keep it up and anything that might be added to support it would make it too heavy to stay up.  No this was not going to work - good foam cut for nothing.

I went to arts and craft stores looking for something that would work. There is no metal on the frame that attracts magnets. Even the screws were not going to work with magnets. What would work with magnets was the shower curtain frame on the ceiling that widely surrounds the fan. I started looking at ways to put something up around the frame - cloth, a quilted cloth, a piece of foam board that would sit inside the frame. All ideas that had their faults when examined closely. I was not giving up and I kept the idea of using the shower curtain track in some way in mind.

Now, a curtain hung from the track to the floor on the side of the track facing the bed would not work - it would not only block getting out of bed, it would also block getting to the toilet. In the middle of the night when you gotta go, you don't want to struggle with a curtain in your way when you are half awake. That idea was considered and dropped.

What would work? I had one of those "ah ha!" moments walking around a store when I saw the pop up fabric trash cans and clothes hampers. The wire in these to give them support and allow them to fold up flat would work fit inside the shower curtain frame with fabric fitted tightly around it. The wire would hold it in place on the frame and the fabric would stretch around the wire and not sag blocking all light coming through the fan in the middle. I wondered where one would get such wire - and then on our first trip of the season, actually saw it for sale in the surplus and hardware shop at Green Dragon Farmers Market. If there is something that is hard to find, this shop usually has it. They had piano wire in various thicknesses. This was a possibility taking shape - but buying fifty feet of piano wire on a maybe idea was not something to jump on. The idea needed to brew and perk a bit more. We had to know how the fabric would be fit and what fabric would block the light. We passed up the wire - it would be there next time, if we had an actual potentially working design. But the idea continued to perk...

That night in Walmart we are walking around the store - again, late night people sometimes look for places to be out late and a 24 hour Walmart in many places is easy to find (again, to those who are astonished - to each their own - this is "our" own), I pass in the auto aisle windshield covers that are just about what I am thinking about making. Would these fit? I took down the measurements (28.5" x 31.5" and considered "jumbo size" on some of these and "standard" on others) and when we got back to the campground and were settled in for the night, I measured the dimensions inside the entire shower curtain track. It was about 28.5" square - though the track goes off square on the shower side of the aisle slightly. It seemed like this might work - and we did not have to create anything or reinvent the wheel. The next night, back to Walmart, we would find out if this would work. We bought a pair - they are sold in pairs - for less than $10. The one we picked was silver fabric on one side and black on the other. The best part about Walmart is that one can return just about anything - open or not, as long as it is in the same condition as when purchased. If it did not work, it could easily go back - to any store - there or at home.

Back at the campground, I took the circle of folded covers out of their package and they popped open into huge potato chips. I took one of the pair and fitted it up into the frame. It was a bit tricky to get it in and it took the two of us to keep one side up in the frame while the other side went in.  Because the frame does go in deeper on the shower side, one side and that the cover is three inches in length longer than the dimensions of the frame, one side of the cover was going to curl, but it stayed close to the ceiling, was not in the way of any cabinets or the bathroom door, and most importantly, it stayed in place - even with a little coaxing to come down. Huzzah! It looked like it was going to work. That night we left it in place to see what we would see - or not see in the morning when the sun came up.

That next morning I would say that 90% of the light was blocked. It was not blocked completely as there was a grey, dull light coming through the cover around the fan opening. Not really a problem, the idea was working. That night I had the idea, that since we had two, if one worked two would work even better. I put the two together - black fabric side down and thicker silver fabric side to the fan - and the two of us fit the pair in place as one - just like the night before - with the curl on the kitchen cabinet side, which seemed the better side for it. The next morning - darkness. No light was coming through the fan vent opening. This was it! This works!

There are instructions attached on one of the pair to fold them together back into a less than one foot in diameter circle. "Put your thumbs here. Fold inward like a taco". Heck if that didn't work.

So if you are tired of the light streaming in from the Fantastic Fan in the morning when you really would like to sleep some more, this will do it!  Take your own measurements in case your shower track is different.

Fits nicely!

Folded for Storage


Wednesday, June 10, 2015

The Best Way to Know Coach Battery Voltage

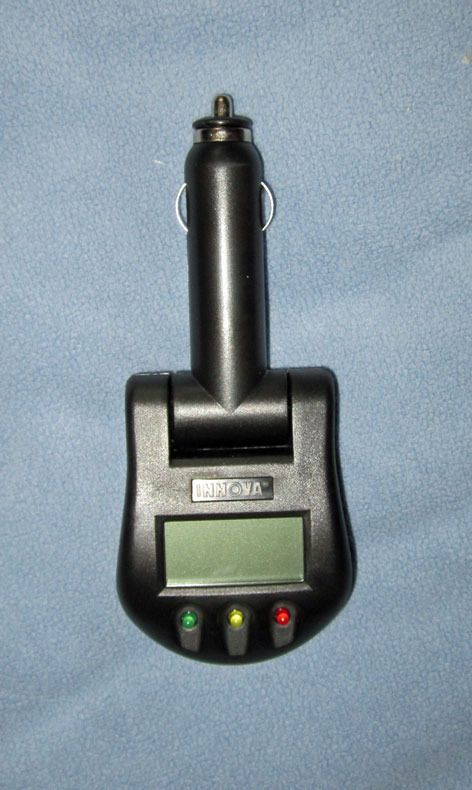
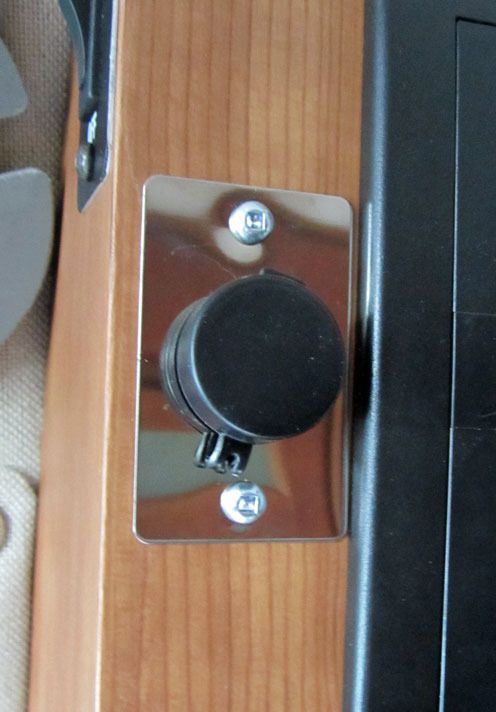
On our first trip of this season, our first stop was at dealer service. (I will write about this trip in a coming article.) One of the things we wanted done was to have a 12 volt outlet that is connected to the coach or house batteries installed (the batteries for the RV, not the engine).  This was a project long in planning. It started with my idea to install digital voltage meter that would be connected to the coach batteries and the TEST button on the monitor panel. I went searching for how this would be done and it is relatively simple IF you know what wire is which and where it is connected - plus how to get to the wires.  The monitor panel - while it is similar to models made by the company that manufactures it, is made for Roadtrek by that company. Finding a schematic for the wiring and even knowing how to pull it from the wall without damaging it was not becoming a simple task. I knew that we had to be going to service anyway - if for nothing else but to get the generator oil changed for its annual change - so why not let the dealer service department do all this for me. I then started looking for a digital voltage meter that could be installed in the space that was available adjacent to the Test button and monitor panel. There are many to be found on Amazon and Ebay but most are designed to be installed into a dashboard and not the half inch wood of the Roadtrek wall in this location. I could rig something with a frame to have it surface mounted but then found this.

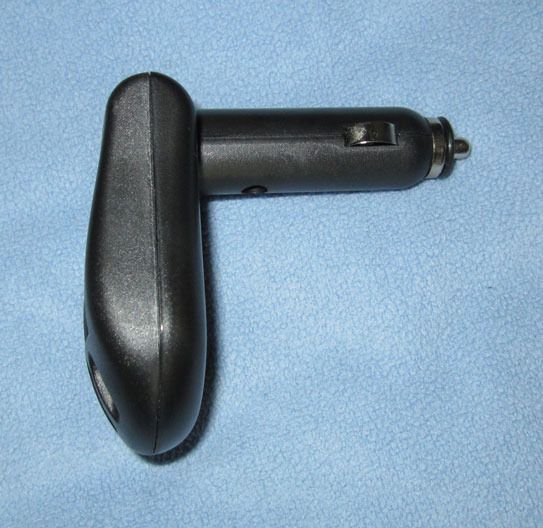
What is this? This is an Equus Innova Model 3721 Battery and Charging System Monitor. It is made for a vehicle battery and plugs into the 12 volt cigarette lighter or appliance outlet in a dashboard. It has an LCD digital display with both numerical voltage and a graph, and also LED lights. On the back is a chart that tells you what voltage levels indicate. The numerical voltage is the exact reading to within the accuracy of the meter. It also folds for different angle viewing. From reading the hundreds of reviews, this is supposedly one of the best of these meters and it was available through the Walmart website's "Site to Store" free delivery for just $13.86. It may be at local retailers but it was not in the several Walmarts in two three states that I looked for it. I ordered it and had it in five days.


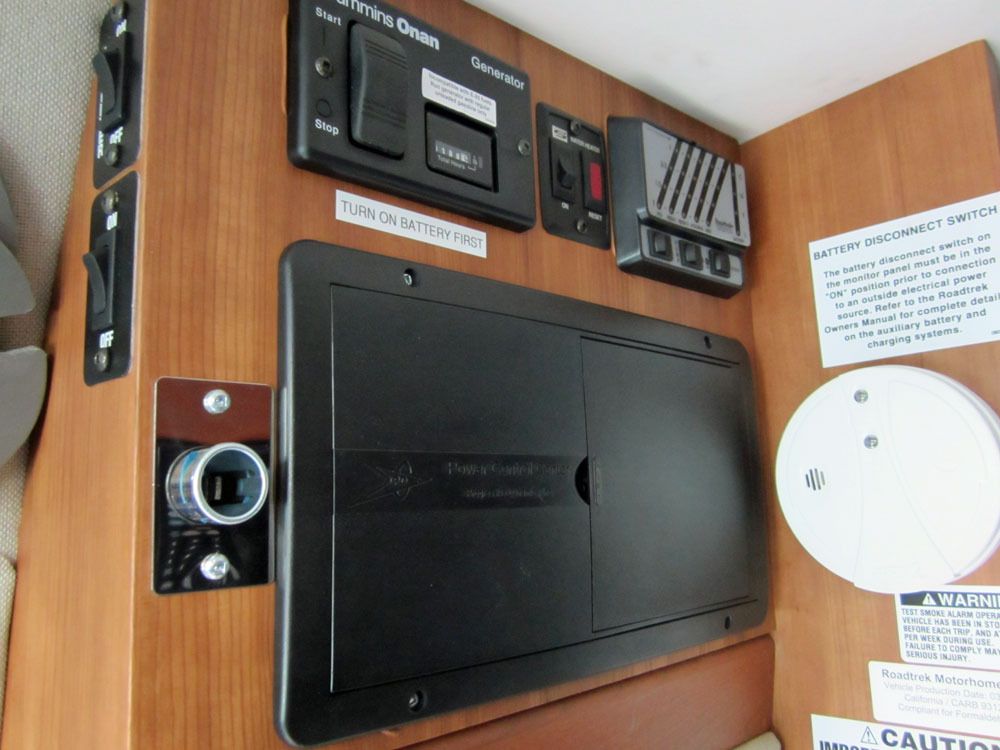
This gave me a new idea. Instead of having a permanently mounted meter installed I could have a 12 volt coach outlet installed. This would enable me to use this meter and also have the outlet for any other 12 volt charger or appliance. Now, some of you with newer or older Roadtreks will say, "But there already is a 12 volt coach outlet in the Roadtrek!" Well not in the 2011 or the 2010. I am not sure when Roadtrek stopped including a 12 volt coach outlet or started including them again, but I don't have one. Newer Roadtreks have the outlet as part of the antenna booster and I could have done it that way also - probably on my own, but inside the cabinet over the TV on the  cabinet ceiling was not going to be very convenient - particularly since we keep the bed made up when traveling and opening that cabinet means climbing up on the bed. So I started looking for and found quickly a common and standard RV part - a 12 volt outlet - which it just so happened was in stock on our dealer's website's part's page. There were two to choose from. One the size of a light switch plate and the other much smaller - small enough to fit in where the monitor panel is.  A discussion with Meryl and it was decided. I sent an email to our friend at dealer service - good friends after all of the time we have spent with her over the four years of our visiting her at the service center - and told her my plan and included the part number and a photo of the vicinity that I wanted to outlet installed. She said she would show the photo and the part to the tech and see what he said. A couple of days later, we were good to go - she had ordered the part and we just had to wait the month for our appointment (more about that in my article about the actual trip). 

So once at service I showed her the spot that I wanted the outlet, she said it may need to be moved slightly lower which was fine and we left it to her and the tech to have the outlet installed. Five hours later - there were other things to be done - I had an outlet. 


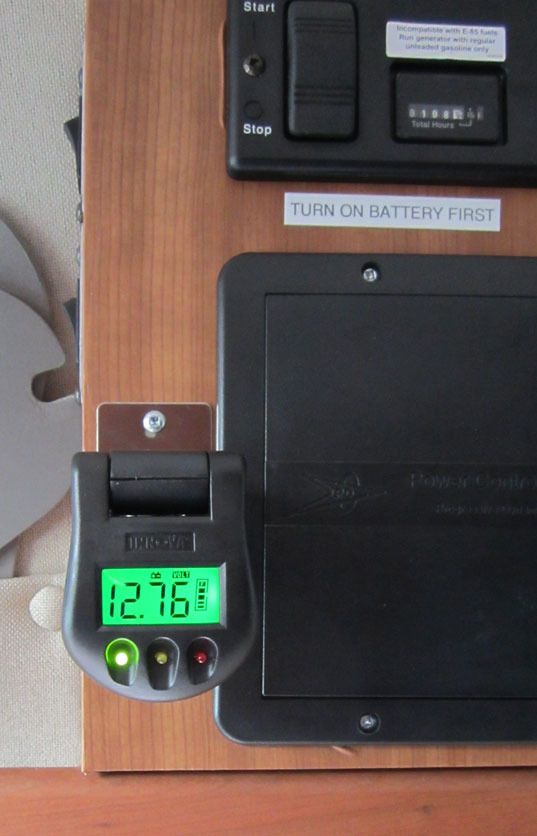
 So here is how it all works - turn on the coach battery switch and just plug the meter in!


This reading is two and a half days after getting home from our trip. When this reading was photographed the "C" charge light was still lit on the monitor panel (this stays lit from a couple of days to a couple of hours after the batteries have been charging), but flickered (usually an indication it is about to drop to the next LED). A few minutes after I pulled the meter from the socket, I pushed the Test button and the panel LED was now on the "G" for "good" third up from the bottom yellow LED. I put the meter back in and the reading now was 12.4 volts. Still very good. Sitting without driving or charging even with the battery switch OFF, there is drain on the battery(ies). 

When I plugged the meter in during the trip while plugged into shore power with the batteries charging the reading was 13.8. During the trip during the day while on batteries only - with the fridge on DC (AC/DC only fridge) readings were 12.6 to 12.8. We were driving during each day and plugged in each night. Finally, I am free from the monitor panel LEDs - constantly guessing what the "G" LED and the second "F" (red) LED mean. No more guessing. 

I had a cap from a 12 volt socket splitter and it fit perfectly so now the outlet is not open when not in use. Not really necessary but a nice touch!


So without the Innova meter you are left with the option to take digital readings in the engine compartment at the Separator or Isolator. This is so much easier. 

After I purchased the Innova I came across a small plug in LED digital 12 volt meter on Amazon for only $3.00 - with Free Shipping. I wondered how this could be sold for only $3.00 and still be shipped free and I decided to take a chance and buy one of these also. The estimated delivery date was a month and a half after the purchase date. I thought that someone could put this in their pocket and walk it to my post office from just about anywhere in the country in less time. It shipped three days after purchase and arrived one week after purchase. The meter was shipped from China -in a brown mailing envelope and inside the meter was in a bubble wrap pouch. The postage on the envelope was from China. This little LED meter works. It lights up with bright red LED readings - the difference is that this meter has only three digits where the Innova meter shows four digits on the display. Used one after the other, the LED meter read the battery voltage as 12.4 while the Innova read the battery voltage as 12.42. If the Innova only had three digits, the  readings would have been the same BUT had the reading on the Innova been 12.49 and the LED meter still read 12.4 that would be somewhat different - though still not dramatic. So if you want a three dollar plug in digital 12 volt meter, search Amazon.

And just in case it needs to be said - I have nothing to do with the companies that makes these meters or this 12 volt outlet.  I get nothing from anyone and I give no "official" endorsement. If there is something good that is worth sharing I share it. 


Wednesday, March 4, 2015

A Better RV Extension Cord

I am interrupting the series, "It Isn't All Peaches and Cream" once again for an article that is more timely and of use to all who own a Roadtrek or an RV. I have written before about my RV extension cord. It is a 30 amp, 10 gauge M/F extension cord that is 30 feet long that I use when my Roadtrek's power cord is not long enough to reach the power pedestal or my outdoor 20 amp house outlet at home. We have rarely needed it at a campground but we do need it at home and that is where it gets monthly use.
 

This winter with temperatures incredibly colder than we have had in this area in many, many years we found a big problem with our RV extension cord.  There is a lip around the socket - made to securely hold the plug in place, I suppose, or to keep moisture out of the connection, but that lip combined with our Plug Dog handle on  both the extension cord socket and the Roadtrek power cord plug in the cold was not seating together properly. This was causing all types of problems including the connection coming apart or when pressured together to stay connected, almost impossible to pull apart in the frigid cold - even with the Plug Dogs. This extension cord socket has always been a tight connection.


After one cold night of panic trying to pull these apart standing in the cold and ice, I decided that I had to get a better extension cord. I have seen RV extension cords with built on handles in RV stores and in Camping World. Of course, snowed in we were not going anywhere near one of those soon. I started searching the internet for anywhere close that had it or if I was available site to store from the Walmart website. I like shopping on the Walmart website with their site to store service. They sell things that are not found in the Walmart stores and they ship for free to any Walmart store that you select. Even better is that you can return the item to any Walmart store for a full refund.

At first my search on the Walmart website was not coming up with anything other than the cord that I already have. A general Google search brought up the cord that I was looking for with a link to the Walmart website. Apparently, RV extension cord was not bringing it up on their site- it needed to include the manufacturer's name - Camco. There was the cord that I felt should be better. It has a large plug and socket and both have solid handles that are part of the plug and socket.


This is a 30 amp, M/F 10 Gauge RV Extension Cord. The cord matches the power cord on the Roadtrek - same gauge. The cord is five feet less than my original cord and is 25 feet long. Twenty five feet is plenty. The name is Camco Power Grip Extension Cord 30 amp Model 30-30 RV. As you can see this cord's socket base is flat - no Plug Dog is needed on the socket side of the connection as there is the nice BIG yellow pull handle. The Plug Dog on the Roadtrek power cord plug allows the two flat surfaces to attach properly. The price is less than the original RV extension cord that I have. This cord costs only $36.21 - free shipping site to store. My old cord costs $50.


It took ten days to ship and it arrived on the date promised. All I had to do was go to the store's Site to Store desk and pick it up.

Now, I have a better RV extension cord for my Roadtrek. This cord comes also in 50 amp for larger RVs. There is also a 50 foot length 30 amp cord with the same large handled plug and socket that sells for $64.38 if one needed a cord that long.

No matter which RV extension cord that you use, if it is cold outside, the cord will be stiff - as will the Roadtrek power cord. It will not unroll easily nor will it roll back up easily. I now keep the extension cord in the house where it stays warm until it is needed and after use in the cold it can warm up to roll it back up. We only put it in the Roadtrek if we are uncertain about the distance to the pedestal at the campground - and when we have carried it "just in case" we have not needed it. IF you are planning on staying at a friend or family's house when traveling take this cord with you. Outdoor outlets are not always conveniently placed to driveways. Combine this cord with a good 15/20 amp plug to 30 amp socket adapter and you can plug in safely. 

I am not sure what I will do with the old cord. One thought that I had was to cut away or grind away the lip on the socket. The plug and socket on that cord are lighted - nice if you want to know that it is plugged into power, but not really necessary. I am not sure if removing that lip will interfere with any wiring. Another thought is to purchase the same handled socket that is on the new cord, cutting the socket off of the old cord, and install the new socket on the old cord. I have seen that socket at RV parts stores. That is something to consider when it is warm again. Will it ever be warm again? Remind me that I asked that when it is 100 dF on July Fourth!

Now, just one word about RV extension cords because I have heard before to just use any household heavy duty 15/20 amp extension cord. I have also read and heard about the fires that have started when those cords get hot because they are overloaded. It was recommended to me and I recommend to you - if you need to use an extension cord on your Roadtrek or RV always match the gauge of the extension cord to the gauge of the power cord on the RV. For $36 why would anyone take a chance?

FIELD TEST -

I fit all of the connections - using the old extension cord plug as a stand in for the Roadtrek power cord plug - inside before going out into the cold with the whole thing just to make sure things fit and came apart easily. The 15/20 amp adapter pulled off the extension cord plug easily easily. The extension cord socket was not as easy and it took holding on to the socket's handle and giving a sharp, quick tug on the Plug Dog handle to get them separated.

We had to plug into the house to charge the batteries and we were lucky enough to have a dry 38 dF day. (Imagine being lucky to have a 38 dF day!) I plugged the plug of the extension cord into my dog bone 30 amp female to 15/20 amp male adapter and plugged the adapter into the outlet inside our very small, screened porch and ran the extension cord out the aluminum screen door and down to the Roadtrek. The Roadtrek power cord plug got one of the Plug Dog handles and plugged that into the extension cord power grip handle socket. They went together easily. Because there was a lot of ice on the ground toward the front of the van that if it melted would come down into the connection I used Velcro straps to hang the connection from the frame of the Roadtrek's little door that covers the power and city water connection.


The connection worked well and the Roadtrek batteries showed that they were charging on the monitor panel. I checked that there was power in one of the Roadtrek's inside outlets and all was well. The Roadtrek remained plugged in for its usual charging time of 12 hours.When we went out the temperature was 27 dF. The Roadtrek plug and power grip extension cord socket came apart with a sharp pull much easier than the plug and old extension cord socket ever did in the cold. The cord came into the house to be kept warm and manageable for the next time it is needed. Maybe by the end of March the temperatures will be much better! I certainly hope so!


Wednesday, December 10, 2014

IT ISN'T ALL PEACHES AND CREAM - Part 1

The title for this article came to me early this past summer. It was during one of our trips in the Roadtrek and things were not going as we had hoped for, more due to the weather than anything else, but there had been some problems since the we had dewinterized the Roadtrek with the Roadtrek, traveling in an RV, and the weather up to that point and now looking back they just did not stop for all of 2014 right up to today. As I write this, which is about a week before you will be reading it, we have cancelled another trip because the weather this year is just not cooperating. Since the title came to me, this article has been playing out in my head more and more while we have been on each trip that we took this Spring, Summer, and Fall. I will now attempt to put all of this on paper and perhaps at the same time this will be as much an exercise in self-exploration as it is a review of a year of RVing that at best can be described as a whole as fair. Overall, this may be a look on the dark side. Maybe in the end, not, but I am taking you along with me and we shall see. Oh, yes, this will never be able to be done in one article so I will just keep on going with it until it is done and it will be divided up into parts, and right now I don't know how many.

So why "It isn't all peaches and cream!"? Well it actually started as "It ain't all peaches and cream" but in my respect for the many teachers and professors who taught me how to write - some of which I purposely ignore at times - I decided that I would change that "ain't" to "isn't". The peaches and cream part comes from a game that I played most of the summer on my tablet. When several levels were completed a little voice would speak out and say - "It's all peaches and cream!". Well, I  completed a level sitting in the Roadtrek and I heard this and with the mood that I was in I said out loud answering the voice in the game - "No, it isn't!" and thought to myself, "It ain't all peaches and cream!"

OK - so we go now all the way back to the Spring and dewinterizing. Dewinterizing started out well until we got to the same point that we have problems with every year when dewinterizing the Roadtrek. We come to flushing the sanitizing bleach out of the tanks with clean water and when we go to fill the rear tank - remember, the 190 has two fresh tanks - as soon as we start the water flowing into the empty tank, it backs up the fill tube and comes rushing out the opening. This has been consistent - year after year. In past years, after a few tries and a few tricks the water would start flowing in normally. We tried all of the tricks that we have - all of which are written down to carry over to the next year to "remember to" when filling the rear tank - and this year nothing worked. What seems to happen is that there is a massive gas bubble in the tank, perhaps from the chlorine bleach and water mix used to sanitize. We stopped trying and I came in to start researching what the problem might be and what to do about it. Asking on the forums and groups was not leading to anything. I did find some discussions on general RV forums that talked about similar problems - not necessarily relating to sanitizing - but with tanks that would not fill from the top. I tried then using the city water with the valve turned to fill to fill the rear tank - but that also did not work. I had figured that the water would go in from the bottom of the tank - or wherever that connection is in the rear tank and push the air/gas? up out of the open fill hole and clear it. That did not work either. I went back to those discussions and someone had commented about using a small hose to reach the bottom of the tank and fill from the bottom up that way - slowly. By this point it was much to late to do anything until the next day. We went out the next day to buy fittings to be able to take 1/4" inner diameter plastic tubing and connect a water hose connection to it. We found the brass fittings in Home Depot and came home with them. Just in case, I tried filling the rear tank as I had the day before and the water came right back up at me. There was still a problem. Time had not corrected it. I assembled the gizmo, added a shut off valve between it and the water hose, turned on the water to run slow and pushed the tube down to the bottom of the rear tank. As a safety precaution - I did not want to have the tube come off the fitting and be lost forever in the tank - I made the tube longer than it needed to be and kept more than a foot of the tube outside the Roadtrek. The water flowed and I waited to see if anything was coming back up and out. It didn't. It took a lot longer to fill this way but it filled. The gas/air? bubble in the tank had plenty of room to come up and out of the fill while the water displaced it. That was the good part - it worked. Getting there was more effort than it should have been.

One crisis resolved just to be followed by another shortly after. With the dewinterizing done and the tanks full we started testing out that all was well - especially as we had an appointment at dealer service to change the oil in the Onan generator in a couple of weeks and should there be anything wrong we did not want to have to make two trips to Pennsylvania. As it was I had two things I wanted them to do in addition to the oil change, and one thing to check. Meryl is the one who can get down on the floor and deal with valves, etc. She has told me that one of the bypass valves on the hot water tank has always been hard to turn. She said now that when she turned it this time it was very hard to turn. With the water in the tank and all supposedly good to go, she went down to close the door of the cabinet with the hot water tank and said that there was water on the floor. I managed to get down there and looked and there was water coming out of the base of that valve. We shut the valve and put the hot water tank back in bypass. Luckily, the valve closed without leaking. I was not going to attempt any plumbing on the Roadtrek myself and this had to be brought to dealer/service to take care of. We called the service center and added one more thing to the list for them to take care of when we came. What happened to the valve? Perhaps it froze during the winter or perhaps it was never right as it was always hard to turn and just finally gave out. I don't know.

Our first trip of the season was that trip to the dealer for service on the Roadtrek.As I had written about in June, this was not an overnight trip and that trip in June was the first real trip, but never the less we were out on the road with the Roadtrek for the first time in 2014 in April when we went for service. By now there was a list of things to be taken care - the oil change on the Onan, I wanted the filter that I devised to keep the water valve on the toilet clear of debris installed, the hot water tank valve had to be replaced, the outside shower would leak whenever the hose was attached to it, and I wanted them to replace the back up camera with a new camera that I had received from Roadtrek as the original camera from the first never had a clear picture and that picture just got worse and worse until it was unusable. They had the whole list in advance and the service was scheduled with their Roadtrek trained technician. I have written about going for service before. We drive 125 miles which takes with traffic three hours. We arrive as close to noon as we can and then wait while the work is done - usually four to five hours which we spend in their shop, looking at RVs on the sales floor, and walking to a shopping plaza about a half mile away where there is a Home Depot, a Staples, a dollar store, and a supermarket. It is not an entertaining way to spend the time but tolerable - once a year. We went over the list and we went off. We got a call to come back at 4:30. Two things had not been done. One they wanted to show us as it was apparently not a problem. That was the outside shower. They said that there is a weep hole in the place where the hose is attached to release pressure when the shower hose is connected and it is turned on. This was what appeared to us to be a leak. Since water spurts everywhere when that hose is connected and the shower is on, it did not seem right to us. The inside shower is basically the same fixture and does not do this. I have to wonder why this is necessary on the outside shower but they showed us the tiny hole that is "supposed" to be there. OK.

The other thing that was not done was the camera. One day I will tell here the entire tale of the camera. It is not to be told yet. What I will tell you now is what transpired on this day. Here is the Roadtrek service technician at the dealer telling me that the removal of the old camera and installation of the new camera is a problem because he has to remove the vent section that sits on the rear of the roof over the back of the air conditioner. The camera wires go from the camera that is installed over the cargo doors in the middle of the van, with wires that go into that vent, are attached with a putty to hold them down on the base and then go into a putty filled hole in the driver's side of the roof and inside the roof where they connect, apparently right there with the wires that go all the way to the dash and radio. The connection he tells me is not the problem. The problem is that in his "experience", as he put it, when he has taken off these vents in Roadtreks he generally finds that the screws that hold it in place have rusted solid and they sometimes will and sometimes will not remove from the plastic grommet nuts that they are secured to. If he should find that the screws are as he anticipates, the job takes hours and he never does a job like this unless he has all day. He said that he would not even attempt it unless he had a day to do it. I said that I could not understand how in three years it could possibly be that bad - and I have seen other Roadtrek owners talking about removing this vent and working on the inside of it with no problems at all. But he was insistent. He also said that when I do come back for the job he needed it first thing when they opened and before I came I should make sure they had the grommet nuts that would need to be used should the ones there need to be drilled out to get the screws out. He had them right then while we were standing there, but they are not always available.  I asked if we came back the next morning - we could find a place to stay for the night even though we had not been prepared for it - and that means with all of the medications, etc. required each day. He said no as he was booked the next day. Now, I had never asked if this was warranty work or not,but assumed that it was likely not and that I would be paying to have the new camera installed. Until this moment, that was fine. Now I started realizing that if this was an all day job, the labor would cost me more than I was able to spend. This was another big disappointment in the tale of the back up camera. I have had no decent use of the camera since the first few months and have gotten by without it. Given the tale, yet untold, it was unbelievable.

By then it was near 6 pm and we paid the bill which was a lot more than I had figured it would be and we headed back the three hours toward home. We had no more leak from the hot water tank and that was a good thing. My filter was installed and that too was good. I still had no camera and that was more than not good in my mind. For that day it was not all peaches and cream.

There is the whole year yet to come.

End of Part 1.


Wednesday, September 17, 2014

The Water Bandit and Household Sink Hose Adapter

A few days before our most recent trip we had a problem with the outdoor water faucet at our house. There was no way to rectify the problem before the trip and I wanted to leave, as we always do, with our fresh water tanks full. I remembered something that I saw at the RV accessories shop at our Roadtrek dealer that would allow me to attach a fresh water hose to any faucet. There was no way we could get to that shop three hours away so I decided to take a chance that a nearby travel trailer shop might have this.  The problem is I could not remember the name.

We went to the trailer shop and looked on the wall of accessories for water hook up. There on a peg was a shopworn package that was it - the only one they had - and it is called the Water Bandit. We bought this - $7.99 - at this shop which was actually higher priced than it should have been but as they say " a bird in the hand is worth two in the bush" and we bought it.

The Water Bandit is made by Camco, that makes many other RV accessories. There is another company that puts the exact same thing out except in a different color and that one is called the Water Thief. It sounds like these are made for stealing water but what they are made for is attaching a water hose to an unthreaded faucet or a threaded faucet with broken threads.


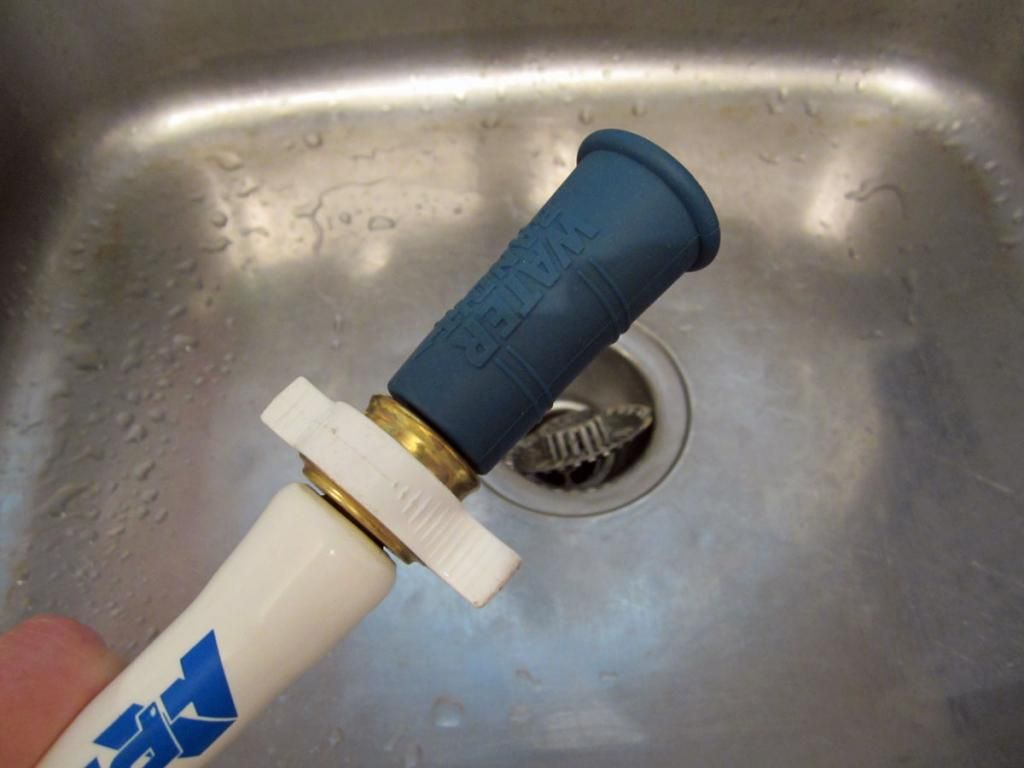
The Water Bandit is a flexible but firm rubber sleeve with a brass water hose connection on the end. The inside of the top of the water bandit has rubber threads to screw onto a damaged, threaded hose faucet, and this is followed below with a smaller open for a friction fit on a non-threaded faucet. It can be used on any faucet. The instructions are VERY CLEAR to NEVER close the end of the hose that the water is coming out of as it will cause too much pressure at the connection and the Water Bandit will come shooting off the faucet. Complaints in reviews that I have read about this since purchasing it all focus on the user using a nozzle on the end of the hose or a water cut off and the Water Bandit ballooning and shooting off the faucet. This is not how this is to be used and this also makes this for filling tanks only. You cannot connect the end of the hose to the city water connection and then not have an open faucet for the water to flow through inside.

When we were getting ready to leave, we tried it and it worked. You first screw the hose onto the Water Bandit -


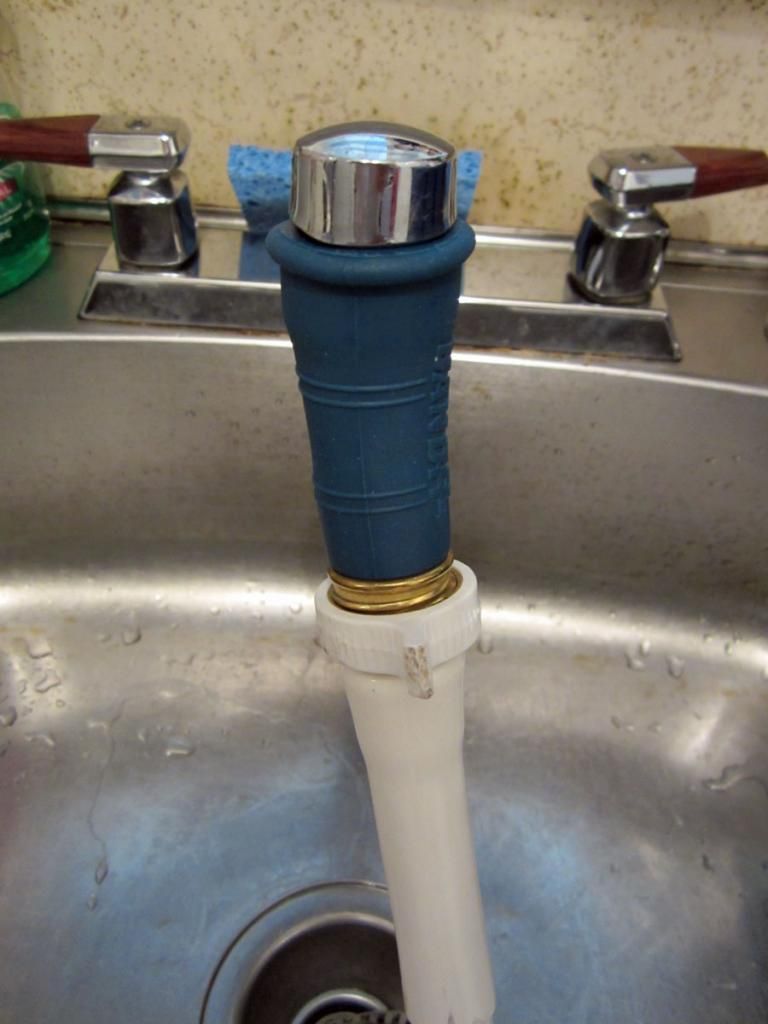
Next you push the water bandit over the end of the faucet -


Try to push it up as far as it goes. Positive user reviews of the Water Bandit suggest to use a screw tightening hose clamp on the Water Bandit to lock it onto the faucet. We did not want to do that on the kitchen faucet so Meryl held it in place while I had the hose outside to fill the front tank. Since the water cannot be shut off at the exit end of the hose, we used our back up the Roadtrek walkie-talkies to communicate when to turn on the water and when to shut it off. The Water Bandit ran with no leaks held in place by Meryl at the faucet. The water pressure did back up a little in the faucet and there was a small leak at the bottom of the faucet where the faucet turns. This was not a problem as the water just ran into the sink. I should add that our kitchen sink is about three feet away from our house's side door so the hose only had to go through the house a few feet, in case you thought we dragged the hose through the house.

As I have been reading about those who use the Water Bandit, I have learned that there are some State, Federal, and Regional campgrounds that have water spigots at the campsites with no threads for a hose. Unless you know the campground, this is a big surprise when you get there and find out you can't connect your water hose. The Water Bandit is ideal for this and will enable a connection to a spigot where one was not intended. For this I would use the clamp - easily found at any home or hardware store.

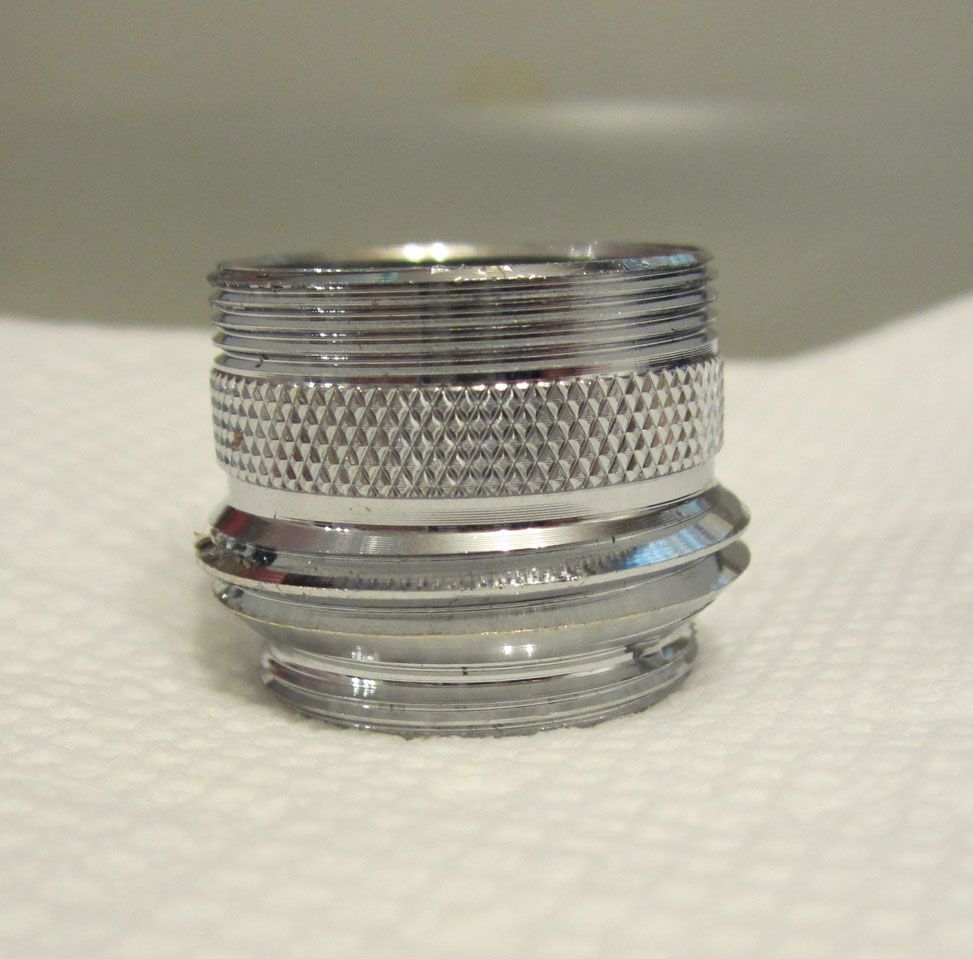
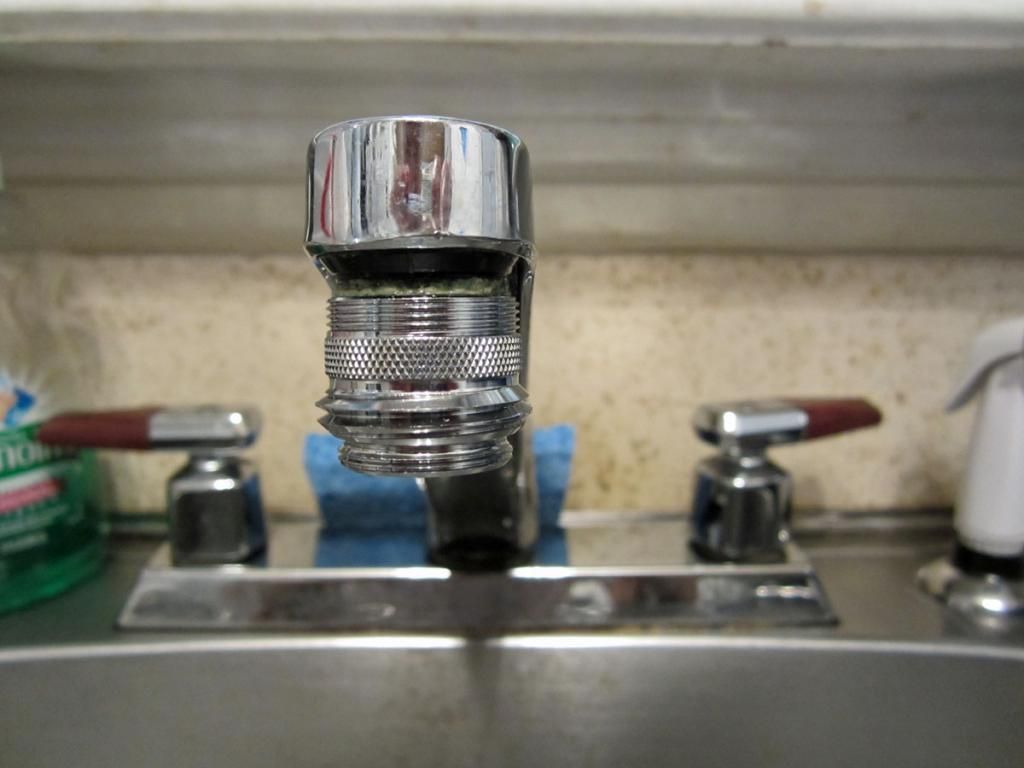
NOW - after we bought the Water Bandit I remembered another way to connect a hose to a household faucet. There are adapters sold in plumbing departments of home stores that will do this. Just in case the Water Bandit would not work on our kitchen faucet, I went to Home Depot to see if they had one. There were various types and I asked the salesman in the plumbing aisle what to buy. He gave me this one -


This is made by Neoperl and is just called "Faucet Adapter". It is lead free. The part number on the package is 571493. This connects a male 15/16" - 27 thread or a female 55/64" -27 thread household faucet to a female 3/4" hose (standard garden and fresh water hose size) and a female 55/64" -27 threaded end. The package will say male 3/4" hose as that is what the end is on the adapter. Why so many dimensions. This adapter is made to replace the water aerator/strainer on the end of a household faucet. On some faucets these are male attached and on the rest these are female attached. This will fit both. On the outlet end, you can put this on the sink and leave it installed all of the time. It allows you to screw the aerator/strainer back on the faucet when a hose attachment is not needed and then just remove that when you are going to attach a hose. These are made for portable dishwasher and portable washing machine attachments to sinks. It cost about $6.

To use this, you unscrew the aerator/strainer end off the sink, set it aside, screw this on and attach a hose just like you would screw the hose onto an outdoor faucet. When you are done, unscrew the hose, unscrew this adapter from the sink - unless you want to leave it there - and screw sink's the aerator/strainer back on.


This was fast and easy and the best part is that the end of the hose can be shut off with the water at the sink still on - as long as the adapter is screwed onto the sink tightly - there is a washer inside to prevent leaks. In fact, there are two washers included - one tall and one short to fit different sinks. The short washer fit our sink.

This was even better than the Water Bandit. It allowed us to both be outside at the Roadtrek - me with the hose in the door fill and Meryl inside the Roadtrek checking the water level on the monitor panel. I had my water fill nozzle on the hose that allows me to shut off the water flow as soon as the water starts to backup into the fill opening and could that caused no problem inside at the sink.

With the kitchen sink closer to the Roadtrek on the driveway than the outdoor water faucet on the other side of the house in the backyard, this was easier than filling the Roadtrek the way we usually do.  The Water Bandit is now in the "water box" that we keep in the outside compartment of the Roadtrek that holds all we use for hooking up to water. It will be there with us in the event of a water connection problem on the road. The sink adapter will stay at home ready for the next time we need to - or want to - fill the Roadtrek from the kitchen sink.

Both are good to have if you ever find yourself with a problem outdoor faucet at home, and the Water Bandit is definitely good to have if you encounter a campsite water spigot with no hose threads.

Wednesday, May 28, 2014

An RV-Specific GPS For $10

If the title got your attention it was meant to. Am I joking? Is there an RV-specific GPS that can be had for $10? Well, if you have a smartphone or tablet - either Android, Iphone, or Windows, yes there is. It is called Copilot and it offers a lot of things that other GPS navigation apps don't offer. I am sure someone reading this will say, "But I can do this for free with my smartphone using free apps such as Google Maps or Nav!" and that is true BUT Copilot offers what these don't.

The main two features that I will highlight most here are two abilities not found on other apps (at least apps near this price):

1) The Copilot app has an RV Mode profile. Set Copilot to RV Mode and the profile will let you pick an RV height of either 12 feet 6 inches or 13 feet. (The 12 feet 6 inches height is fine for any Roadtrek.) and it will ask if you want to route around tunnels that prohibit propane.

2) The Copilot app installs maps - either the entire North America set of maps, all of the United States, all of Canada, or just the sections of the US that you want - on your smartphone's internal memory or SD card memory. With Copilot YOU NEED NO DATA CONNECTION to follow a complete route or change route mid-trip. Download and install maps on wifi to save data usage. If you purchase Copilot USA you do not get Canada but can purchase the Canada maps in addition. I do not see a Copilot Canada only version when I look at Google Play Store. It may be available but I cannot confirm if it is.

I have been testing the Copilot app for a few weeks. The results so far surpass the Rand McNally RV GPS that sells for $399 list price, and are as good as the Garmin RV GPS that also sells for $399 list. Copilot RV mode goes one better than the Garmin as the Garmin does not have an "avoid propane restrictions" setting. A year ago I purchased the Rand McNally RV GPS and returned it after one day's use. I had it route me locally with the height restriction set first to no roads with clearances less than ten feet and then no roads with clearances less than 12 feet. It routed me directly onto a road with a seven foot ten inch height limit - no vehicles over 7'10" as posted on the entrance ramps. I know that on this road there are overpasses that are even lower than 7'. I contacted Rand McNally and they told me that they were not aware of these roads. The GPS was returned for refund. I have tried the Garmin truck/RV GPS in a store and set in the same destination for the same area - height limit set as with the Rand McNally - and it avoided those roads completely and took me on a height safe route. I then had it route me to Washington, D.C. which is normally routed on a  GPS through the tunnels of Baltimore, MD. and the Garmin - with no propane setting routed through the tunnels. The Copilot so far has routed around all roads that have less than a 12' 6" height allowance and routed completely around the city of Baltimore avoiding the tunnels that prohibit propane.

In addition to an RV profile Copilot has a car profile, a walking profile, and a city transportation profile for routing. Each has options for selecting the roads and conditions that you want or want to avoid.

What else will the Copilot App do? It has turn by turn voice directions including voices that speak street names as long as you device is text to speech capable (most are). It creates alternate routes to select from when starting a route. You are able to review each route and select the one that you like best. Of course, if there is no alternate, there will be none calculated. It has lane guidance to show you which lane to be in when an exit is approaching. The display zooms to show the turn approaching. The map display on the premium ($10) version has 3D or 2D view. There are speed alerts (visual and audio that can be turned on or off) to tell you if you are over the posted speed limit. If you go off route the app automatically calculates your new route to the original destination. You can create a route with multiple stops. You can create and save a route. It has Points of Interests and these can be easily added to from POI sites like POIfactory.com. It shows direction, speed, and estimated arrival time. It also displays either the street that you are on OR the street of the next turn on the bottom of the screen. I have not found it lacking any feature that I have had on any of the stand alone GPS units that I have had from Tom Tom and Garmin. Maps are from Navtec, one of the leading GPS map providers, and ARE FREE - including updates when available. If there is an update Copilot will alert you to download the update when you want to - and you can set the app to only download when on wifi to prevent a large data download. If you get a call coming in while Copilot is running, the call screen will take precedence and come up on your phone for you to answer the call. There will be a small Copilot icon on the top of the screen and all you need to do to come back to Copilot is touch that icon. If you stop the app and do not delete the route when you start the app again, it will resume the route from the location you are at.

Now, I am sure you are saying - but what about traffic? Yes, there is traffic reporting and re-routing bu this is the only catch about Copilot. Traffic requires a data connection. For a phone this is not a problem - the data usage is not high - but you need a data connection. If you have a wifi device only - such as a tablet - you can use every feature of Copilot except traffic if you have no wifi connection to stay connected to. The other catch about traffic is that after the first year it is not free. A traffic subscription costs $10 a year BUT you get the first year free with the $10 purchase of Copilot. One other thing about traffic - if you install the FREE version of the Copilot app first and you decide to get the "Premium" version which costs $10 you must NOT upgrade from within the app to the paid version IF YOU WANT THE FREE YEAR OF TRAFFIC. The developers make no secret about this. If you want the free year of traffic then purchase at the Google Play Store or ITunes the Premium Copilot app and download this app onto your phone - uninstall the free version first - and buy the app and install it. This is the only way that you get the free year of traffic service. If you update from within the app you get all of the features of Premium BUT NO FREE TRAFFIC. Traffic service will then cost you an additional $10 for the first year. This all seems odd but this is how they do it. Traffic works well - if there is traffic to be routed around, a screen comes up and asks - will show you the new route if you want - and lets you decide if you want to remain on the route into the traffic or take the traffic avoidance route - it will tell you how much time you will save on the new route.

I just talked about a FREE version of Copilot - so why not just get and use the free version. You can - and you will get some of the features that I have been describing. The free version is referred to as Copilot Standard. When you first download this free app you are given a 14 day trial of all Premium features but in 14 days those stop. Again, let me say that the free version for the first 14 days gives you EVERYTHING free - and then if you do not update it, the free version will lose some of the features. Maps are still free and installed in memory - no data required. Interestingly, it appears that on the free version you can download Canada and the US and Europe, etc. for free. RV mode and all of the modes are there. What is not there is automatic rerouting. If you go off route on the free version (after the 14 day trial period ends) there will be a button on the top center of the map display that will say "RECALCULATE". You must click this button manually to recalculate the route. There is no traffic option on the free version - after the 14 day trial. There is no voice text to speech for turn by turn with street names directions. There is voice for turn by turn directions that do not speak street names. The free version only has a 2D display. There are other features from the premium version also missing.  It is usable but compromised and for $10 for the full featured version, it is worthwhile to try the free version and then purchase the Premium version from the App Store - not from the upgrade built into the app.

Once you purchase the app it is yours and the only purchase then is traffic for $10 per year after the first year (if you follow my instructions above). The app can be moved from device to device but may be installed on only one device at a time - and another BUT, I have learned that there is an undisclosed limit to how many times you may do that. I suppose the reason why makes sense. I had planned to purchase the app and have it on my phone (with data for traffic) and then if I wanted a larger screen on a trip uninstall it from the phone and install it on my small tablet that is wifi only. I can do that but if I do it too often I will exceed the limit and the app will lock out future installations and pretty much you have lost the app unless you purchase it again. If you do this only when you get a new phone there will be no problem. The limit is not just a few times but enough to allow you keep the app on your newest device. The lock out is to stop pirating and is automatically triggered according to Copilot. Copilot recommends that if you want to purchase this app several times for other devices you must create a new User ID when you register the app upon installation on each device.  The app developers are very responsive and have techs available to help on their website's support forum and there are forums for each version and each OS. The app is also updated when new features are added or problems found are fixed.

One word of advice. When using the app on a trip, plug your phone or tablet into the 12 volt power on the dash. On a trip of several hours or all day this will drain your phone's battery. It will not do that any more or faster than watching a movie or playing a game but any app that uses the display full time (there is a battery saver mode to shut off the screen) will use up the phone's battery. And it is important to save your battery in the event you need to make an emergency call. 

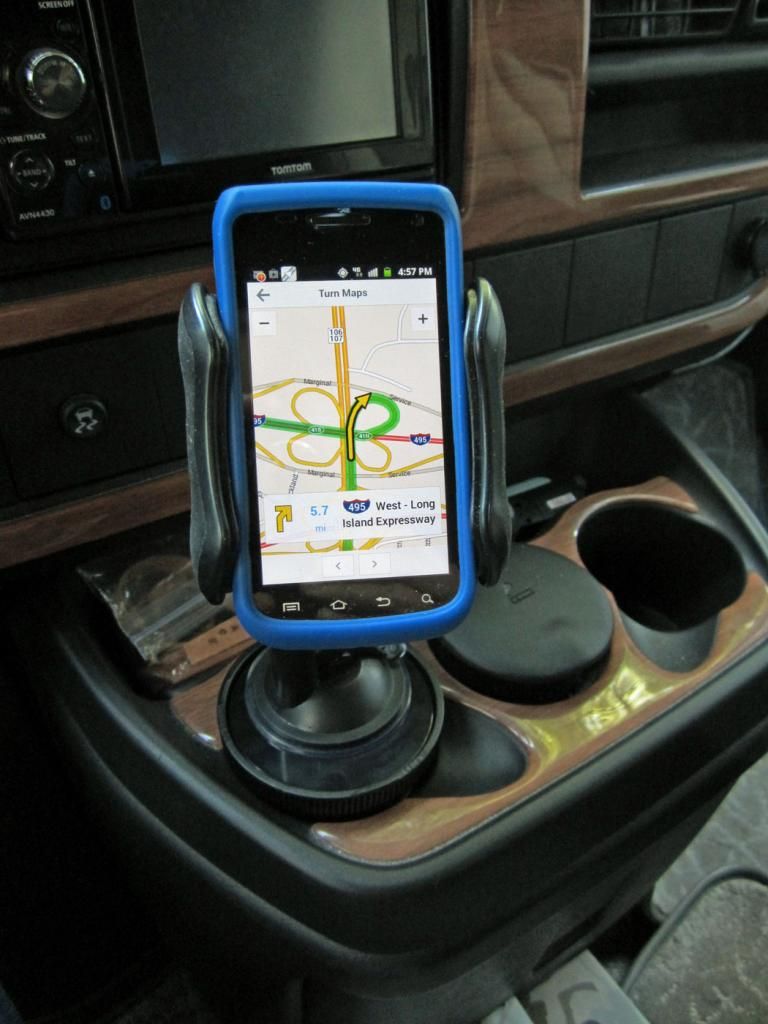
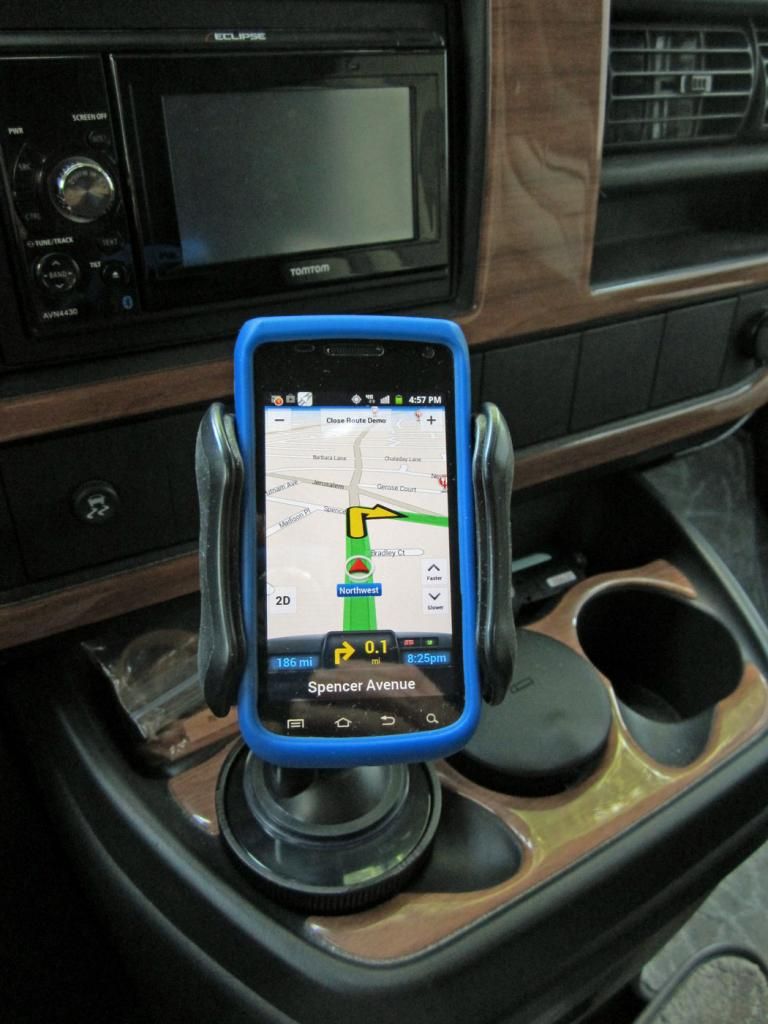
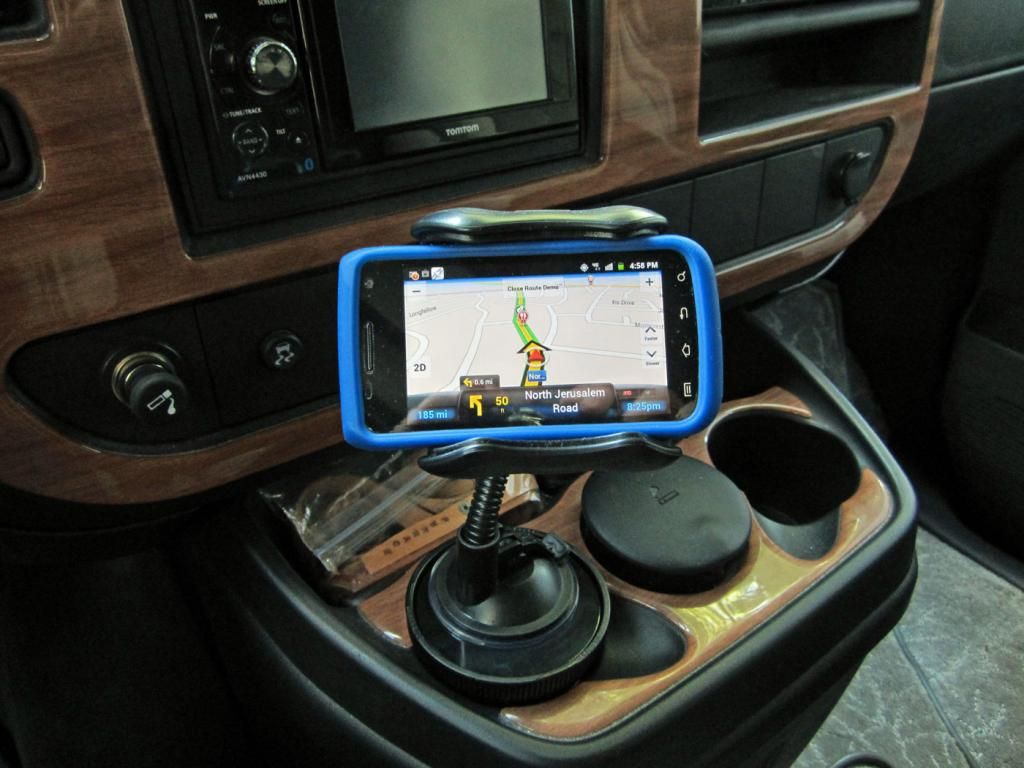
Here are some photos of the app in use -

Routing Screen showing calculated route

Right Turn Ahead on Spencer Avenue
Portrait or Landscape Orientation

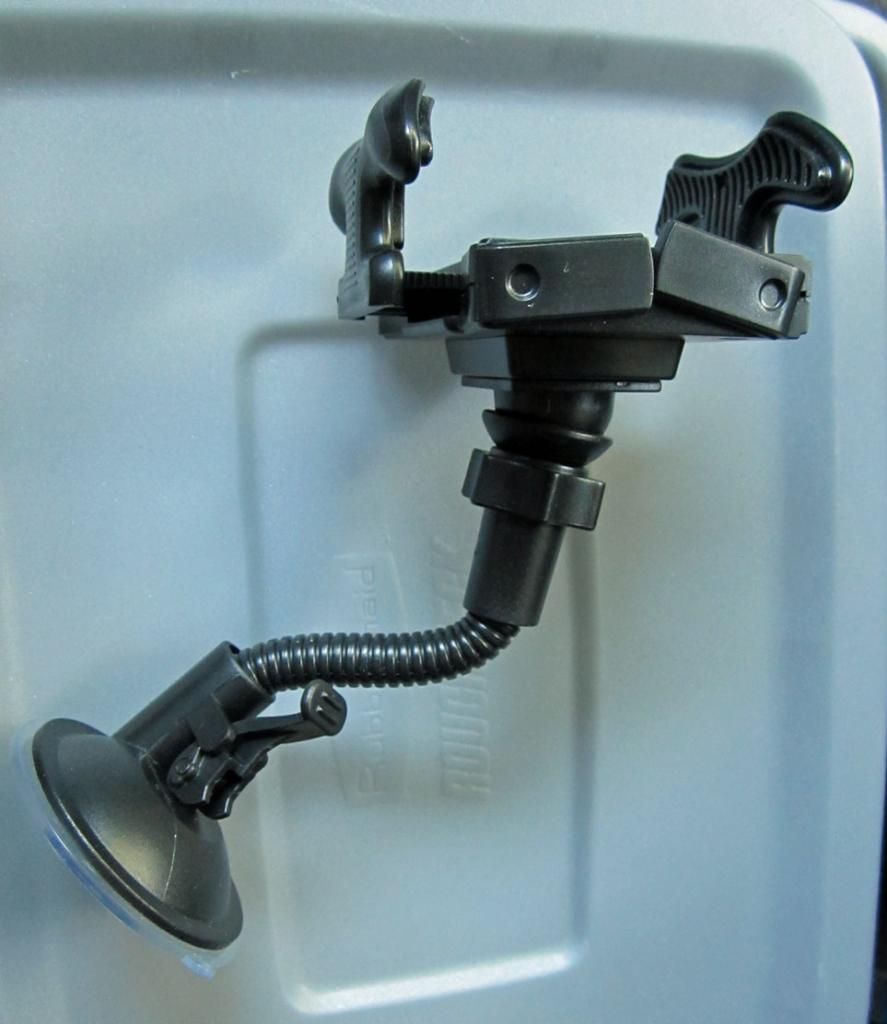
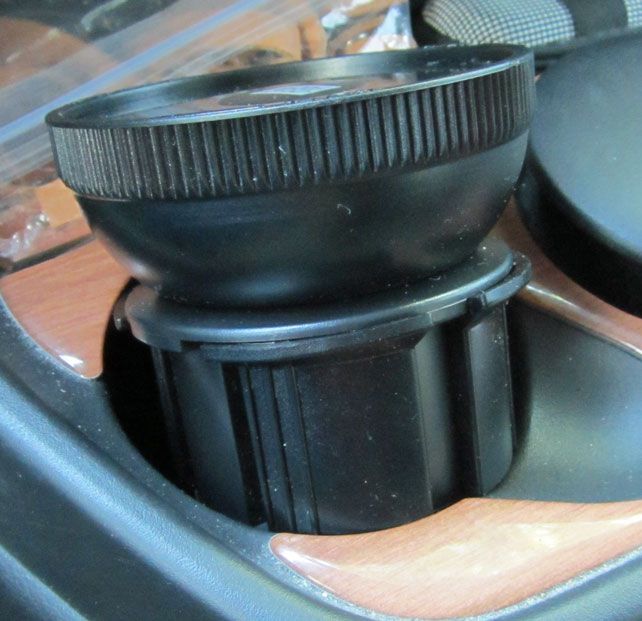
I have my phone in a phone cradle with a flex mount that is set on a special cup holder accessory for any GPS that locks into a cup holder and provides a surface for the suction cup to strongly stick to. You can find these as separate pieces or you can find a phone cradle with a flex arm and its own cup holder attachment. Anything that you have - works. You just want to be sure your phone is easily visible without distracting your driving. A weighted dash mat works also.

Flex arm cradle
Cup holder mount


OK - so in addition to the $10 you are going to have to buy something to hold it all securely to your dash. If you buy the $400 RV GPS unit, you get that included... And you have to have the phone and I am not going to say that everyone does - but many do. Again, what sets this app apart from the other GPS apps is that you get RV Mode and you get the maps you want on your phone. Google maps now lets you save an area to your phone for navigation but that area is limited to no more than a ten mile radius. This is not much good for an RV trip! There is a heck of a lot here for ten bucks and believe me, I don't often purchase apps, so if I will spring for the ten dollars it must look good to me!  And of course, you don't need a Roadtrek for this app - it is for any RV or trailer or even your car!

There is a website - www.copilotgps.com. Don't just take what I have to say about this app. Go to the website and look for yourself - then install Copilot Standard, the free version and try it for 14 days and decide for yourself. If you like it, buy it from the app store - remember don't upgrade from within the app or you lose a free year of traffic service.  Also look for sales on this app through the Copilot website or the app stores. There was just a limited time sale for Memorial Day weekend reducing the Copilot Premium to $7.99! For Black Friday the app was $6.99 as was the traffic service renewal.


Wednesday, May 14, 2014

Adding a FIlter to the Toilet Water Line

Since our second season in the Roadtrek we have been experiencing an odd thing. When flushing the toilet - sometimes - chunks of a white and/or black chalk-like substance come through the water running into the toilet. These chunks look exactly like the mineral deposits that form in the hot water tank that are seen when the tank is flushed out. Where do these deposits form? No one really has had an answer to that. Since they look exactly like what is in the hot water tank one would wonder if these are those same minerals somehow finding their way from the hot water line to the cold water line but everyone says that this is impossible - and, yes, it does seem to be impossible. One thing that I do know is that they are not forming in the fresh water tanks and here is why I know that. The water comes from the fresh water tank(s) and first through a filter that you can see, open, and clean before the water passes through to the water pump. This protects the water pump from anything that might be in the water that would damage the inside of the pump. I have examined that filter many times and it has been perfectly clean. These chunks are originating after the water pump.  What is more interesting is that there are no such deposits coming through the sink faucet as the end of the faucet also has a small, mesh screen and that screen too has been clean.

This has caused all types of problems with water flow from the toilet. The water running through the toilet valve slows down and runs with little pressure. The valve that is part of the toilet that regulates the flow of water through the toilet when the flush pedal is pushed becomes clogged and on two occasions has broken - once requiring full replacement and once requiring a part to be replaced. Last summer during each trip there was a problem with the water flowing into the toilet - on our first trip the water ran slow. On the first night of our major trip of the summer the water in the toilet did not flow at all and we had to flush the toilet with a jug of water filled at the sink. Almost at the end of that trip we again saw the chunks come through into the toilet with the little water that has started flowing into the toilet and just before the end of that trip there was suddenly a rush of this debris out and the toilet water started flowing normally. The last trip of last season we had a water leak running from the bottom edge of the toilet where it meets the floor. This was the same leak that we had when the toilet valve broke the first time and it was the same thing again. Something had to be done about the water flowing into the toilet valve.

Some blame hard water for this. The thing is that we live in an area that is not known for hard water. Where in many parts of this country people regularly have water softening systems in their homes to treat their hard water, this is unknown in this area. Most of the water that goes into our fresh tanks is water from home. We always start each trip with full tanks and these last for all of our short trips and partway into our longer trips. Water from away from home has gone into the tanks but more water from home has gone into the fresh tanks than other water. I am not ruling out the idea of a hard water problem and have looked at portable water softening systems for RVs. 

All along I was thinking that there had to be a way to catch these chunks somewhere before the toilet valve. I thought that a filter just like the one before the water pump would do the job. This winter I started to put my idea into a plan and started researching. I would start with the company that makes the water filter that is used before the water pump in the Roadtrek and find out if that would work if placed on a water line somewhere along after the water pump. The company replied that it certainly could be used that way. I then started looking for that filter to purchase one and also what I would need to attach it to the Roadtrek water line leading into the toilet valve. The filter could be purchased at various websites but because of delivery problems at our house, we try to buy locally before having to order anything that needs to be shipped. I was able to find the exact same water filter that is on the Roadtrek at a boating store chain named West Marine. There was a store not far away and we went there to purchase it. Just an aside - marine stores have a lot of things that are also used on RVs and we had a great time looking through the entire store at things that could be used in our Roadtrek.

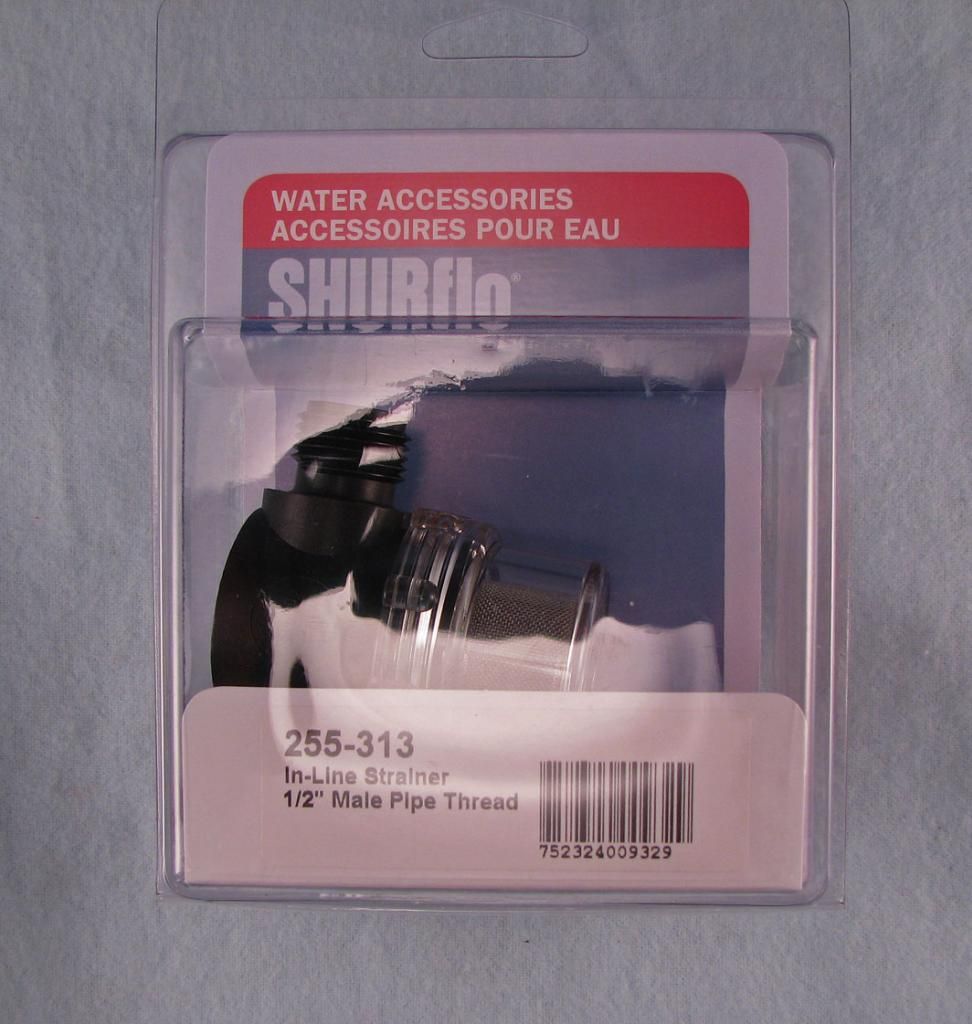
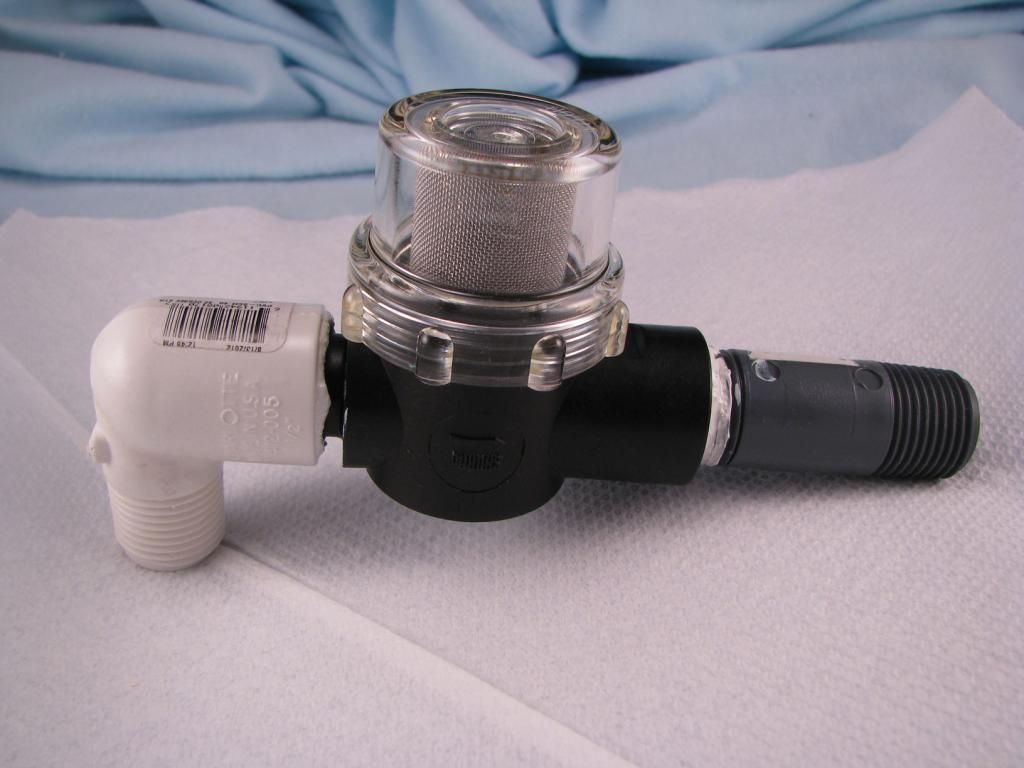
The filter - note the name and parts number


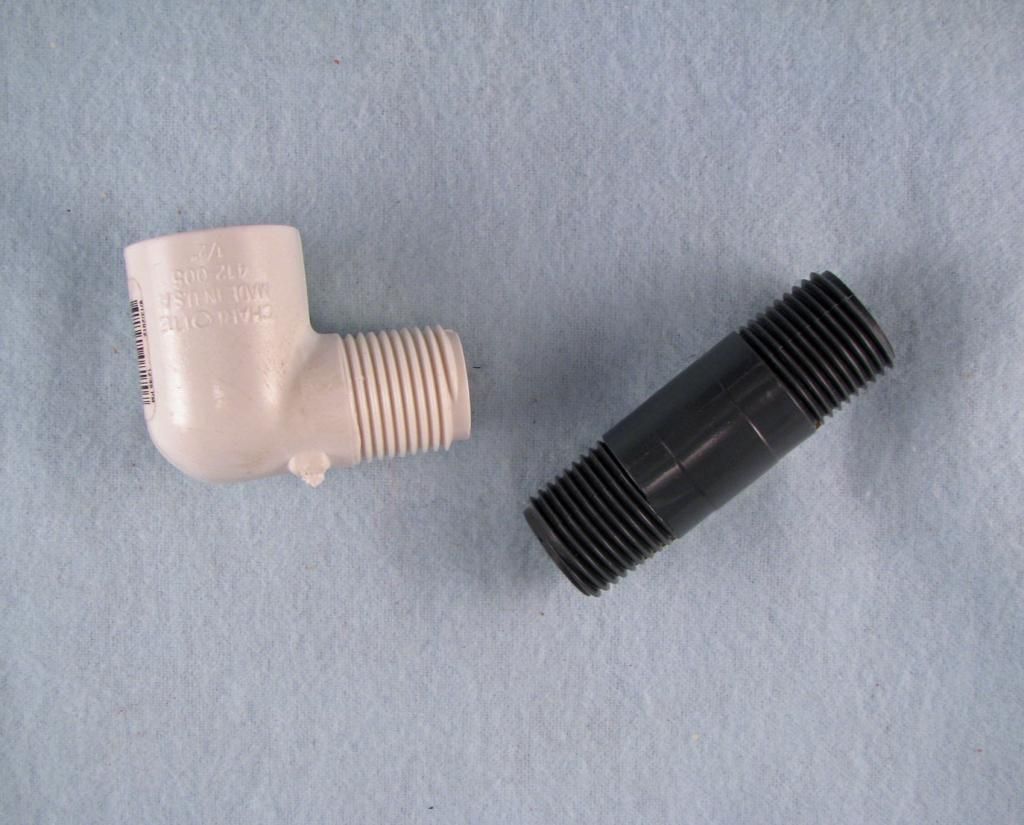
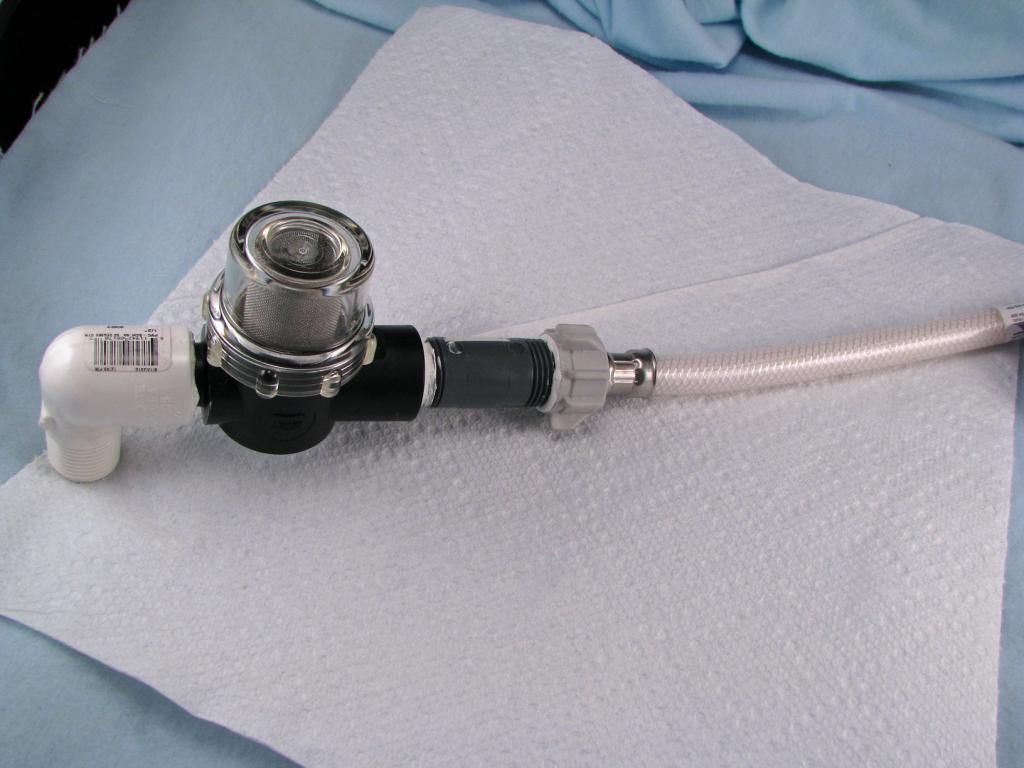
Now I needed to attach this into the water line going into the toilet valve. The plumbing in the Roadtrek is 1/2" pex pipe and fittings. This filter has 1/2" fittings. The water in the filter must flow in one direction only and that is marked on the side of the filter. You can just about make out the arrow right in the middle of the black base of the filter in the photo above. It flows from the male end into the female end. The connection coming from the water line is male. The connection on  the toilet valve is male. I did not want to cut into any pipes. I wanted to be able to put this in so that if for some reason it had to come out, it could come out easily. I found the following fittings -


The fittings were not easy to find. Home Depot and Lowes did not have the 1/2" fittings as shown in the first photo above. I found them at Ace Hardware. Their larger stores seem to carry a bigger assortment of plumbing fittings than the big box stores. The water line is used for a sink and is common but only Lowes had this flexible PVC reinforced water line. The ones at Home Depot were all flex metal construction. This is the shortest available with 1/2 inch connectors and it is 12 inches long.

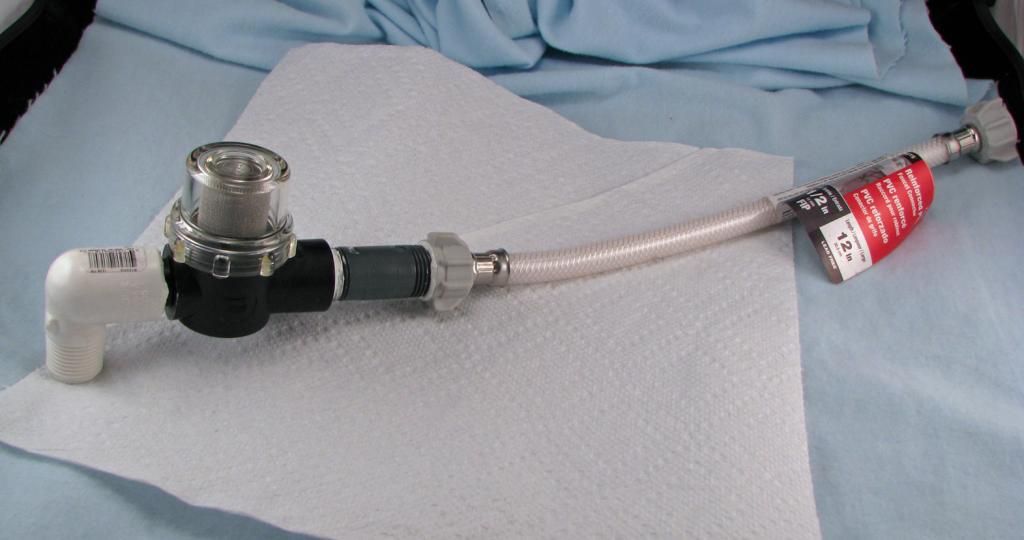
I proceeded to assemble what I wanted to install into the Roadtrek.


There it is all together. It is all hand tightened and not wrench tightened. Recently I have found that using pipe seal paste is better than Teflon tape on plumbing thread connections. It is easier to apply than wrapping the Teflon tape around the threads and from my research is better at preventing leaks. Its only drawback is that is never dries and always stays a paste so the joints are messy to touch. Usually you are not touching the joints once they are together so that is not a problem. It is drinking water safe and can be used for both cold and hot water pipes. It can be found anywhere that plumbing supplies are sold.


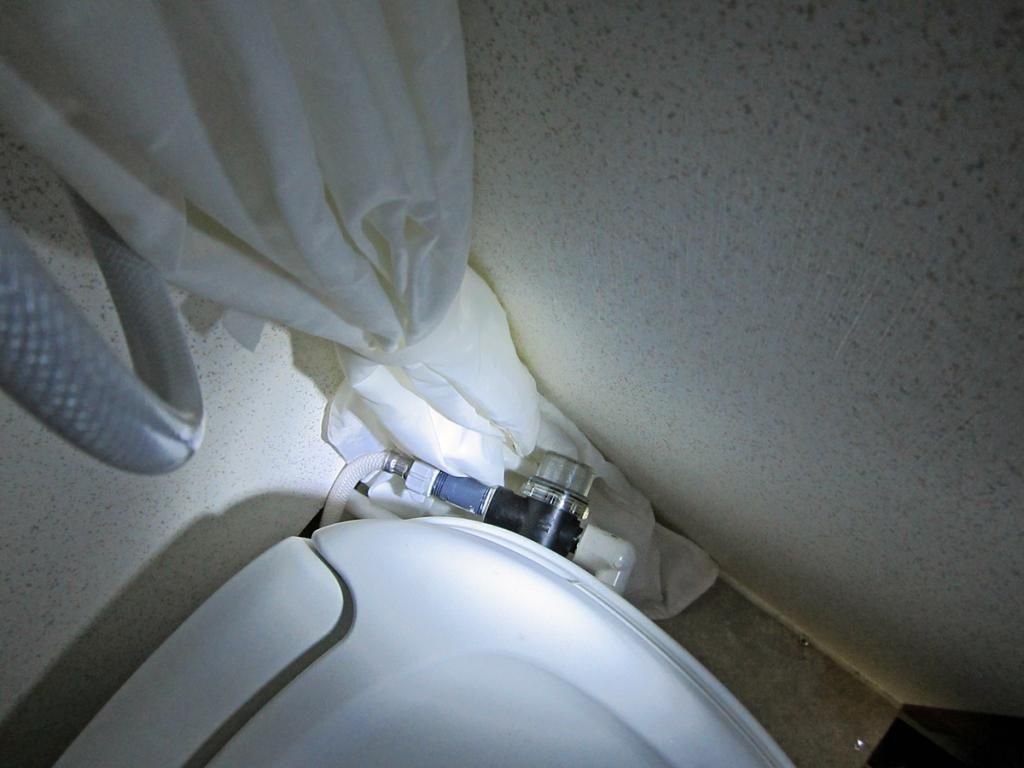
So, it was all together. It next had to be installed in the Roadtrek. Meryl and I went out to install it before we winterized and while the temperature outside was still reasonable. I looked again at the connections and it would fit perfectly. The only problem was that when I tried to open the connection at the toilet I could not get my hand on the connection to get it open.  The connection goes into the top of the toilet valve which is located behind the toilet on the left side as you face the toilet. To get to the connection without removing the toilet completely one most reach down blindly behind the toilet and find the connection. It is also close to the back wall.  I decided before I even put pressure on the connection that I would wait and pay our Roadtrek service center to install this for me. We put the assembled filter away until Spring.

With Spring we dewinterized and called for an appointment at dealer service for a variety of things the most important of which was the water leak that we found during October's trip - the leak that occurred before I decided on making this filter. We brought the filter and when we got there for our service visit I showed it to the Roadtrek service tech, explained what it was and why I wanted this installed - asked them to install it in such a way that the filter dome would be easy to see and to get to to take off and clean the filter, and also to make sure nothing would leak once it was installed. I also offered for them to install it any way that they wanted to if there was a better way than my assembly.

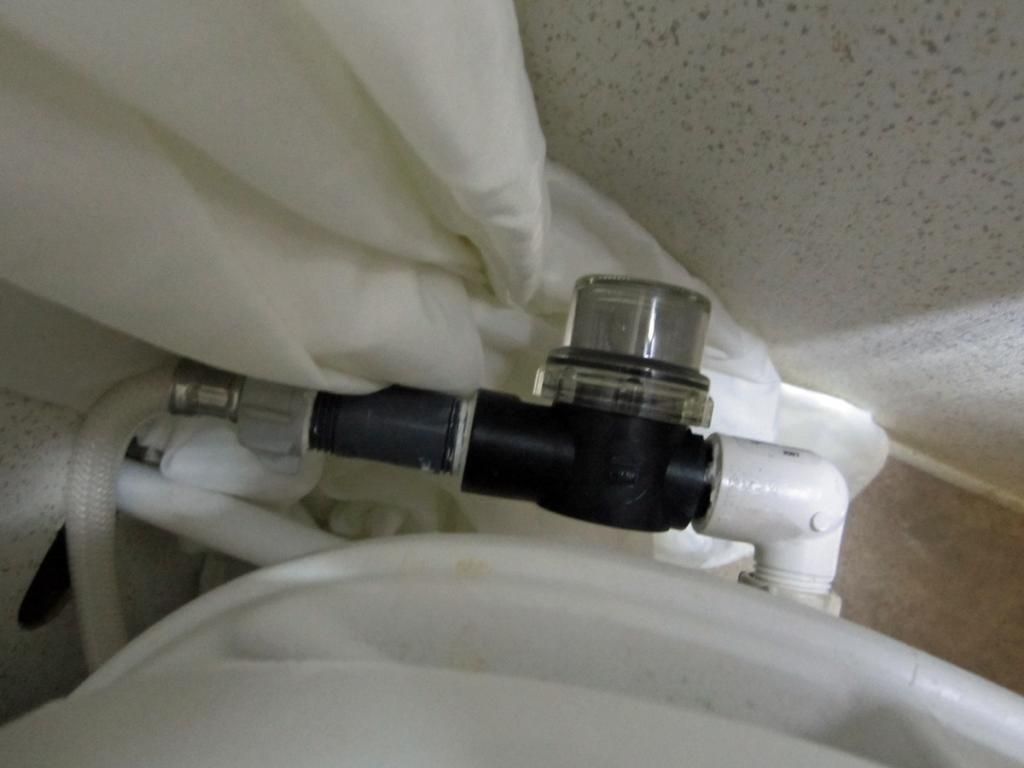
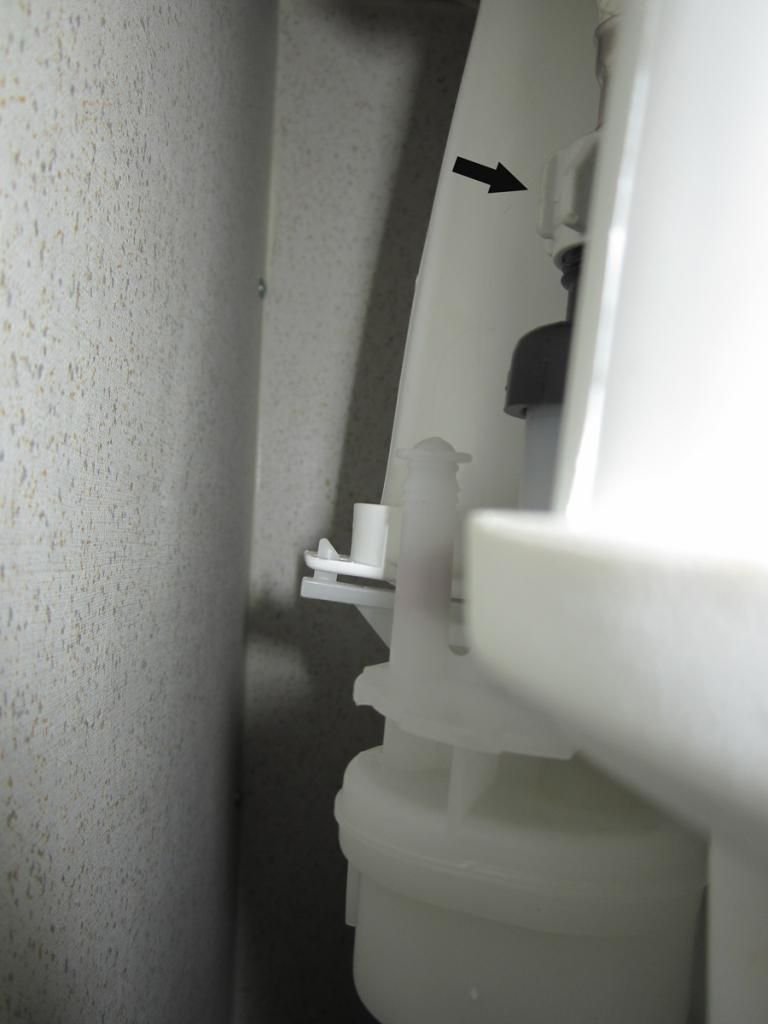
They installed the filter and used the assembly as I gave it to them. They tested for leaks and it held dry. Great! Here is the filter now installed -


In the photo above you can see the connection into the top of the toilet valve at the arrow.

I recently read in a forum that another Roadtrek owner was having this same problem. He also has chunks of minerals flowing into the toilet bowl from the water supply. I was glad to find out that I am not the only one. I don't know how many this is a problem for. It has certainly been a big problem for us and I am hoping that this will do it. So far the water runs through the filter with no lack of pressure and comes through into the toilet as it is supposed to. Only time will tell if the same problem comes back even with the filter in place. I am hoping that those minerals will get caught in the filter and from the size of them they certainly should. Beyond this the only other fix I can think of is the water softening system. These systems use salt to "recharge" the chemical reaction that removes the "hard" from the water to make it soft and Meryl is concerned about that salt in the drinking water. I am not so sure that is any problem at all. But hopefully, this has fixed the problem and we will flush with a smile from now on.

This will work for any RV or trailer that is experiencing the same problem - not just Roadtreks. Just check the size fittings your pipes use - but more than likely they are the same 1/2 inch.

May you all always flush with a smile!

ADDENDUM - After a full season of use we had no problems with the toilet valve. 


Wednesday, November 20, 2013

WINTERIZING YOUR ROADTREK - STEP BY STEP

I have written two other articles about winterizing the Roadtrek - Winterizing the Roadtrek and Winterizing Observations. Many of our readers have used both of these articles successfully to winterize their own Roadtrek. Looking over both articles and just completing our second winterizing experience on our own, I felt that what is needed is one article that puts the entire process in one place and definitively goes through the process in simple to follow steps. The basic process applies not only to all Roadtreks similarly equipped, but also all RVs and many trailers. There is no mystery to winterizing unless you have never done it before. With this article anyone should be able to winterize their Roadtrek and in no more than two hours - most likely a lot less. Remember that this is STEP BY STEP IN THE SIMPLEST OF STEPS. Do not let the number of steps you see here overwhelm you or discourage you!

 NOTE: If you have not installed a winterizing valve on your Roadtrek and/or you don't have a winterizing hand pump, Just pour the RV antifreeze into your EMPTY front (exterior) fresh tank and just use your water pump to put the RV antifreeze through the plumbing and fixtures. 

IF you just have the winterizing hand pump you can use that to do the entire process. It just takes two to do this - one inside the turn on and off the water fixtures and one outside with the pump and the RV Antifreeze bottle to pump. 

THIS IS A CHANGE TO WHAT TYPE OF RV ANTIFREEZE TO USE (SEPTEMBER 2024). IT HAS RECENTLY COME TO MY ATTENTION THAT RV ANTIFREEZE THAT IS ETHANOL BASED MIX OR FULLY ETHANOL IS NOT GOOD FOR THE SEALS IN THE TANKS OR THE TOILET. IT IS RECOMMENDED TO USE RV ANTIFREEZE THAT IS PROPYLENE GLYCOL BASED.  PROPYLENE GLYCOL RV ANTIFREEZE IS SAID TO BE GOOD FOR THE SEALS AND LUBRICATES THEM. MANY OF THE BOTTLES OF RV ANTIFREEZE SOLD ARE A COMBINATION OF THE TWO BUT APPARENTLY THAT DOES NOT HELP WITH THE MAJORITY OF ETHANOL THAT IS IN THE MIX. I HAVE SEARCHED LOCALLY FOR WHO CARRIES PROPYLENE GLYCOL RV ANTIFREEZE AND FOUND THAT HOME DEPOT CARRIES  THIS PROPYLENE GLYCOL RV ANTIFREEZE:

PRIME GUARD 128 FL OZ PG FORMULA AND GLYCERIN FREE  MINUS 50 DEGREE F RV ANTIFREEZE

IT IS MORE EXPENSIVE THAN THE ETHANOL BASED ANTIFREEZE AT VARIOUS RETAILERS. CURRENTLY IT IS SELLING FOR $7.98 A BOTTLE.  HOME DEPOT ALSO HAS A ETHANOL BASED RV ANTIFREEZE FROM THIS SAME COMPANY - DO NOT BUY THAT. TO AVOID PROBLEMS WITH THE TANK SEALS I AM SWITCHING TO PROPYLENE GLYCOL RV ANTIFREEZE FOR WINTERIZIING. (I am in no way related to this RV Antifreeze company or Home Depot and am not receiving anything in return for mentioning this product.)

THERE IS A RELATED CHANGE IN THE INSTRUCTIONS SECTION ABOUT WHAT TO USE TO KEEP YOUR TOILET BOWL FLUSH SEAL MOIST WHEN WINTERIZING. PLEASE LOOK FOR THAT. IT WILL ALSO BE IN RED.


To start, here is a list of what you will need to follow this process and as I go through the steps I will explain alternatives for some of these items. There are some that you must have.

WHAT YOU MUST HAVE BEFORE YOU START:

 -  THREE (3) BOTTLES OF RV ANTIFREEZE (Pink, non-toxic and drinking water safe)

 -  RATCHET SOCKET WRENCH with 1 -1/16" SOCKET (For Roadtrek SUBURBAN Water Heater)

WHAT YOU SHOULD HAVE BEFORE YOU START:

-   CAMCO WATER PUMP CONVERTER WINTERIZER KIT


This is permanently installed between the pipe coming from your fresh water tank and your water pump. Here it has been installed on the intake side of the water pump filter strainer (which on my Roadtrek was moved by service to make room to install the winterizing kit - the brass valve that you see here). Some older Roadtreks do not have room for this valve to be installed. It is possible to make room by adding pipe to the intake side of the water pump as was done here bringing the connection to the floor. A service center can install this for you and make it fit. If no modifications are required for space at your water pump this is an easy DIY install with full instructions included with the kit.

-   PLASTIC WINTERIZING HAND PUMP KIT


This is distributed by several RV accessories companies. They are all the same with the exception of color. If you cannot install the water pump converter above you can winterize with just this. With the pump converter, you will also want this as you will see in the winterizing steps below.


-  8" ADJUSTABLE WRENCH
The wrench is to remove and replace the cap on the water pump converter valve as shown above.

 Before you begin here is one preliminary step - 

CLEAN THE FLOOR OF YOUR ROADTREK AROUND THE SHOWER DRAIN TO AVOID ANY DIRT GETTING WASHED INTO YOUR WASTE TANK.

NOW - You are ready to BEGIN!

1. IF YOU HAVE A 190 OR 210 (Models with two fresh water tanks) MAKE SURE YOUR TANKS ARE SET TO SUMMER MODE. 

2. OPEN THE INSIDE SHOWER DRAIN BY REMOVING THE DRAIN SCREEN/PLUG. For an aisle shower remove the plate on the aisle floor and the shower drain is inside. For the permanent bathroom, remove the shower drain screen/plug from the floor.

3. OPEN ALL FAUCETS INSIDE AND OUTSIDE. FLUSH TOILET.  Water pump OFF! Put your inside shower head down on the floor right at the drain to catch the water that will come out. Remove any water filters that you may have on your faucets first.


4. DUMP YOUR WASTE TANKS - BLACK AND GREY. Flush your black tank with clean water to full and dump again.  For convenience this can be done at the end of your last camping trip of the season. As long as it is done before you start winterizing.


5. REMOVE THE FRESH WATER TANK FILL CAP(S) IN THE DOOR FRAME(S).

6. DRAIN YOUR FRESH WATER TANK(S). Newer Roadtreks have a cap on a drain under the chassis at the rear, lower corner of the driver's door that must be unscrewed and removed. Some older Roadtreks will have a turn valve in the same location. Other older Roadtreks have other methods to drain the fresh water tank. For 190's and 210's, the rear interior tank will drain into the front exterior tank with the outside drain if your are set to Summer Mode as per Step 1. WAIT FOR ALL OF THE WATER TO DRAIN OUT. This may take some time. It will come to a slow drip and then stop. If you want to be sure, leave the drain open for 24 hours or more to allow the inside of the tank to dry out.

7. CLOSE ALL FAUCETS INSIDE AND OUT.

8. CLOSE THE FRESH WATER TANK DRAIN.

9. KEEP THE FRESH WATER TANK CAP(S) OFF FOR A FEW DAYS TO ALLOW THE TANKS TO DRY OUT BEFORE PUTTING THEM  BACK INTO THE DOOR FRAME(S) HOLE(S).

10. OPEN THE HOT WATER HEATER OUTSIDE PANEL. Turn the white plastic ring so that it matches the slit and grab the top of the panel pulling up and out.


11. OPEN THE HOT WATER PRESSURE RELEASE VALVE. This is the small handle in the middle of the photo above on the top of the compartment. Pull up gently on the metal handle. STEP BACK AND OUT OF THE WAY! Water will come rushing out with some force. Leave this open. Wait for the water to stop coming out before going to the next step.

12. OPEN THE HEX HEAD BOLT USING THE 1 1/16" SOCKET AND RATCHET WRENCH. This is seen in the exact middle of the bottom of the compartment in the photo above. This will be hard to turn at first. This hex bolt is the head of the ANODE ROD. Once completely loose pull out the Anode Rod by pulling out the head of the bolt you just turned open. ALL OF THE WATER WILL RUSH OUT OF THE HOT WATER HEATER. YOU JUST DRAINED THE HOT WATER HEATER TANK. SOME WATER WILL REMAIN IN THE BOTTOM OF THE HOT WATER TANK. Y9U CAN LEAVE THIS OR LEAVE IT OPEN FOR A FEW DAYS TO LET IT DRY OUT.

13. INSPECT THE ANODE ROD FOR CONDITION. It's purpose is to corrode. If it's diameter is less than a pencil it needs to be replaced. Replace with a new one now or make a note to replace when you de-winterize.  THIS IS A GOOD TIME TO FLUSH THE HOT WATER TANK OF ALL SEDIMENT - FOLLOW THIS ARTICLE TO SEE HOW.

14. REPLACE THE ANODE ROD AND TIGHTEN IT IN WITH THE SOCKET WRENCH. Use Teflon pipe tape or pipe sealant paste on the threads of the hex bolt.

15.  CLOSE THE PRESSURE RELIEF VALVE BY JUST GENTLY PUSHING IN THE HANDLE YOU PULLED OUT.

16. REPLACE THE HOT WATER HEATER PANEL. Put the bottom in first lining up the two points on the bottom frame with the two holes in the door. Push in with the plastic ring going through the slot. TURN THE PLASTIC RING TO LOCK.

GO INSIDE THE ROADTREK 

17.  BYPASS THE HOT WATER HEATER. Newer Roadtreks have three valves on pipes in the middle of the hot water tank inside in a cabinet. The hot water tank is covered in foam and is easy to identify. Older Roadtreks may have one valve. Roadtrek Ranger's have a very different process to drain the hot water tank and there is only one valve for the bypass.


You see above the three valves that you need to turn to bypass the water heater. The foam box behind the pipes is the hot water tank. There is a valve on the top pipe, one on the down (middle) pipe, and one on the bottom pipe. In this photo these valves are in NORMAL HOT WATER USE POSITION. TURN THEM IN THEIR OTHER DIRECTION and you have bypassed the hot water heater!   What you are doing is closing the valves on the top and bottom pipes and OPENING the valve on the down pipe. This is a bit confusing, but if you think about what you are trying to accomplish - cutting off water from the hot water tank and sending water around it, it starts to make sense as that down pipe once opened will send water around the closed connections. When in bypass water still comes out of the hot water faucets - it will just be COLD water - and that is what is should be when the hot water heater is bypassed.

18. PLUG IN YOUR ROADTREK OR TURN ON YOUR GENERATOR IF YOUR COACH BATTERIES ARE NOT FULLY CHARGED. You will now be using your water pump and you don't want to run out of battery power. If your batteries are charged, just use your batteries. TURN ON YOUR BATTERY DISCONNECT SWITCH.

19.  TURN ON YOUR WATER PUMP WITH THE SWITCH ON THE WALL.

20. OPEN AND CLOSE ALL FAUCET HANDLES INCLUDING THE SHOWER HOT AND COLD AND FLUSH THE TOILET UNTIL NO MORE WATER COMES OUT. The water pump may run on because it is now sucking air from the empty fresh water tanks.

21. TURN OFF THE WATER PUMP WITH THE SWITCH ON THE WALL. 

22. OPEN THE TOILET LID AND POUR ONE HALF GALLON OR MORE OF ANTIFREEZE INTO THE TOILET AND FLUSH IT DOWN INTO THE BLACK TANK. Doing this step now prevents the loss of antifreeze that you put into the toilet lines if you do this step later. This is to keep the black tank wet all winter with antifreeze so that it does not dry out and also puts antifreeze in that you will use later to protect the macerator. Do this even if you don't have a macerator. 

GO OUTSIDE THE ROADTREK

23. CONNECT THE HOSE ON THE ANTIFREEZE HAND PUMP ONTO THE CITY WATER INLET CONNECTION. Make sure that the CITY WATER VALVE IS SET TO USE WATER AND NOT TO FILL THE FRESH TANK(S).

24. SOMEONE NEEDS TO GO INSIDE THE ROADTREK TO THE SINK FAUCET, WHILE YOU STAY AT OUTSIDE WITH THE HAND PUMP. Open a door or a window or use a walkie-talkie so that the two of you can communicate.

25. PERSON INSIDE OPEN THE SINK FAUCET ALL THE WAY TO COLD.

26. PUT THE OTHER END OF THE HAND PUMP INTO AN OPEN, FULL ANTIFREEZE BOTTLE.


27. PUMP THE HAND PUMP UNTIL THE PERSON INSIDE SEES PURE PINK ANTIFREEZE COMING OUT INTO THE SINK FROM THE FAUCET. As soon as the person sees pink antifreeze and no water coming out and tells you, they should CLOSE THE FAUCET and YOU STOP PUMPING.

28. REMOVE THE HAND PUMP FROM THE CITY WATER HOSE CONNECTION. The pump is full of antifreeze and will spill so get both ends of the hose into the bottle quickly and empty the pump. 

29. CAP THE CITY WATER HOSE CONNECTION IF YOU HAVE A CAP.

GO INSIDE THE ROADTREK YOU ARE FINISHED WITH THE HAND PUMP. YOU HAVE JUST PROTECTED THE CITY WATER HOSE VALVE AND THE PIPES THAT GO INSIDE THE ROADTREK.

YOU ARE NOW GOING TO USE THE WATER PUMP CONVERTER VALVE. IF YOU DO NOT HAVE A WATER PUMP CONVERTER VALVE INSTALLED YOU CAN USE THE HAND PUMP BY FOLLOWING THE NEXT STEPS WITH THE HAND PUMP STILL CONNECTED AND ONE PERSON INSIDE AND ONE PERSON OUTSIDE PUMPING ANTIFREEZE INTO THE PLUMBING USING THE HAND PUMP.

30. REMOVE THE WATER PUMP CONVERTER VALVE CAP. You may need the 8" adjustable wrench to do this if the cap is on tight. 

31. CONNECT THE WATER PUMP CONVERTER VALVE ANTIFREEZE HOSE TO THE VALVE BY SCREWING IT ON WHERE YOU REMOVED THE CAP.

32. OPEN THE VALVE. Turn the brass valve to point toward the antifreeze hose (across the valve).

33. PUT THE END OF THE HOSE INTO THE ANTIFREEZE IN THE BOTTLE.

34. TURN ON THE WATER PUMP.

35. TURN ON THE KITCHEN SINK FAUCET TO COLD ALL THE WAY. In a few moments the pump will pull the antifreeze from the bottle and into the water pump, through the pipe and out the kitchen sink faucet.

36. TURN OFF THE FAUCET WHEN YOU SEE PURE PINK ANTIFREEZE ONLY COMING FROM FAUCET INTO THE SINK. First there may be a burst of air, then maybe, but unlikely water, and then antifreeze with some water, and then pure pink antifreeze. Let it go down the sink drain.

37. REPEAT STEPS 35 AND 36 FOR THE

                      KITCHEN SINK HOT WATER

                      INSIDE SHOWER COLD WATER

                      INSIDE SHOWER HOT WATER

                      OUTSIDE SHOWER HOT WATER

                      OUTSIDE SHOWER COLD WATER
                    
      IF YOU HAVE A PERMANENT BATH WITH A SINK THAT IS NOT THE SAME FAUCET AS THE SHOWER FAUCET:
 
                      BATHROOM SINK HOT WATER

                      BATHROOM SINK COLD WATER

                       QUICKLY OPEN AND CLOSE THE HOT WATER HEATER BYPASS VALVES TO ALLOW A LITTLE RV ANTIFREEZE TO FLOW INTO THE VALVES TO PROTECT THOSE. CLOSE THOSE VALVES ALMOST IMMEDIATELY!


38. FLUSH THE TOILET AND HOLD THE VALVE OPEN UNTIL YOU SEE PURE PINK ANTIFREEZE COMING INTO THE TOILET.

39. ALLOW SOME ANTIFREEZE TO REMAIN IN THE TOILET COVERING THE RUBBER FLUSH FLAP/DOOR. If there is none remaining after you flushed the antifreeze, then just pour some from an antifreeze bottle into the toilet and let an inch or so sit over the flush flap.

**** UPDATE/ADD IN -

Having followed my own directions for several years now to winterize my Roadtrek, I have found one step that needs to come at THIS POINT and not later. That step is winterizing the macerator pump. IF YOU DO NOT HAVE A MACERATOR SKIP NOW RIGHT TO STEP 49. IF YOU DO HAVE A MACERATOR, do these steps NOW.


40. POUR A HALF GALLON OF ANTIFREEZE INTO THE KITCHEN SINK DRAIN. This is to put some antifreeze into the Grey Tank.

41. TURN OFF THE WATER PUMP. LEAVE THE SETUP WITH THE A/F BOTTLE AND THE WINTERIZING VALVE IN PLACE.

 GO OUTSIDE THE ROADTREK

41. PREPARE TO DUMP THE BLACK TANK WITH THE MACERATOR.

42. POINT THE MACERATOR HOSE INTO A BUCKET AND OPEN THE BLACK TANK VALVE. RUN THE MACERATOR UNTIL PURE PINK ANTIFREEZE COMES OUT. 

43. REPEAT STEP 42, BRIEFLY OPENING THE GREY TANK VALVE. 

44. STOP AND PUT AWAY THE MACERATOR HOSE.

YOU HAVE JUST PROTECTED THE MACERATOR.    

 GO INSIDE THE ROADTREK

45. GO TO THE TOILET AND OPEN THE TOILET FLAP. POUR AT LEAST ONE HALF GALLON OF RV ANTIFREEZE DOWN THE TOILET INTO TH BLACK TANK. When you push the flush pedal you may see pink antifreeze coming from the toilet water opening even though the water pump is OFF. This is OK. This is the antifreeze sitting in the toilet valve and pipe under pressure. We will replace that NEXT.
 

46. TURN ON THE WATER PUMP AND GO BACK TO THE A/F BOTTLE AND WINTERIZING VALVE. MAKE SURE THE HOSE IS IN THE BOTTLE.

47. HAVE YOUR PARTNER PUSH DOWN THE TOILET PEDAL ALL THE WAY UNTIL PINK ANTIFREEZE FLOWS STEADILY OUT OF THE TOILET WATER OPENING INTO THE BOWL AND DOWN INTO THE BLACK TANK. STOP (FOOT OFF THE PEDAL) AS SOON AS IT FLOWS.  

48. CHANGED STEP --- 9/2024 -  WE NOW NEED TO KEEP THE RUBBER SEAL IN THE BOTTOM OF THE TOILET BOWL MOIST FOR THE WINTER.  IN THE SUMMER WE DO THIS WITH WATER. FOR THE WINTER I RECOMMEND THAT YOU GET THIS PRODUCT - OR USE THE PROPYLENE GLYCOL RV ANTIFREEZE THE PRODUCT I AM RECOMMENDING FOR THIS STEP IS THETFORD TOILET SEAL LUBRICANT AND CONDITIONER. THIS USE IS RECOMMENDED ON THE BOTTLE IN ADDITION TO THE OTHER THINGS IT IS USED FOR WITH THE TOILET SEAL. PER THE BOTTLE POUR 1/4 OF THE CONTENTS OF THE BOTTLE (6 OUNCES) ONTO THE TOILET FLAP AT THE BOTTOM OF THE BOWL WITH THE BLACK RUBBER RING AROUND ITS EDGE.  THIS WILL COVER THE FLAP UP TO THE TOP OF THAT INDENT IN THE BOWL.  IF YOU USE THE RV ANTIFREEZE INSTEAD THEN PUT 6 OUNCES OF THAT ON THE SAME WAY.  THIS PRODUCT IS NOT EASY TO FIND LOCALLY.  IT CAN BE FOUND ONLINE. IF THERE IS AN RV DEALER WITH A PARTS SHOP TRY CALLING THEM TO SEE IF THEY HAVE IT. I TRIED TWO - ONE DID NOT AND THE OTHER WAS ABLE TO GET IT FOR ME THE NEXT DAY TO COME AND PICK UP. (I am in no way related to the Thetford company and I am not receiving anything in return for mentioning this product.)


*49. TAKE THE HOSE OUT OF THE ANTIFREEZE BOTTLE.

50. TURN ON THE KITCHEN SINK AND LET ANTIFREEZE RUN OUT INTO THE SINK.

51. TURN OFF THE WATER PUMP.

52. TURN THE WATER PUMP CONVERTER VALVE HANDLE TO POINT TOWARD THE WATER PIPE (AS SHOWN IN THE PHOTO ABOVE). 


53. UNSCREW THE HOSE FROM THE WATER PUMP CONVERTER VALVE.

54. PUT THE CAP BACK ON THE WATER PUMP CONVERTER VALVE. Make sure the cap is on tight. Use the wrench but don't over tighten. You want to be sure that no air can leak into your water pump plumbing from here when you go to use your Roadtrek next Spring. 


55. POUR A CUP OF ANTIFREEZE SLOWLY INTO THE KITCHEN SINK DRAIN TO FILL THE TRAP.

56. POUR A CUP OF ANTIFREEZE SLOWLY INTO THE SHOWER DRAIN TO FILL THE TRAP.


57. PUT THE SHOWER DRAIN STRAINER/CAP ON BUT LEAVE IT LOOSE.

58. IF YOU DON'T HAVE A MACERATOR AND DID NOT DO THIS STEP ABOVE, POUR SOME ANTIFREEZE INTO THE TOILET TO COVER THE TOILET FLAP AT THE BOTTOM OF THE BOWL TO KEEP IT FROM DRYING OUT OVER THE WINTER.

59. TURN OFF THE BATTERY SWITCH ON THE WALL!

60. IF YOU PLUGGED IN FOR POWER UNPLUG OR TURN OFF THE GENERATOR.

61. IN A FEW DAYS, PUT THE DOOR FILL CAP(S) BACK INTO THE HOLE(S). 


 YOU HAVE JUST WINTERIZED YOUR ROADTREK!

 
When you are going to winterize your Roadtrek print these step by step directions out and cross off each step as you complete it. This will be far better than trying to use a checklist with brief and confusing wording of items. Here you have it complete and simple. 

If you do not wish to use the "toys" that make this job simple as shown in the photos at the beginning, you could just pour gallons and gallons of antifreeze down into the fresh water tank and let the water pump bring it out and into the pipes following the steps above. This method uses far more antifreeze than is necessary. With my directions you will not need more than three gallons of antifreeze, maybe less. I would rather not have the antifreeze in the tanks for my drinking water. Yes, it is in the pipes and is is non-toxic, but why have all of that antifreeze sitting in your fresh water tank(s) all winter.

Do not be concerned about the fresh water tank(s). If there is any water left in the bottom of the exterior tank at all it will be so little that it can cause no problems in a freeze. The problems come when water freezes in small places such as pipes and valves. The water when it freezes expands and has no room to go so the pipe or valve bursts. The large tanks have plenty of room for water expansion as long as they are as near empty as possible. In all of those small places you have replaced the water with antifreeze!


If you plan to travel with your Roadtrek winterized, NEVER TURN ON THE HOT WATER HEATER SWITCH. Doing so on an empty hot water tank will burn out your hot water heater and can be very dangerous. There is a wire cable coming out from the top of the foam tank that connects with a small circuit board plug to a socket on the wall to the front right of the hot water tank. By pulling that plug gently out you will prevent the hot water wall switch from operating. Just remember that you did this when you de-winterize.

Don't forget that you still need to go into your Roadtrek all winter. You must run the generator under load (in the winter this means connect an electric heater to put the half load needed on the system) for two hours every month to keep it running properly.Start the Roadtrek engine. Take a drive, but avoid roads with salt for ice and snow as the salt will corrode the under carriage and what is located there of your Roadtrek

An RV shop will charge you $50 or more to do what you just did for the price of three bottles antifreeze, a one time only investment in the water pump converter valve and the antifreeze hand pump, and less than two hours of time. The actual process goes quickly. It is the moving from spot to spot, getting things out and putting things away that take most of the time.