Roadtrek

Roadtrek
Showing posts with label modification. Show all posts

Wednesday, August 5, 2015

Finally - Keeping the Drawer CLOSED! Closed!

If you are a regular reader you know that we have had a big problem keeping the one drawer that we have in the 190 closed. There is one, small, plastic catch at the bottom corner of one side of the drawer face and the inside of the drawer space and this is supposed to keep the drawer closed - but since we have had the Roadtrek - that's four years now - that drawer flies open at the most inopportune times. At the beginning we brought it back to the dealer and they said they "tightened the catch" - since both sides of the catch are plastic I am not sure how they did that but it did nothing. it is very exciting when driving on a high speed interstate and you go around a turn and hear "CRASH BANG" behind you inside. Of course, I can look so Meryl turns around from the passenger seat and says "Drawers open again." and we keep on driving because there is no place to stop to do anything about it. And then as you drive, the slightest bump now jumps whatever is in the drawer and that makes a loud crash. Then with a turn in the other direction the drawer goes back across the aisle to the drawer opening, but that is not enough to close it, so with the slightest turn it comes sliding back across with another "crash"! As I say, very exciting.

We have been looking for four years for a way to keep this drawer closed. Several things have been suggested - none have worked. The suction cups on the counter top with a string around the draer pull worked for awhile but then didn't. The suggestion to install a hasp on the drawer front did not work and resulted in four screw holes that will never go away - even if filled they will be obvious (covering them with a charm or sticker may be the solution for that). The reason the hasp did not work as the cabinet front next to the drawer is - surprise to us - hinged in place so that when the hasp was closed and secured with a pin - when the drawer tried to open it pulled the cabinet front down. As I said in another article we are not sure why this panel is hinged as there is nothing accessible to utilize behind it. So we have been looking for a solution - and with a visit to an RV show an idea started to perk...

We went to an RV show just for something different to do. We went into all types of Class As, Cs,  B+s, Fifth Wheels, Toy Haulers, and Trailers. I was interested in seeing what kept the many drawers inside a Class A closed. The most common catch was a spring loaded hook that was caught when pushed into the drawer by a mating piece on the other side. It took a very hard pull to get one fo these drawers open. A similar catch was used on cabinet doors. I took some photos and kept this in mind. We also saw something that was unrelated. Many of these Class As had house refrigerators with large doors and freezer doors. Many of these had a velcro strap that went across the door to the cabinet or wall on the side and with this put in place the door would not open. I did not think much of this - but this was the seed that was planted.

We went to dealer service for work and they have an RV parts and accessories store. They had these catches that we saw at the RV show, but looking closely at them there was no room in the Roadtrek drawer or drawer frame to install one. The drawer front top goes under the granite counter top ledge which sticks out about a half inch or more past the drawer front when it is closed. No catch can be attached above the inside of the drawer because you would be screwing into the granite - or whatever the granite is backed with - and you take a chance of cracking the counter top. No way was I going to attempt that. We left that catch on the rack and looked around for something that might fit and other than the standard catches one sees in Home Depot there was nothing - and none of those standard ones were going to hold this drawer in - which is weighted by whatever is inside and picks up the side momentum of the van.

But there was still this idea percolating at the back of my head. I made a trip to Home Depot and Lowes and looked at various possibilities. I passed a display of Velcro and that refrigerator stap came back to me - what if I created a similar Velcro strap for the drawer? I had an idea like this about a year ago - making a catch with Velcro but I was seeing it in my head at that time all wrong and there were reasons why that way would not work.  Now when put together with the strap around the Class A fridge - this would work. I went home to examine the inside of the drawer.

What I saw were several obstacles. The most logical place to put the strap was across the bottom of the drawer as this would cover all of the edge of the lower drawer front - but on one side was the catch that did not work and that would have to be removed - but if removed and when living inside the Roadtrek on a trip, nothing would keep the drawer closed - and if on a slight angle it would open unless strapped. The top edge had room for installation but I was not sure enough of the top edge of the drawer would be covered enough to hold the drawer closed. Meryl gave her opinion and said, if you can do it without removing the catch do it that way. OK - as I have said often - "Meryl is always right." (Well almost but we won't get into that story right now... though I will tell you that she insists the map was wrong.) Anyway - here is how we did it.

What to buy - Velcro strap - 3/4" double sided Velcro that comes on a roll of 12 feet of strap to make cord ties, wraparounds, etc. One side sticks to the other side. We found it in Walmart at the cheapest price ($7) in the electrical department. It is in Home Depot and Lowes for $10.
You will also need two screws  3/8" - 8 and two matching washers. I had stainless screws this size and bought a package of matching washers - both come from Home Depot (or Lowes). You also should have metal eyelets and an eyelet setter. The eyelets will prevent the screws from ripping through the Velcro - while this Velcro is strong and thick, the drawer exerts force when it opens as it has been. A simple setter complete with eyelets is a few dollars at any sewing store. As a leatherworker I had a supply and the setter already.

First step - we measured from the inside side of the top of the drawer just above the drawer side going inside three inches to outside around the drawer past the drawer pull. Longer was better than shorter and we decided on 14".  I cut two lengths of the Velcro 14 " long and I set on eyelet on each of these lengths one inch from the end of one end. I wanted the rounded side of the eyelet to be against the wall of the drawer opening so I made sure the Velcro was oriented in the proper direction for each strap. When the strap is installed it must be soft side out on the outside of the drawer which means inside - soft side against the wall of the opening.


Next came the actual install - easy as long as you remove the drawer. There is a catch on each drawer slide. Pull the drawer out all the way. Go to mid-slide sticking out and look for the black lever - one side goes up and the other side goes down. Push those and pull. The drawer slides off the track. If you don't empty the drawer (I didn't) support the drawer well as it comes off and sit it aside.

One more step - VERY important to remember at this point (and not later). If you have the sliding cutting board inside the drawer that slides out and sits on top of the drawer for use - PULL IT OUT NOW! The only drawback of this whole solution is that the cutting board will not fit inside any longer - well, it fits inside but it will never pull out (don't ask me how I know...). Just put it aside and it can sit under the sink or under one of the cushions. We have never used this in four years anyway. It still sits on top of the drawer once the drawer is open. We have it under a cushion for the moment and I will look to see if there is a way of modifying it to bet it back in and out. With this install the screw blocks its path out and in.

Now you are ready to start putting the straps on. These are installed right along the top edge od the slide against the inside of the drawer opening. Measure three inches from the front edge and mark that spot - do this on both sides. Do not drill a pilot hole for the screw. The wall is only 1/2" thick - and despite Roadtrek's claims that all of the wood inside the Roadtrek is real wood - the side of the drawer against the end of the kitchen sink woodwork from the counter top to the floor is plywood covered in laminate and not solid wood. The sink side of the drawer space is real wood. (The cabinet doors and SOME of the trim are real wood - in mine, cherry, but that is the extent of the real solid wood.) Put the strap in place and mark around the inside of the eyelet with a sharp pencil. Use a nail or awl with a gentle push to make a small starter dimple for the screw in the center of the eyelet that you just marked in pencil. Put a washer on one of the two screws and put the screw and washer on the end of a magnetic screwdriver - if the screw does not stay use a piece of Scotch tape and wrap it around the screw head securing it to the end of the screw driver. Put the strap in place - soft side to the wall and push the screw into the dimple on the wall in the middle of the eyelet and start to screw the screw in.Screw it in so that it is well in but not so tight that the eyelet won't rotate slightly on the screw. Do this on both sides. Remember - soft side to the wall - so that when you pull the straps out to around the drawer front the soft side will be facing out and what you feel if you rub against the straps.


That is it. Put the drawer back on the slides. Pull both slides out - fit them back onto the drawer. This is easiest done by two - togetherness is a prerequisite for traveling in a Class B. Once the slides are lined up and each is set into its mate, push the drawer closed and it will be as it was before. As you close the drawer keep both straps outside the drawer.


Now pull one strap over the top of the drawer snugly and hold it in place and pull the other strap over it and across and let the Velcro catch. It does not matter which strap you put over or under - they will hold both ways - this is how this Velcro is designed. The top of the strap will cover just about all of the top edge of the drawer. Give a tug. That drawer is not going anyplace.


Now when you are stopped and are going to use the drawer - opening and closing and opening again, just open the drawer by pulling the end of the Velcro strap on the top off the strap under it, open the drawer and just put the two straps over the drawer sides inside the drawer. The drawer will open and close normally and those straps will stay inside until you are ready to lock up the drawer again for travel.


It works. No more crash bang! The drawer stays closed until you want it open!

FIELD TEST REPORT:  It works perfectly. We have been on the roughest roads and the sharpest turns with the strap closed on the drawer front and the drawer does not budge. At night and stopped, the strap ends go inside the drawer and the drawer opens and closes normally and they don't get in the way. 


Wednesday, May 14, 2014

Adding a FIlter to the Toilet Water Line

Since our second season in the Roadtrek we have been experiencing an odd thing. When flushing the toilet - sometimes - chunks of a white and/or black chalk-like substance come through the water running into the toilet. These chunks look exactly like the mineral deposits that form in the hot water tank that are seen when the tank is flushed out. Where do these deposits form? No one really has had an answer to that. Since they look exactly like what is in the hot water tank one would wonder if these are those same minerals somehow finding their way from the hot water line to the cold water line but everyone says that this is impossible - and, yes, it does seem to be impossible. One thing that I do know is that they are not forming in the fresh water tanks and here is why I know that. The water comes from the fresh water tank(s) and first through a filter that you can see, open, and clean before the water passes through to the water pump. This protects the water pump from anything that might be in the water that would damage the inside of the pump. I have examined that filter many times and it has been perfectly clean. These chunks are originating after the water pump.  What is more interesting is that there are no such deposits coming through the sink faucet as the end of the faucet also has a small, mesh screen and that screen too has been clean.

This has caused all types of problems with water flow from the toilet. The water running through the toilet valve slows down and runs with little pressure. The valve that is part of the toilet that regulates the flow of water through the toilet when the flush pedal is pushed becomes clogged and on two occasions has broken - once requiring full replacement and once requiring a part to be replaced. Last summer during each trip there was a problem with the water flowing into the toilet - on our first trip the water ran slow. On the first night of our major trip of the summer the water in the toilet did not flow at all and we had to flush the toilet with a jug of water filled at the sink. Almost at the end of that trip we again saw the chunks come through into the toilet with the little water that has started flowing into the toilet and just before the end of that trip there was suddenly a rush of this debris out and the toilet water started flowing normally. The last trip of last season we had a water leak running from the bottom edge of the toilet where it meets the floor. This was the same leak that we had when the toilet valve broke the first time and it was the same thing again. Something had to be done about the water flowing into the toilet valve.

Some blame hard water for this. The thing is that we live in an area that is not known for hard water. Where in many parts of this country people regularly have water softening systems in their homes to treat their hard water, this is unknown in this area. Most of the water that goes into our fresh tanks is water from home. We always start each trip with full tanks and these last for all of our short trips and partway into our longer trips. Water from away from home has gone into the tanks but more water from home has gone into the fresh tanks than other water. I am not ruling out the idea of a hard water problem and have looked at portable water softening systems for RVs. 

All along I was thinking that there had to be a way to catch these chunks somewhere before the toilet valve. I thought that a filter just like the one before the water pump would do the job. This winter I started to put my idea into a plan and started researching. I would start with the company that makes the water filter that is used before the water pump in the Roadtrek and find out if that would work if placed on a water line somewhere along after the water pump. The company replied that it certainly could be used that way. I then started looking for that filter to purchase one and also what I would need to attach it to the Roadtrek water line leading into the toilet valve. The filter could be purchased at various websites but because of delivery problems at our house, we try to buy locally before having to order anything that needs to be shipped. I was able to find the exact same water filter that is on the Roadtrek at a boating store chain named West Marine. There was a store not far away and we went there to purchase it. Just an aside - marine stores have a lot of things that are also used on RVs and we had a great time looking through the entire store at things that could be used in our Roadtrek.

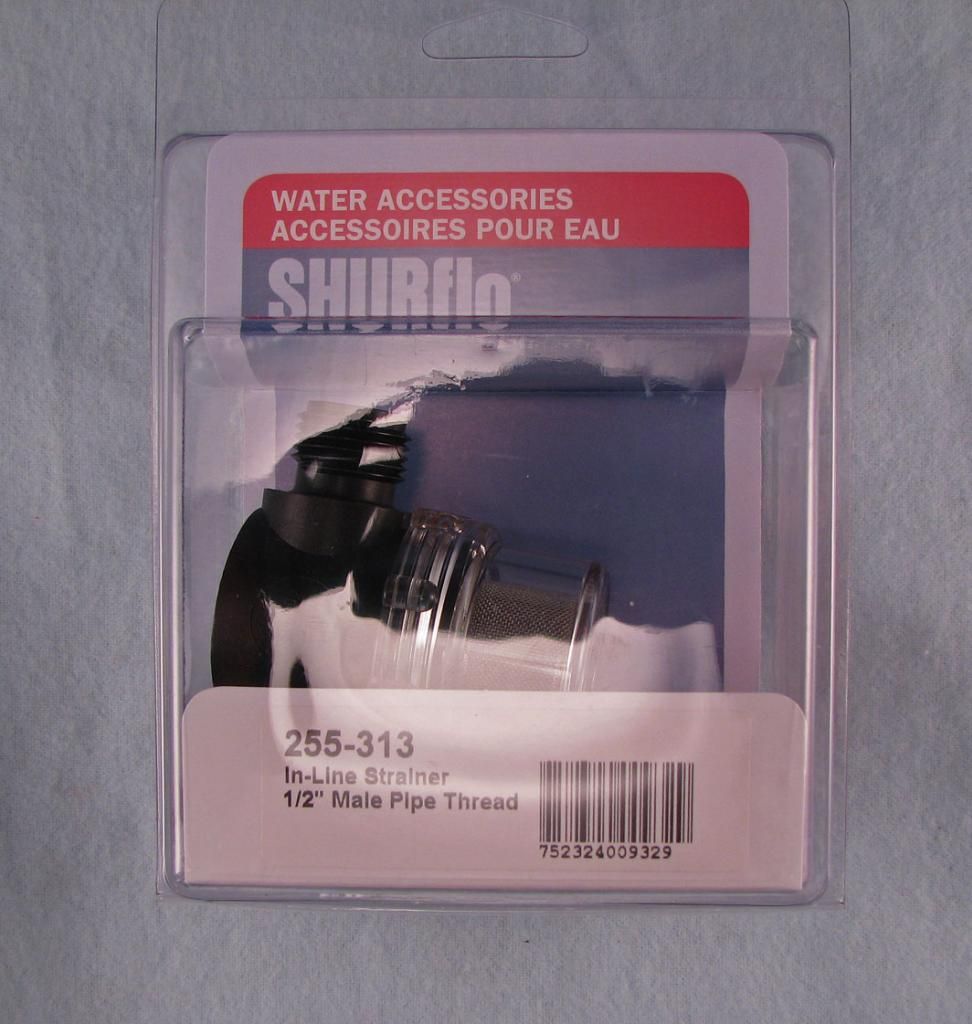
The filter - note the name and parts number


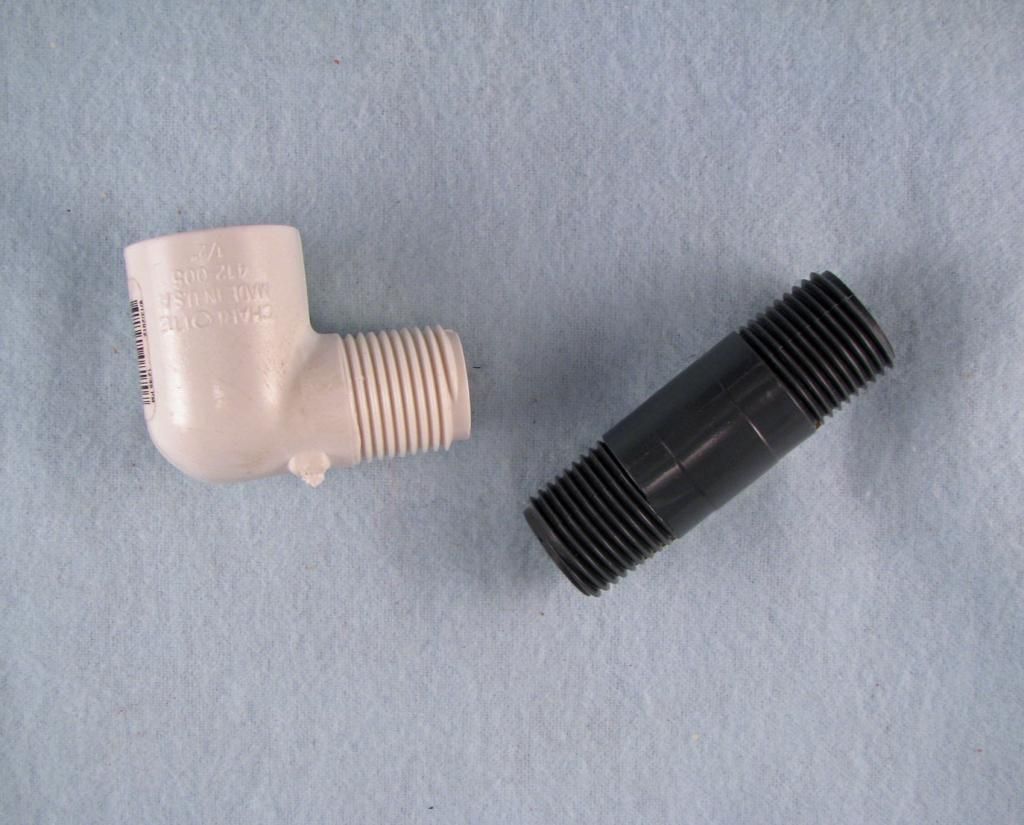
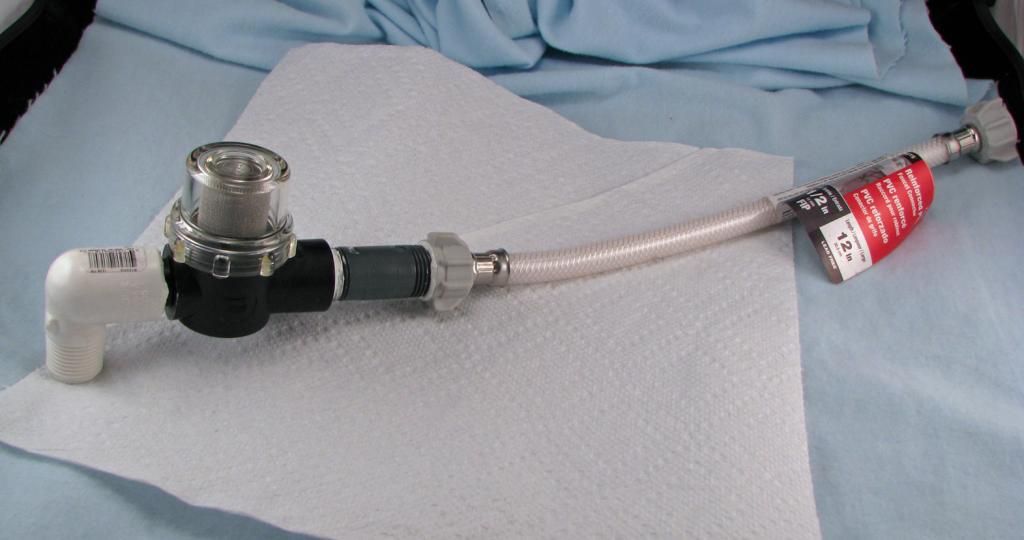
Now I needed to attach this into the water line going into the toilet valve. The plumbing in the Roadtrek is 1/2" pex pipe and fittings. This filter has 1/2" fittings. The water in the filter must flow in one direction only and that is marked on the side of the filter. You can just about make out the arrow right in the middle of the black base of the filter in the photo above. It flows from the male end into the female end. The connection coming from the water line is male. The connection on  the toilet valve is male. I did not want to cut into any pipes. I wanted to be able to put this in so that if for some reason it had to come out, it could come out easily. I found the following fittings -


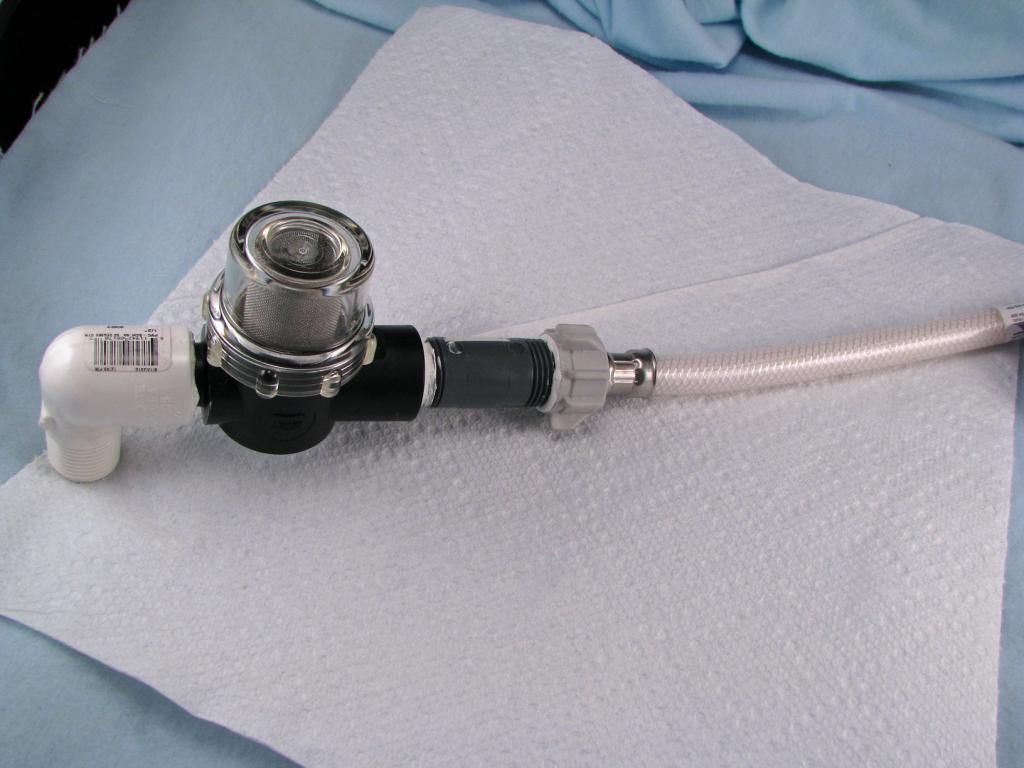
The fittings were not easy to find. Home Depot and Lowes did not have the 1/2" fittings as shown in the first photo above. I found them at Ace Hardware. Their larger stores seem to carry a bigger assortment of plumbing fittings than the big box stores. The water line is used for a sink and is common but only Lowes had this flexible PVC reinforced water line. The ones at Home Depot were all flex metal construction. This is the shortest available with 1/2 inch connectors and it is 12 inches long.

I proceeded to assemble what I wanted to install into the Roadtrek.


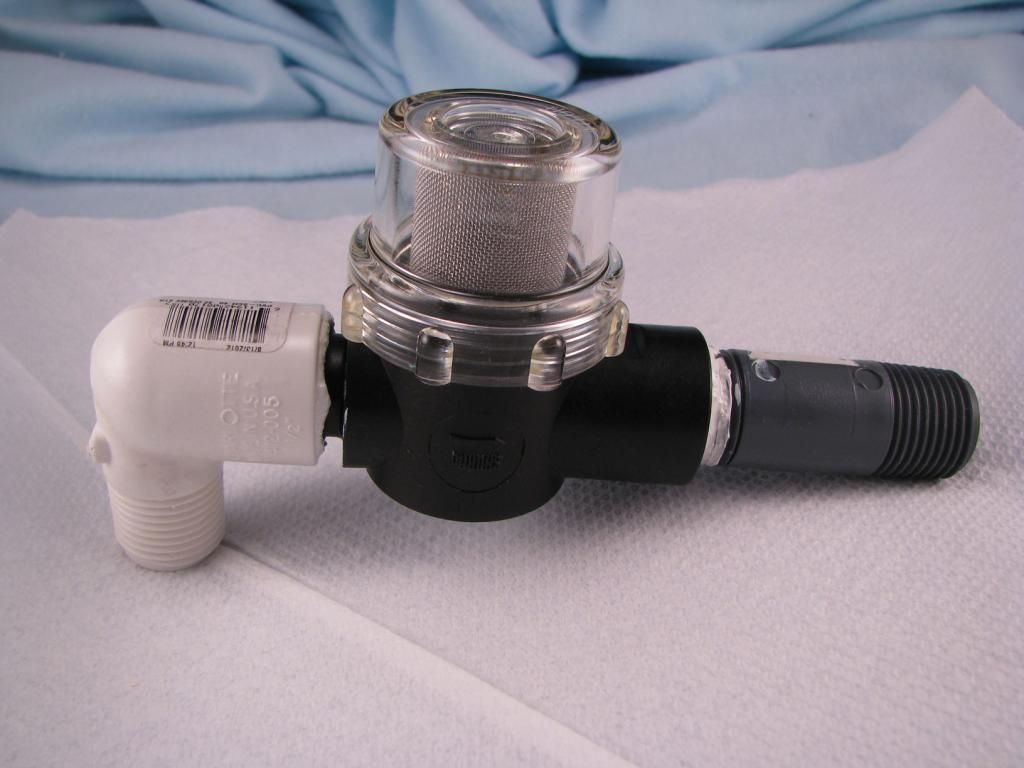
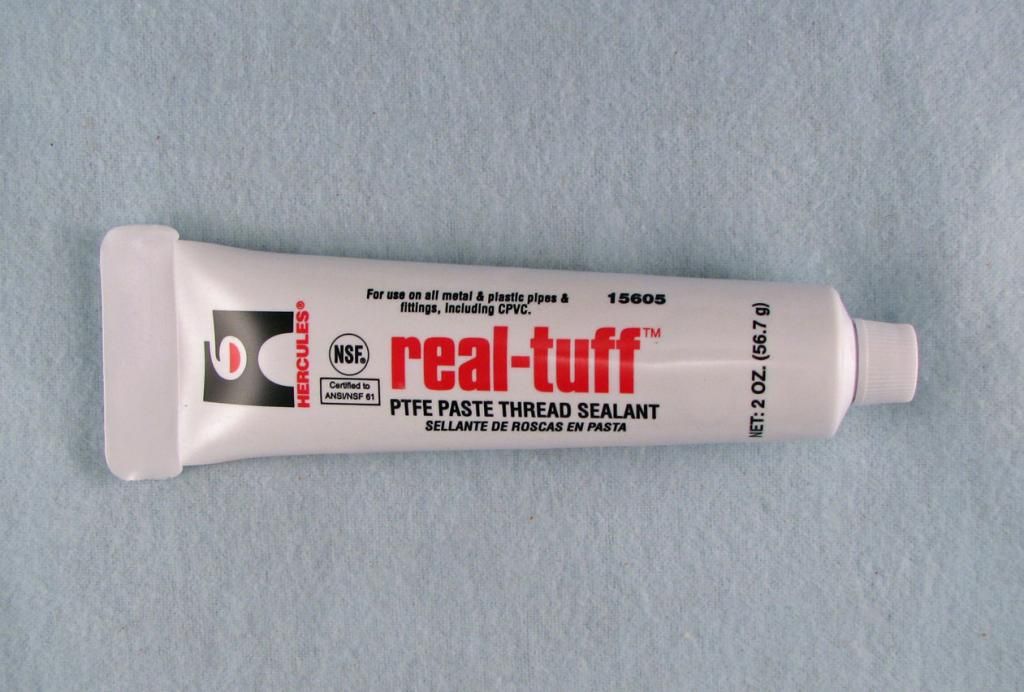
There it is all together. It is all hand tightened and not wrench tightened. Recently I have found that using pipe seal paste is better than Teflon tape on plumbing thread connections. It is easier to apply than wrapping the Teflon tape around the threads and from my research is better at preventing leaks. Its only drawback is that is never dries and always stays a paste so the joints are messy to touch. Usually you are not touching the joints once they are together so that is not a problem. It is drinking water safe and can be used for both cold and hot water pipes. It can be found anywhere that plumbing supplies are sold.


So, it was all together. It next had to be installed in the Roadtrek. Meryl and I went out to install it before we winterized and while the temperature outside was still reasonable. I looked again at the connections and it would fit perfectly. The only problem was that when I tried to open the connection at the toilet I could not get my hand on the connection to get it open.  The connection goes into the top of the toilet valve which is located behind the toilet on the left side as you face the toilet. To get to the connection without removing the toilet completely one most reach down blindly behind the toilet and find the connection. It is also close to the back wall.  I decided before I even put pressure on the connection that I would wait and pay our Roadtrek service center to install this for me. We put the assembled filter away until Spring.

With Spring we dewinterized and called for an appointment at dealer service for a variety of things the most important of which was the water leak that we found during October's trip - the leak that occurred before I decided on making this filter. We brought the filter and when we got there for our service visit I showed it to the Roadtrek service tech, explained what it was and why I wanted this installed - asked them to install it in such a way that the filter dome would be easy to see and to get to to take off and clean the filter, and also to make sure nothing would leak once it was installed. I also offered for them to install it any way that they wanted to if there was a better way than my assembly.

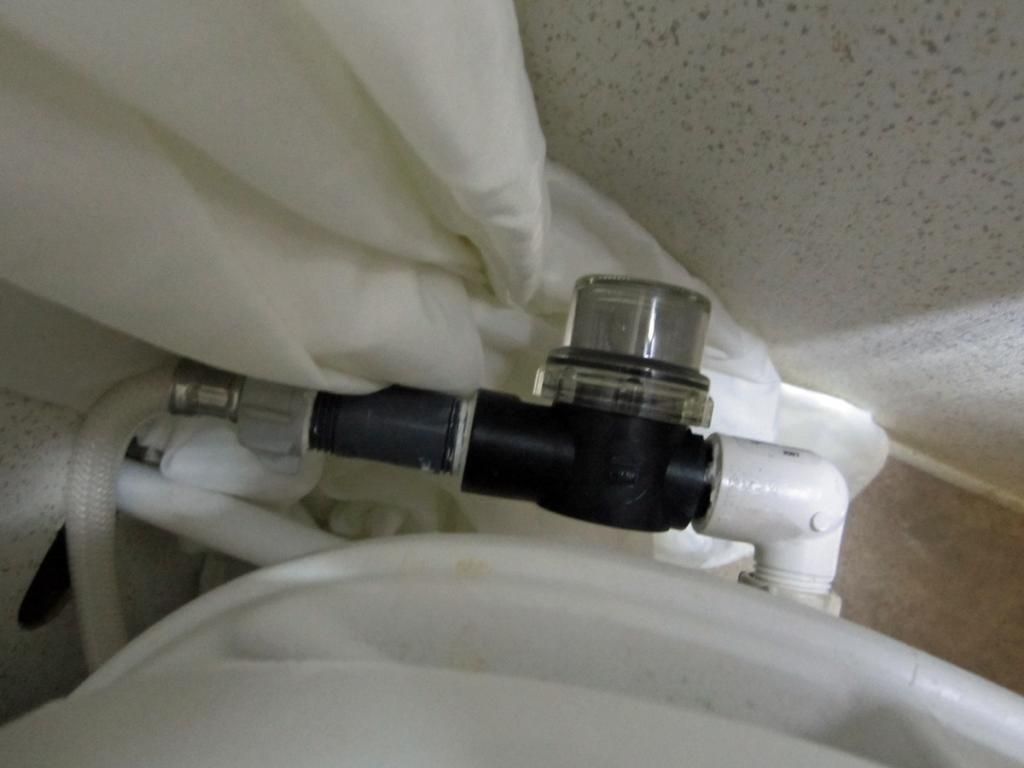
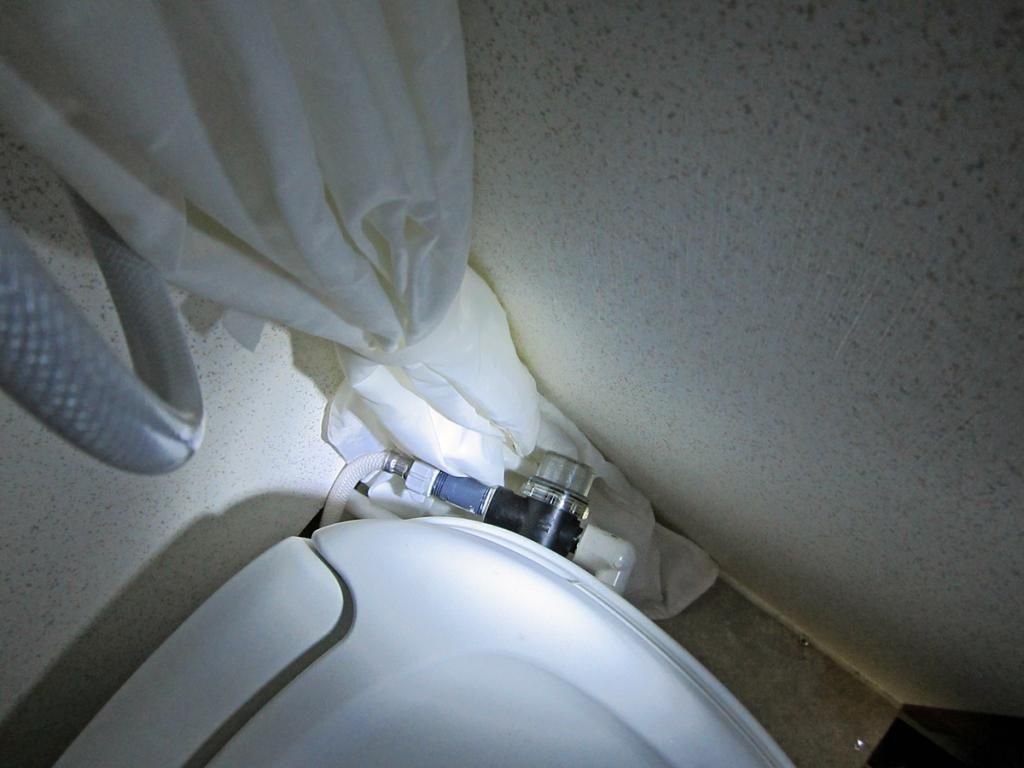
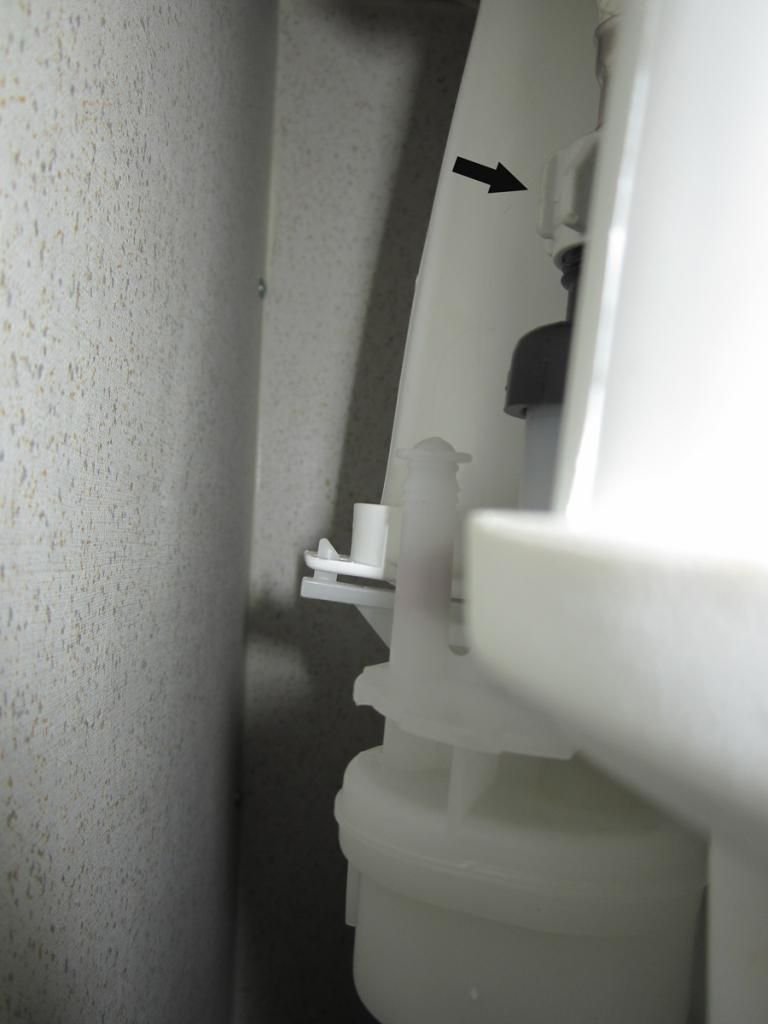
They installed the filter and used the assembly as I gave it to them. They tested for leaks and it held dry. Great! Here is the filter now installed -


In the photo above you can see the connection into the top of the toilet valve at the arrow.

I recently read in a forum that another Roadtrek owner was having this same problem. He also has chunks of minerals flowing into the toilet bowl from the water supply. I was glad to find out that I am not the only one. I don't know how many this is a problem for. It has certainly been a big problem for us and I am hoping that this will do it. So far the water runs through the filter with no lack of pressure and comes through into the toilet as it is supposed to. Only time will tell if the same problem comes back even with the filter in place. I am hoping that those minerals will get caught in the filter and from the size of them they certainly should. Beyond this the only other fix I can think of is the water softening system. These systems use salt to "recharge" the chemical reaction that removes the "hard" from the water to make it soft and Meryl is concerned about that salt in the drinking water. I am not so sure that is any problem at all. But hopefully, this has fixed the problem and we will flush with a smile from now on.

This will work for any RV or trailer that is experiencing the same problem - not just Roadtreks. Just check the size fittings your pipes use - but more than likely they are the same 1/2 inch.

May you all always flush with a smile!

ADDENDUM - After a full season of use we had no problems with the toilet valve. 


Wednesday, February 27, 2013

Modifying the Front Table

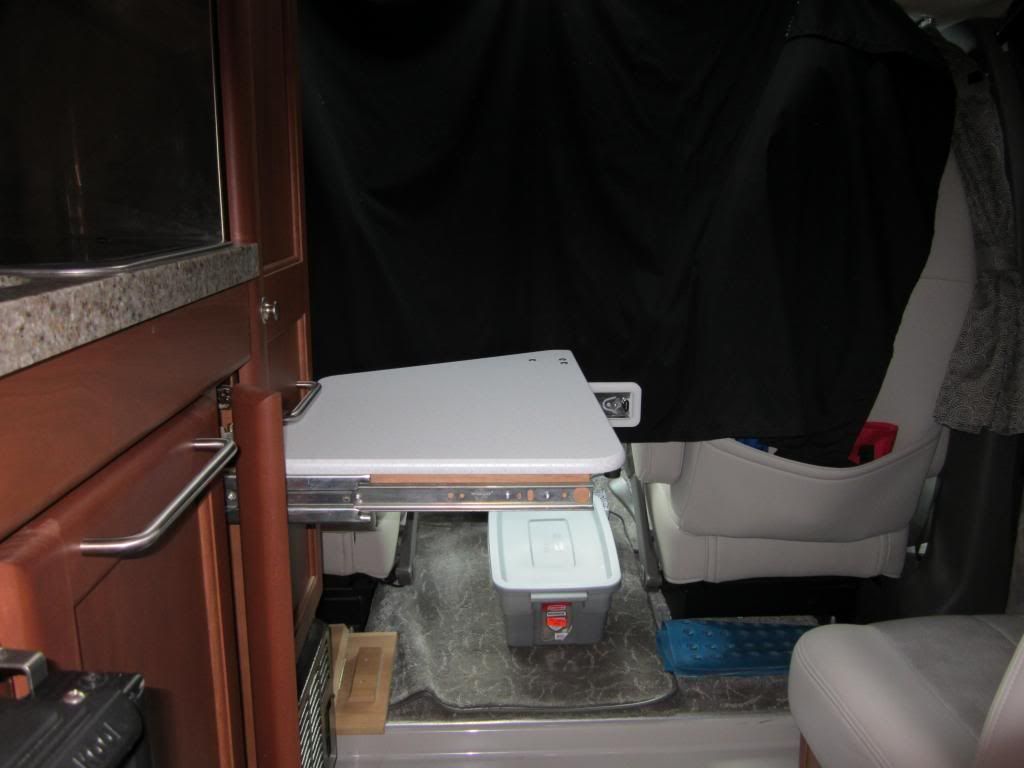
The front table in the Roadtrek has changed over the years and from model to model. It has been a clover-leaf table supported by a leg that fits into a hole in the floor. It is a table on a tripod in some models. In the 2011 Roadtrek 190 Popular that front table is stored in its own thin cabinet and it slides out on a rail and is hinged to swing up into place supported by a poly support that slides out from the outside of the wardrobe behind the driver's seat. This table is a drop-leaf table hinged in the middle with a spring mechanism to keep it open.

The first time we opened the table I went to sit behind it in the driver's seat swiveled into lounge position. I could not get into the seat behind the table as it was too long. It was slightly easier to get in behind the table in the swiveled passenger seat - but still the seat was just too close. As it was the table was not very usable. To use it I would sit and Meryl would swing the table up and we would both hold it to open it. Then she could get into her seat. I was pretty much trapped. There had to be a better way.

I went out on the forums and learned that a number of people had this same feeling and there were a variety of modifications to the table - in addition to those who just did not use the built in table at all and used a folding table in its place. Examining the table, it did not look hard to remove the leaf which while reducing the table's size in half would make it much more usable to sit at. There are two hinges on the bottom of the table - one with the spring mechanism. I got a screwdriver and removed the screws - and nothing came apart. It was still solidly assembled. Back to the internet and I learned that the hinges are not only bolted on but also glued down.

So now what? I did not want to ruin the table trying to break the glue. I could see breaking the table with the glue. I then had a suggestion on a forum to use a paint scraper slid under the hinge and cut the glue bond.

What you will need -

1) a flexible paint scraper. Buy a cheap one.

2) a phillips head screw driver

3) a square head screw drive (for the usual RV Robertson head - square head - screws)

My table had a combination of both types of screws used on the hinges.

4) a hair dryer (a heat gun will be TOO hot for this job)

5) a mallet or small hammer

How to do it -

First open the table. You will be removing the fold down leaf and not the side of the table that slides on the slide attached to the inside of the cabinet.

Next remove all of the screws from the two leaf hinges on the side of the table that will REMAIN in the Roadtrek.

Now you are going to break the glue. I started with the plain hinge and not the spring hinge. I found quickly that if the hinge was heated with a hair dryer this task is much easier and the glue bond breaks much cleaner.

Slip the paint scraper against the edge of the hinge - on the top of leaf of the table that will remain.With the mallet or a light weight hammer, tap the top of the paint scraper's handle gently. The blade of the paint scrapper will start to move behind the hinge. Start at the point of this hinge. We will call this Hinge #1 and I will label it as such in the photos below. I found that a few taps actually broke the handle of my paint scrapper. I just proceeded by tapping the top of the blade once the handle broke off. If the blade is hard to move deeper behind the hinge heat the hinge with the hair dryer again. DO NOT tap so that the blade is moving into the table top. Just move it along straight down. Once the blade is mostly through the length of the hinge, heat the hinge again and give the handle of the scrapper (or  in my case since the handle broke off - the end of the blade) a slight twist and the hinge should come off. If it does not, just heat it again, and drive the blade a little deeper. In this way the hinge will come of. There will be glue residue left behind on the table bottom.

Once this first hinge comes off you need a partner to hold the table together where the hinge once was or you run the risk now of flexing the table top at the other hinge and the table top breaking. This partner is needed now for the rest of the removal.

Repeat now what you did on Hinge #1 on Hinge #2 - the spring hinge (which will be labeled in a photo below).  This hinge is heavier metal and will need more heat to penetrate than Hinge #2. Heat the blade of the scrapper also. Move it in behind the metal, again careful not to dig it into the table top. When you have most of the blade in give a twist and the bond should come apart and the hinge will be free. At this point your partner is supporting the table leaf you are removing. It is heavy and awkward.

The photos that I have taken were taken after the leaf was removed.

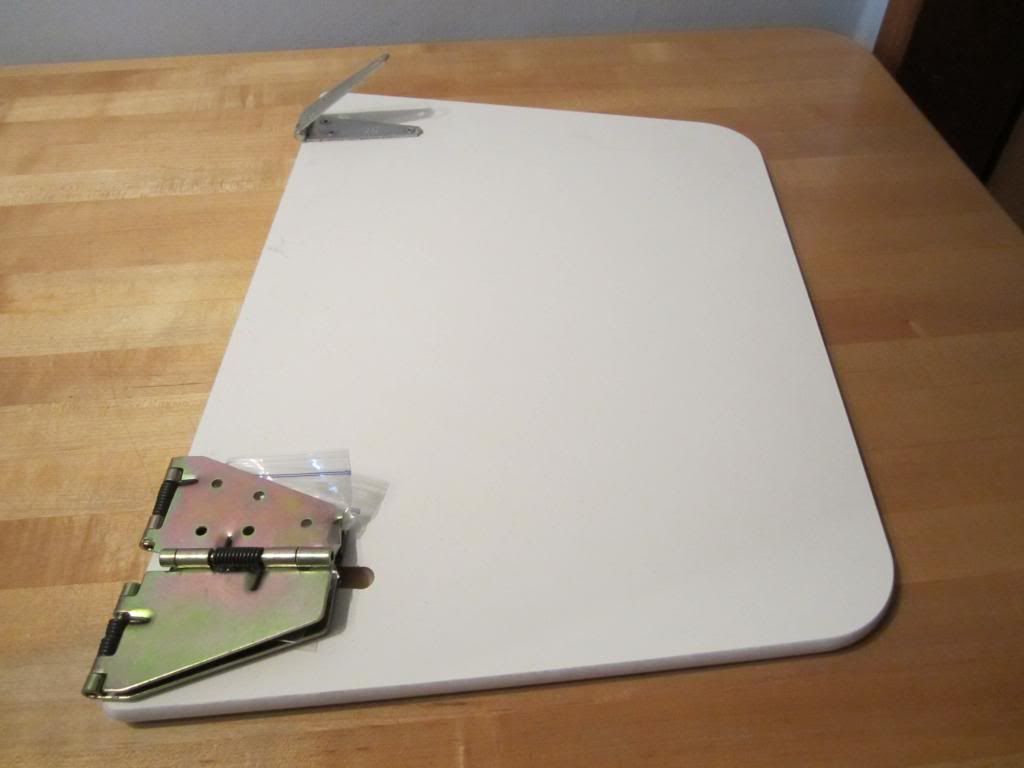
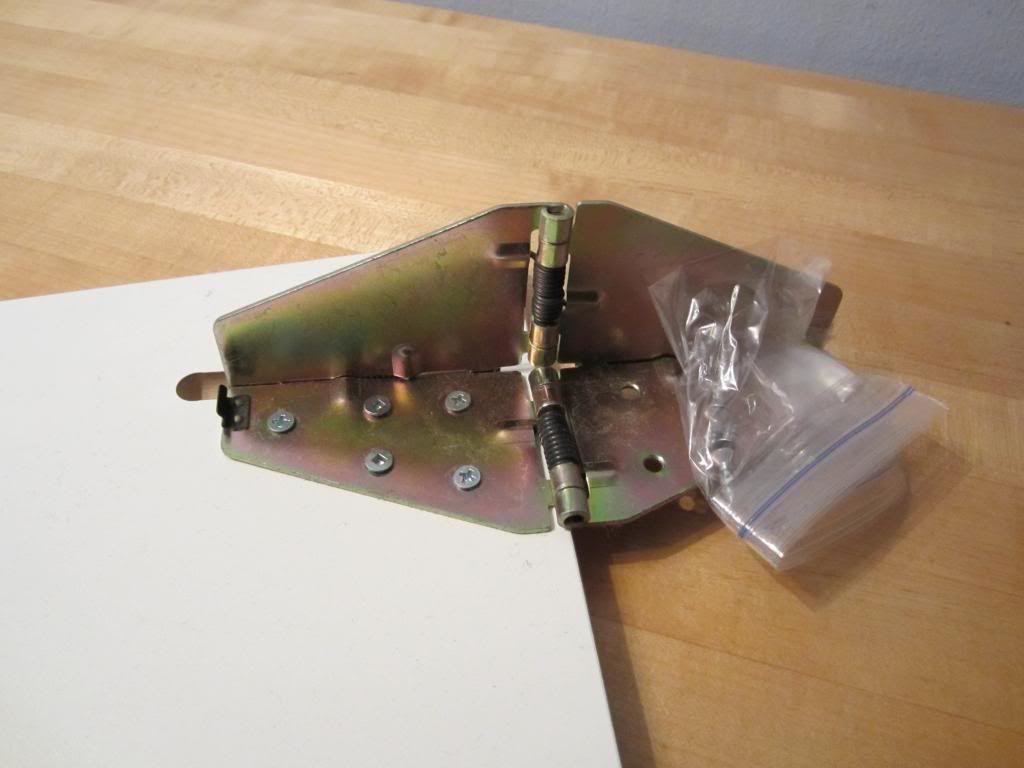
The table leaf removed. Here you see what the hinges look like.

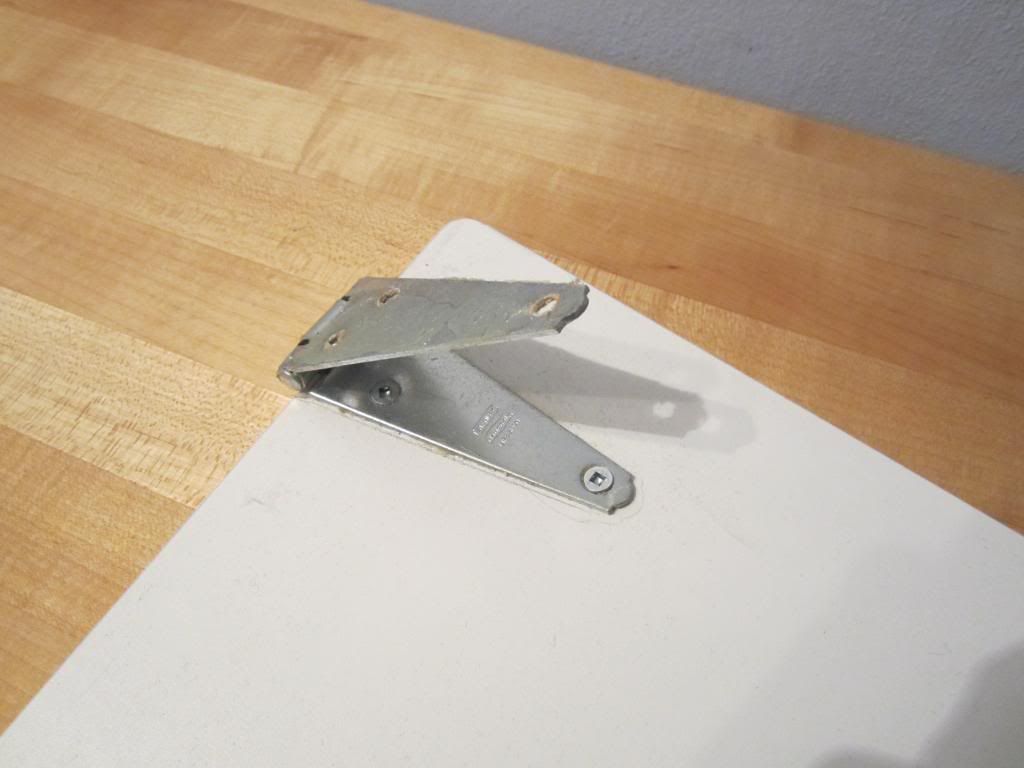
Hinge # 1

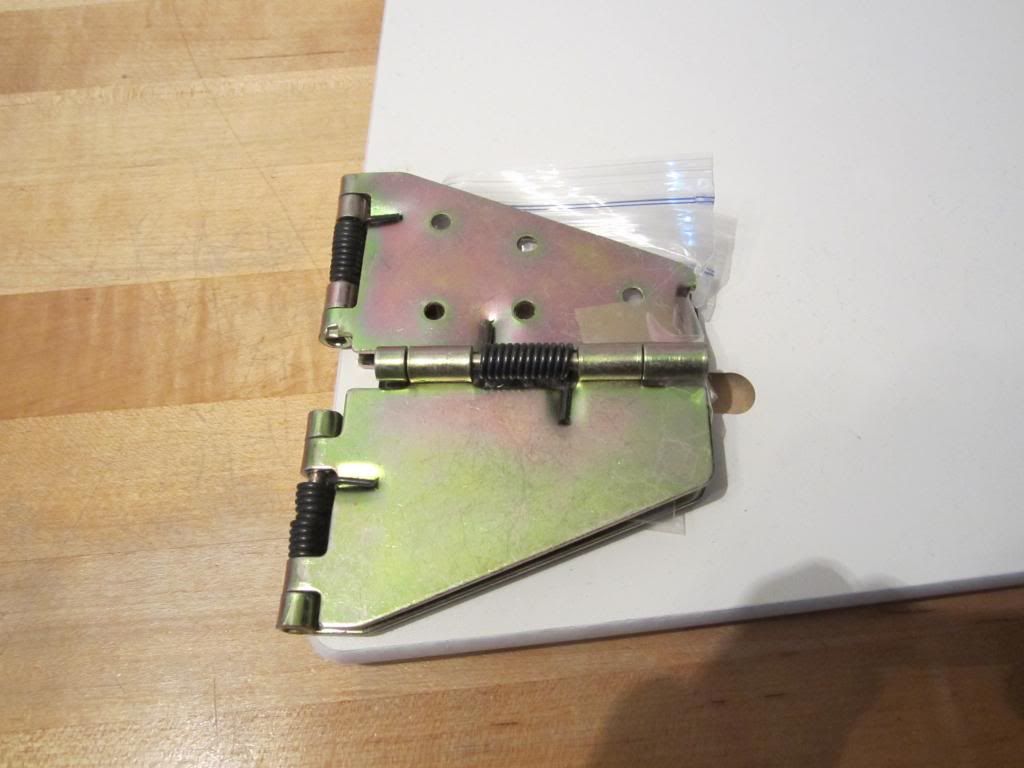
Hinge #2 CLOSED
 (I kept the screws that I removed in the plastic bag attached)

Hinge #2 HALF OPEN - this is a very strong spring!

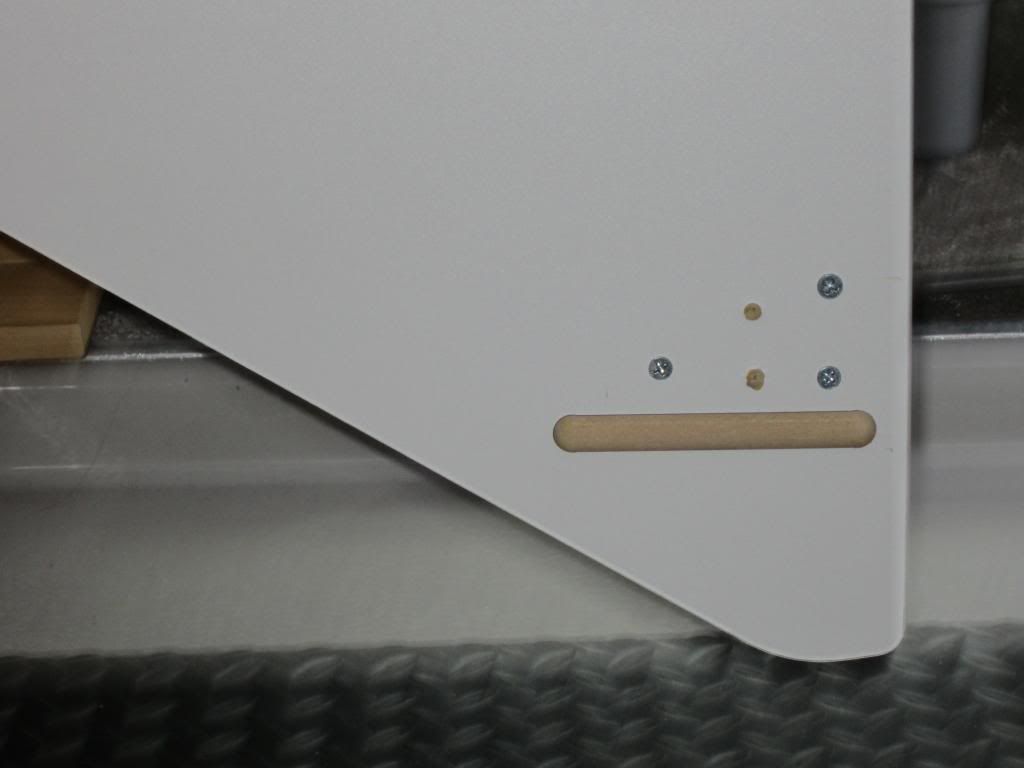
The three holes are where Hinge #1 was removed.
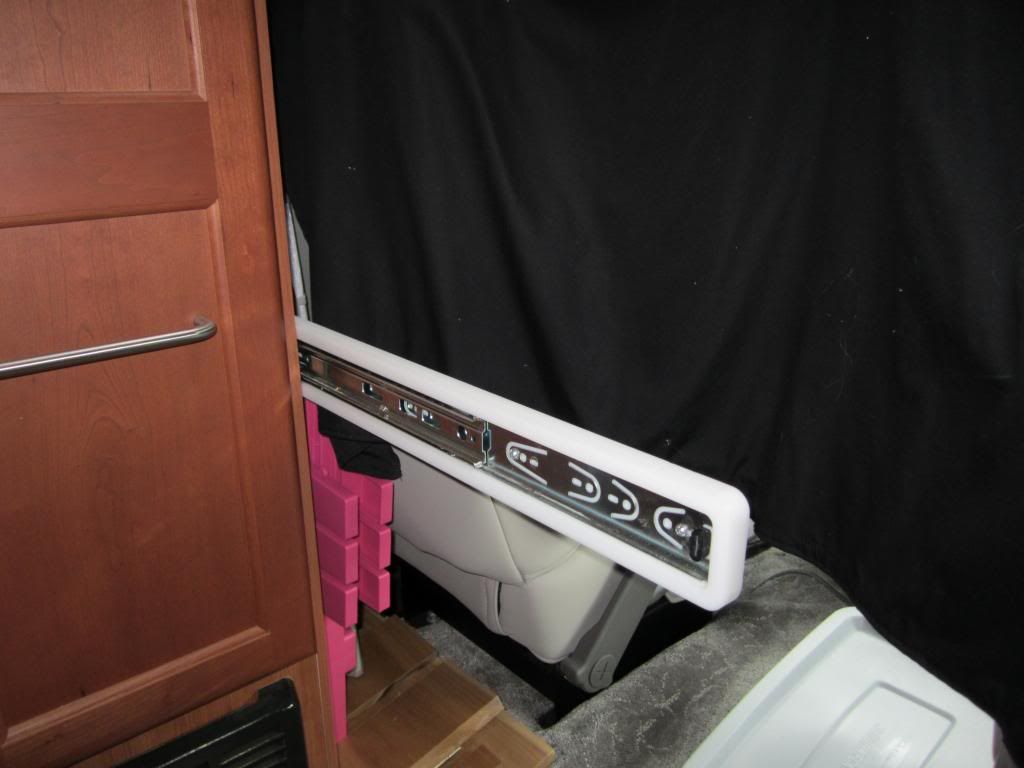
Above, you see the slide that moves the table out of the cabinet.

 The five holes are where Hinge #2 was removed. The routed groove is where the hinge spring slid.


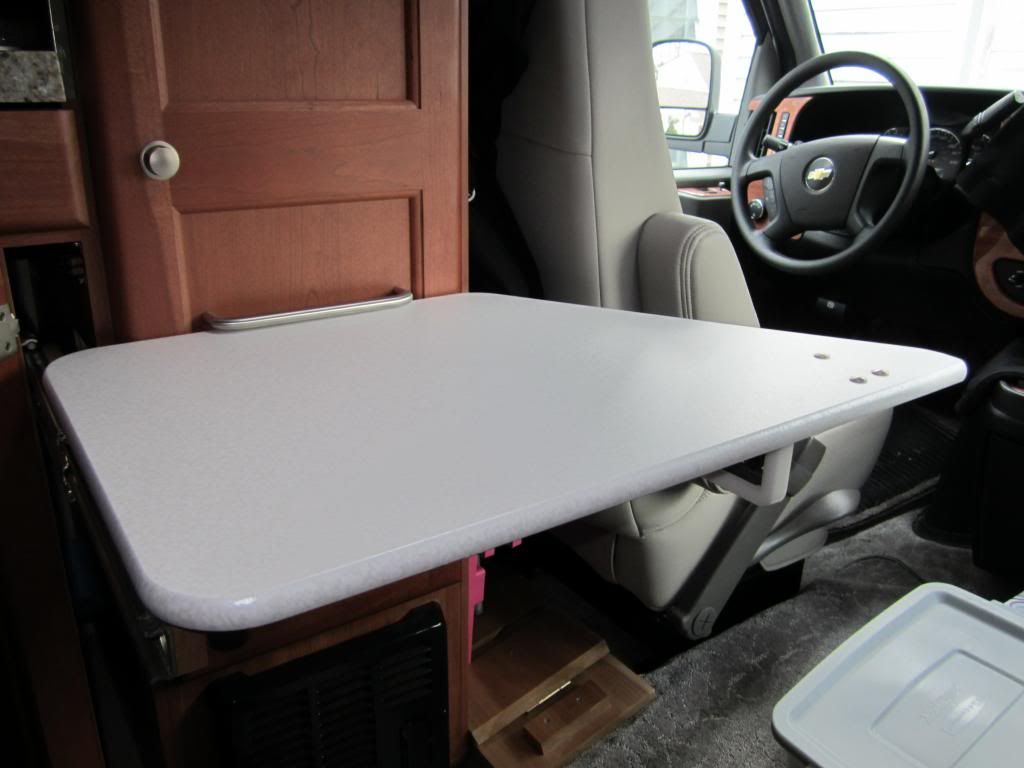
You now have half the table as show above. In this photo you see it hanging from its slide/hinge from inside its storage cabinet. Above it you see the slide that supports the table. To open this table, first slide out the table and pick it up from the bottom to above where the slide support will be. Then slide out the slide support to hold the table securely up. Remember that you now have half the table that you started with and the slide support is made for the full size open table. This is no problem. Just slide the slide out enough now for the smaller table. It will securely stay in place.

Notice in the photos that there is no sign of glue residue. The glue was easy to remove with a little scrapping and alcohol. Household cleaner finished the job to make the table ready for use. 

 Here is a good shot of the table now open. Look to the right front corner and you see three circles. These are the outer caps to the screws that went through the hinge. I returned these caps and the screws that were opposite so that the table would have no holes through it left behind by the missing hinge.

SLIDE SUPPORT
That is all that there is to reducing this table to usable size. We find it most comfortable to eat at this table with one of us sitting in the passenger seat and the other in the third seat as both reach this table nicely. I have used the table while sitting in the driver's seat to work on the laptop. The driver's seat,  when turned around to face the rear of the van, does not slide back very far because of the steering wheel. It still can be a tight fit but with the table in half it is much easier now to get out around it. 

Now you may ask, why not just leave the table as it was, and just not open the leaf. The leaf would hang down and would get in the way. It was also awkward and very heavy with the leaf hanging down like this. 
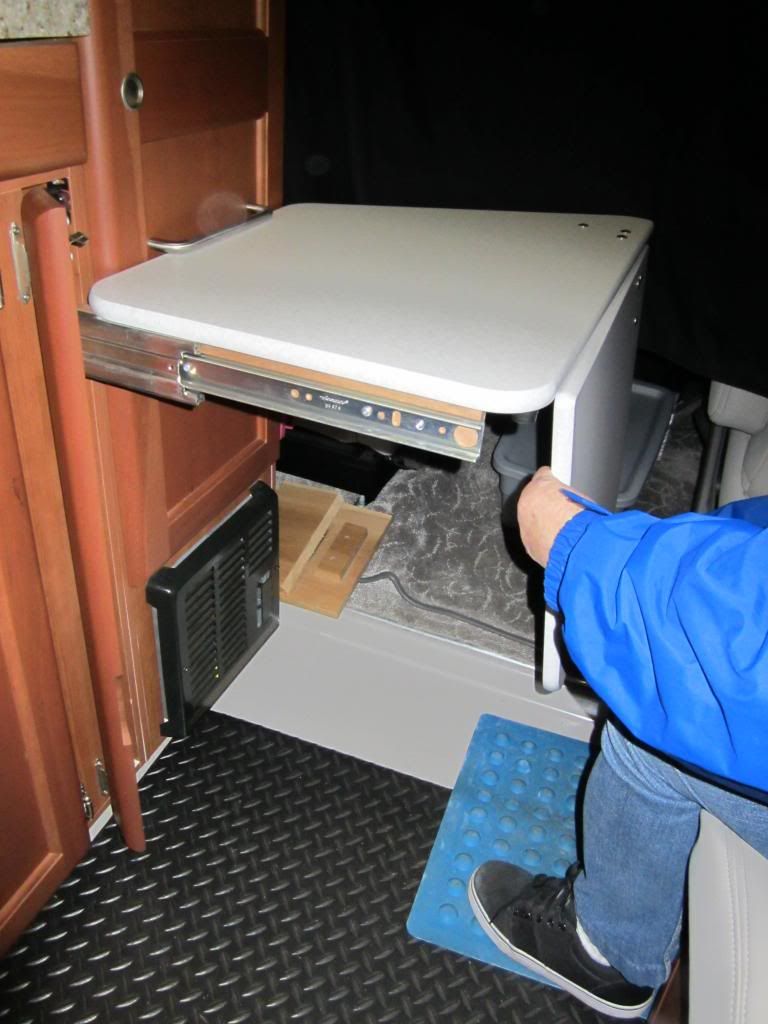
Here are some shots of the table open. 


If you look into the cabinet in the photo above you will see a blue cylinder. Once the table is reduced to this size it is not half as wide as the cabinet is wide. Before with the full table there was some swing inside the cabinet when the van was moving. I cushioned that with a sponge. Now, with half the table gone there was a lot of movement inside. Once again, a swimming pool noodle float came in very handy. I cut a six inch length of the float and trimmed the foam flat on two sides to fit between the table and the wall of the cabinet. This was pushed into the cabinet when the table was inside - at first. I then glued the foam inside to hold it in place with some stick on adhesive. The foam now prevents any swing and any noise from the table while driving. Swimming pool noodle floats have many uses inside the Roadtrek to keep things from moving around and making noise! Buy them in the summer for a dollar!

ADDENDUM:  It was suggested that the table could be left with both leaves attached and just let the leaf that folds up hang down. We did not find this convenient - you may. Here is a photo of what that would look like (Meryl is holding the table in place where it would be if it was still attached and hanging down).


Wednesday, February 13, 2013

Are You On The Level?

For a variety of reasons when you park your Roadtrek or any RV on a campsite, you want the RV to be as level as possible. One of the reasons is for a three-way propane RV refrigerator. This does not as much apply to newer models of these fridges as much as it does to ones that may be in older Roadtreks or RVs but even on a newer model propane fridge you do not want it to be too far off level. At least, the inside of the Roadtrek should be comfortable to stand in - if you are parked on an incline or decline and are going to be running the refrigerator. A propane refrigerator works differently than your fridge at home and will not run efficiently and can be damaged if operated on a steep angle. The other reason you want to be as close to level as possible is for comfort. Park off level and things roll off counters, you may find yourself walking up or down hill as you move around inside, or you may roll to one side of the bed.  I exaggerate some, but you really want to be as close to level as possible. 

How do you know if your Roadtrek is level? This is something that the company did not build into your Roadtrek, but the solution is as simple as bringing a level inside the van.  A level is simply a tube with liquid inside and an air bubble floating in that liquid. There are various types of levels. There are round levels that will tell you which way you are off level in 360 degrees all around. There are straight tube levels. Now there are electronic levels. In fact you can download an app to your Iphone or Android phone or tablet that will function as a level. (Just be aware that these apps require that you calibrate your device with the app on a perfectly level surface to get it to function correctly.) When checking for level you can be off level in any direction. Usually, though, two straight tube levels are sufficient to tell you if you are level with one positioned front to back and the other positioned side to side.

I started out with a round level. This is just a little disk and the bubble floats in the circle. If it is in the middle of the circle you are level. If it is off, that is the direction that must be corrected. The trick with this - and with every level is that the level must be sitting on a level surface to start with to be able to tell if the vehicle around that surface is actually level. In other words, if a counter top is not level to start off with, any level put on that counter top will always be off level no matter what is going around below that counter top. Things are not built quite so precisely. I soon discovered that the ground we were on was level, but my Roadtrek counter top was not. So putting the little round level on the counter to check the van was no help at all. I did discover that the middle of the floor just behind where we sit when driving was level. So if the level went there, it would pretty accurately tell us if the whole van was level. This worked for a while but started to be literally a pain in the turning around and looking down to see if we were level - that is once we put the level there to start checking. I knew there was an easier way.

Many RVs put the levels on the outside of the vehicle - on in the back and one on a side. This way a second person can see if you are level. This does require that a second person be outside to check while the driver finds the most level spot on the campsite pad or that the driver stop and keep getting out to check. Not good. So where to put the levels in a Roadtrek. The best place would be in the front fully and easily visible from the driver's seat.  I looked around inside and eliminated various places because I wanted a spot that was flat, horizontal and easy to see. I found two spots that work well.

First, purchase a pair of levels from an RV store (or Walmart). The ones you will see in my photos are cheap, work well, come with adhesive and screw holes, and only take up about two inches of space.

Second, find a perfectly level spot to park your RV on when you install your levels. This could be the hardest part. You can always level your Roadtrek with leveling blocks anywhere so that you have a level Roadtrek. I am not going to talk about leveling blocks here but will in a future article (when it gets warmer outside). Why do you need to level your Roadtrek first? If you don't, how will you know that your levels are level to the van to start out with? I knew that in one particular campground that we go to that has cement campsite pads, that the sites are for the most part all level. I waited for our next trip there to install my levels.

The two spots I selected are on the middle of the dashboard and on the side of the passenger door. I can see both easily and not move from the driver's seat. At night, it does require that I put on the light inside or use a little flashlight that I keep in one of the cup holders in the dashboard. Not a problem!

Here is where they are located:


To mount the levels, I used the adhesive backing that comes on these levels. Remove the tape from the adhesive.  Hold the level over the spot exactly where you want the level to be. MAKE SURE THE LEVEL BUBBLE IS EXACTLY IN THE MIDDLE. Push the level against the surface and it sticks. You get one shot. If it goes on off level, you are going to have to try again and you will need to peel the adhesive off the back of the level and replace the adhesive. I actually found it easier to just buy a new set of levels. (I did not put it on wrong - one fell off and I will get to that in a minute.)


Here is the level on the dash. This one went on nice and easy and has stayed on ever since. The glue and the plastic that the dash is made of worked well together. This spot seems almost made for this purpose!


 Here is the level on the passenger door. I don't know what type of plastic Chevy uses to make the door panels and column covers, but no glue seems to hold to this for very long. The adhesive on the back of the level lasted for only three days. This level fell off on the way home from that trip. I have tried gluing and using self-adhesive strips on other parts of the van that have this same plastic and sooner or later every one of them has fallen off including an epoxy.  When I put this level back on I had a reference pencil mark on the wall that I had made when I installed the levels. Just in case, what happened, happened. I did buy a new set of levels and used one to replace the one that fell off. I used the adhesive again to put it on and then I used two stainless steel sheet metal screws to permanently hold the level on. I was very careful to make sure that in the process of screwing these screws in I did not move the position of the level.

These photos were taken with the Roadtrek parked on my driveway which is apparently very level side to side and as expected, on an incline angle toward the front of the van. This is a good example of how the levels work. If the bubble is on one end of the level, the van is lower on the other end. So you need to raise the lower end until the bubble sits in the middle. Yes, very basic stuff, but you would be surprised to know how many get confused by this.

Most campgrounds will tell you that all of their spaces are level. I have begun to think that they are not telling the truth OR that these spaces are level for a much larger RV and with one of the shortest and smallest RVs there is, our Roadtreks just don't find the level spot that easily. I will drive around the site back and forth and side to side to find a place where both bubbles are in the middle. So far, more often than not, they are close enough, though sometimes it means stopping in the space on a diagonal. That is it. Then get out and put down the leveling markers that I have told you about and you are on the level!

Wednesday, October 31, 2012

An Enlightinging Idea about the Continental Spare Tire Kit

When we are in Williamsburg, Virginia, we like to walk around the historic area after dark. It is quiet, peaceful, and history seems to come to life in the shadows. We park in a lot on the edge of the historic area that is very dark. The spaces, while fine for cars, are just a little short for the Roadtrek even if I pull the tires all the way up to the wooden log that serves as a curb for each space. When I looked the back of the Roadtrek was sticking out into the exit lane by the length of the Continental Spare Tire kit on the back. The spare on the back adds about a foot in length to the standard Roadtrek length.

During the day, the Roadtrek is clearly visible to anyone driving past in such a situation, but I noticed while parked here at night that from the side, if driving down the entrance/exit lane, the Roadtrek was almost completely in the dark - and there was the spare tire sticking out into the lane. That night walking around in Williamsburg I kept thinking that this was really not good. There is no reflector on the side of the Roadtrek at all and the only reflectors on the rear are up in the air on the lights that are on the top halves of the cargo doors. I wondered why Roadtrek had not added reflectors to the Continental Spare Tire Kit - and it was certainly shaped to accommodate their placement. I decided that a trip to Walmart was in order. And, of course, we when got back to the Roadtrek that night I headed over to the 24 hour Walmart in Williamsburg.

I was not certain if I wanted to use plastic reflectors or reflector tape. I looked through what they had in the auto department and decided that the plastic reflectors with an adhesive backing would never stay on during all types of weather and temperature. I found the reflective tape and it just did not look reflective to me. You should have seen us walking around the store to where there were lights focusing down to a spot where I could hold the tape package and see how well the tape reflected the light. Pretty much it looked no more reflective than the red duct tape that they had. Then I saw a package of reflective strips intended to be placed on a truck bumper. This was very reflective and combined both red and white foil reflectors in each strip. Cut down this would work perfectly. It installed with an strong adhesive backing and should hold much better than the stick on foam that was on the plastic reflectors. (I did not want to drill holes to screw anything on.)

When I get an idea, no matter what time it is, I have to see it through. We purchased the reflective strips and went out to the Roadtrek in the parking lot where there was plenty of light. I knew that the campground was too dark - and besides, do it now when there is nothing else to do than wait until the morning and take the time for things we had planned. And it was not raining...


We cleaned the Continental Spare Tire cover with household cleaner that we have in the Roadtrek and paper towels. I washed it well and dried it completely. I cut the long strips into pieces and placed the side strips on - which were for the time being the most important. I decided that I would wait until I got home to do any more - but at night with just the side strips we would be fine in the dark parking lot. The large white strip at the top and the large red strip at the bottom are what we put on that night.The dots you see were added after we got home and I punched those from this same material with a 3/4" leather punch. It punched very cleanly.


At home I was pulling into my driveway behind the Roadtrek and realized that I could not see the back of the Continental Spare  Tire Kit at all in the dark. I had the reflector strips so I added the two red strips that you see here on the bumps that are molded into the tire cover.  The s original strip was cut lengthwise in half to fit here perfectly. Of course, everything was cut to matching size using a ruler and when stuck on I made sure with the ruler that each strip was as close as possible in a matching position. The bottom white strip was the last added, because I saw that my small car's headlights were not lighting up the upper reflectors.

I look at this now, and wonder, "too much?" I really don't think so. We are out of the campground a lot at night and the Roadtrek is very dark in a lot of parking lots. This added just enough to make the part of the Roadtrek that sticks out the most visible. Even if they are able to see the side of the Roadtrek - you could not see the spare tire sticking out the back - and if you cut it close, you clipped the spare tire. This is an easy mod and it cost about $8 for the reflective strips (package of four) to enlighten your Roadtrek's Continental Spare Tire Kit.