Roadtrek

Roadtrek
Showing posts with label level. Show all posts

Thursday, February 25, 2021

ANDERSEN LEVELERS MODIFICATION

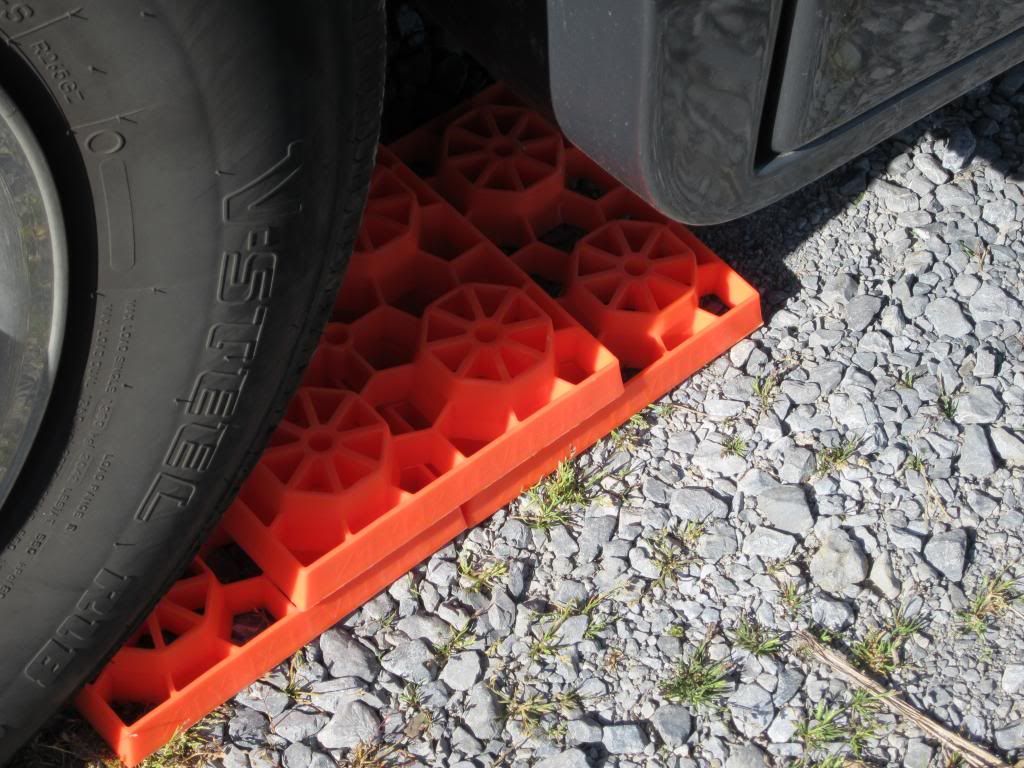
 I have written two articles about the leveling ramps we use - Andersen Levelers - to get our Roadtrek level when the campsite is not level. LINK 1 and LINK 2 to read these articles to see what I am talking about here. As they come, the surface of the ramp is very smooth. On one hot day the tires slipped slightly on the ramp - the Roadtrek stayed level but it was obvious the next morning when we were taking the Roadtrek out of the campsite for the day that there were black skid marks on the red ramps. Looking around the Internet I found a way to deal with this and enhance the levelers to work even better. I do not take credit for this but I did it with my set of Andersen Levelers and it works great!

I added strips of anti-slip grip tape that is usually applied to stairs to the top of each one.  This is sold in the home stores usually by the roll, but Ace Hardware sells this by the foot and for what is needed, there is no reason to buy a roll of more than you need. This is adhesive and comes in various widths. It is rough on the top and will prevent slipping of the tire - and gives better traction when pulling up on the ramps. 

Here is how I put it on -


Cut a piece the length of the leveler plus an inch or two for the back. Peel off the backing and apply it carefully to be centered on the face of the ramp. DO NOT PUT ANY OF IT OVER THE THIN EDGE OF THE RAMP (See in Photo 1). The reason for this is this is where the ramp stop block will be inserted and if it cannot be moved out easily it will be a problem getting off the ramps as you will not be able to remove it with the weight of the tire on it and the grip tape keeping it from moving.  On the back of the ramp - the tall side that goes to the ground (Photo 2) put an inch or two of tape lapping over from the top. This will hold the tape in place if it should the adhesive pulled by the tire as you roll up onto it. Do the same for both ramps.

That is all there is too this. It adds a few dollars to the ramps but it is well worth the difference this small modification makes. 

These are still the best things I have found to level the Roadtrek when a site is way off level.


Wednesday, July 8, 2015

Andersen Levelers at the Campground

Back in October 2014 I wrote about a better way to level a Roadtrek or any RV or Travel Trailer that does not have a leveling system built in. That is with Andersen Levelers. At the time of the article I only had tried them out on the driveway. Happily we did not need them after that until this past trip. We learned some lessons on using Andersen Levelers during this trip and I will share them with you here.

We arrived at the campsite and tried to find a level spot. Usually with enough moving around the site with the small Roadtrek you can find a spot - even if it means being on a diagonal in the space. This time the Roadtrek was perfectly level side to side but front to back it was too high in the front. This, as shown on my front to back level bubble that is permanently mounted to the passenger door. I don't need to level for our refrigerator. We do not have the usual propane three way fridge. We have an RV condenser AC/DC electric fridge. These do not need to be level to operate properly. I need to level for comfort and a feeling of being off balance if the van is off. I can tolerate it more if the van is lower in the front and higher in the back as I am not sleeping with my head lower than my feet, but as this site was high in the front, it was time to pull out the Andersen Levelers and give them their first trial by fire.

I will go step by step now in what to do with them and will share what we learned or perhaps realized as we went along.

One curved leveling ramp must be placed under each of the tires that are low - with a front to back problem and the back is too low, the Andersens will go under the rear tires. Put the low point of the ramp under the edge of the front of the tire. CENTER it under the wheel. There is a mold line in the center of the ramp that runs along the full length (you can even see this in the dark with a flashlight). There are five threads on the tire. Line up the center of the third thread with the center of the ramp. Make sure that the ramp is pointing in the same direction as the tire or you will drive off the edge of the ramp. This takes some adjusting. We had to make sure of this each time we put one under a tire and we did this five times each of the two tires during this trip - and each time needs some adjustment before proceeding. A tip - at night put your flashlight on the center thread of the tire (third thread) and point it straight down along the thread to the front of the ramp -see teh center line on the ramp - you are good for that adjustment but you still may need to make sure the ramp is straight. DO THIS FOR BOTH TIRES.

Now - look at the front wheels and make sure they are straight (and they must stay that way before you move onto the ramps. If not when you get in, straighten the front wheels and have your spotter (partner) tell you they are straight. There is a LOT of communication that should be going back and forth for safety doing this - we realized that this is a MUST during this trip. Open the window and make sure each can hear the other.

NOW, tell the spotter to stand clear away from the van but to keep watching the tire on their side of the van that is going up the ramp. Put start the engine, release the parking brake, and put the the van in FIRST GEAR. Slowly put your foot on the gas while holding the steering wheel absolutely straight. Start to move S L O W L Y up the ramp and as soon as you see the level bubble go to the center STOP! The spotter needs to tell you to stop if you don't stop before going off the end of the ramp - there is nothing to stop you from doing this.

NEXT - The spotter is NOT to move from their safe spot. The driver must put the parking break on and put the van in PARK. Stop the engine. Be ABSOLUTELY SURE that when you take your foot off the brake the van is not rolling back! Now - yell out to the spotter "ALL CLEAR". They can now move from their safe spot.

I got out of the van - I could have stayed in but I wanted to be sure that Meryl was safe for the next step. The safety wedges are now inserted under the BACK of the leveling ramp - the part that is now sticking up off the ground because the tire has rolled forward and rolled the ramp up in the rear. This is really one of two dangerous parts of using these ramps. Your hand is under the back of that tire and if the tire should slip it will be on your hand if you don't do this safely. Just put the wedge in place and give it a slight push under the end of the ramp. Do the same on the other side of the van.

Now - here is something that I found out about the third day of using the ramps. Once the ramps are in place, go into the driver's seat and have the spotter stand away - back to a safe spot. Put the key in the van, take it out of Park and into Neutral and and release the emergency brake. The van will slightly roll back on the ramp and the wedge - it really moves very little and should remain level. Put the van in Park and step down on the emergency brake to set it. That is it. The van is now level.

Why did I decide to do this last step? One morning on the hottest day of the trip when we removed the leveling ramps the next morning there were black tire marks on each ramp. Heavy black marks. Our first thought was that we had driven through tar but there was no tar on the front tires and no tar on the rear tires where they had not been on the ramp. What I did see on the rear tires was a smooth area on the face of the tire corresponding to the length of the marks on the ramps. What I believe happened - as I had not been letting the emergency brake off as in the last step before this - was that the tires (perhaps due to the heat) had slipped down the ramp to rest where they should have been in the middle of the ramp during the night or that morning. I had been setting the brake where I stopped and that was it - it had apparently held the tire up the ramp until then - but this time the tires could not hold and slipped. So this extra step seems to take care of that.


Here you see the Andersen Leveler in place under the passenger side rear tire. You see the wedge at the back and the leveling ramp at the front and middle. You will notice that the tire rests right in the middle of the curve - as it should and as this curved leveling ramp is designed. The tire should always be cradled this way no matter how high or low the ramp raises the tire. Both tires - one on each time are raised the same, at least as much as the ground will allow.

At this point you leave them and go inside the van or whatever you are going to do at the campground. When you are ready to leave for the day or for whatever, you are going to remove the ramps which is another process with again, with a need to stay alert to safety. I emphasize this because the Roadtrek weighs three tons and there were a few moments that I was not sure that all hands and feet were well enough away while putting the levelers in and taking them away. It was then that we made some rules - the most important of which is never move until you hear "All Clear".


So now to take them out. Your spotter goes to a safe spot and you go into the driver's seat. Open the window and make sure each can hear and understand the other clearly. Put your foot on the brake, start the engine. Release the emergency brake (some call it the parking brake). Put the van into LOW. Don't move! Your spotter should be watching one of the Andersen's under a tire. You will now S L O W L Y move about an inch up the ramp - don't put your foot down on the gas, just five a little to start to move. Your spotter should see the ramp move up off the wedge and tell you to STOP! Put the emergency brake on and put the van in PARK - stop the engine.

LESSON LEARNED THE HARD WAY: DO NOT DRIVE  OFF THE FRONT OF THE RAMP as I had in the first article to get off the ramp and as Andersen shows in their video. I did this and BANG the RV crashed off the ramp and the ramp went flying back. BAD IDEA! When I did this on the driveway the Roadtrek was not loaded, there was no water in any tank, and it was somewhat lighter. On a trip in real life there is a lot of weight added to the already three tons and you come CRASHING off that ramp if you drive off the front!

SO - next step - your spotter or you is going to reach behind the wedge and pull it out. This is the second danger point in the process. The wedge has nothing to grab onto on the side. It has to be grabbed from the back on both sides to get it out. The only thing holding the van from rolling back on your hand is the emergency brake, the tire threads, and the parking gear. As I am writing this I am thinking that since the wedge is now free to move easily, something might be rigged to push it out without your hands being under the tire. The wedge is solid and there is no way to attach a rope. If I come up with something for this, I will share it when I do.

So for now, get both wedges out from both of the Andersens and get them out from under the van. You need them clear of the rear of the ramp for the next step.

Again - spotter in a safe spot looking at one of the Andersen ramps. Go into the driver's seat, start the engine and put the van in REVERSE and release the emergency brake. Very little gas is applied and you roll slowly back and off the ramp. As soon as you are off the ramp the spotter needs to tell you to stop.  Put the van in park, put on the emergency brake and shut off the engine. Get out to help put the Andersen levelers away.

Other than the obvious hazards described here, the Andersen Levelers worked very well. It was easy to get level. The process does not take long but for safety must not be rushed. At one point I saw Meryl moving to the tire before I had the emergency brake on and the van in park. No! And when tired things can get confused and confusing. We set up our signals and all was well.

I used to be concerned about going to a new campground or getting a site in a campground that we knew that was not one that we have had before. For 95% of the unlevel sites we have refused at  campgrounds these will take the concern away about not getting level.  Those big RVs and trailers have systems built in to do this - nice to be able to push a button. We can't push a button but these make it a lot easier than using the big Lego blocks or trying to carry boards that just won't fit in a Roadtrek or Class B.

I have nothing to do with the Andersen company. I bought my two Andersen levelers for full price on Amazon. I do not get paid in any way to tell you about these levelers. If it works, or it doesn't work - I share that information with my readers (for free).


Wednesday, October 29, 2014

A Better Way to Level a Roadtrek

Anytime we are heading to a new campground or even a campground that we have been to before the big question in my mind is will the campsite we are assigned be level. Too often campsites are not even close to level. They are sloped up or sloped down or sloped to one side or the other. We have the Nova Kool all electric condenser refrigerator so we don't need to be level for the fridge as some three way absorption fridges require. For me it is how I feel inside. I am sensitive to being on a slant and it is uncomfortable. If we have to be off, being higher in the back is better for sleeping than being higher in the front, but it is still something that bothers me. When a site is very off, we ask for a new site and that happened twice this year. The new sites we were given were not much better but doable - one by spending 30 minutes moving around in the space trying to find the best the most close to level position and the other by resorting to the "Lego" type blocks that we carry for leveling. Those blocks can be a pain in the neck and I have resisted using them unless there was no way to getting the RV into any position that was close including trying positioning diagonally as much as possible.Large RVs, so equipped, push a button and an automatic leveling system levels the RV - legs come down and adjust to the correct heights. Nice! There is no room under a Roadtrek or any Class B to accommodate the mechanism required to do this. The leveling blocks are the most common way to level a Class B. We always ask for a level site when we are making reservation and also when we arrive at a campground. We are always told that the site is level and have been told that we are getting their most level site - and that most level site is often not level. On the campgrounds that we go back to regularly we request certain sites that we have been in that we know are level (and even that can change when the sites are gravel), but often those sites are not available. I kept thinking that there had to be a better way.

During this past summer I learned about a new type of leveling device that can be used with a Roadtrek or any RV or travel trailer. They are called Camper Levelers (3604) and are made by a company named Andersen Hitches. When I first saw these on the Internet and the company video about how they work (video link) I thought how great this seemed. I wanted to know though would this work with a Class B RV like my Roadtrek. I went on various forums and asked about these and found out first that the company's claims were true - they worked as described. I then learned that those who have them like them and they like them much better than the blocks - and I also learned from a few Roadtrek owners who have them that they work just fine with the Roadtrek. I showed the video to Meryl and she was skeptical but when I explained how they worked and showed her the video more than once she agreed that they were worth a try, especially after our last trip where we played with the blocks every day to get level.We decided to order them.

I have not seen these in any camping/RV store. Some store may have them but they are easily purchased on the web either at the company's website , other RV accessories sites, or Amazon. They are not cheap - they cost $40 each - each as in $40 for one wheel. You need to buy two packages. We bought ours on Amazon through a company called Tweety's RV. There were several sellers on Amazon with the Andersen Levelers. I chose Tweety's because of a huge number of positive ratings. We bought two sets - one set for each tire needed to level side to side or front to back. On Amazon there was free shipping (given the price of these). Andersen's website was charging shipping. At $80 they are expensive, but if they make life easier $80 is not much to pay.

So what makes these levelers different? The Andersen leveler is a curved ramp - curved to match the curve of the tire on the top and slightly curved on the bottom allowing the ramp to rock.


It is made of a very tough material. I contacted Andersen while I was considering these and asked about their ability to take the weight of the Roadtrek and if they can stand up to gravel or paved surfaces. They told me there would be no problem at all. They can support up to 30,000 pounds. They will raise the wheel from 1/2" to 4" in height.

To secure the ramp once the wheel is in the correct position, there is a second piece to the ramp that wedges under the section that will raise up as the tire moves up the ramp to where the RV is level.


Together under the tire, the two parts will be like this -


So how do you use these? Simple. You set the ramp in front of the two tires you need to increase in height to get level and drive up the ramp. You stop when your level bubbles are in the middle and you are level. Get out - or have your partner as in this is Meryl's job - put the wedge under the back of the ramp and you are done! Of course, you set the emergency break and put the van in park before going near the ramps to set the wedges in place.


 The ramp is slightly smaller in diameter than the tire, which gave me some concern at first but it is a fraction of an inch on each side if you put the ramp in the center of the tire. This was easy to determine as the ramp has a dimple in the middle from the mold and the third thread on the tire is the middle of the tire. I lined the two up and set the ramp just at the edge of the tire. You can see that the front of the ramp is moved up when the rear is just under the tire and looks in the photo like it is hitting the Roadtek's ground effect in front. It actually is not and does not touch.


Now that there is one of these set on the two tires - either the two front or the two rear or the two on the passenger side or the two on the driver's side depending on which way it is off-level - you get in, start the van, put it in First gear (this was easier than doing it in Drive), take off the emergency brake and move SLOWLY up the ramp making sure before you move that the front tires are pointing straight ahead. As you move you watch the level bubbles on your levels. I have a side to side level on the dashboard and a front-back level on the passenger door. As you start to climb the ramps you will see the bubbles move to level. I quickly found that if I went to brake to check the levels, the van would slide slightly back down the ramp so I used one foot on the brake and one foot on the gas pedal and moved the van into level. Once there I stopped, set the emergency brake and put the van in Park.


I got out to guide Meryl in putting the wedges in place which turned out to be very easy. Just slip the wedge in place and give it a push under the ramp.


That is all there is to it. Level!

When it is time to leave it is just as simple. The company shows in their video just pulling forward and off the edge of the ramp. I tried this and the Roadtrek came off with a slight thud. All was well but Meryl suggested trying it by removing the wedge and rolling back off the ramp. This worked. It was not hard to pull the wedge out from under the ramp and then I just put the van into Reverse and rolled back and off. The two ramps and wedges get picked up and put away and you are off.

Storing the ramps in the limited space of the Roadtrek took some doing and Meryl rearranged the outside storage cabinet to accommodate the two ramps and two wedges. Taking the tall stack of leveling blocks out helped a lot. The Andersen levelers are heavier than they look but stack easily and we got them in for storage without a problem and easily accessed to get out when they are needed.

We tried this out on the driveway at our house. The incline of the driveway is steeper than any campsite that we have ever been in - though I am not sure if the off-level campsite two years ago at the Yogi campground in Hagerstown, MD was not very close. The Andersen levelers level to four inches. The driveway drop was just more than that and I was on the very edge of the front of the ramps to get the level bubble to just inside the front level line. The van sat on the ramp in that position with no problem and we set the wedges and it was solid. I even went inside and jumped around to see what might happen. As I did that Meryl sat in the front and watched the bubble on the level. It stayed where it was.  That would be good enough and likely we will never encounter a site that far off. And if we do, we would still ask to for another site.

I would rather I always have a nice level site, but I know from experience that getting that every time just does not happen. As soon as I have an opportunity to try these out at a campground I will come back to this article and add an addendum on their first field trial. I am sure it will be fine and even better than on my driveway. (This may take awhile as our first campsite after getting these was nicely level all on its own. Nice that it was but I was looking forward to trying these out at a campground.)

Consider these. I don't get anything from the Andersen company. I am not a paid spokesperson. I bought these and paid full price.  I just want to share what I find to solve some of the things we all encounter when RVing. This one is works. I would say that this is the next best thing to pushing a button and getting automatically level - though if that were possible on my B I would still like to have that!

I am putting the table of contents link to this article on both the Living in the Roadtrek/How Tos page and the Modifications/Gizmos page as it is really more than a gizmo and an important thing to know about if you hate having to level your Roadtrek, trailer, or RV.

Wednesday, September 18, 2013

Pine Hill RV Park Campground, Kutztown, Pennsylvania

We took a trip to two different events in northeastern Pennsylvania. One was a muzzleloader gun makers fair located in Kempton, PA which appeals to reenactors and muzzleloader hunters and the other was a quilt exhibition and vendors show in Hershey, PA.  We wanted a campground that would be convenient enough to both of these events. With some research looking at campgrounds and their reviews I found Pine Hill RV Park campground located in the town of Kutztown, PA. Kutztown is the home of the Kutztown Pennsylvania Dutch Folklife Festival that is an annual event at the beginning of July and it is also home to a university. This campground is perfect if going to the Kutztown Folk Festival or if visiting the university.

The campground is very easy to get to and is right off Route I78. There is an exit right by the campground and if coming from the east ignore the exit your GPS wants you to take and continue to the next exit which is Route 737 North. The exit sign says Krumsville which is to the south. Get off on Route 737 going north and go to the intersection and make a right. The campground is down this road on the left. There is a small lit sign for the campground and the campground is hidden from the road by large hedges. This is a local residential and farm road.

The campground office is ahead to the left in a building that seems to be the home of the owners of the campground. The woman in the office was very friendly and welcoming. There is a small store in the office and there was a sign outside that said that hot fresh pizza was being served inside. This is not a restaurant but the pizza was convenient to take back to your RV.

The campground has sites with 30 amp electric hook ups or 50 amp electric hookups. The 30 amp sites can be selected with or without cable TV service. All of the 50 amp sites have cable hook ups. All of the sites have water and sewer hook ups. There are also a couple of cabins for daily rental. There are actually also four 20 amp sites.

Sites are gravel and our site was LEVEL. For a Class B and a Roadtrek this is very important. There was no problem getting level - the site was level. The sites are, of course, next to each other but not right on top of each other. There was a grass area between every site.


Many of the sites are pull though. There are 30 amp sites with cable that are backin sites along the edge of the campground. We had a pull though site.


While it was no problem, the electric box does not have its own circuit breaker for the outlet. Every so many sites had a large circuit breaker box for several adjacent sites.  

We were in a site with such a circuit breaker box (but our site did not seem to be in that box). So when you plug in, you are plugging into a live outlet. In the photo to the right you can see the small box at the bottom to the right. That is the 30 amp outlet. There are no other electric outlets at the site. The larger boxes are boxes for the circuit breakers and electric circuits that go to other sites.  You can see the water connection to the right. On the opposite side of this was an box with the cable TV connection which can be seen below.


The cable TV at this campground had the most channels of any campground that we have been to so far. When I scanned for cable channels 160 digital and analog channels locked in. Now, in that number there were duplicates and even triplicates of some channels but the selection to watch was broad and included many of the channels that you might expect at home - with the exception of the premium movie channels.

The wifi was not as good as the cable and the connection at our site was marginal. We were at almost the end of the campground so closer to the main buildings might have had better wifi. My tablet had no problem making a connection but my phone was not able to get a good connection to the wifi. Here in the mountains cell voice service is good but data service is marginal which has nothing to do with the campground.


The sewer connection at the site had a hands-free cover. The lid was on a foot pedal and lifted up without having to touch it. I have not seen this at other campgrounds that we have been to. The usual is just a screw on pipe cap.


The campground was very clean. There is a trash dumpster near the office and that is where garbage is placed. There is no trash pickup at site. The restrooms were small but very clean and well maintained. There are showers in the men's and ladies' restrooms. There is a large hall for parties, a recreation room/game room and an ice cream parlor on site (these were closed while we were there). There are shade trees but you are not in the woods - which is fine with us. There is a playground for children and there is a free miniature golf course.

The people who run this campground are very nice and are very attentive to their guests. We also found that the people in the other RVs here were also very friendly. We don't always find that. There were some very large Class A's here, trailers,  Class Cs and even a Class B other than ours.


The campground is located along I78 and there is traffic with trucks that travel along this route. We could hear the traffic OUTSIDE of the Roadtrek but could not hear any noise inside. A suppose a thin-walled trailer may hear some noise. This was not a problem for us in our Roadtrek.

We had a very nice stay at Pine Hill RV Park and we will be going back again. The events that we attended on this weekend are annual and we will happily stay here again to attend them. The gunmakers' fair at Dixon's was just down Route 737 from the campground. Hershey is about an hour away down I78. Right near this campground is a shop named Dietrich's Meats and Country Store that sells many unusual smoked meats and foods that are local to this region of the Pennsylvania Dutch. You can get sandwiches or buy by the pound here. It is not a restaurant. It is well known by any who come to this area. Also a little further west on I78 is Cabella's Outdoor store, one of their largest stores and a destination store to visit. Not only is this a great place to shop for items outdoors, fishing, and hunting but there is a room sized aquarium of local fish to walk through. This is not to be missed if you come to this area.


I definitely recommend Pine Hill RV Park. Rates for this area are reasonable.  It is located at 268 Old Route 22 in Kutztown, PA 19530. The phone number is (610) 285-6776. There is a toll free reservations number at (800) 217-6776. Their website is pinehillrvpark@verizon.net. They have a website at http://pinehillrvpark.com/

Just to note - if driving on I78 and you go through the toll for the Delaware River bridge, the toll is over $6.00 because the Roadtrek's weight puts it in the toll class with commercial trucks. The sign says a $1 for passenger vehicles but this does not apply to the Roadtrek over 7000 pounds.

Wednesday, June 26, 2013

Leveling the Roadtrek

When you stop for the night in your Roadtrek or any RV, for that matter, it is important that the RV is level. The primary reason for this is the absorption type refrigerator that most RVs have. The secondary reason is comfort. Since we have a condenser refrigerator in our Roadtrek we don't have the problem requiring the refrigerator to be level, but the typical Roadtrek will have an absorption refrigerator and this article is going to be very important for you.

For us it is a matter of comfort. I don't like sleeping with my feet higher than my head and I don't want to feel like I am walking up or down hill walking in the Roadtrek. As to leveling side to side, you will either roll across the bed or watch things roll on the counter. As I have written many times, we had our Roadtrek delivered from the factory without a three way absorption fridge and purchased and had our dealer install a condenser fridge which works just like your refrigerator at home. This type of refrigerator does not have to be level to operate without a problem and one of the reasons that we did this is because we knew that there are specific places we would go and park for the day or more that would not be level and we would have to leave the fridge running all of the time.

Let's talk first about the refrigerator. The typical RV fridge is a three way powered absorption refrigerator. This means it can be run on propane OR battery OR 110 volt current. It works with heat exchange and the unlike your home refrigerator there is no condenser to keep the coolant in the pipes of the fridge moving and circulating. The absorption fridge (your RV fridge) relies upon a level position to keep the water or coolant in the pipes moving - simply, gravity does not allow a liquid to flow up hill.  So what happens when the RV and therefore the fridge are not level - water flow in the pipes of the fridge stops, there is no water flow to the boiler section of the fridge, and the water in the boiler pipe dries out. There is, apparently, rust inhibitor in the pipe that dries up and blocks the boiler tube. The result is when running this way for too long is that the boiler pipe will get too hot and the cracks from the gas pressure inside the coils.  If this happens the fridge is damaged to the point that some say it is beyond repair and will require expensive replacement - which, I have read in doing research about the RV fridge - is one of the most common installation jobs that RV shops have. Why? Because too many don't know that the fridge inside the RV has to be kept level.  I have also read that newer RV absorption refrigerators do not have to be as level as older models.  What is level? Level is relative. Some say as long as you are comfortable inside the RV the fridge will be fine, but I may be a lot less comfortable on the same angle that you may be comfortable with. There seems to be a reluctance to put an angle to the tolerance of the fridge but I have found most often stated that the RV needs to be no more than, no I am not going to give any numbers that are uncertain - LOOK IN YOUR MANUAL FOR YOUR SPECIFIC REFRIGERATOR. Since you most likely are checking how level your Roadtrek is with a bubble level, I would say that the bubble should be somewhere inside the lines. And if you park even for sightseeing and you are running your fridge inside while you are away, you are going to also need to be level - for these very same reasons. I don't mean a quick stop but hours and hours away - and this still depends on how off level your parking space is. I have been to attractions where you park in a grass field and are uphill.

Most campgrounds advertise that they have level sites. Well, in our experience so far, few campgrounds have level sites. One problem may be that a gravel or dirt site designed to be level for a large RV is going to have a large area in the middle (between the wheels of that larger RV) that is not quite so level. Paved sites should be level, but few campgrounds offer paved sites. For the most part with the Roadtrek, drive around all parts of the site you have and often you will find one spot that is level enough for comfort and your fridge in your Roadtrek. But sometimes there is no such spot. What you have to do then is level your Roadtrek.

Leveling large RVs - Class As and Class Cs and trailers - can be easy. You push a button and legs drop down and self-adjust until the unit is level. Nice. That is a luxury item even on some of these.  A trailer can be leveled by cranking down the leg in the front that holds the trailer front up when not hitched to a vehicle. This leg can be adjusted in height and you can get to level front and back. And if the leg is not long enough you add wood boards or what I am going to tell you about here in this article. Some Class C's have crank down legs that do the same thing. Roadtreks and other Class B RVs have none of these. There is no room under the chassis to install what is required for self-leveling legs. For the Roadtrek the way to level is with blocks.

You know what Lego Blocks are. Imagine these much, much larger. Here is a photo of a leveling block -


 The block is about an inch or so high and about 10 inches square. It is large enough to sit below a tire and fully support the bottom of the tire. The blocks we purchased are Lynx Blocks and we choose these because they were the easiest to find (most Walmarts sell these in the RV section). These come ten in a package with a storage bag. Other companies make these blocks also. There are yellow ones made by Camco that look similar but are more solid on top (not sure it makes any difference) that work the same way. Those come eight to a set with a storage bag. Cost is about the same for all, though with Lynx you get more blocks. Lynx also sells caps that fit on the top block to make them more sturdy for the tire to sit on a flat, smooth surface and they sell tire stop blocks that interlock with the Lynx blocks to prevent your tire from rolling to far when getting up on the blocks. (I only have the blocks and not the caps or the stop block.) The full bag fits easily in the outside storage compartment of the Roadtrek (along with all the rest of the things kept in there).  Just like Lego Blocks you ASSEMBLE these the same way to get the tire higher if needed.

They are easy to use - you just have to remember to pick them up and put them away each time you leave.  For most campsites that are just off level, we have found that one block under each of two tires will get you level.

Here is what you do. If you are off level front to back - back higher than front - you put one block under each of the two front tires.  If you are off level  with the front higher than the back, put the blocks under the two rear tires. If you are off level side to side - passenger side higher - put the blocks under the tires on the driver side. If the driver side is higher, put the blocks under the tires on the passenger side.  The big question, I hope you don't ask - what if you are off level both front and back and side to side? My solution would be to get another site. I am sure you could make a combination but you must get blocks under all of the wheels - and my personal opinion, is that I would not want to do this.

If you need to be up higher than one block, put two blocks end to end and a third on top between the two. Higher than this requires more blocks than are in the package of ten. To go up three blocks you put three down on the ground, two on top of that, and one on top of that. This takes six blocks and you have ten - so if you encounter sites this off level you need to carry two sets of blocks.

Here is how you use the blocks -

 Here we need to raise the back up as the front is higher and the Roadtrek is off level front to back. Push one block under the tire as far as it goes and stops. Do this on the other side tire also. Now, start the van and very slowly start to drive a few inches forward. This is done best with two people - one outside to yell STOP! Otherwise you will very easily drive right off the other end of the block. Check your bubble level and look to see if you are level. Hopefully, you are and that is it. Your van tires will sit on the blocks while you are there.(Just to note that there is no reason why you could not put the block in front of the tire and drive forward.)

Here is where one block got us during our last trip to the previously mentioned campground.


There actually is not much more in the front that the bubble could go. One block did nothing for us. So we went to an assembly of three blocks to raise us two block heights. 

Two block heights - 

Rolling on.


And then on - 


This still did not bring the Roadtrek close to level on this site. The bubble barely moved in the level. So we rolled right back off the blocks. actually tried a few more times moving around the space, and then gave up as we did not have enough blocks for three block heights (one dozen blocks required).

I had hoped to show you photos of the Roadtrek up on all of the blocks and finish with a photo of the bubble in the middle just where it should be, but as you know if you have been reading along recently, that just did not happen. We gave up and asked for another site - that is the easiest way to level your RV but that will not always happen as there are times when there are no other sites to offer.

If you are leveling only for the sake of your refrigerator and not your own comfort, some recommend putting the level inside the refrigerator (some say the freezer) and use that as a reference for level. At that location, the fridge will be level even if the rest of the van is not. Others might want to compromise between the two and have a fridge that is level "enough" and a comfortable interior in your Roadtrek.


Wednesday, June 19, 2013

Return to Yogi Bear Jellystone Campground, Hagerstown, Maryland

We were at Yogi Bear Jellystone Campground, located in Williamsport, Maryland, for our trip to For Frederick in Big Pool, Maryland a year ago. This campground is located in the town of Williamsport but is listed for the area of Hagerstown, Maryland. For our trip to Fort Frederick again this year at the end of April, we returned to this campground. When we travel we travel to relax and enjoy the time we are away. We don't want any unpleasant surprises. This visit with Yogi Bear brought unpleasant surprises. We had a few surprises last year when we stayed here, but this time was the ultimate.

We made our reservations over a month in advance. We wanted to be sure to reserve a space in the "premium" area away from the rock and tree hazard campground sites and roads that we experienced last year. A year ago, we had reserved a site in this section of the campground also, but when we arrived we were told that someone was in our space and we would have to be relocated. We were relocated last year to a "standard" site with no difference in rate. As per the website, at this time of the year, the premium sites and standard sites have the same rate. I tell you this now for what is to come in our experience this year. So - our reservation for 2013 was a "premium" site located in an open section of the campground with no trees or rocks in the way. That is what we wanted.

I made sure to arrive at the campground while the office was still open. This was not easy making the seven plus hour trip in one day. We did not stop anywhere along the way other than for lunch. There were several places that we would have liked to stop at but that would have gotten us there after the office closed. We arrived as anticipated and the office was open.  As we entered the campground we immediately noticed that the entrance road had been repaved. Gone were the large pot holes and ruts that were there before. The interior roads were still the same dirt and/or gravel. We went into the office and were told our site number and were told to wait for the "ranger" in his golf cart to accompany us to the site. Let me explain, that all employees here are called "rangers" to be like "Ranger Smith" in the Yogi Bear cartoons. Well, Ranger Smith met us outside and we followed him in the Roadtrek to the site. The site was a large pull through - and that was what we wanted. What we did not expect was that the site went uphill. Ranger Smith showed us the hookups and was off. I got into the Roadtrek and drove around the site looking for a spot that was level or at least close to level. The site was level side to side but with the hookups on the passenger side, we had to face in the direction that we were in to hookup and the site was on a steep incline in that direction. This would mean that when lying down to sleep, your feet would be hirer than your head.  There was no place on the site that was any different. We got out and decided to level the Roadtrek with the leveling blocks that we carry. These are large "Lego" type blocks that fit together in different combinations that you drive up onto and even out your RV with the angle of the ground. We would need blocks under the rear wheels. We tried one block under each rear wheel - and there was no significant change. We tried two blocks under each rear tire which requires a combination of three blocks to achieve. Still there was no significant difference. Three blocks under each of two tires requires an assembly of six blocks for each tire and the set of blocks is a set of ten. I suspect that they don't expect anyone to need to raise their RV that high to get level. The bubble was pushing at the end of the level in my Roadtrek.   At that point I asked Meryl to go to the office - walk to the office - and tell them that we needed another site and I would stay there and continue to find a spot on the site that we might be able to get even close to level. As it turns out there was none. While I was waiting for Meryl or a "Ranger" to return, I looked around. All of the sites along side of us went uphill at the same dramatic angle. I saw the levelers on trailers and RVs (large RVs have mechanical systems to level with) built up with blocks and wooden boards. I saw the same in the sites in front of us and behind us.

"Ranger Smith", the same man who escorted us to the site arrived in his golf cart. As Meryl was on foot and the office was a walk of distance, she had not returned yet. He saw what I was talking about and pointed to a site behind us. This was a back in site which was fine with me if we would be level. That site was not only on an incline but it was also off side to side. He pointed to another site in the row in front of where we started. Again we were on a steep incline. I pointed this out to him - how the front was higher than the road and it all went uphill. I held my composure and remained polite but did say, "The sites are supposed to be level. These are not even close." He did not say anything. By this time Meryl had arrived. We had tried one more and then he pointed to one that actually looked by eye to be level. "Try there," he said. OK. I pulled in and to my surprise it was very close to level. It was good enough and I was relieved. We thanked him - a lot - and before he drove off on his golf cart I asked him if we needed to go back to the office and let them know that we are now here and get a new hang tag with the new site number on it that needs to be hung from the rearview mirror while you are in the campground. He said no - he said that he would go back right then an inform the office of our new site and all we needed to do was change the number on the tag ourselves. Fine.

We settled in. Checked the power box and instead of the glass fuses that the site we had last year had, this box had circuit breakers - which is what we have found in every other campground we have stayed in. (Hooking up with a glass fuse means you are plugging into a live 30 amp or 50 amp outlet. It is best to have the circuit breaker on OFF and then plug in - and then turn the circuit breaker on.) the power was good and there was even a light on top of the power box. We assumed that this would go on in the dark (it didn't) as this is a very dark campground at night. For the first time since we've had it, we put out a little flag stand with a banner on it staked into the grass on our site. This was to do a little personal decoration to the site as we see so many others do (often to excess)  at campgrounds and also to show that the site is occupied when we are not there during the day.

It was early and we decided that before leaving for dinner we would walk around the campground and explore in this area, as last year we had not really looked in this back section. We walked around for an hour and a half. I took some photos which I had intended to share with you all here in this review but under the coming circumstances, there really is no point. While we were walking we passed "Ranger Smith" (the same man who got us the new site)  - twice - who waved and went about his business riding in his golf cart.

Over an hour and a half later from getting settled we left the campground to go to dinner at a restaurant. When we came back we went into our space, hooked up for the night and we were delighted to see the extensive selection of television channels that came in on the campground's cable connection. We settled in for the night happy.

The next morning (Friday) we got a late start getting out to our event at Fort Frederick. It was after 11 am before we pulled out of the site and went on our way. We had a pleasant day and then returned to the campground at 5:30 pm. We drove into the section that our site was in and drove down to it - not seeing any open sites. I thought that we were in the wrong row. I asked Meryl and she looked at me and said. "There is a big trailer in our site." I looked and there it was. Our flag was gone too. I said to Meryl that we would drive to the office and that I was not going to confront these people in our site. If a confrontation was necessary the campground employees should do it. When we walked into the office and I told them what happened, we were sent to a lady at a desk behind a partition. "Oh", she said,"those people had reserved that site." She followed with, "That's OK, I can move you to another site" It was in the standard section. What!?! (Remember what I said happened to us last year - how come, as with what happened to us, they were not sent to another site?)  I asked if "Ranger Smith" had informed them of the new site he changed us to last night. She said he had but they realized that it was reserved. She claimed to have come to find us then. I told her that we were in the campground at that time for more than an hour and a half and no one including "Ranger Smith" who we saw twice during our walk came to find us and he never said a word to us. No note was left on our van while we were walking around the campground.  Basically she did not care and she then told me that she would refund a one day's difference to us from the premium rate to the standard rate for the site she was sending us to. What?!? The sites were supposed to be the same rate. I got no refund last year we were sent to a standard site rather than our reserved premium site. There were no apologies and no concern to make sure that we were "satisfied". When I asked about our flag it was handed to us with the stand from behind the front counter. She did offer us a choice of five sites in the woods with the boulder hazards at the sides of the road - exactly where we did not want to be and the reason why we were sure to make the advanced reservation that we did. She recommended one that was "secluded" and level. It was between two large boulders and we did not even take a chance on trying to squeeze the Roadtrek in to this site that was shaped in a curve.

Of those five sites - and we tried them all except the curved one mentioned - one was almost level. The rest were not even close - front to back or side to side. The one that we settled on had a broken power box  - with glass fuses - that was hanging at an angle on the post that contained the box's power cable. The box moved when it was touched. Plugging into it later that night resulted in it leaning over. (I will share that we tried to contact the campground we were going to the next night in another state to just leave Yogi behind right then and there, but that campground's office was already closed.) We had the hazards again of getting into the dark campground at night and making our way through the large trees, sharp turns, and boulder rocks along  the road in the dark. We were furious and we were stuck for the night.

That night when we hooked up, I thought that the cable connection did not work. We connected the cable and few of the channels that were scanned into the TV on the cable the night before were there and the ones that came in were fuzzy. We reconnected the cable three times. I rescanned the channels and discovered that this area of the campground had different cable channels than the side we were in the night before. The selection here was half what there had been and the choices were basic broadcast channels and a few other channels with fuzzy reception.

We were very happy to leave there the next morning and thankful that we had not planned to stay at this campground through the weekend as we had considered when planning this trip. Here is the kicker- when we returned home five days later, there was a message on our answering machine - AT HOME - from Yogi,  made on that Friday of the problem at about 1:45 pm telling us that there was a problem at our site and we should come to the office. Well, I guess calling you at your home 400 miles away when you are there with them in Maryland is their idea of contacting you. They never asked for a cell phone number which we would have gladly given them when we arrived. So, here was proof that their attempt at contacting us was not Thursday night but when this trailer arrived that Friday afternoon to check in. That was when they realized there was a problem. So they lied to us when we were there. They lied again when they said they took our flag away that Saturday morning as we actually got to speak with the people in our site and they told us that they had to argue with the Yogi people to take our flag away from the site and that the Yogi people were surprised that it was there. (As if we were never there.)

We will never stay in Yogi Bear Jellystone Campground in Williamsport/Hagerstown, Maryland again. I suggest that you avoid it. The people who work/run this campground have no concern for their guests at all. There is no effort to make sure that a guest feels that things have been made right. Management is as if Yogi himself was running the place. Though, perhaps, Yogi would do it better. They are totally disorganized and seem to function in a whim. Stay away! We will be contacting Yogi corporate with what took place here.

There is one other campground in this area and, if we make the trip to this area again, we will check them out. Stay away from Yogi!


Wednesday, February 13, 2013

Are You On The Level?

For a variety of reasons when you park your Roadtrek or any RV on a campsite, you want the RV to be as level as possible. One of the reasons is for a three-way propane RV refrigerator. This does not as much apply to newer models of these fridges as much as it does to ones that may be in older Roadtreks or RVs but even on a newer model propane fridge you do not want it to be too far off level. At least, the inside of the Roadtrek should be comfortable to stand in - if you are parked on an incline or decline and are going to be running the refrigerator. A propane refrigerator works differently than your fridge at home and will not run efficiently and can be damaged if operated on a steep angle. The other reason you want to be as close to level as possible is for comfort. Park off level and things roll off counters, you may find yourself walking up or down hill as you move around inside, or you may roll to one side of the bed.  I exaggerate some, but you really want to be as close to level as possible. 

How do you know if your Roadtrek is level? This is something that the company did not build into your Roadtrek, but the solution is as simple as bringing a level inside the van.  A level is simply a tube with liquid inside and an air bubble floating in that liquid. There are various types of levels. There are round levels that will tell you which way you are off level in 360 degrees all around. There are straight tube levels. Now there are electronic levels. In fact you can download an app to your Iphone or Android phone or tablet that will function as a level. (Just be aware that these apps require that you calibrate your device with the app on a perfectly level surface to get it to function correctly.) When checking for level you can be off level in any direction. Usually, though, two straight tube levels are sufficient to tell you if you are level with one positioned front to back and the other positioned side to side.

I started out with a round level. This is just a little disk and the bubble floats in the circle. If it is in the middle of the circle you are level. If it is off, that is the direction that must be corrected. The trick with this - and with every level is that the level must be sitting on a level surface to start with to be able to tell if the vehicle around that surface is actually level. In other words, if a counter top is not level to start off with, any level put on that counter top will always be off level no matter what is going around below that counter top. Things are not built quite so precisely. I soon discovered that the ground we were on was level, but my Roadtrek counter top was not. So putting the little round level on the counter to check the van was no help at all. I did discover that the middle of the floor just behind where we sit when driving was level. So if the level went there, it would pretty accurately tell us if the whole van was level. This worked for a while but started to be literally a pain in the turning around and looking down to see if we were level - that is once we put the level there to start checking. I knew there was an easier way.

Many RVs put the levels on the outside of the vehicle - on in the back and one on a side. This way a second person can see if you are level. This does require that a second person be outside to check while the driver finds the most level spot on the campsite pad or that the driver stop and keep getting out to check. Not good. So where to put the levels in a Roadtrek. The best place would be in the front fully and easily visible from the driver's seat.  I looked around inside and eliminated various places because I wanted a spot that was flat, horizontal and easy to see. I found two spots that work well.

First, purchase a pair of levels from an RV store (or Walmart). The ones you will see in my photos are cheap, work well, come with adhesive and screw holes, and only take up about two inches of space.

Second, find a perfectly level spot to park your RV on when you install your levels. This could be the hardest part. You can always level your Roadtrek with leveling blocks anywhere so that you have a level Roadtrek. I am not going to talk about leveling blocks here but will in a future article (when it gets warmer outside). Why do you need to level your Roadtrek first? If you don't, how will you know that your levels are level to the van to start out with? I knew that in one particular campground that we go to that has cement campsite pads, that the sites are for the most part all level. I waited for our next trip there to install my levels.

The two spots I selected are on the middle of the dashboard and on the side of the passenger door. I can see both easily and not move from the driver's seat. At night, it does require that I put on the light inside or use a little flashlight that I keep in one of the cup holders in the dashboard. Not a problem!

Here is where they are located:


To mount the levels, I used the adhesive backing that comes on these levels. Remove the tape from the adhesive.  Hold the level over the spot exactly where you want the level to be. MAKE SURE THE LEVEL BUBBLE IS EXACTLY IN THE MIDDLE. Push the level against the surface and it sticks. You get one shot. If it goes on off level, you are going to have to try again and you will need to peel the adhesive off the back of the level and replace the adhesive. I actually found it easier to just buy a new set of levels. (I did not put it on wrong - one fell off and I will get to that in a minute.)


Here is the level on the dash. This one went on nice and easy and has stayed on ever since. The glue and the plastic that the dash is made of worked well together. This spot seems almost made for this purpose!


 Here is the level on the passenger door. I don't know what type of plastic Chevy uses to make the door panels and column covers, but no glue seems to hold to this for very long. The adhesive on the back of the level lasted for only three days. This level fell off on the way home from that trip. I have tried gluing and using self-adhesive strips on other parts of the van that have this same plastic and sooner or later every one of them has fallen off including an epoxy.  When I put this level back on I had a reference pencil mark on the wall that I had made when I installed the levels. Just in case, what happened, happened. I did buy a new set of levels and used one to replace the one that fell off. I used the adhesive again to put it on and then I used two stainless steel sheet metal screws to permanently hold the level on. I was very careful to make sure that in the process of screwing these screws in I did not move the position of the level.

These photos were taken with the Roadtrek parked on my driveway which is apparently very level side to side and as expected, on an incline angle toward the front of the van. This is a good example of how the levels work. If the bubble is on one end of the level, the van is lower on the other end. So you need to raise the lower end until the bubble sits in the middle. Yes, very basic stuff, but you would be surprised to know how many get confused by this.

Most campgrounds will tell you that all of their spaces are level. I have begun to think that they are not telling the truth OR that these spaces are level for a much larger RV and with one of the shortest and smallest RVs there is, our Roadtreks just don't find the level spot that easily. I will drive around the site back and forth and side to side to find a place where both bubbles are in the middle. So far, more often than not, they are close enough, though sometimes it means stopping in the space on a diagonal. That is it. Then get out and put down the leveling markers that I have told you about and you are on the level!

Wednesday, December 12, 2012

ON THE LEVEL

When we arrive at a campground site one of the first things that we do when we drive the Roadtrek up onto the site is find a level spot on the site for the Roadtrek so that we know that there will be a level spot on the site when we come back later that day, the next day, and so on. Just about every campground will claim that all of their sites are level, but that has not always proven to be true. We were back at one campground this past season that we had been to twice before that has concrete paved sites and both sites that we had in the past were perfectly level no matter where on the site the Roadtrek stopped, but this past summer, the site pad was off slightly. We were able to find a spot that was level enough - and this is mostly for comfort in side than anything else. But coming back each night, we were looking for that spot again - and this is something that we have been doing at just about every campground - finding that one spot on the site that we found that was level.

I had an idea of marking the spot in some way. On the concrete pad, it was easy and we purchased a box of sidewalk chalk and marked the places the tires were in on the spot that was level. This does not work on a gravel or dirt site. There is nothing that the chalk will mark. I decided to find a more universal solution.

I started looking for what I could put down on the ground that would not interfere with pulling the Roadtrek in and out and what would remain (as long as no one took it) when we came back to the site each time during our stay. I looked at a variety of things that might work. I started with flat metal bars and decided that they would work well, but I wanted something that would not rust and would be a more convenient size without having to cut anything down. In a store, I walked through the hardware aisle and came upon something that in construction and woodwork are called mending plates. They came in galvanized metal and also brass. While galvanized metal is not supposed to rust, brass will not rust and even though the brass ones cost a dollar more, that is what I settled on. I bought a package of four inch, straight mending plates that are a half inch wide. I also purchased a roll of yellow reflector tape. I chose yellow over red as I felt that the yellow would show up better in the dark when pulling in - even with the help of a flashlight. Below is a photo of what I made -


The reflector tape was one put on the top of the mending plate and turned over the sides with a good overlap on the bottom to hold it on. I took a piece of clear packing tape and covered over the exposed holes on the bottom so that the adhesive in the hole on the reflector tape would not fill with dirt. Simple and quick to put together for just a few dollars.

Here is how they are used. Find a level spot on the site with your Roadtrek. Take one plate and it it along the side of the rear tire (driver's side of the van), right at the edge of the tire. Put a second plate at the very back edge of the tire so that you know how far back to back in. (If you are in a pull in space, do this instead on the front edge of the front tire.) Next, take a third plate and put it along the side edge of the front tire.


Now, when you leave the space and later return you just have to look for the plates on the ground and pull in along side them stopping when the tire reaches the cross plate (rear or front). If these plates on are on the driver's side you can see them in the side mirror as you back in during the daylight or  if illuminated with a flashlight by your partner outside directing you into the space at night.


This really does work - on concrete, gravel, grass, or dirt sites and these are small enough that they will not be noticed by anyone but you - and who would want to steal this. Of course, someone who is not nice could come and move them, but you will know right away if you level(s) are off when you pull in.  It makes for quick positioning every time you come back to your space. If you are in a space that is just not level and need to use the Lego-type leveling blocks, just mark the location of the blocks with the same plates and you will not have to leave your blocks behind - as these do get stolen. And add a note on your departure checklist to collect your plates and put them away before you leave for the last time.

UPDATE -

Over time of using these, there have been several times when we have returned to the campsite and found these missing. I have made a larger and more obvious version using a block of wood with a red oval reflector on top and these on the front edge - in addition to what I have shown in the photos above. And sadly, because it seems that children in the campground find these attractive to take, each has been labeled - "Do NOT touch! Do NOT Move! Do NOT STEAL!"  We have been using these now for several years and they do work in getting us back to the spot on the site that we have found to be level - and marked with these - without starting from scratch each time.