The title of this article is an expression that I am using a bit differently. Fourth of July - and the days before and after this year in the Middle Atlantic states - were hotter than a fire cracker. Temperatures were over a hundred and we were traveling in Pennsylvania in our Roadtrek.
I made the reservations for Fourth of July at the campground - Old Mill Stream Campground in Lancaster, PA - three months in advance. When I made them, I had not been able to make reservations for Memorial Day weekend in any campground in Lancaster, and decided that I would make this Fourth of July trip for four nights and five days. Then, as you know, if you have been reading along, I got last minute reservations in Lancaster for Memorial Day - the only reservations that I could get anywhere. So our trips to Lancaster were coming close together and this is something that I try to space more apart. But there are things to do in this area of Pennsylvania around Fourth of July. As we did last year - and every year since I was a boy - we go to the Kutztown Pennsylvania German Folk Festival - or the Kutztown Folk Festival as it is now better known. This takes place from the full weekend before the Fourth of July to the full weekend after the Fourth of July in the town of Kutztown, Pennsylvania. People come from all over the country to attend. So, Pennsylvania over Fourth of July is a given for us.
Fourth of July fell on a Wednesday this year and that posed a question as to what was Fourth of July weekend - which actually created a problem for many tourist oriented places this year. Was it the weekend before leading up to the Fourth or was it starting on the Fourth and leading up to the next weekend. Many chose the first weekend. Some the second. We went during the week. We left on Tuesday and stayed through Friday night, driving back at night on Saturday. The campground was busy throughout. They had reservations for the weekend before, during the week, and the next weekend.
I was able to reserve a site that we have been in before that is easy to get in and out of. I have been uncertain about this site because it has not always been level. There have been a time or two that we were in this site that we could not find a level spot. But it is a very convenient spot - on the end of a row off the main entrance and exit - and we have been requesting this space. And for this trip I was able to get it. More about the space later.
Before we left, we received our Easy Pass statement. Easy Pass is the electronic toll transponder that automatically charges your charge card when you drive through a toll booth. It is in NY and several other states including Pennsylvania. For the past year we have been comparing the tolls paid on the Pennsylvania Turnpike for the Roadtrek and for our car. They had not seemed any different, but suddenly on the past two statements the Roadtrek tolls are higher. There is a higher toll on the PA Turnpike for heavier weight vehicles and apparently with Easy Pass they have started to enforce this. There are a few ways to go to Lancaster. Using the PA Turnpike has been how we have gone for many years, but the GPS is always trying to send us off the PA Turnpike around Valley Forge to take two limited access roads to Lancaster County that would take us more directly to Old Mill Stream Campground. We decided on this trip that we would try that route.
We headed out early - around here early means as soon as after rush hour as you can without still sitting in stop and go traffic. We did encounter the usual construction traffic through Brooklyn getting to the Veranzano Bridge to take that over Staten Island - which is also under road construction and over the Outerbridge Crossing into New Jersey to the NJ Turnpike. Interesting side note - the Outerbridge Crossing is not named this because it is an outer bridge. It is named for Mr. Outerbridge. Anyway, the TomTom calls the Veranzano Bridge the Veranzano Branch and the Outerbridge Crossing is called the Outerbridge Creek. So much for Tom Tom.
It took us the usual delay times to get to the New Jersey Turnpike which also is completely under construction and that to the PA Turnpike which was not completely under construction but just in varied locations. We decided to take this "new" way to go and pulled off at Valley Forge and headed to Route 202 which lead us to Route 30 - which once you get into Lancaster becomes a local route and is the road that the campground is on. It seemed to make sense. The problem was that both roads were also under construction - major construction - even on the day before the Fourth of July and the road surfaces were completely broken up and in some points temporary lanes were formed on the sides to bring you around the work being done. This all added about an hour to the trip - which was delayed from all of the other construction. It did save us several dollars in tolls. My opinion on going this way again is still out - when the construction is finished it will be great - but until then, I am just not sure.
We arrived at the campground and checked in. I don't think I have ever told you about checking in at a campground. It really is no different from checking in at a hotel. You pull up close to the office and out of the way of other RVs and trailers that may need to drive through. Inside there is a desk and someone, hopefully, with a smile that will register you in for the days you will be staying. Unlike many hotels, you pay in full up front. If you will be there for four days, you are asked for payment in advance for all four days. You are then told your site number and given a map and that is it. Unlike a hotel, you do not check out. When you leave, you just leave. There is no need to go into the office to say you are "checking out". I did not know this last year and they looked at me strange at a campground when I did this.
When we were checking in on this trip we were asked if we wanted to reserve the site for next Fourth of July. I first said no because I was not sure when we wanted to come down for Fourth of July a year from now - but we were told if we did not make the reservation now, there was someone already asking for our site for next year - and if we took it, it would have to be for the corresponding days next year - and not the Saturday at the end as the space was already booked. The one thing I like about this campground is that you can cancel right up to the day before. I was tired from driving and I just looked at Meryl. She said, "take it" - so we took it. This is a very popular area and even with the many campgrounds that are there, holidays book solid way in advance.
We then did our usual routine as I have written about before. We went to the site and backed in. I was amazed. When I randomly stopped the two levels in the front of my Roadtrek were on level. Wow! There has been some work done on this site. It was level - and I found level spots to stop on the site the whole four nights.
End of Part 1 - Part 2 is next week.
Roadtrek

Wednesday, July 25, 2012

Wednesday, July 18, 2012
The Water System
I wrote what follows on a forum in response to a fellow Roadtrekker who was having problems getting the water to work on a Roadtrek 210. While it seems that the layout of plumbing is different on several of the Roadtrek models - and through the years on the same model things seem to change, the basics are the same. It is a simple and complete explanation of getting the plumbing on your Roadtrek to do what it is supposed to do - get the water flowing.
The Roadtrek 190 has two fresh water tanks - one in the front located outside under the driver's side and the other is inside in the rear of the passenger side (you cannot see the tank it is not in the living area). The Roadtrek 210 has the same two tanks. The Roadtrek 170 and the Roadtrek's built on Sprinters have one fresh water tank and these are tanks outside the van like the front tank on the 190s and 210s. If your Roadtrek has only one tank, as you read through this disregard what I write that involves the rear or interior tank. The water capacity of the two tanks together is not larger than the capacity of the one tank models. The water is just split between the two tanks. The purpose of this is to enable water use in freezing weather if only the interior tank is used and the inside of the van is kept consistently above freezing. This would also involve putting anti-freeze into the two waste tanks so that they would not freeze. When the Roadtrek is set up for use only with the rear, interior tank - this is called "Winter Mode". When the two tank Roadtreks are set up to use both tanks - this is called "Summer Mode".
I am going to step through all of this so that you can get the water all working. Keep in mind that even though you may have a different plumbing layout, the valves are all the same but in different locations.
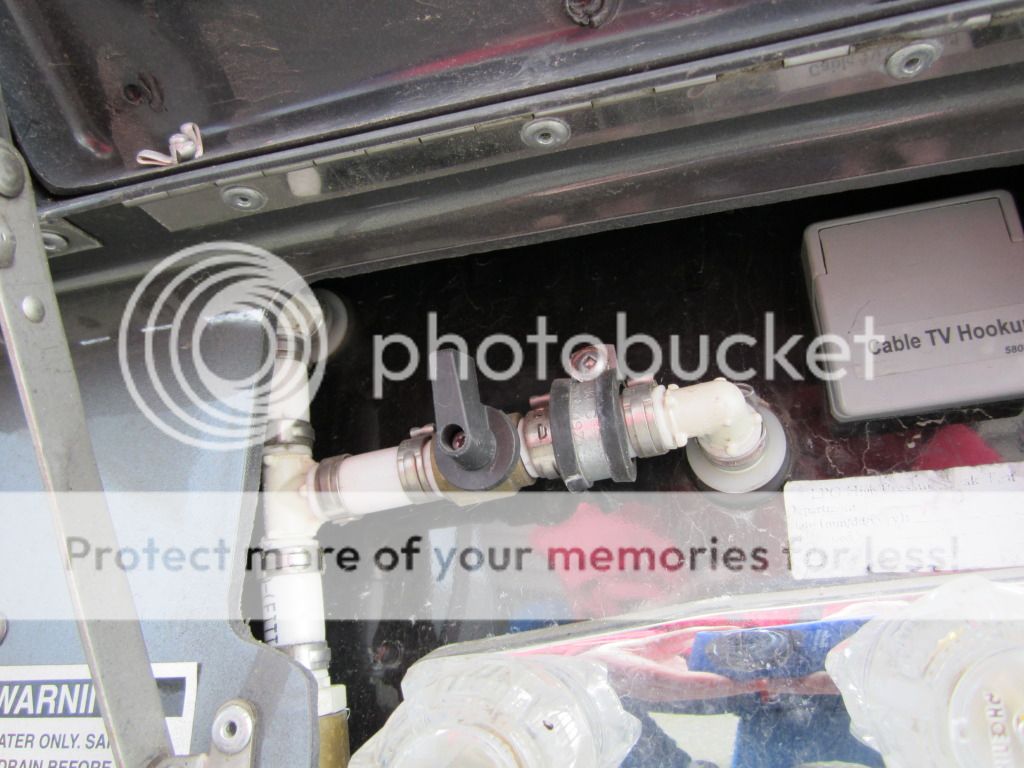
First - we are going to focus on getting everything flowing with your tanks. Outside at the city water valve - turn that down pointing to the ground. If this is open you will draw air into the system so you want it closed. Then - The so-called summer mode requi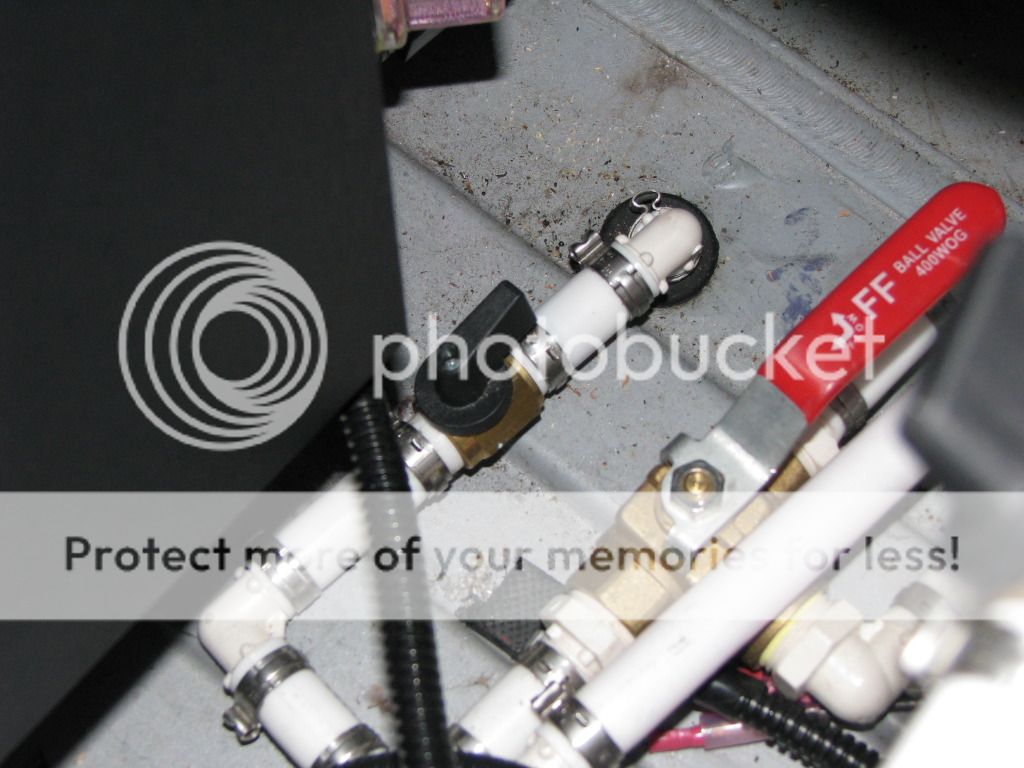 res that two valves be open - one is the red handle valve inside and the other is the small black valve that sits next to it. The little black valve sends water from your rear tank to your front tank. The red handle selects which tank the water is coming out of and you want the water to come from the outside (front) tank. So this handle must be turned so that the handle is inline with the pipe (and not across the pipe). The black valve handle needs to be in line with the pipe also - so that that water from the rear tank flows directly into the front tank. With this you are now set to run water from the two fresh water tanks to all of the faucets and the toilet.
Next - let's get your hot water tank set up. You must have all valves pointin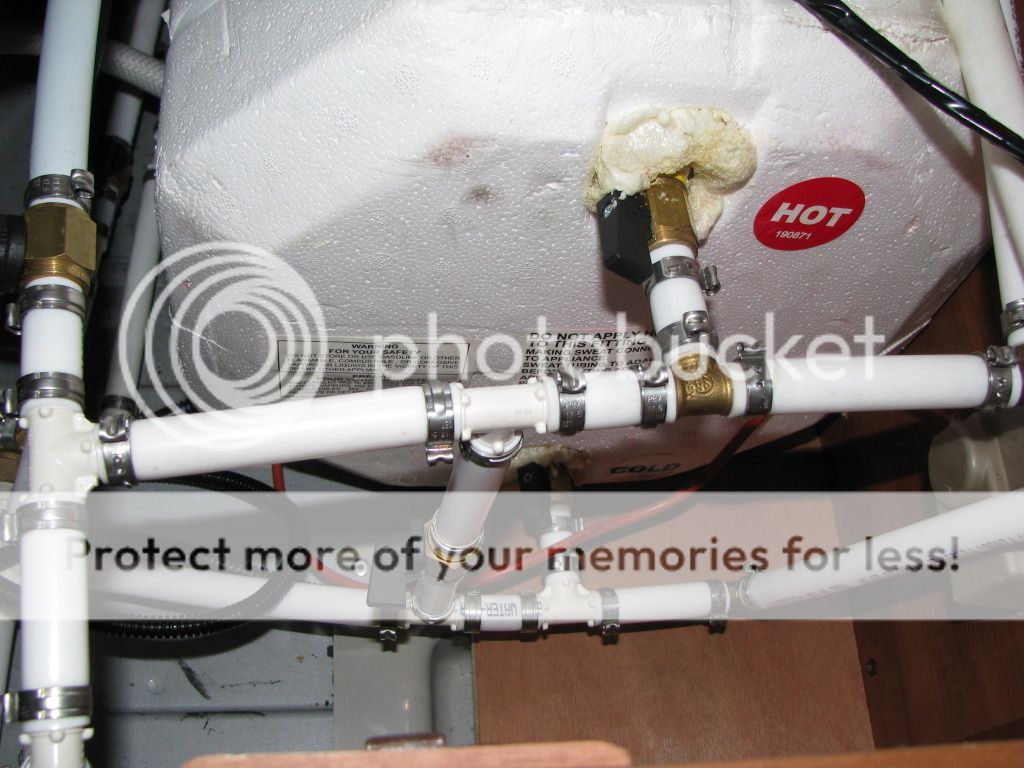 g toward the aisle - they look like they are all pointing the same way - though actually the top and bottom one are open and the middle one is closed. Yes, it is confusing. The top and bottom are open for the water to go into the hot water tank and come out of the hot water tank and the middle one is closed so that water does not flow between the top and bottom pipe (which you only want to happen when the hot water is bypassed). If you read our article on Winterizing you will see what you do to BYPASS the hot water tank for the winter.
You should now be ready to get water through your tanks. Fill your rear tank and your front tank through the door frame holes. Just for the heck of it, make sure your exterior drain valve is closed just to make sure water will not pour out of the tanks when you put water in. My Roadtrek does not have a valve, but has a screw cap. Take off the screw cap and the water in the tanks pours on the ground. My drain is located right under rear corner of the driver's door underneath the Roadtrek. I understand that some Roadtreks have an actual valve to turn -and not all models have the drain in the same location. Look at your panel monitor and you should see two full tanks. You are now ready to go.
Go inside. Turn on your battery disconnect switch - make sure you have battery power because you are going to need it. Turn on a light just to make sure or you can just push the test button on the monitor panel and you will see the battery level. When the battery disconnect switch is ON there is a red LED light on the switch that comes on.
TURN ON THE WATER PUMP - switch is next to the Battery Disconnect Switch. A light should show that it is on.
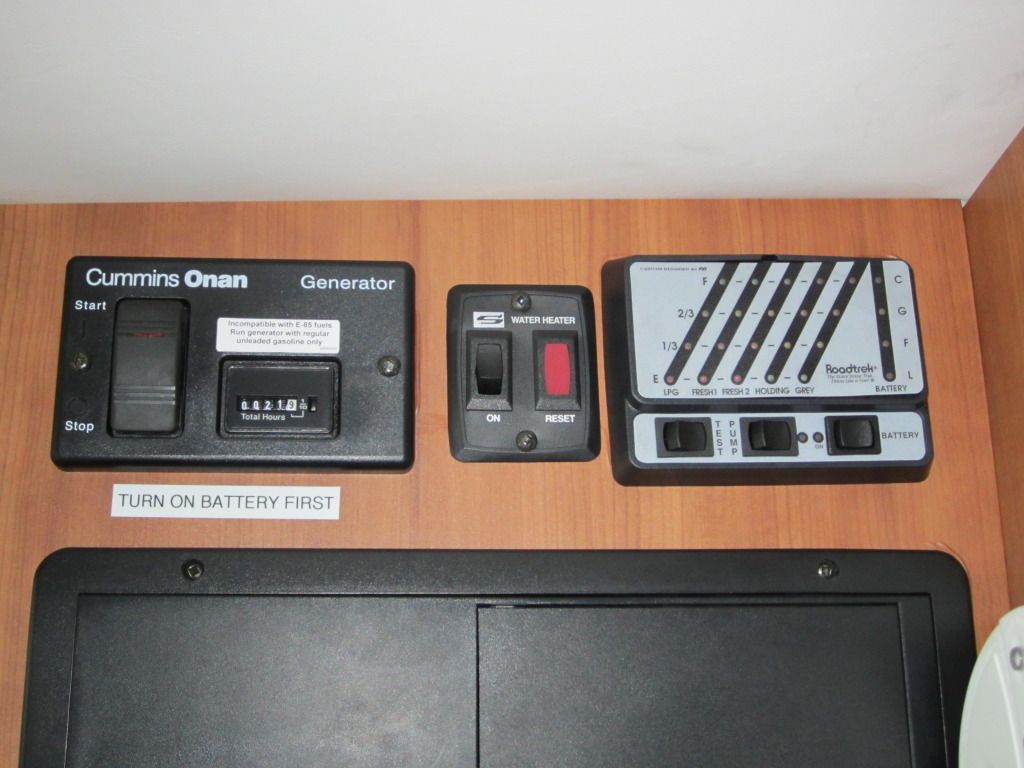
Go outside and turn on your Propane. It helps to light the stove for a minute just to see that propane has filled the lines.
Now, open the kitchen sink to cold water, a lot of air will come out and you will hear the water pump start. The hot water tank should fill itself using the water pump and that pump will remain on until it is full even if the sink is off. Give it sometime - it is six gallons going in. After a short amount of time, if you turn on the hot water on the faucet you will get more air and then water coming out - cold water. Do NOT turn on the hot water heater switch YET. Only do so
when the hot water heater is full of water. You will know it is full when the water pump stops running. (You can also know if it is full by going outside, opening the side panel of the van for the hot water heater, open the pressure relief valve on the top (it is on what looks like a faucet pipe) by pulling the silver handle gently towards you and stand back when you do this. IF water is in the top of the tank it will start pouring out. Close the valve right away or you will lose all that water. The pump will come on and refill what you let out. Close the side of the hatch outside the van. Go back inside. If there is this much water in the tank, you can turn on the hot water heater switch - BUT first, turn on your propane (and keep your battery on). You should see the red light next to the switch come on - and it will go off shortly after. If you go outside to that hatch you will hear the burner running and heating the water - this get real hot so don't touch. Even the vent screen outside gets hot.
It takes awhile for the water to get hot - you are heating six gallons of COLD water. Come back in fifteen minutes and you should feel a difference now between the hot and cold water in your sink - even if the hot is not yet really hot. You now have hot water!
And you have cold water. Flush your toilet. Turn on the shower - inside and outside if you want. Water should flow - hot and cold. Try the sink in the bathroom (if you have one - I don't). All should be flowing water on both the hot and cold handles. This is a properly working water system and yours should be working as it is supposed to.
NOW - if you want to run the city water with a hose at a campground. First - TURN OFF THE WATER PUMP. Leave the electric on as you need this for your hot water heater. DO NOT TOUCH THE CITY WATER VALVE OUTSIDE - IT IS IN THE POSITION THAT YOU NEED TO HAVE WATER INSIDE FROM THE HOSE.
NEXT - connect a water pressure valve to your fresh water hose, connect that to the water source - house or campground. DO NOT CONNECT TO A HOSE FOR A CITY WATER CONNECTION WITHOUT A WATER PRESSURE REGULATOR. This is something that is standard to all RVs and I am not sure why RV plumbing does not come with one built in at the City Water connection. You can purchase one for less than ten dollars at any RV supply store and Walmart sells one in their RV section. These limit water pressure to no greater than 40 to 50 psi. There are simple water pressure regulators for sale and their are ones with dials and adjustments. I am sure these more sophisticated ones are better than the simple ones, but the simple ones - just connect the end of the hose to the outflow of the regulator and the water faucet (or anywhere in between if you have other hoses connected to reach your Roadtrek) . The end of the hose that is past the outflow of the regulator is the end that gets connected to your Roadtrek.
You connect the other end of the hose to the Roadtrek city water intake connection. (We use the quick connect that Roadtrek supplied on this connection but you can just screw the hose directly on.
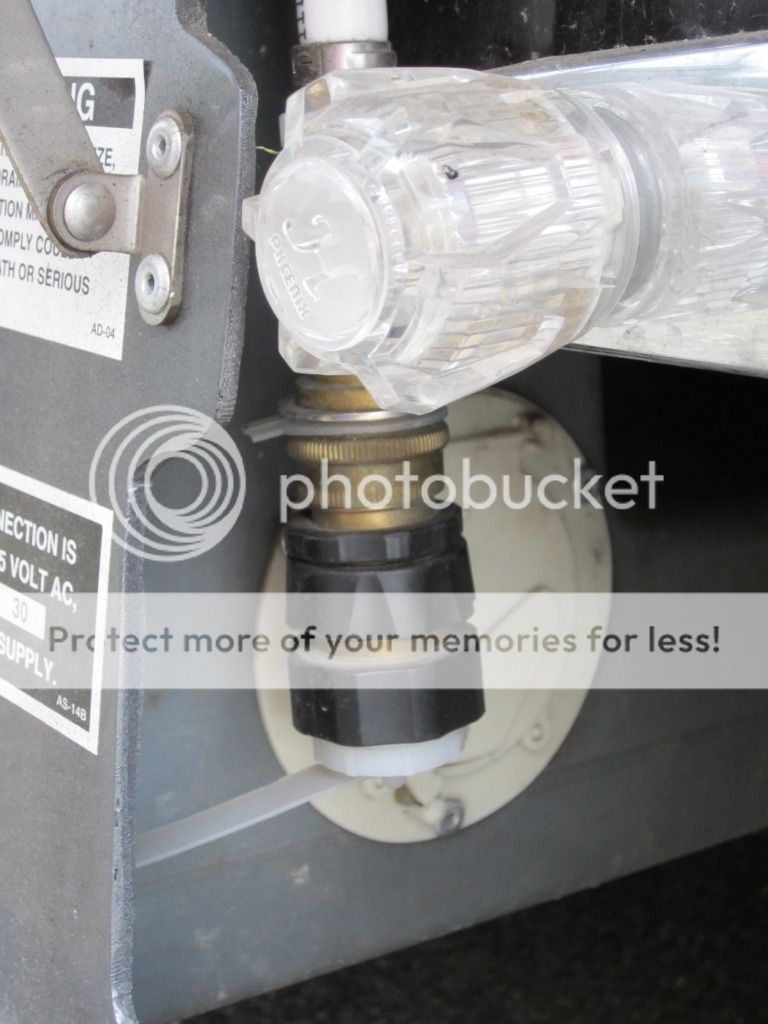
Turn on the water at the campground faucet to full or almost full pressure - the water pressure regulator that you put on the hose will protect your plumbing (again, never connect to city water without one when connecting the hose to the city water inlet).
I have recently learned that inside the Roadtrek in the cabinet where the water valves and hot water tank are located there are two other valves - mine are at the top rear of the cabinet. These shut water off to the outside shower. I have been told by the service tech at the dealer that we should never touch these - and leave them as they are. I have learned that if these two valves are CLOSED no city water will flow into your plumbing! How nice to learn this and now I know why I was told never to touch these. Just leave them on - we winterized with them on and had no problems.
Next - LEAVE THE WATER PUMP OFF - turn on the sink. You should have running water everywhere. If you start with empty water lines you will again get air coming out. If there is no water in the hot water tank it needs to fill again. It will do so from the water pressure alone.
It will fill much faster this way. Again, the water needs to heat so make sure to wait patiently for hot water. Make sure to follow the same directions as above to have hot water.
REMEMBER - that city water valve outside is only pointing in line with the pipe when you want to use it to fill your fresh water tanks. Basically - forget about it. Set it pointing down and leave it that way and fill your tanks with a hose put into the holes in the two door frames. There is a way to fill your water tanks with the city water hose connected to the same place by turning that valve but it is just as easy to fill your tanks one at a time through the holes plug in the door frames. Every time we have tried to use the city water inlet to fill the tanks we have had problems.
This is it. If you follow these steps you will have flowing hot and cold water when you need it.
ADDENDUM:
If your water pump runs continuously and does not shut off there is a leak somewhere on the intake side of the water pump or a blockage or the City Water Valve is set to FILL or the water filter that is attached to the water pump on the intake side - between the pump and the fresh tank - needs to be cleaned out as the gunk in it is blocking the water from getting to the tank. The pump runs and does not stop because it is sucking for water and getting air.
If the water pump stops and stops, starts and stops over and over and does not stop, there is a leak on the outtake side of the plumbing from the pump. The water pump senses the need for water somewhere - the leak - and wants to send water there - a small leak or drip and it starts and stops with a longer space between repeats. If there is a big leak it keeps starting and stopping faster. First thing to check is that all faucets are closed tight - including shower handles inside and outside. Also if the toilet valve is leaking this will happen. If it is not a faucet handle - check everywhere for water dripping.
IN BOTH OF THESE SITUATIONS SHUT OFF THE WATER PUMP!
ALWAYS SHUT OFF THE WATER PUMP IF YOU ARE NOT INSIDE THE RV.
The Roadtrek 190 has two fresh water tanks - one in the front located outside under the driver's side and the other is inside in the rear of the passenger side (you cannot see the tank it is not in the living area). The Roadtrek 210 has the same two tanks. The Roadtrek 170 and the Roadtrek's built on Sprinters have one fresh water tank and these are tanks outside the van like the front tank on the 190s and 210s. If your Roadtrek has only one tank, as you read through this disregard what I write that involves the rear or interior tank. The water capacity of the two tanks together is not larger than the capacity of the one tank models. The water is just split between the two tanks. The purpose of this is to enable water use in freezing weather if only the interior tank is used and the inside of the van is kept consistently above freezing. This would also involve putting anti-freeze into the two waste tanks so that they would not freeze. When the Roadtrek is set up for use only with the rear, interior tank - this is called "Winter Mode". When the two tank Roadtreks are set up to use both tanks - this is called "Summer Mode".
I am going to step through all of this so that you can get the water all working. Keep in mind that even though you may have a different plumbing layout, the valves are all the same but in different locations.
First - we are going to focus on getting everything flowing with your tanks. Outside at the city water valve - turn that down pointing to the ground. If this is open you will draw air into the system so you want it closed. Then - The so-called summer mode requi
 res that two valves be open - one is the red handle valve inside and the other is the small black valve that sits next to it. The little black valve sends water from your rear tank to your front tank. The red handle selects which tank the water is coming out of and you want the water to come from the outside (front) tank. So this handle must be turned so that the handle is inline with the pipe (and not across the pipe). The black valve handle needs to be in line with the pipe also - so that that water from the rear tank flows directly into the front tank. With this you are now set to run water from the two fresh water tanks to all of the faucets and the toilet.
Next - let's get your hot water tank set up. You must have all valves pointin
 g toward the aisle - they look like they are all pointing the same way - though actually the top and bottom one are open and the middle one is closed. Yes, it is confusing. The top and bottom are open for the water to go into the hot water tank and come out of the hot water tank and the middle one is closed so that water does not flow between the top and bottom pipe (which you only want to happen when the hot water is bypassed). If you read our article on Winterizing you will see what you do to BYPASS the hot water tank for the winter.
You should now be ready to get water through your tanks. Fill your rear tank and your front tank through the door frame holes. Just for the heck of it, make sure your exterior drain valve is closed just to make sure water will not pour out of the tanks when you put water in. My Roadtrek does not have a valve, but has a screw cap. Take off the screw cap and the water in the tanks pours on the ground. My drain is located right under rear corner of the driver's door underneath the Roadtrek. I understand that some Roadtreks have an actual valve to turn -and not all models have the drain in the same location. Look at your panel monitor and you should see two full tanks. You are now ready to go.
Go inside. Turn on your battery disconnect switch - make sure you have battery power because you are going to need it. Turn on a light just to make sure or you can just push the test button on the monitor panel and you will see the battery level. When the battery disconnect switch is ON there is a red LED light on the switch that comes on.
TURN ON THE WATER PUMP - switch is next to the Battery Disconnect Switch. A light should show that it is on.
Go outside and turn on your Propane. It helps to light the stove for a minute just to see that propane has filled the lines.
Now, open the kitchen sink to cold water, a lot of air will come out and you will hear the water pump start. The hot water tank should fill itself using the water pump and that pump will remain on until it is full even if the sink is off. Give it sometime - it is six gallons going in. After a short amount of time, if you turn on the hot water on the faucet you will get more air and then water coming out - cold water. Do NOT turn on the hot water heater switch YET. Only do so
when the hot water heater is full of water. You will know it is full when the water pump stops running. (You can also know if it is full by going outside, opening the side panel of the van for the hot water heater, open the pressure relief valve on the top (it is on what looks like a faucet pipe) by pulling the silver handle gently towards you and stand back when you do this. IF water is in the top of the tank it will start pouring out. Close the valve right away or you will lose all that water. The pump will come on and refill what you let out. Close the side of the hatch outside the van. Go back inside. If there is this much water in the tank, you can turn on the hot water heater switch - BUT first, turn on your propane (and keep your battery on). You should see the red light next to the switch come on - and it will go off shortly after. If you go outside to that hatch you will hear the burner running and heating the water - this get real hot so don't touch. Even the vent screen outside gets hot.
It takes awhile for the water to get hot - you are heating six gallons of COLD water. Come back in fifteen minutes and you should feel a difference now between the hot and cold water in your sink - even if the hot is not yet really hot. You now have hot water!
And you have cold water. Flush your toilet. Turn on the shower - inside and outside if you want. Water should flow - hot and cold. Try the sink in the bathroom (if you have one - I don't). All should be flowing water on both the hot and cold handles. This is a properly working water system and yours should be working as it is supposed to.
NOW - if you want to run the city water with a hose at a campground. First - TURN OFF THE WATER PUMP. Leave the electric on as you need this for your hot water heater. DO NOT TOUCH THE CITY WATER VALVE OUTSIDE - IT IS IN THE POSITION THAT YOU NEED TO HAVE WATER INSIDE FROM THE HOSE.
NEXT - connect a water pressure valve to your fresh water hose, connect that to the water source - house or campground. DO NOT CONNECT TO A HOSE FOR A CITY WATER CONNECTION WITHOUT A WATER PRESSURE REGULATOR. This is something that is standard to all RVs and I am not sure why RV plumbing does not come with one built in at the City Water connection. You can purchase one for less than ten dollars at any RV supply store and Walmart sells one in their RV section. These limit water pressure to no greater than 40 to 50 psi. There are simple water pressure regulators for sale and their are ones with dials and adjustments. I am sure these more sophisticated ones are better than the simple ones, but the simple ones - just connect the end of the hose to the outflow of the regulator and the water faucet (or anywhere in between if you have other hoses connected to reach your Roadtrek) . The end of the hose that is past the outflow of the regulator is the end that gets connected to your Roadtrek.
You connect the other end of the hose to the Roadtrek city water intake connection. (We use the quick connect that Roadtrek supplied on this connection but you can just screw the hose directly on.
Turn on the water at the campground faucet to full or almost full pressure - the water pressure regulator that you put on the hose will protect your plumbing (again, never connect to city water without one when connecting the hose to the city water inlet).
I have recently learned that inside the Roadtrek in the cabinet where the water valves and hot water tank are located there are two other valves - mine are at the top rear of the cabinet. These shut water off to the outside shower. I have been told by the service tech at the dealer that we should never touch these - and leave them as they are. I have learned that if these two valves are CLOSED no city water will flow into your plumbing! How nice to learn this and now I know why I was told never to touch these. Just leave them on - we winterized with them on and had no problems.
Next - LEAVE THE WATER PUMP OFF - turn on the sink. You should have running water everywhere. If you start with empty water lines you will again get air coming out. If there is no water in the hot water tank it needs to fill again. It will do so from the water pressure alone.
It will fill much faster this way. Again, the water needs to heat so make sure to wait patiently for hot water. Make sure to follow the same directions as above to have hot water.
REMEMBER - that city water valve outside is only pointing in line with the pipe when you want to use it to fill your fresh water tanks. Basically - forget about it. Set it pointing down and leave it that way and fill your tanks with a hose put into the holes in the two door frames. There is a way to fill your water tanks with the city water hose connected to the same place by turning that valve but it is just as easy to fill your tanks one at a time through the holes plug in the door frames. Every time we have tried to use the city water inlet to fill the tanks we have had problems.
This is it. If you follow these steps you will have flowing hot and cold water when you need it.
ADDENDUM:
If your water pump runs continuously and does not shut off there is a leak somewhere on the intake side of the water pump or a blockage or the City Water Valve is set to FILL or the water filter that is attached to the water pump on the intake side - between the pump and the fresh tank - needs to be cleaned out as the gunk in it is blocking the water from getting to the tank. The pump runs and does not stop because it is sucking for water and getting air.
If the water pump stops and stops, starts and stops over and over and does not stop, there is a leak on the outtake side of the plumbing from the pump. The water pump senses the need for water somewhere - the leak - and wants to send water there - a small leak or drip and it starts and stops with a longer space between repeats. If there is a big leak it keeps starting and stopping faster. First thing to check is that all faucets are closed tight - including shower handles inside and outside. Also if the toilet valve is leaking this will happen. If it is not a faucet handle - check everywhere for water dripping.
IN BOTH OF THESE SITUATIONS SHUT OFF THE WATER PUMP!
ALWAYS SHUT OFF THE WATER PUMP IF YOU ARE NOT INSIDE THE RV.
Subscribe to:
Posts (Atom)