Roadtrek

Roadtrek
Showing posts with label cabinet. Show all posts

Monday, June 2, 2025

THE BEST CABINET LATCH REPLACEMENT IN YOUR ROADTREK

 In December 2013 I wrote an article about the cabinet latches in the Chevy chassis Roadtrek models. 

https://roadtrek190popular.blogspot.com/2013/12/roadtreks-cabinet-latches.html

Since the original Roadtrek that built the Chevy chassis Roadtreks is long gone and the new owners no longer support the Chevy chassis Roadtreks the latches once available from them are no longer available from the "new" Roadtrek. The brown push bar latch is infamous for how easily it breaks. While there is a way to avoid as best as possible to keep it from breaking - when closing the cabinet door keep the brown push bar pushed all the way in until the cabinet is completely closed so that inside the cabinet the latch goes over the metal catch open - and once completely closed and you let go of the latch bar it is not pushed and broken by the metal catch - eventually that latch will break. What is available looks like these latches but are even less strong than these are. 

So when you need a new latch what should you get?  The best way to go is to get a latch with NO movable parts and nothing to break.  Does such a latch exist? Yes!

You want a latch that has strong enough hold that the cabinet door will only open when you want it to open and not when taking a sharp curve on an interstate or when something in the cabinet falls against the door and pushes it open. What you want is a 40 pound pull 90 degrees magnet latch. What does 40 pound pull mean? To pull the magnet off the metal catch it takes a physical pull of 40 pounds. There is nothing that is going to push the cabinet door open from inside - and no way that cabinet is opening by the pull of gravity going while driving. 

 Here is what such a latch looks like - in its parts -  


This 40 pound pull magnet latch is made of stainless steel.  Two screws go onto the 90 degree magnet bracket into the side of the cabinet door (before putting in any screws check to make sure they are not too long and will come through the wood of the cabinet to the outside of the cabinet. One screw goes around the metal disk into the back of the cabinet door frame to match up with the 90 degree magnet on the bracket. Again - make sure the screw is not too long. IF the screws are too long - stainless steel screws like these are available in all sizes in Home Depot, Lowes, or Ace Hardware.

Since you need a strong hold on the door to pull it open - get a decorative and functional door pull handle - again -  Lowes, Home Depot, Ace or any other local store that sells cabinet hardware. The handle must be put into the solid wood edge frame of the door. Do not put the pull handle on the thin wood on the center of the cabinet door - that wood is too thin and will break if you pull on it.

Now you have a cabinet door that is going to stay closed when it should be closed and likely will never have to replace that cabinet's latch again. This will work on cabinets, wardrobe doors, and the bathroom door. 

Where to get these - I have not seen these in the local big box home stores' hardware departments. They are available on Amazon, and other hardware supplies who will ship. The lowest price I have seen for these is $10,99 each. They do go up - for the same ones - to over $20 - for one. Google this - 

" 40 pound pull magnet 90 degree cabinet latch " 

and they will come up on a search. 

Woodcraft Stores - a tool and woodworking specialty stores has these in their stores and online for $10.99 each. 

Rockler woodworking supplies - another tool and woodworking specialty stores has these in their stores and online also for $10.99 each.

Some listings for these will also show lower pound pull magnet latches that look the same - 10 pound pull and 20 pound pull are NOT strong enough to keep the door closed. 

Walmart online shows the 40 pound pull magnet for almost $30 - way too much to pay for this.

Amazon - $17.00 and they claim "free shipping" but it is being shipped by a third party. 
 

Tuesday, June 7, 2022

THE VERSATILE POOL NOODLE AND ITS MANY USES IN A ROADTREK!

 I know - some of you are saying as you read this - "What the heck is a pool noodle?" Pool Noodles start showing up in stores as Summer approaches. It is a swimming float made of molded foam plastic. 

The photo is a section of pool noodle. They come in different colors and they come in a few diameters. The size I find that is best is two and a half inches in diameter. The length is six feet when you buy it. They cut easily with a razor blade knife. The center of the pool noodle is a hole. The easiest way to cut it is to insert the blade of the knife into the foam and turn the pool noodle holding the knife in place to cut all around to get a section of the length you want to use.

BUT WHAT AM I GOING TO USE IT FOR IN A ROADTREK?!

Here are things we have used a pool noodle for in our Roadtrek - and I often find new ways when I need to figure out what can I use to ?

A POOL NOODLE IN THE MICROWAVE:

As the Roadtrek drives along there is a lot of vibration inside from the tires on the road surface - bumps, and bounces as you go along. Inside the microwave as you all know is a glass plate that you put what you are going to cook in the microwave on top of. That glass plate just sits inside - and it bounces a lot. Aside from the noise sooner or later if you don't protect it, it is going to break. When we first got the Roadtrek Meryl made a cushioned cloth case for the plate using two quilted placemats and a towel that she stitched into a pouch and put a Velcro closure on to put the plate into. She also made a case for the wheeled plastic rack that sits under the plate to rotate the plate while cooking. She attached the two pouches and they go into the bottom of the microwave. But as we drove the plate was still bouncing around and there are enough noises inside the Roadtrek  to not need this one so we needed to fix the plate into place so that it would not move. What did we do? We used a section of pool noodle!

The section of noodle was cut just a little longer than the height from the plate to ceiling of the microwave. The pool noodle will push into itself and act like a spring when pushed into a space that is just slightly shorter than it.  Don't make it too long or you could push the inside of the top of the microwave too much. This works perfectly in our Roadtrek!

NOODLES IN THE FRIDGE - POOL NOODLES THAT IS!

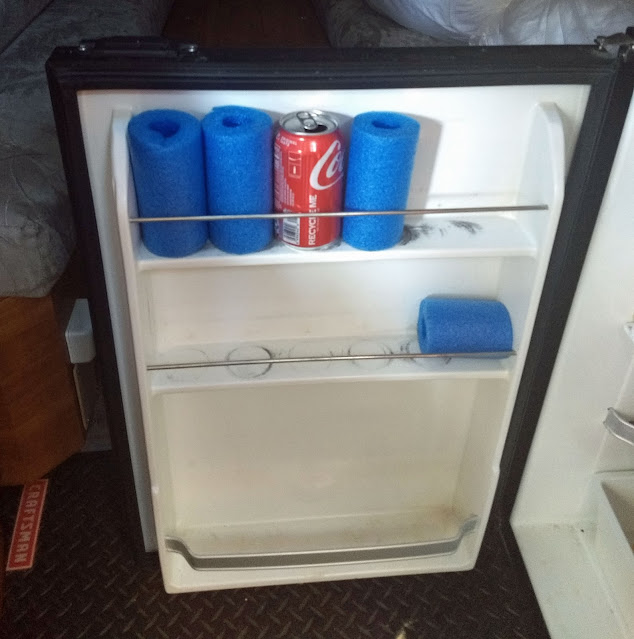
We want to have cold soda with us when we are traveling, especially when the weather is going to be hot. Soda cans on the shelves in the door of our fridge in the Roadtrek rattle around  a lot. There had to be something that would prevent them from moving.  AS it happens - the two and a half inch diameter pool noodle is about the diameter of a soda can. I cut sections of pool noodle the height of a soda can.  We may fill a shelf with soda cans but as we go along and use up cans the shelf gets emptier - and the cans rattle more - so a  pool noodle section takes its place. And one always joins the cans from the start to stop them from moving along the shelf.

No more rattling cans!  There are other places in the fridge that you can do the same thing. 

A POOL NOODLE TO STOP THE FRONT TABLE FROM BANGING INSIDE ITS CABINET:

Some Roadtreks have table top that is placed on a leg and it stands in a post in a hole on the floor. Our 2011 Roadtrek 190 Popular has a front table that is on a sliding hinge that goes into a cabinet just a few inches wide and it pulls out when in use and sits on a support that slides out from the side of the wardrobe cabinet behind the driver's seat. The table on its hinge bangs and hits the two side walls inside the cabinet. Talk about loud! So a section of pool noodle to the rescue! 


There is also no latch on this door - never was since it came from the factory, and on sharp turns, before the noodle took its place standing guard, the table would hit the door and open it - sliding the table out, which at 60 miles an hour around a highway curve can become very exciting - the kind of excitement you don't want! No more since the pool noodle was pushed into place! 

MOVING OUTSIDE THE ROADTREK!

A POOL NOODLE WHEN THE MOUSE HOLE GOES BAD: 

New owners are going to say - "First its noodles, now its MOUSE HOLES?!" The mouse hole is an RV term for the hole between where the shore power cord is stored and brought outside without having to leave the outside storage cabinet open. It is a hole - with a snap cap on the outside, looks like a cartoon mouse hole in a wall BUT the name is twofold because since the cord is smaller than the opening of the hole to get the large 30 amp socket out with the cord, mice have enough room to walk on the power cord outside, up the cord to the "mouse hole" and walk right into the outside storage cabinet - and from there find their way inside your Roadtrek. (EEEK!)  When the Roadtrek comes from the factory the mouse hole unit comes with flaps to take care of that. Over time, however, the flaps fold out of place - no longer close together to keep anything out - and because Roadtrek in all its wonder, riveted everything instead of installing with screws (yeah - rivets don't come loose - but they also prevent easy repairs requiring drilling  out the rivets). Ours went bad. I thought so what. Nothing is coming in (and nothing has) BUT Meryl said we need to close this! I thought about it - and, of course, what better than a pool noodle!


When doing this you have to get the pool noodle around the power cord - there is no end to just slip it through. I sliced along one side into the center hole of the pool noodle. It just gets pulled open and slips around the cord and is moved into the mouse hole around the cord filling the hole. It has to be slid back - and taken off when pulling the cord back in - and you do not put the noodle on the cord to put in the mouse hole until all of the power cord you need is outside the Roadtrek. Again, the two and a half inch diameter pool noodle is perfect for this - it fits just right - and does need to be squeezed into the hole to fill all gaps and stay in place.

A POOL NOODLE FOR YOUR FRESH WATER HOSE:

When at a campground, the ground can get muddy and you never do know what dog or other animal just came by and added some biological moisture to where you will be dragging your fresh water hose as you stretch it out to empty it of any water when you put it away.  I just did not like the idea of the end of the hose dragging along the ground in the mud - and what else. So I cut a pool noodle section and when we are ready to get the water out of the hose as we wind it up to put it away, the pool noodle goes on the threaded end of the hose. Simple - and I know where the inside of the pool noodle touching the hose end has been. 

SO - there you have the versatile pool noodle - every RVer's friend! I am sure you will figure out other uses for them.  You may even want one to go swimming with! 


IF YOU WOULD LIKE TO CONTACT US TO ASK A QUESTION ABOUT ANYTHING YOU READ IN THIS ARTICLE PLEASE EMAIL US USING THE LINK IN THE RIGHT COLUMN OF THIS PAGE.


Wednesday, September 3, 2014

Storage and How We Store Things in the Roadtrek - Part 3

PART 2 WAS THE LAST ARTICLE

We have had many readers contact us to write an article with photos of how we store things in the Roadtrek when we travel. Meryl is a master of finding a place for anything to fit - in the house, in the car, and especially in the Roadtrek. I asked Meryl to write this article. Here, once again, is Meryl...

PART 3:

 On the shelf over the toilet we have 2 fabric crates.  One holds cleaning type items - like Lysol spray, spray cleaner, etc.  The other holds personal type items - q tips, shampoo, bar soap for showers, etc.  On top of the box with personal stuff is the privacy curtain we made which hangs from the shower curtain track so that one can use the toilet en route without having to stop and pull the back window curtains closed.  Next to these boxes are a few latex gloves in a zip bag to use as it is easier to have a few out than pull the box out each time.  These are basically bathroom related items.  On the floor of the toilet compartment (we have an aisle toilet, not the permanent bathroom option) we have 2 boxes of camping toilet bags (wag bags).  Just in case something happens with the toilet we have these to use and we use them during winter trips when we travel without using the water system.  There are 2 boxes as one would shift around too much.


In the storage under the seat of the third front seat (in front of the toilet compartment) I have another set of personal and kitchen towels and another set of sheets and pillowcases sealed in plastic zip bags so that they can be changed on long trips.  The toilet chemicals are also in here.  I have a large accordion folder with the various instruction books and manuals in folders. A hair dryer is in here.   There is also a second spare  roll of toilet paper in here as it is easier to access quickly if needed.  We have quilted foil inserts (Reflectix) for some of the windows and they are also in here.  It is an area that can be reached fairly easily, but still takes some work, but is large.


We have a mesh net that goes around the back of the third seat which can hold magazines, brochures, etc. on the front of the seat.  It is a convenient place for these.


On the shelf over the door we have hats to wear if it is sunny and a jacket for me is rolled up in here.  There is a folding “gopher”, the thing to pick up items dropped on the floor (or items at the back of the space under the bed if one does not want to crawl under.)  In the pocket for the opera window covers we keep a folder with maps of and information about campgrounds which we go to on a regular basis.   


We have the overhead front drawer, which was an option when we ordered the Roadtrek.  This holds an assortment of items - folded up rain jackets, a zippered bag with tools, a rechargeable electric drill/driver,  another with spare parts, a clipboard that holds stationery items inside, two pop up garbage cans - one for garbage and another to hold wet umbrellas if needed - and a vinyl box to hold magazines brought along to read..  There is more than this, but this is all I can remember.  The items here are fairly light in weight and are used from nightly to as needed and need to be easy to access. 


In the pocket on the back of the passenger seat is a fold up umbrella and a very small fold up seat.  On the floor behind the seat (in the carpeted front area, not the dropped floor) is a bath mat rolled up that we use as a door mat for the second passenger door when it rains.

In my map pockets I have reflective markers that we put out on the campsite ground when we find a level spot so we can find it again, walkie-talkies to use when pulling in and finding level, as well as when we pull out of our driveway at home.  A red light flashlight to use when hooking up at night (red LED does not attract mosquitoes).  Rubberized, knit gloves to use when setting up in wet or cold weather.  Coupon holders (I have travel coupons and coupons for food and stuff and for restaurants that I pull from our car and house hen we travel.)  I also have an envelope that holds items I have collected at home for this trip - reservations, brochures, etc.  Car charger for laptop, basically stuff I might need from the seat while riding or on my way out the door.

In the compartment over the windshield, I have a spare pair of glasses, more spare parts - such as fuses - and other small items that are rarely used as this is not an easy section to access with the sliding top draw in front of it. 

The glove compartment holds glove compartment items.  We also have a plastic box between the seats which holds other items related to or needed while driving.  On the top of the glove compartment I have sunglasses and we have the labeled, leather tags that that we made to snap onto the steering wheel at night to remind us to check and take care of everything we need to before we drive off in the morning.  During the day we keep a remote thermometer for the refrigerator in one of the cup holders over the glove compartment.

I have no idea what “Me” has in his map pockets other than sunglasses and eyeglasses.

Moving back behind the driver’s seat where we started, in the pocket there is a folding umbrella.  On the floor between the seat and the closet (where we started) there is a very small folding table, a windshield reflector, and a small folding step "Me" made.    
 
On the shelf over driver’s door is “Me’s” jacket rolled up as mine is on my side. 


 Wherever there is space that needs to be filled to keep stuff from moving I put the crumbled plastic store bags or sweatshirts if we bring them.

In the rear of the Roadtrek, accessed from outside, we have 3 laundry baskets to hold assorted tools and items we buy en route.

In the storage section outside under the driver’s side we have a thin coiled general use garden hose,  a can of bug spray (sealed in a plastic bag) and a spare TV cable wire.  There are leveling blocks, the water filter, a piece of swimming pool noodle, 3 potable rolled water hoses stacked on each other with a small plastic box in the middle of them with water related items (such as a water pressure device, hose washers, etc.), then a slightly larger plastic box with electric related items such as polarity and voltage testers, 30 amp to 15 amp converter and vice-versa, 50 amp to 30 amp adapter converter, a portable RV surge/power protector , a TV coax cable wire and, of course, the Roadtrek's electric line to attach us to the campground’s electricity.  I try to keep the water related items separate from anything, such as the bug spray, that one would not want near one’s drinking water.
I think that covers everything.  There are always odd items (both in that they are not normally with us and often in what they are) that have to be fit in on different trips.  It is generally a quandary where to put them, but I always manage to find a place that fits them, even if it does not seem the most logical place.


Wednesday, December 11, 2013

Roadtrek's Cabinet Latches


    AN UPDATED ARTICLE ABOUT ROADTREK CABINET LATCHES HAS BEEN WRITTEN.  SEE THAT ARTICLE HERE! 

Roadtrek uses several different cabinet latches for the cabinets in the Roadtreks. The challenge in an RV is that a cabinet latch needs to keep a cabinet closed with the bouncing, vibrations, and shaking of a vehicle while driving. Something that is not necessary for a cabinet in a house. Some of the latches used are standard household latches on cabinets that will resist the extremes of this challenge. Some are special latches and these latches are available only from Roadtrek. A number of Roadtrek owners complain that the latches used break easily - and we have had two different latches break since we bought our 2011 Roadtrek. We will look at each latch and ways to keep it working as best as it can without breaking. Not all Roadtrek models use the same latches in the same places, but you should see in this article latches that are in your Roadtrek.

The latch -


And its catch -


This latch is the most used latch in our Roadtrek. It is on a number of cabinets. There is no visible release when looking at the cabinet doors.


The release is located in the lower edge of the door, in the middle on these cabinets shown above. 


Looking up from the bottom of the cabinet door, the latch is hidden in a cutout. To release this latch you push up on the long button that you see above and pull forward on the cutout to open the cabinet. Look above at the top photo and you will see the latch itself and how it works. When you push up on the button you are pulling the plastic wedge in front of the button up and into the latch and above the metal catch that is on the inside of the cabinet. 

This latch breaks easily. When closing the cabinet door the plastic wedge must must be pushed up and over the metal catch by scraping against the metal putting a lot of pressure on the mechanism and eventually breaking. Some break internally and will prevent the door then from opening as when you push on the button it no longer is able to move the wedge up. Since the hinge is inside the cabinet there is no way to open the door without forcing the door open or trying to push a flat, thin, and strong object (like a thin paint scraper in through the space between the cabinet and the door and moving the wedge up - but the wedge is behind the metal catch so you must not only get blindly to the right spot but so so behind the metal catch. It is possible. I did it when ours broke this way.  It has been suggested that by pushing up on the bottom edge of the cabinet and pulling out, the latch will release but this was not the case when I had to get the cabinet open when the latch broke. The door was solid and would not move in any direction.

If you look to replace this latch you will find one that looks very similar at many RV shops including Camping World, BUT that latch while looking like this one, is not the same size and the installation holes will not match the holes in your cabinets. The catch that this other latch uses is nylon and not metal and much lower than the metal catch. It does look like it might work better with the catch gliding over the nylon catch instead of scraping over metal. The latch used by Roadtrek is only available from Roadtrek. When one of ours broke and I learned that it had to be ordered from the Roadtrek factory or purchased at a Roadtrek dealer/service that stocked it, I purchased three spares in addition to the one that needed to replace the broken latch. I went to our Roadtrek dealer/service and their store did stock the Roadtrek latch, but they were out of stock. I was told that these sell out quickly. They ordered four latches for me at $10 each latch. Some have been able to have these broken latches replaced by service under warranty. That was not offered to me when I went to the service center. They were shipped to me (at my cost) and they arrived in ten days to my address.

There is a way to avoid these latches breaking. When you close the cabinet door always be sure to push the latch button in and hold it in until the door is completely closed. This will prevent the plastic wedge catch and the metal edge of the catch from putting a strain on the mechanism and stop the scraping of the catch every time the cabinet door is closed. 

Next -

The latch -


The catch -


What it looks like on the outside of the cabinet LOCKED -


What it looks like on the outside of the cabinet UNLOCKED -


To open this latch you push in on the lock - the round circle on the outside of the cabinet. This will release the latch from the metal catch inside and also pushes the door open at the same time. This latch is used on some newer Roadtreks or perhaps only the Sprinter Roadtreks on many cabinets that the first latch is used in our Roadtrek. In our Roadtrek this latch is only used on the bathroom door and on the wardrobe cabinet door. When you close the door with these latches you push in the button and it will click into place and lock the door closed.

It is reported that this latch breaks easily also. Roadtrek has said that if the door is closed with the latch in the locked position (as shown in the photo two above) the latch will break. When the latch is open, the middle of the circle pops significantly out and stays out - as shown in the photo two above - and I am not sure why anyone would push this in while the cabinet is open, but apparently some do and the latch will break inside. One of these on ours - we have one on the wardrobe and one on the bathroom door - sticks when pushed in to open and the door needs to be given a gentle push in and then the button pops out.

This latch also can only be obtained from Roadtrek. If you need a replacement, a Roadtrek dealer/service center will order them for you. If you order a replacement, order spares at the same time.

Next -

The latch -


The catch -


This latch is a stock household cabinet latch found at most home stores at less than $2.00. This latch should not break unless the door is misaligned with the cabinet and the latch does not hit the center of the rollers when closed. In my Roadtrek this latch is used in combination with the latch just above on the bathroom and the wardrobe cabinet doors. The mechanism is simple. The point of the catch passes through the nylon rollers and is caught between them and a strong spring. To open you just pull. To close you just push.

Next and last -

The latch -


The catch -


This latch is also a household latch that can be found at most home stores and I replaced a broken one of these latches for less than one dollar. With this latch the metal clip surrounds the outside of the nylon rollers and holds on behind them. Outside the cabinet door has a pull knob attached. We only have this catch on one cabinet - the pantry cabinet over the sink. On our cabinet, I discovered - after one arm of the metal catch broke off - that the door is out of line and this catch was not going around the rollers but rather one arm of the metal was going into the center of the rollers - and at the same time cutting into the edge of the cabinet (which has a metal edge) every time the cabinet door was closed. On close examination I could see that the door was not evenly aligned. To close this cabinet now, we push up on the door bottom as we close the cabinet so that the metal arms of the catch clear the edge of the cabinet and listen for the click of the catch locking around the rollers. I did try to adjust the alignment of the door but I could not and will explain why in the next paragraph.

Cabinet Hinges -

The horizontal cabinets have these hinges -


I have recently learned that all hinges used by Roadtrek are not created equal. The above hinge is what is in the cabinets in my Roadtrek. Other Roadtreks - by model? - perhaps just Sprinters - by year? - perhaps after 2011? - have a similar looking hinge that is a much heavier metal and has an adjusting screw in the middle that will widen and lessen the gap between the the door and the cabinet where the hinge is attached. Those hinges are common and are called in woodworking among other names, European hinges. A lot of knockdown furniture uses those hinges. To adjust a European hinge to align the cabinet door you turn one or more adjusting screws - simple. Now, in my Roadtrek and I am sure many others, the hinge that you see in the photo above has no adjusting screw. There is a small adjustment possible IF the screws holding the hinge were aligned with each other exactly on installation by loosing the screws and then sliding the entire hinge forward or back. That would be fine but I have found more than once that if the wood screws in the Roadtrek are loosened they do not always tighten back again. I tried to do this with the cabinet latch above and the hinges on that cabinet to adjust that latch from hitting the edge of the cabinet but the screws were stripping the wood with just the slightest adjustment and I stopped. Yes, I know about wood filler and how to put glue and a matchstick or steel wool or toothpicks into the holes and screw into them again (I have been a woodworker for a long time), but I was not going to do this and hope it would go back together. So, be very careful if you decide to take out or loosen wood screws in the Roadtrek as they don't always have anything to screw back into.

Some cabinets have metal piano hinges - a long strip of hinge. These cannot be adjusted at all. 

So there you have the cabinet latches found in Roadtreks. Perhaps in older Roadtreks there were different latches used. If you would like to change these over to other types of hinges it is always possible but you will need to make different holes in the cabinets and may need to cover any cutouts that these hinges require in the cabinet doors. Be sure to find latches that will withstand the motion of the vehicle as it travels and will not release and spill the contents of your cabinet all over.


Wednesday, November 6, 2013

Fast and Easy Way To Add Shelves to a Roadtrek Wardrobe Cabinet

In our 2011 190 Popular Roadtrek we have a wardrobe cabinet behind the driver's seat. It is set up with an RV "rod" to hang hangers from. Not many articles of clothing will fit in this cabinet if one tries
to hang them on hangers. It is possible to carry a more than a week's clothing in this cabinet by adding shelves.
 

The fastest way to install shelves is to purchase a soft-sided hanging shelf or "cube" unit from a closet or home store. These are found in almost every discount store, department store, linens store, etc. We looked at several before we found one that was going to fit just right inside the Roadtrek cabinet.

One thing to be aware of is that any of these that you buy will be too long for this short cabinet, but that is not a problem. Once inside the excess shelves will fold flat at the bottom. The one we selected, shown in the photo above, fits the width of the cabinet. As you look at the photo, you are seeing the rear dining table leg through the translucent vinyl back of the unit. We don't use the rear dining table, but if you did, it is no problem to get it out past the soft shelves. The unit did not come with the boards that you see on our shelves. I added these. Without the boards the shelves do sag down under the weight of the clothes and will limit the space that you can stack in on the shelf below. All I did was measure the soft bottom of each shelf, and cut out a piece of thin fiber board to those measurements. Now our shelves have solid bottoms.

To use the shelves, just fold and stack your clothes. Everything comes our nice and neat with no wrinkles. And we can put over a week's clothing on the four shelves that you see here.

One thing that made this particular soft shelf unit best were the two hangers that it hangs from. These make it stable in side the cabinet and it does not move around while driving. There is no noise from this unit while traveling - even with the fiberboard shelf bottoms.

We found this unit at Target. We had purchased two others at other stores. This is the only one that had two hangers and the only one that fit the space perfectly.  Some units like this have a soft tube to put around the closet rod - this type will not work with the RV closet "rod".

This method of adding shelves is inexpensive and all it takes to install it is hang it up. If you decide that you want to hang from hangers, all it takes is to take this out and let it fold flat to store.

Now, this works well, but I have been thinking about more permanent shelves in this cabinet. To do that I want to have shelves that are adjustable in height. I also want to be sure that the shelves do not move while the Roadtrek is traveling. With all of the shakes and rattles that you get when driving on even some of the smoothest roads, I don't want to add another source of noise with shelves bouncing with every bump in the road. To do this I have been looking at hardware that would let me sandwich a shelf in-between a top and a bottom clip on each corner. This is not that hard to find and stores like Home Depot and Lowes do sell systems that will let you do this (though they are not intended to use two clips in this way). Since we don't use the rear table we have been considering removing it all together and eliminating the pole in this cabinet which would limit the size of the shelves that could be fit in. One option is to cut the shelf around the pole. This is a project on the list of things to do in the Roadtrek "at some point". In the meantime the soft shelves work just fine.