Tis' the Season! Meryl and I wish you all of the best holidays this year!
Merry Christmas!
Happy Hanukkah!
Happy New Year!
Happy Holidays to All!
We will continue our multi-part article, "It Isn't All Peaches and Cream" in two weeks.
Just in case you are disappointed in not finding a regular article, I will share a very helpful video that I recently came across about BACKING UP A MOTORHOME. Perhaps it will save your RV from some damage.
Good Christmastide!
Roadtrek

Wednesday, December 24, 2014
Wednesday, December 10, 2014
IT ISN'T ALL PEACHES AND CREAM - Part 1
The title for this article came to me early this past summer. It was during one of our trips in the Roadtrek and things were not going as we had hoped for, more due to the weather than anything else, but there had been some problems since the we had dewinterized the Roadtrek with the Roadtrek, traveling in an RV, and the weather up to that point and now looking back they just did not stop for all of 2014 right up to today. As I write this, which is about a week before you will be reading it, we have cancelled another trip because the weather this year is just not cooperating. Since the title came to me, this article has been playing out in my head more and more while we have been on each trip that we took this Spring, Summer, and Fall. I will now attempt to put all of this on paper and perhaps at the same time this will be as much an exercise in self-exploration as it is a review of a year of RVing that at best can be described as a whole as fair. Overall, this may be a look on the dark side. Maybe in the end, not, but I am taking you along with me and we shall see. Oh, yes, this will never be able to be done in one article so I will just keep on going with it until it is done and it will be divided up into parts, and right now I don't know how many.
So why "It isn't all peaches and cream!"? Well it actually started as "It ain't all peaches and cream" but in my respect for the many teachers and professors who taught me how to write - some of which I purposely ignore at times - I decided that I would change that "ain't" to "isn't". The peaches and cream part comes from a game that I played most of the summer on my tablet. When several levels were completed a little voice would speak out and say - "It's all peaches and cream!". Well, I completed a level sitting in the Roadtrek and I heard this and with the mood that I was in I said out loud answering the voice in the game - "No, it isn't!" and thought to myself, "It ain't all peaches and cream!"
OK - so we go now all the way back to the Spring and dewinterizing. Dewinterizing started out well until we got to the same point that we have problems with every year when dewinterizing the Roadtrek. We come to flushing the sanitizing bleach out of the tanks with clean water and when we go to fill the rear tank - remember, the 190 has two fresh tanks - as soon as we start the water flowing into the empty tank, it backs up the fill tube and comes rushing out the opening. This has been consistent - year after year. In past years, after a few tries and a few tricks the water would start flowing in normally. We tried all of the tricks that we have - all of which are written down to carry over to the next year to "remember to" when filling the rear tank - and this year nothing worked. What seems to happen is that there is a massive gas bubble in the tank, perhaps from the chlorine bleach and water mix used to sanitize. We stopped trying and I came in to start researching what the problem might be and what to do about it. Asking on the forums and groups was not leading to anything. I did find some discussions on general RV forums that talked about similar problems - not necessarily relating to sanitizing - but with tanks that would not fill from the top. I tried then using the city water with the valve turned to fill to fill the rear tank - but that also did not work. I had figured that the water would go in from the bottom of the tank - or wherever that connection is in the rear tank and push the air/gas? up out of the open fill hole and clear it. That did not work either. I went back to those discussions and someone had commented about using a small hose to reach the bottom of the tank and fill from the bottom up that way - slowly. By this point it was much to late to do anything until the next day. We went out the next day to buy fittings to be able to take 1/4" inner diameter plastic tubing and connect a water hose connection to it. We found the brass fittings in Home Depot and came home with them. Just in case, I tried filling the rear tank as I had the day before and the water came right back up at me. There was still a problem. Time had not corrected it. I assembled the gizmo, added a shut off valve between it and the water hose, turned on the water to run slow and pushed the tube down to the bottom of the rear tank. As a safety precaution - I did not want to have the tube come off the fitting and be lost forever in the tank - I made the tube longer than it needed to be and kept more than a foot of the tube outside the Roadtrek. The water flowed and I waited to see if anything was coming back up and out. It didn't. It took a lot longer to fill this way but it filled. The gas/air? bubble in the tank had plenty of room to come up and out of the fill while the water displaced it. That was the good part - it worked. Getting there was more effort than it should have been.
One crisis resolved just to be followed by another shortly after. With the dewinterizing done and the tanks full we started testing out that all was well - especially as we had an appointment at dealer service to change the oil in the Onan generator in a couple of weeks and should there be anything wrong we did not want to have to make two trips to Pennsylvania. As it was I had two things I wanted them to do in addition to the oil change, and one thing to check. Meryl is the one who can get down on the floor and deal with valves, etc. She has told me that one of the bypass valves on the hot water tank has always been hard to turn. She said now that when she turned it this time it was very hard to turn. With the water in the tank and all supposedly good to go, she went down to close the door of the cabinet with the hot water tank and said that there was water on the floor. I managed to get down there and looked and there was water coming out of the base of that valve. We shut the valve and put the hot water tank back in bypass. Luckily, the valve closed without leaking. I was not going to attempt any plumbing on the Roadtrek myself and this had to be brought to dealer/service to take care of. We called the service center and added one more thing to the list for them to take care of when we came. What happened to the valve? Perhaps it froze during the winter or perhaps it was never right as it was always hard to turn and just finally gave out. I don't know.
Our first trip of the season was that trip to the dealer for service on the Roadtrek.As I had written about in June, this was not an overnight trip and that trip in June was the first real trip, but never the less we were out on the road with the Roadtrek for the first time in 2014 in April when we went for service. By now there was a list of things to be taken care - the oil change on the Onan, I wanted the filter that I devised to keep the water valve on the toilet clear of debris installed, the hot water tank valve had to be replaced, the outside shower would leak whenever the hose was attached to it, and I wanted them to replace the back up camera with a new camera that I had received from Roadtrek as the original camera from the first never had a clear picture and that picture just got worse and worse until it was unusable. They had the whole list in advance and the service was scheduled with their Roadtrek trained technician. I have written about going for service before. We drive 125 miles which takes with traffic three hours. We arrive as close to noon as we can and then wait while the work is done - usually four to five hours which we spend in their shop, looking at RVs on the sales floor, and walking to a shopping plaza about a half mile away where there is a Home Depot, a Staples, a dollar store, and a supermarket. It is not an entertaining way to spend the time but tolerable - once a year. We went over the list and we went off. We got a call to come back at 4:30. Two things had not been done. One they wanted to show us as it was apparently not a problem. That was the outside shower. They said that there is a weep hole in the place where the hose is attached to release pressure when the shower hose is connected and it is turned on. This was what appeared to us to be a leak. Since water spurts everywhere when that hose is connected and the shower is on, it did not seem right to us. The inside shower is basically the same fixture and does not do this. I have to wonder why this is necessary on the outside shower but they showed us the tiny hole that is "supposed" to be there. OK.
The other thing that was not done was the camera. One day I will tell here the entire tale of the camera. It is not to be told yet. What I will tell you now is what transpired on this day. Here is the Roadtrek service technician at the dealer telling me that the removal of the old camera and installation of the new camera is a problem because he has to remove the vent section that sits on the rear of the roof over the back of the air conditioner. The camera wires go from the camera that is installed over the cargo doors in the middle of the van, with wires that go into that vent, are attached with a putty to hold them down on the base and then go into a putty filled hole in the driver's side of the roof and inside the roof where they connect, apparently right there with the wires that go all the way to the dash and radio. The connection he tells me is not the problem. The problem is that in his "experience", as he put it, when he has taken off these vents in Roadtreks he generally finds that the screws that hold it in place have rusted solid and they sometimes will and sometimes will not remove from the plastic grommet nuts that they are secured to. If he should find that the screws are as he anticipates, the job takes hours and he never does a job like this unless he has all day. He said that he would not even attempt it unless he had a day to do it. I said that I could not understand how in three years it could possibly be that bad - and I have seen other Roadtrek owners talking about removing this vent and working on the inside of it with no problems at all. But he was insistent. He also said that when I do come back for the job he needed it first thing when they opened and before I came I should make sure they had the grommet nuts that would need to be used should the ones there need to be drilled out to get the screws out. He had them right then while we were standing there, but they are not always available. I asked if we came back the next morning - we could find a place to stay for the night even though we had not been prepared for it - and that means with all of the medications, etc. required each day. He said no as he was booked the next day. Now, I had never asked if this was warranty work or not,but assumed that it was likely not and that I would be paying to have the new camera installed. Until this moment, that was fine. Now I started realizing that if this was an all day job, the labor would cost me more than I was able to spend. This was another big disappointment in the tale of the back up camera. I have had no decent use of the camera since the first few months and have gotten by without it. Given the tale, yet untold, it was unbelievable.
By then it was near 6 pm and we paid the bill which was a lot more than I had figured it would be and we headed back the three hours toward home. We had no more leak from the hot water tank and that was a good thing. My filter was installed and that too was good. I still had no camera and that was more than not good in my mind. For that day it was not all peaches and cream.
There is the whole year yet to come.
End of Part 1.
Wednesday, November 26, 2014
Kitchen Kettle Village, Lancaster PA
I get many questions asking about where to go and what to do in Lancaster, PA. One of our regular stops whenever we are in Lancaster is Kitchen Kettle Village in the town of Intercourse. Yes, that is really the name of the town and the origin of the name has various stories none of which involve what comes to most people's minds. Needless to say, had the original name of the town, Cross Keys, remained the town post office would not have done quite the business that it regularly does in letters and post cards sent from there just for the post mark. Kitchen Kettle Village has been around for many, many years and on my first trip to Lancaster, PA more than fifty years ago, we went to Kitchen Kettle.
Going in the Roadtrek, there is RV parking in the Kitchen Kettle parking lot - accessed from Route 340. If it is a crowded Saturday, and most Saturday's here are crowded along with any holiday that they are open, you really don't want to get in the mess of cars being directed by parking lot directors pointing you to the nearest space or chance that the few RV spaces that they have are available. It is easier to go turn into the parking lot on the opposite side of Route 340 behind those business and the entrance to that lot is right where Route 772 meets Route 340. This is a big parking lot with often very few vehicles parked there even on busy days. You will often see other RVs parked there, all much bigger than a Roadtrek.

Kitchen Kettle Village has grown over the years. It is a village of small specialty shops primarily geared to the tourist centered around a family business that creates homemade jams and jellies. All of the jams and jellies are made right there in the open kitchen at the Kitchen Kettle jelly shop and you can watch as Amish women make and can the jellies, jams, fruit butters, and preserves - and now much more. The jellies are wonderful and there are samples of everyone of them that they make out free for the tasting. Many of the Pennsylvania Dutch specialties served in local restaurants are also made here and for sale such as chow chow, pepper relish, pepper cabbage, apple butter and more.

Now I can hear everyone thinking that they don't want to go anyplace just for shopping but there is also entertainment here along with carriage rides of the Pa Dutch farmlands. This is a very popular spot with visitors to Lancaster County. What are offered here are horse and carriage rides and not horse and buggy rides. You will get a very good view of Amish farms as the horse clip-clops along the roads and you will see why, first hand traveling by horse power, it is very important to yield when driving to the carriages and buggies all throughout Lancaster County.

On Saturdays you will be entertained by Banjo Jimmy and his band. Banjo Jimmy LaRue has been playing at Kitchen Kettle for as long as I can remember and he never fails to draw a crowd and get everyone's toes tapping - even those too young to know the classic songs that he plays. You will often find Banjo Jimmy here playing solo but on Saturday's and holidays he is here with the band. If you like what you hear, drop a little something into their milk can. You can also take home a CD.

There are places to eat at Kitchen Kettle in addition to the shops. There is a fancy restaurant called the Kling House Restaurant that is located on the street along the west side of Kitchen Kettle Village which is Route 772. This is open for breakfast and lunch and offers a variety of American foods, though not necessarily Pennsylvania Dutch. There is the Kettle Cafe that serves lunch with burgers and sandwiches along with homemade soups. There is the Smokehouse Shop which has smoked meats and cheeses. Go in and have them slice you some local specialties and then go into the Bake Shop located in the building with the Jelly and Jam and buy a fresh loaf of bread and take that to the Roadtrek and fix your own lunch. While you are looking around the bake shop try a small, free sample of shoo fly pie. For some sweet treats there is a fudge shop and also Lapp Valley Farms Ice Cream. OK, now I have to tell you about Lapp Valley Farms ice cream. They are located in several locations around Lancaster at Farmers Markets. You can also go to the farm to their dairy and buy the ice cream right where the cows are. This ice cream is homemade. It is the best ice cream that I have ever had. You can taste the freshness of the cream in this ice cream and it comes in several flavors. If you get Chocolate Almond you are getting whole almonds throughout the ice cream. I have to say that you will pay more for Lapp Valley Farms ice cream at Kitchen Kettle thn you will at one of the Farmers Markets such as Green Dragon or Roots, but if this is your only chance to try it, don't miss that. They are located near where the garden shop is.
And that brings me to the garden shop. There is really no room in the Roadtrek to buy and take home large plants but they have great prices here and some very unusual plants. It is always interesting to walk through and see what the season has brought and look at all of the pretty flowering plants.

The shops you will encounter are varied. There is a PA Dutch gift shop, a candle shop, a shop that sells things made from iron, a jewelery shop, a pottery shop - the lady who is selling makes it all herself, a toy shop, a doll shop, two shops with ladies accessories and handbags, a craft shop with locally made handcrafts, a wood sign shop where they will carve a sign for you while you wait and watch, a leather shop, and a shop just for pets. There is an entire building that was recently moved from a corner of the parking lot to a location more adjacent to the rest of the shops at Kitchen Kettle and this building was picked up and planted down as if it had always been there. Inside is country furniture and early American home furnishings. I have to comment that over the years the shops here have become more commercial than they once were, which is OK but I do miss some of some of the shops were things were made right there.
The most recent addition to Kitchen Kettle Village is lodging and while you would not be interested in staying there since you have your Roadtrek or RV, there are now hotel rooms that are quaintly decorated located above several of the shops.


While you are at Kitchen Kettle keep in mind that there are a number of shops on the street adjacent to Kitchen Kettle Village and while they are not part of Kitchen Kettle there are some interesting things to see. Walk out from Kitchen Kettle Village onto Route 340 and turn left and start walking. You will come to a small fabric shop. This shop is there primarily for the Amish to shop in. While they have many quilting fabrics to purchase, there is a large selection of fabrics that the Amish and Mennonites use to make their clothing. Go into the rear of that fabric shop and through a door and you will be in a store that caterers exclusively to the Amish - though you are welcome to come in and buy if you see something that you like. I don't know why I have to say this but be respectful when you are in a shop like this as these people are going about their lives and are not a tourist attraction to gawk at - and never take a photograph of the Amish. You will be violating a basic of their religious beliefs.
Come out of that shop and keep walking in the same direction and you will see two Hollywood movie locations where the film, "Witness" was shot - Harrison Ford featured in both of those scenes. As you walk back to Kitchen Kettle come to Route 772, cross the road and make a right and walk down to the Amish Buggy shop - one part of the shop there will be a sign that you can't go in - this part of the shop is for the Amish only. Next to that is where the tourists are allowed in.
I told you about the various places to eat in Kitchen Kettle Village but I must add where you should go to eat lunch. Across the Route 340 from the main entrance of Kitchen Kettle is a small road that goes into a small shopping center. On the right and up a short hill there is the Intercourse Post Office. Right next door to the post office is Stoltzfus Meats. This is a Pennsylvania Dutch family owned business and they have exceptional country sausage made at their farm. There is a small cafe on the side of the meat store and you order at the counter and when your food is ready, you are called to get it and bring it to one of the few tables that they have - or you can get it to go. Try the country sausage sandwich. On my most recent visit there I tried something new that they have added to the cafe menu that is available in their refrigerated cases. A new Amish farm family has started making and selling Zook's chicken pot pies - also beef and sausage. There are few places that you can get these other than going to the shop at their farm but Stoltzfus has them and they are serving a whole small size pie at the cafe. It is just right for one and it was as good as I have heard. This is not the usual Pennsylvania Dutch chicken pot pie which is actually "chicken bot bie" and is a chicken stew with thick dough noodle squares (which if you see in one of the many PA Dutch restaurants in Lancaster, you should try), but it is a traditional style chicken pot pie in a full pie crust. But try the country sausage for something different. One of the good things about the Roadtrek or any RV is that you have the refrigerator to bring home some of these treats. We fill the fridge with two dozen or more of these country sausages before we go home.
Kitchen Kettle Village is open from Monday to Saturday (closed Sunday) from 9:00 am to either 5:00 or 6:00 pm depending on the season. The only holiday it is closed on is Christmas. The address is 3529 Old Philadelphia Pike, Intercourse, PA 17534 and the phone number if you have questions for them is (800) 732-3538. Kitchen Kettle Village is very close to Beacon Hill Campground. It is a long walk but one could walk to it from there.
I will leave you now with some music from Banjo Jimmy and the band...
*The photographs in this article were taken with a cell phone camera and are not up to my usual standard for photographs I take to accompany my articles. The idea for this article came to me while walking around Kitchen Kettle and my camera was in the Roadtrek across the road.
Going in the Roadtrek, there is RV parking in the Kitchen Kettle parking lot - accessed from Route 340. If it is a crowded Saturday, and most Saturday's here are crowded along with any holiday that they are open, you really don't want to get in the mess of cars being directed by parking lot directors pointing you to the nearest space or chance that the few RV spaces that they have are available. It is easier to go turn into the parking lot on the opposite side of Route 340 behind those business and the entrance to that lot is right where Route 772 meets Route 340. This is a big parking lot with often very few vehicles parked there even on busy days. You will often see other RVs parked there, all much bigger than a Roadtrek.
Kitchen Kettle Village has grown over the years. It is a village of small specialty shops primarily geared to the tourist centered around a family business that creates homemade jams and jellies. All of the jams and jellies are made right there in the open kitchen at the Kitchen Kettle jelly shop and you can watch as Amish women make and can the jellies, jams, fruit butters, and preserves - and now much more. The jellies are wonderful and there are samples of everyone of them that they make out free for the tasting. Many of the Pennsylvania Dutch specialties served in local restaurants are also made here and for sale such as chow chow, pepper relish, pepper cabbage, apple butter and more.
Now I can hear everyone thinking that they don't want to go anyplace just for shopping but there is also entertainment here along with carriage rides of the Pa Dutch farmlands. This is a very popular spot with visitors to Lancaster County. What are offered here are horse and carriage rides and not horse and buggy rides. You will get a very good view of Amish farms as the horse clip-clops along the roads and you will see why, first hand traveling by horse power, it is very important to yield when driving to the carriages and buggies all throughout Lancaster County.
On Saturdays you will be entertained by Banjo Jimmy and his band. Banjo Jimmy LaRue has been playing at Kitchen Kettle for as long as I can remember and he never fails to draw a crowd and get everyone's toes tapping - even those too young to know the classic songs that he plays. You will often find Banjo Jimmy here playing solo but on Saturday's and holidays he is here with the band. If you like what you hear, drop a little something into their milk can. You can also take home a CD.
There are places to eat at Kitchen Kettle in addition to the shops. There is a fancy restaurant called the Kling House Restaurant that is located on the street along the west side of Kitchen Kettle Village which is Route 772. This is open for breakfast and lunch and offers a variety of American foods, though not necessarily Pennsylvania Dutch. There is the Kettle Cafe that serves lunch with burgers and sandwiches along with homemade soups. There is the Smokehouse Shop which has smoked meats and cheeses. Go in and have them slice you some local specialties and then go into the Bake Shop located in the building with the Jelly and Jam and buy a fresh loaf of bread and take that to the Roadtrek and fix your own lunch. While you are looking around the bake shop try a small, free sample of shoo fly pie. For some sweet treats there is a fudge shop and also Lapp Valley Farms Ice Cream. OK, now I have to tell you about Lapp Valley Farms ice cream. They are located in several locations around Lancaster at Farmers Markets. You can also go to the farm to their dairy and buy the ice cream right where the cows are. This ice cream is homemade. It is the best ice cream that I have ever had. You can taste the freshness of the cream in this ice cream and it comes in several flavors. If you get Chocolate Almond you are getting whole almonds throughout the ice cream. I have to say that you will pay more for Lapp Valley Farms ice cream at Kitchen Kettle thn you will at one of the Farmers Markets such as Green Dragon or Roots, but if this is your only chance to try it, don't miss that. They are located near where the garden shop is.
And that brings me to the garden shop. There is really no room in the Roadtrek to buy and take home large plants but they have great prices here and some very unusual plants. It is always interesting to walk through and see what the season has brought and look at all of the pretty flowering plants.
The shops you will encounter are varied. There is a PA Dutch gift shop, a candle shop, a shop that sells things made from iron, a jewelery shop, a pottery shop - the lady who is selling makes it all herself, a toy shop, a doll shop, two shops with ladies accessories and handbags, a craft shop with locally made handcrafts, a wood sign shop where they will carve a sign for you while you wait and watch, a leather shop, and a shop just for pets. There is an entire building that was recently moved from a corner of the parking lot to a location more adjacent to the rest of the shops at Kitchen Kettle and this building was picked up and planted down as if it had always been there. Inside is country furniture and early American home furnishings. I have to comment that over the years the shops here have become more commercial than they once were, which is OK but I do miss some of some of the shops were things were made right there.
The most recent addition to Kitchen Kettle Village is lodging and while you would not be interested in staying there since you have your Roadtrek or RV, there are now hotel rooms that are quaintly decorated located above several of the shops.
While you are at Kitchen Kettle keep in mind that there are a number of shops on the street adjacent to Kitchen Kettle Village and while they are not part of Kitchen Kettle there are some interesting things to see. Walk out from Kitchen Kettle Village onto Route 340 and turn left and start walking. You will come to a small fabric shop. This shop is there primarily for the Amish to shop in. While they have many quilting fabrics to purchase, there is a large selection of fabrics that the Amish and Mennonites use to make their clothing. Go into the rear of that fabric shop and through a door and you will be in a store that caterers exclusively to the Amish - though you are welcome to come in and buy if you see something that you like. I don't know why I have to say this but be respectful when you are in a shop like this as these people are going about their lives and are not a tourist attraction to gawk at - and never take a photograph of the Amish. You will be violating a basic of their religious beliefs.
Come out of that shop and keep walking in the same direction and you will see two Hollywood movie locations where the film, "Witness" was shot - Harrison Ford featured in both of those scenes. As you walk back to Kitchen Kettle come to Route 772, cross the road and make a right and walk down to the Amish Buggy shop - one part of the shop there will be a sign that you can't go in - this part of the shop is for the Amish only. Next to that is where the tourists are allowed in.
I told you about the various places to eat in Kitchen Kettle Village but I must add where you should go to eat lunch. Across the Route 340 from the main entrance of Kitchen Kettle is a small road that goes into a small shopping center. On the right and up a short hill there is the Intercourse Post Office. Right next door to the post office is Stoltzfus Meats. This is a Pennsylvania Dutch family owned business and they have exceptional country sausage made at their farm. There is a small cafe on the side of the meat store and you order at the counter and when your food is ready, you are called to get it and bring it to one of the few tables that they have - or you can get it to go. Try the country sausage sandwich. On my most recent visit there I tried something new that they have added to the cafe menu that is available in their refrigerated cases. A new Amish farm family has started making and selling Zook's chicken pot pies - also beef and sausage. There are few places that you can get these other than going to the shop at their farm but Stoltzfus has them and they are serving a whole small size pie at the cafe. It is just right for one and it was as good as I have heard. This is not the usual Pennsylvania Dutch chicken pot pie which is actually "chicken bot bie" and is a chicken stew with thick dough noodle squares (which if you see in one of the many PA Dutch restaurants in Lancaster, you should try), but it is a traditional style chicken pot pie in a full pie crust. But try the country sausage for something different. One of the good things about the Roadtrek or any RV is that you have the refrigerator to bring home some of these treats. We fill the fridge with two dozen or more of these country sausages before we go home.
Kitchen Kettle Village is open from Monday to Saturday (closed Sunday) from 9:00 am to either 5:00 or 6:00 pm depending on the season. The only holiday it is closed on is Christmas. The address is 3529 Old Philadelphia Pike, Intercourse, PA 17534 and the phone number if you have questions for them is (800) 732-3538. Kitchen Kettle Village is very close to Beacon Hill Campground. It is a long walk but one could walk to it from there.
I will leave you now with some music from Banjo Jimmy and the band...
*The photographs in this article were taken with a cell phone camera and are not up to my usual standard for photographs I take to accompany my articles. The idea for this article came to me while walking around Kitchen Kettle and my camera was in the Roadtrek across the road.
Wednesday, November 12, 2014
For the First Time...
This will probably be one of the shortest articles I have ever written for this site. For the first time since we got the Roadtrek, my black tank sensor reads empty. This may not sound like a big deal to most but to RV owners this is a rare occurrence. At the time that I am writing this article it has read empty for three weeks now.
I have written before that we have tried the GEO method of treating the black tank. This is the mixture of Calgon water softener mixed with washing machine liquid detergent. We did this for a year it had no better result in keeping the waste flowing out of the tank and keeping odors down than just using the tank chemical - digester/deodorizer/lube - that we buy in Walmart's RV section and have used since we first got the Roadtrek. Toward the end of that year of trying this I started adding the tank chemical to the GEO mixture to see if that would improve the result. The result I was looking for was to see the black tank sensor go to Empty - the bottom LED. That never happened. I tried cleaning the tank by flushing it with water through a tank wand. I tried pouring ten gallons of clean water down the toilet into the black tank after dumping and dumping again. No change. The sensor would read 1/3 or 2/3 and as soon as we started using the toilet the sensor would read Full. Sometimes each press of the test button with the empty tank would change from 2/3 to 1/3 and back again to 2/3. We knew the tank was empty but the sensor didn't. I pretty much gave up and at the end of the 2013 season, took the bottle of Calgon and the bottle of laundry detergent out of the Roadtrek and stored them away in the basement. Meryl does not use this type of laundry detergent in the washer at home and we don't need to use Calgon so they have been sitting there since last year.
Here is how I achieved the black tank sensor reading empty - and I hesitate to put this out in case it is a fluke and one time thing. And should it turn out to be that, I will come back to this article and let you know that it was a failed hope. So, before our last trip I saw the bottle of Calgon in the basement and decided that since it was just sitting there, I would try an experiment. Since the trip before the tank sensor was now alternating reading Full or 2/3. It had never read full after dumping before. I took the Calgon out to the Roadtrek and filled the entire bottle cap with liquid Calgon water softener. This is about three times what is recommended in the GEO method to do. I flushed it down the toilet into the black tank and followed it with a little water to get it out of the drain pipe and into the tank. There already was our usual one gallon of clean water added to the tank after dumping and the usual two ounces of the tank chemical treatment. That was it.
We went on our next trip a week later. When we dumped the black tank and the grey tank, I took the garden hose that we carry for the tank wand, connected it to the campsite water spigot, and added a shut off valve to the end of the hose. I shut the Roadtrek water pump off as I did not want that water going into the tank at the same time. The hose was snaked into the Roadtrek through the driver's door to the toilet. Meryl turned on the spigot and I pointed the end of the hose into the toilet with my foot on the pedal to hold the flap open and I turned on the water - full force pointing down the drain pipe into the black tank. It took a little while for the tank to fill and for me to see the water coming up the pipe toward the bowl (using my flashlight and "no drop" lanyard). I turned the valve on the hose to off and called for Meryl to shut off the water. The hose and I then went back outside. We dumped the black tank again. The water that flowed was fairly clear. I went inside and could not believe what I saw when I pushed the test button on the monitor. It read empty. It then went to 1/3 and I thought it was worth a try.
During that day we were traveling around the area before heading home that night and I checked the tank sensor again at the first stop. The black tank read EMPTY. And it has stayed that way to now (now being when this article was written which is not the day it is published). Was it the Calgon or the hose? Since I have done both before but never as much Calgon as this, I think it was a combination of too much Calgon - a full cap - and the heavy rinse with the hose to a full tank.
We have another trip coming up - again, before this article will appear - and I will repeat this. This next trip will be the last trip of the season before winterizing and I want that black tank empty for winterizing after this trip. If it works again, I will be back and share what happens in an addendum on this article. Stay tuned for the end of this cliffhanger.
Addendum:
A week before our next trip I went in and put another full cap of Calgon into the black tank. Before I did I noticed that the black tank monitor was no longer reading empty but now was at the 1/3 LED. When we started using the tank the first night of trip the monitor went quickly up to 2/3 and was at Full by the start of the next day. The tank was far, far from full. At the end of the the trip I flushed and emptied the tank and the monitor went no lower than 2/3. Back to the same old reading and it did not go down to 1/3 as it had been. When we winterized - and the tank was definitely empty - the tank was still at 2/3 and will likely stay there until the Spring. SO - it was nice while it lasted but perhaps this was a one time thing, not to be seen again. I did purchase another bottle of Calgon and it will be used through the new RVing season when it comes> We shall see if we ever get to see the monitor say the black tank is empty again. Until then don't jump to try this. At least I can say now that I once saw the black tank monitor read empty.
Wednesday, October 29, 2014
A Better Way to Level a Roadtrek
Anytime we are heading to a new campground or even a campground that we have been to before the big question in my mind is will the campsite we are assigned be level. Too often campsites are not even close to level. They are sloped up or sloped down or sloped to one side or the other. We have the Nova Kool all electric condenser refrigerator so we don't need to be level for the fridge as some three way absorption fridges require. For me it is how I feel inside. I am sensitive to being on a slant and it is uncomfortable. If we have to be off, being higher in the back is better for sleeping than being higher in the front, but it is still something that bothers me. When a site is very off, we ask for a new site and that happened twice this year. The new sites we were given were not much better but doable - one by spending 30 minutes moving around in the space trying to find the best the most close to level position and the other by resorting to the "Lego" type blocks that we carry for leveling. Those blocks can be a pain in the neck and I have resisted using them unless there was no way to getting the RV into any position that was close including trying positioning diagonally as much as possible.Large RVs, so equipped, push a button and an automatic leveling system levels the RV - legs come down and adjust to the correct heights. Nice! There is no room under a Roadtrek or any Class B to accommodate the mechanism required to do this. The leveling blocks are the most common way to level a Class B. We always ask for a level site when we are making reservation and also when we arrive at a campground. We are always told that the site is level and have been told that we are getting their most level site - and that most level site is often not level. On the campgrounds that we go back to regularly we request certain sites that we have been in that we know are level (and even that can change when the sites are gravel), but often those sites are not available. I kept thinking that there had to be a better way.
During this past summer I learned about a new type of leveling device that can be used with a Roadtrek or any RV or travel trailer. They are called Camper Levelers (3604) and are made by a company named Andersen Hitches. When I first saw these on the Internet and the company video about how they work (video link) I thought how great this seemed. I wanted to know though would this work with a Class B RV like my Roadtrek. I went on various forums and asked about these and found out first that the company's claims were true - they worked as described. I then learned that those who have them like them and they like them much better than the blocks - and I also learned from a few Roadtrek owners who have them that they work just fine with the Roadtrek. I showed the video to Meryl and she was skeptical but when I explained how they worked and showed her the video more than once she agreed that they were worth a try, especially after our last trip where we played with the blocks every day to get level.We decided to order them.
I have not seen these in any camping/RV store. Some store may have them but they are easily purchased on the web either at the company's website , other RV accessories sites, or Amazon. They are not cheap - they cost $40 each - each as in $40 for one wheel. You need to buy two packages. We bought ours on Amazon through a company called Tweety's RV. There were several sellers on Amazon with the Andersen Levelers. I chose Tweety's because of a huge number of positive ratings. We bought two sets - one set for each tire needed to level side to side or front to back. On Amazon there was free shipping (given the price of these). Andersen's website was charging shipping. At $80 they are expensive, but if they make life easier $80 is not much to pay.
So what makes these levelers different? The Andersen leveler is a curved ramp - curved to match the curve of the tire on the top and slightly curved on the bottom allowing the ramp to rock.

It is made of a very tough material. I contacted Andersen while I was considering these and asked about their ability to take the weight of the Roadtrek and if they can stand up to gravel or paved surfaces. They told me there would be no problem at all. They can support up to 30,000 pounds. They will raise the wheel from 1/2" to 4" in height.
To secure the ramp once the wheel is in the correct position, there is a second piece to the ramp that wedges under the section that will raise up as the tire moves up the ramp to where the RV is level.

Together under the tire, the two parts will be like this -

So how do you use these? Simple. You set the ramp in front of the two tires you need to increase in height to get level and drive up the ramp. You stop when your level bubbles are in the middle and you are level. Get out - or have your partner as in this is Meryl's job - put the wedge under the back of the ramp and you are done! Of course, you set the emergency break and put the van in park before going near the ramps to set the wedges in place.

The ramp is slightly smaller in diameter than the tire, which gave me some concern at first but it is a fraction of an inch on each side if you put the ramp in the center of the tire. This was easy to determine as the ramp has a dimple in the middle from the mold and the third thread on the tire is the middle of the tire. I lined the two up and set the ramp just at the edge of the tire. You can see that the front of the ramp is moved up when the rear is just under the tire and looks in the photo like it is hitting the Roadtek's ground effect in front. It actually is not and does not touch.

Now that there is one of these set on the two tires - either the two front or the two rear or the two on the passenger side or the two on the driver's side depending on which way it is off-level - you get in, start the van, put it in First gear (this was easier than doing it in Drive), take off the emergency brake and move SLOWLY up the ramp making sure before you move that the front tires are pointing straight ahead. As you move you watch the level bubbles on your levels. I have a side to side level on the dashboard and a front-back level on the passenger door. As you start to climb the ramps you will see the bubbles move to level. I quickly found that if I went to brake to check the levels, the van would slide slightly back down the ramp so I used one foot on the brake and one foot on the gas pedal and moved the van into level. Once there I stopped, set the emergency brake and put the van in Park.

I got out to guide Meryl in putting the wedges in place which turned out to be very easy. Just slip the wedge in place and give it a push under the ramp.


That is all there is to it. Level!
When it is time to leave it is just as simple. The company shows in their video just pulling forward and off the edge of the ramp. I tried this and the Roadtrek came off with a slight thud. All was well but Meryl suggested trying it by removing the wedge and rolling back off the ramp. This worked. It was not hard to pull the wedge out from under the ramp and then I just put the van into Reverse and rolled back and off. The two ramps and wedges get picked up and put away and you are off.
Storing the ramps in the limited space of the Roadtrek took some doing and Meryl rearranged the outside storage cabinet to accommodate the two ramps and two wedges. Taking the tall stack of leveling blocks out helped a lot. The Andersen levelers are heavier than they look but stack easily and we got them in for storage without a problem and easily accessed to get out when they are needed.
We tried this out on the driveway at our house. The incline of the driveway is steeper than any campsite that we have ever been in - though I am not sure if the off-level campsite two years ago at the Yogi campground in Hagerstown, MD was not very close. The Andersen levelers level to four inches. The driveway drop was just more than that and I was on the very edge of the front of the ramps to get the level bubble to just inside the front level line. The van sat on the ramp in that position with no problem and we set the wedges and it was solid. I even went inside and jumped around to see what might happen. As I did that Meryl sat in the front and watched the bubble on the level. It stayed where it was. That would be good enough and likely we will never encounter a site that far off. And if we do, we would still ask to for another site.
I would rather I always have a nice level site, but I know from experience that getting that every time just does not happen. As soon as I have an opportunity to try these out at a campground I will come back to this article and add an addendum on their first field trial. I am sure it will be fine and even better than on my driveway. (This may take awhile as our first campsite after getting these was nicely level all on its own. Nice that it was but I was looking forward to trying these out at a campground.)
Consider these. I don't get anything from the Andersen company. I am not a paid spokesperson. I bought these and paid full price. I just want to share what I find to solve some of the things we all encounter when RVing. This one is works. I would say that this is the next best thing to pushing a button and getting automatically level - though if that were possible on my B I would still like to have that!
I am putting the table of contents link to this article on both the Living in the Roadtrek/How Tos page and the Modifications/Gizmos page as it is really more than a gizmo and an important thing to know about if you hate having to level your Roadtrek, trailer, or RV.
During this past summer I learned about a new type of leveling device that can be used with a Roadtrek or any RV or travel trailer. They are called Camper Levelers (3604) and are made by a company named Andersen Hitches. When I first saw these on the Internet and the company video about how they work (video link) I thought how great this seemed. I wanted to know though would this work with a Class B RV like my Roadtrek. I went on various forums and asked about these and found out first that the company's claims were true - they worked as described. I then learned that those who have them like them and they like them much better than the blocks - and I also learned from a few Roadtrek owners who have them that they work just fine with the Roadtrek. I showed the video to Meryl and she was skeptical but when I explained how they worked and showed her the video more than once she agreed that they were worth a try, especially after our last trip where we played with the blocks every day to get level.We decided to order them.
I have not seen these in any camping/RV store. Some store may have them but they are easily purchased on the web either at the company's website , other RV accessories sites, or Amazon. They are not cheap - they cost $40 each - each as in $40 for one wheel. You need to buy two packages. We bought ours on Amazon through a company called Tweety's RV. There were several sellers on Amazon with the Andersen Levelers. I chose Tweety's because of a huge number of positive ratings. We bought two sets - one set for each tire needed to level side to side or front to back. On Amazon there was free shipping (given the price of these). Andersen's website was charging shipping. At $80 they are expensive, but if they make life easier $80 is not much to pay.
So what makes these levelers different? The Andersen leveler is a curved ramp - curved to match the curve of the tire on the top and slightly curved on the bottom allowing the ramp to rock.

To secure the ramp once the wheel is in the correct position, there is a second piece to the ramp that wedges under the section that will raise up as the tire moves up the ramp to where the RV is level.

Together under the tire, the two parts will be like this -

So how do you use these? Simple. You set the ramp in front of the two tires you need to increase in height to get level and drive up the ramp. You stop when your level bubbles are in the middle and you are level. Get out - or have your partner as in this is Meryl's job - put the wedge under the back of the ramp and you are done! Of course, you set the emergency break and put the van in park before going near the ramps to set the wedges in place.

The ramp is slightly smaller in diameter than the tire, which gave me some concern at first but it is a fraction of an inch on each side if you put the ramp in the center of the tire. This was easy to determine as the ramp has a dimple in the middle from the mold and the third thread on the tire is the middle of the tire. I lined the two up and set the ramp just at the edge of the tire. You can see that the front of the ramp is moved up when the rear is just under the tire and looks in the photo like it is hitting the Roadtek's ground effect in front. It actually is not and does not touch.

Now that there is one of these set on the two tires - either the two front or the two rear or the two on the passenger side or the two on the driver's side depending on which way it is off-level - you get in, start the van, put it in First gear (this was easier than doing it in Drive), take off the emergency brake and move SLOWLY up the ramp making sure before you move that the front tires are pointing straight ahead. As you move you watch the level bubbles on your levels. I have a side to side level on the dashboard and a front-back level on the passenger door. As you start to climb the ramps you will see the bubbles move to level. I quickly found that if I went to brake to check the levels, the van would slide slightly back down the ramp so I used one foot on the brake and one foot on the gas pedal and moved the van into level. Once there I stopped, set the emergency brake and put the van in Park.

I got out to guide Meryl in putting the wedges in place which turned out to be very easy. Just slip the wedge in place and give it a push under the ramp.


That is all there is to it. Level!
When it is time to leave it is just as simple. The company shows in their video just pulling forward and off the edge of the ramp. I tried this and the Roadtrek came off with a slight thud. All was well but Meryl suggested trying it by removing the wedge and rolling back off the ramp. This worked. It was not hard to pull the wedge out from under the ramp and then I just put the van into Reverse and rolled back and off. The two ramps and wedges get picked up and put away and you are off.
Storing the ramps in the limited space of the Roadtrek took some doing and Meryl rearranged the outside storage cabinet to accommodate the two ramps and two wedges. Taking the tall stack of leveling blocks out helped a lot. The Andersen levelers are heavier than they look but stack easily and we got them in for storage without a problem and easily accessed to get out when they are needed.
We tried this out on the driveway at our house. The incline of the driveway is steeper than any campsite that we have ever been in - though I am not sure if the off-level campsite two years ago at the Yogi campground in Hagerstown, MD was not very close. The Andersen levelers level to four inches. The driveway drop was just more than that and I was on the very edge of the front of the ramps to get the level bubble to just inside the front level line. The van sat on the ramp in that position with no problem and we set the wedges and it was solid. I even went inside and jumped around to see what might happen. As I did that Meryl sat in the front and watched the bubble on the level. It stayed where it was. That would be good enough and likely we will never encounter a site that far off. And if we do, we would still ask to for another site.
I would rather I always have a nice level site, but I know from experience that getting that every time just does not happen. As soon as I have an opportunity to try these out at a campground I will come back to this article and add an addendum on their first field trial. I am sure it will be fine and even better than on my driveway. (This may take awhile as our first campsite after getting these was nicely level all on its own. Nice that it was but I was looking forward to trying these out at a campground.)
Consider these. I don't get anything from the Andersen company. I am not a paid spokesperson. I bought these and paid full price. I just want to share what I find to solve some of the things we all encounter when RVing. This one is works. I would say that this is the next best thing to pushing a button and getting automatically level - though if that were possible on my B I would still like to have that!
I am putting the table of contents link to this article on both the Living in the Roadtrek/How Tos page and the Modifications/Gizmos page as it is really more than a gizmo and an important thing to know about if you hate having to level your Roadtrek, trailer, or RV.
Wednesday, October 15, 2014
Gettysburg National Military Park, Gettysburg, Pennsylvania PART II
PART I WAS THE LAST ARTICLE
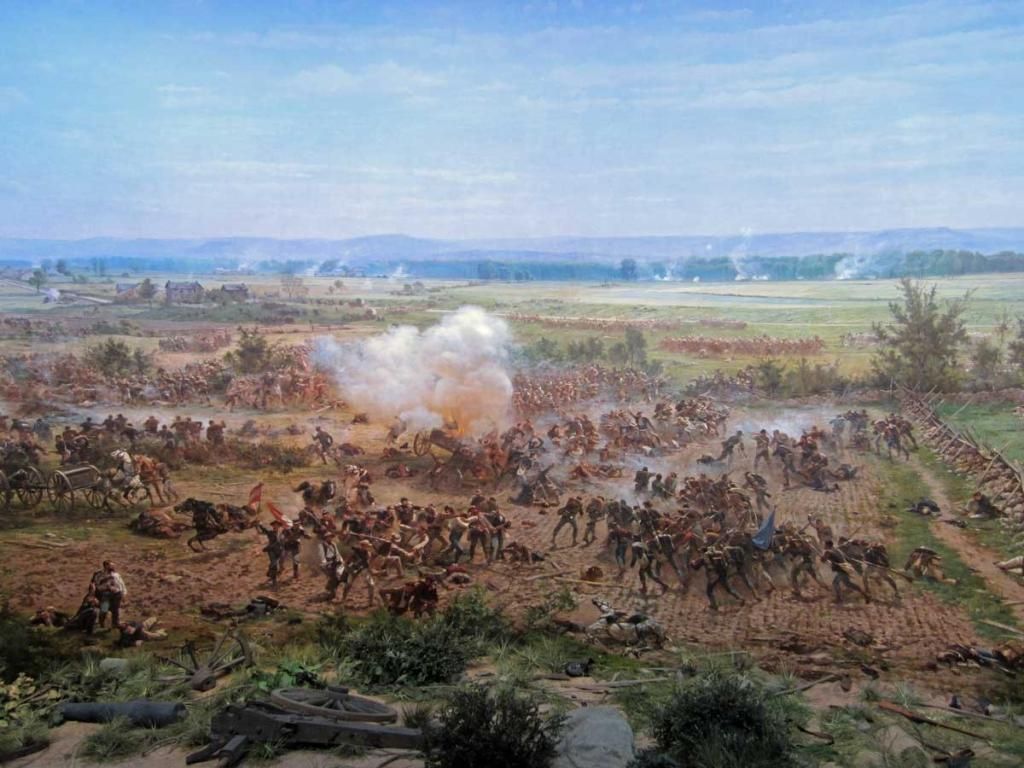
We left Part I with our just leaving the film in the Gettysburg National Military Park Visitors Center and being escorted with everyone else who had just watched the film up to the Cyclorama. The Cyclorama is located in the dome in the center of the building. So what is a Cyclorama?
In the 1880s, French artist Paul Philippoteaux painted the Battle of Gettysburg in the round. He and his assistants took more than a year to do the actual painting after months of research on the battlefield with veterans, guides, and a photographer. The painting is 377 feet in circumference and 42 feet high. What you are seeing is a depiction of Pickett's Charge on the third day of the battle. Four versions of the painting existed in the United States. It is the Boston version that is on display here and this first was displayed in Boston in 1884.
You come up into the center of the dome and there is a metal walkway all around the dome facing the painting. You can walk anywhere around the painting to see it. The painting is displayed as the artist originally intended with a three dimensional diorama in front of the bottom of the painting - making what you are seeing very realistic. Each place you stop around the painting and each place you look you are seeing another part of this battle.
There is a very short recorded narration that is played while you are up looking at the painting. What they do not do is tell you to look at any one particular part of the painting as the narration starts and you may be looking at a part of the painting that has nothing to do with what the narrator is saying. Your time with the Cyclorama is short - perhaps ten minutes and everyone is then asked to follow back down and out of the Cyclorama. You are then brought into a room with an explanation of the Cyclorama and its own historic artifacts. Frankly, this should have been at the start of the Cyclorama experience and not at the conclusion of it.
The Cyclorama is the end of your escorted part of the building and now you are on your own to go into the museum. Your tickets are only good for the day of purchase, so unless it is very early in the day it would be unwise at this point to leave intending to come back later. Your ticket does let you into the museum throughout that day. The film and the Cyclorama may be seen only once with a ticket. We went right into the musuem.
The museum consists of 12 galleries. The exhibits are displays of artifacts - some put together to create a room or a scene. There are also video presentations in some of the galleries. The first gallery is the Impact of War. The second gallery is the Causes of War from 1776 to 1861. Gallery three is the Approach to War. Gallery four gets into the Civil War 1861 to1863. Now in the galleries are approaching July 1863 with gallery five's Campaign to Pennsylvania. Included in Gallery five is the Campaign to Pennsylvania Voices Theater, a film program where you will hear from people who were there.
 |
| General Robert E. Lee's campaign furniture as it would have been set up in his tent. |
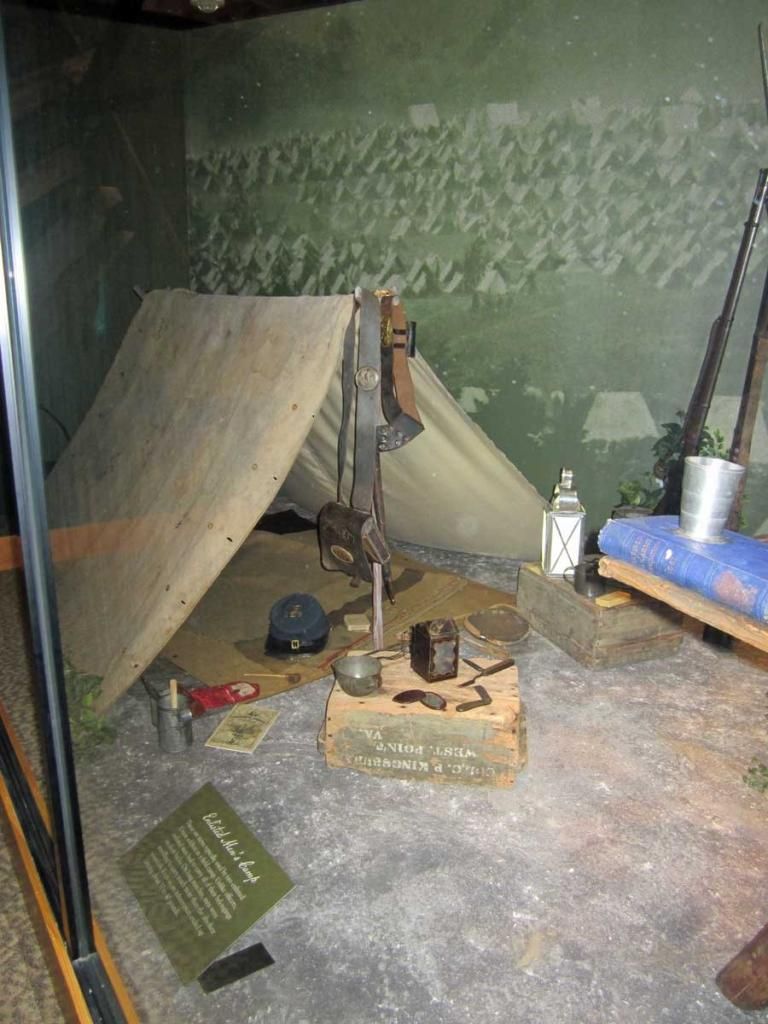 |
| Soldiers' tent - two men share this tent - each carries half the tent with him. |
 |
| General George Meade's bedroom furniture from his Gettysburg Headquarters |
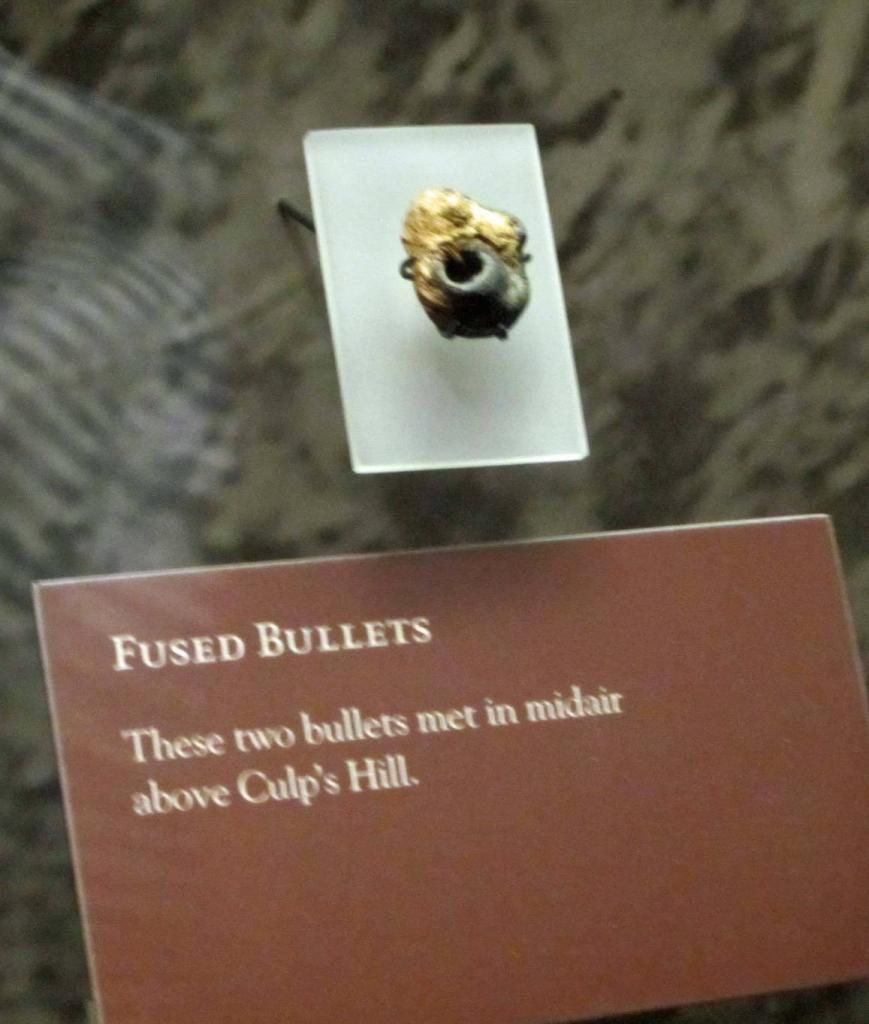 |
| Two bullets that met in mid-air! |
 |
| This photo of a piece of a hospital tent from the battle kept and embroidered as a remembrance. This photo and a series of photos of this piece were taken for Meryl who is an embroidery historian. |
Gallery nine is the Civil War, 1863 to 1865 - the remainder of the war all the way through to General Lee's surrender of his army to General Grant at Appomattox which led to the end of the Civil War. There are some very significant artifacts to see in this gallery.
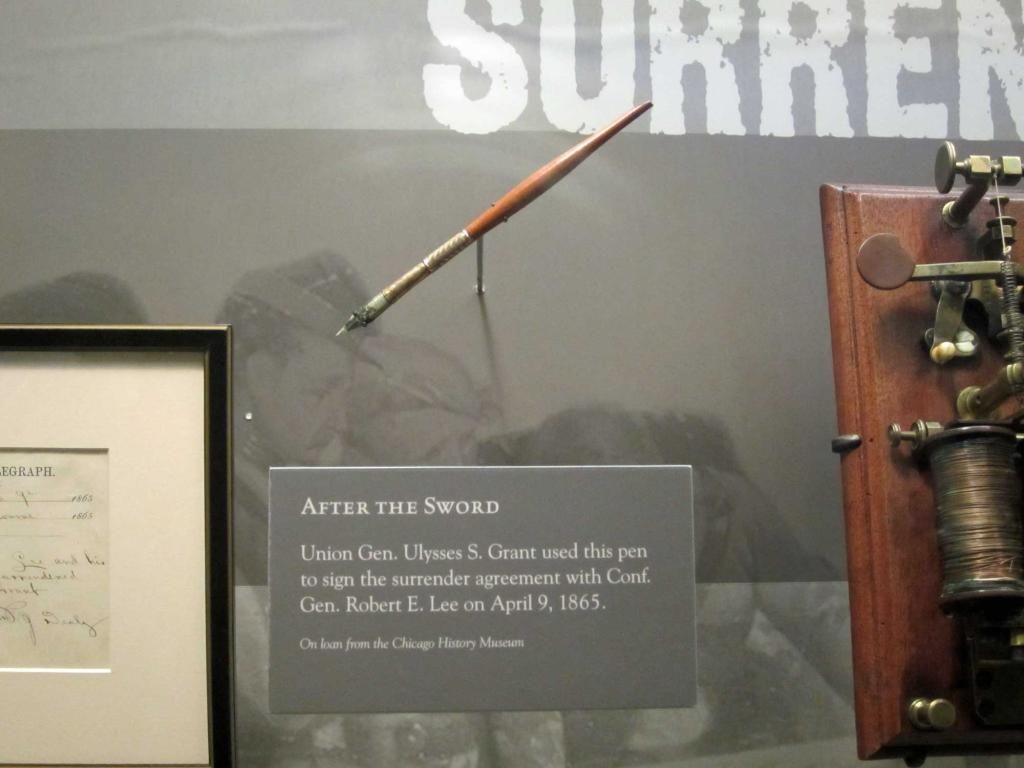 |
| The Surrender Pen |
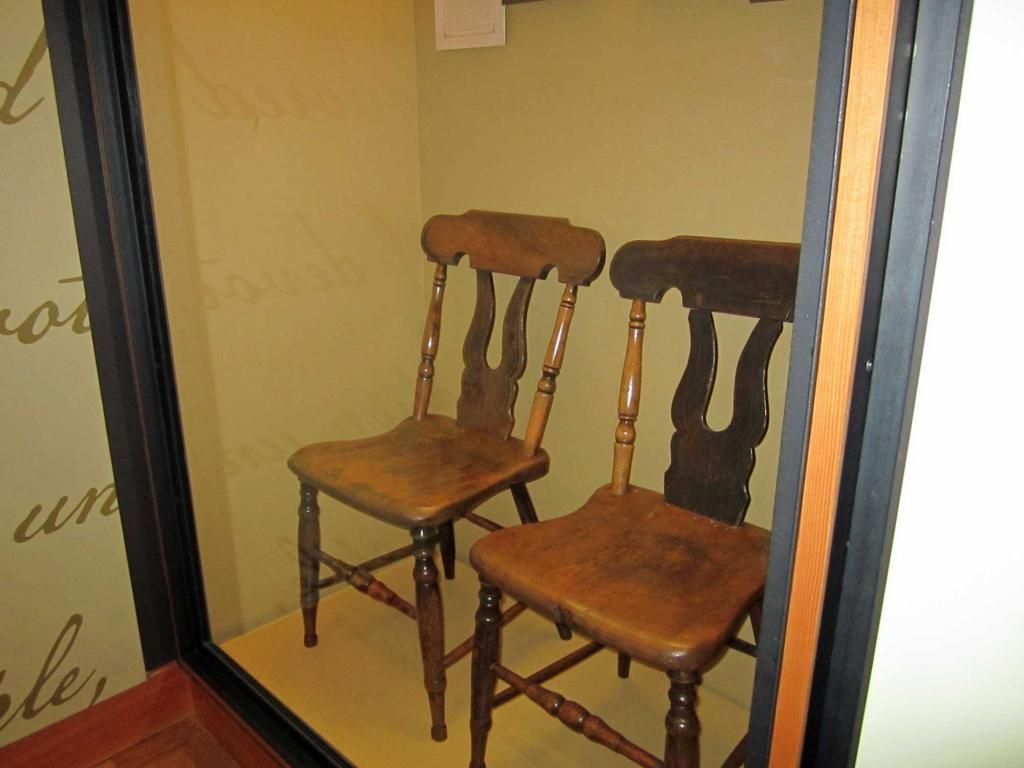 |
| Chairs used by Grant and Lee while signing the surrender |
The last gallery is a special exhibits gallery and the exhibits here change here on a schedule. At the time of our visit this exhibit was (and may still be) Treasures of the Civil War: Legendary Leaders Who Shaped a War and a Nation. This includes artifacts from collections from all over the country. The following three photographs are of artifacts in that exhibit.
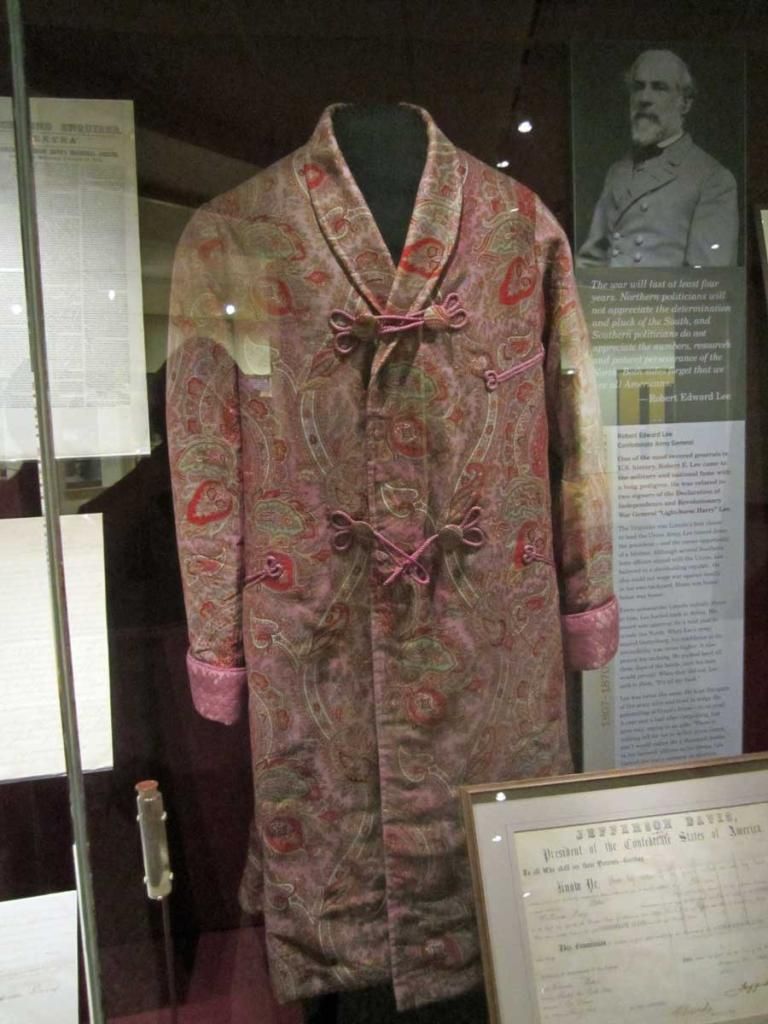 |
| Robert E. Lee's Dressing Gown |
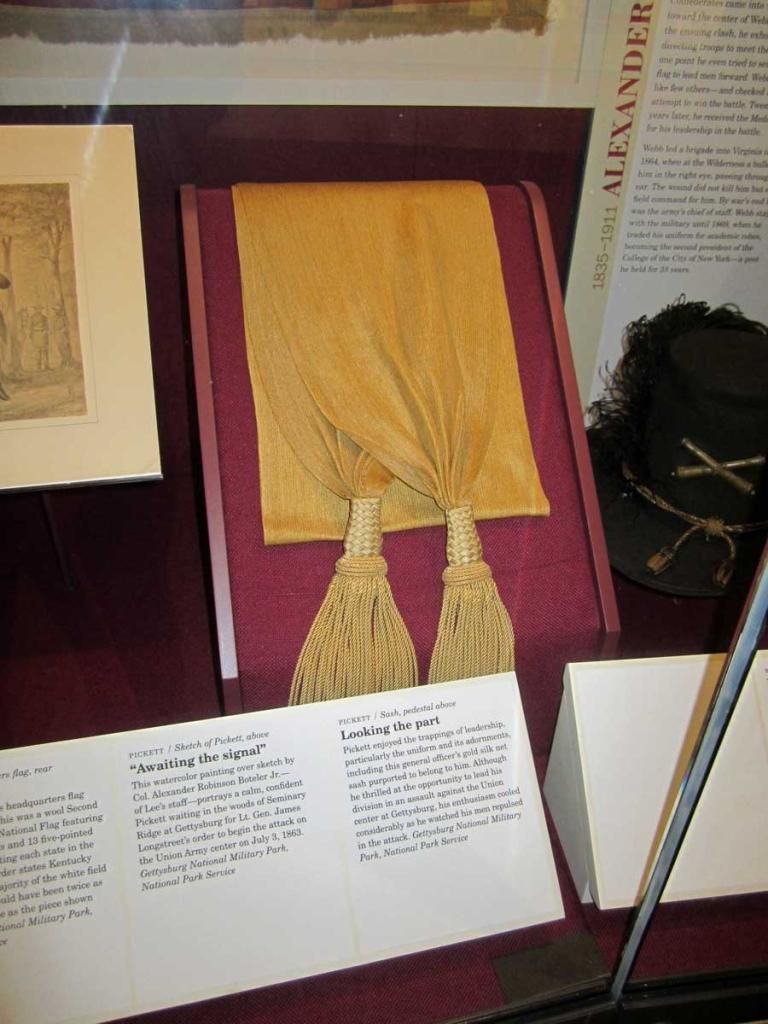 |
| Pickett's Sash |
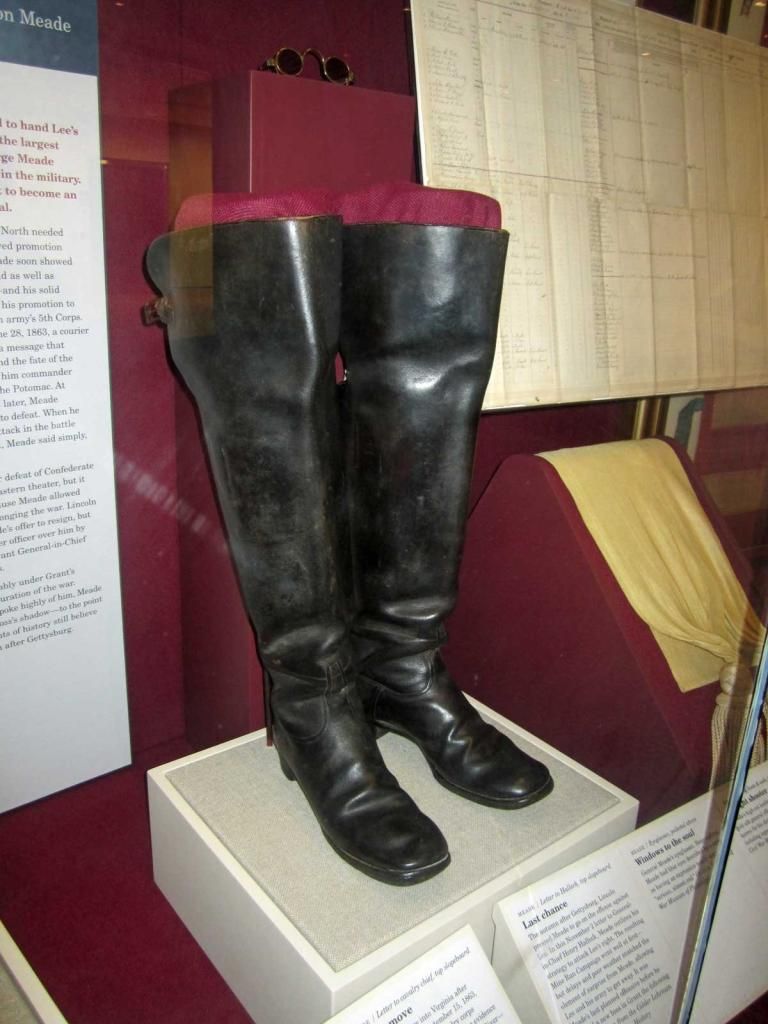 |
| George Meade's Boots |

The route takes you along to Big Round Top and then Little Round Top. There was fierce fighting on Little Round Top. You may park and climb to the top of both looking out over the entire battlefield.
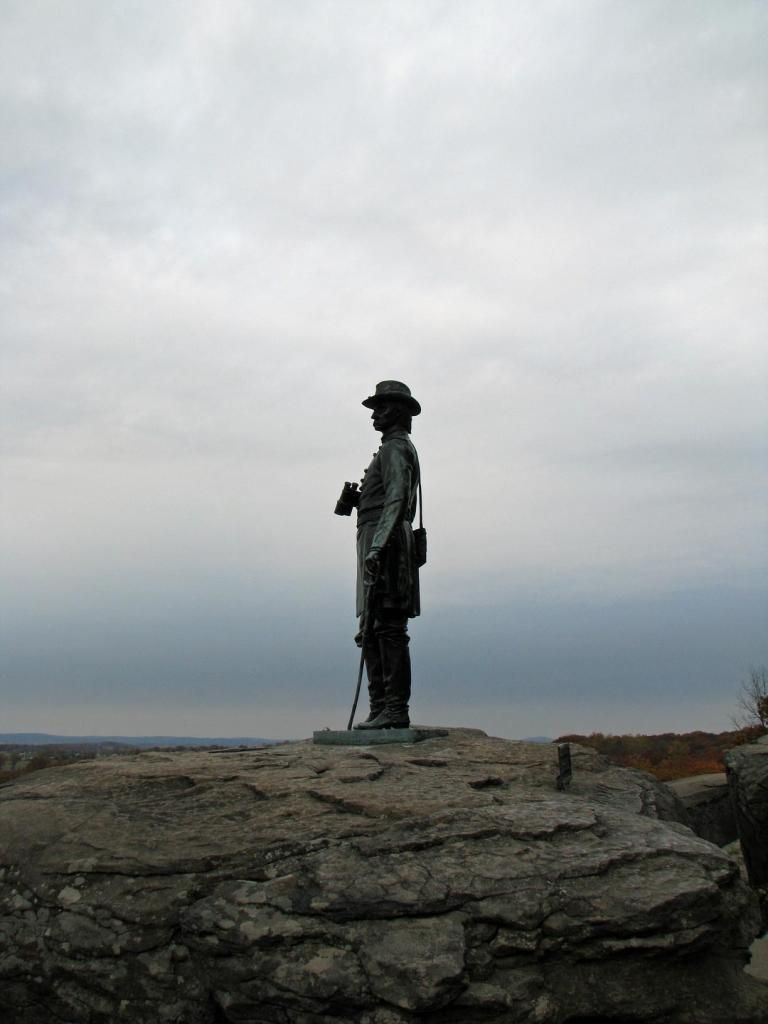 |
| Atop Little Roundtop |
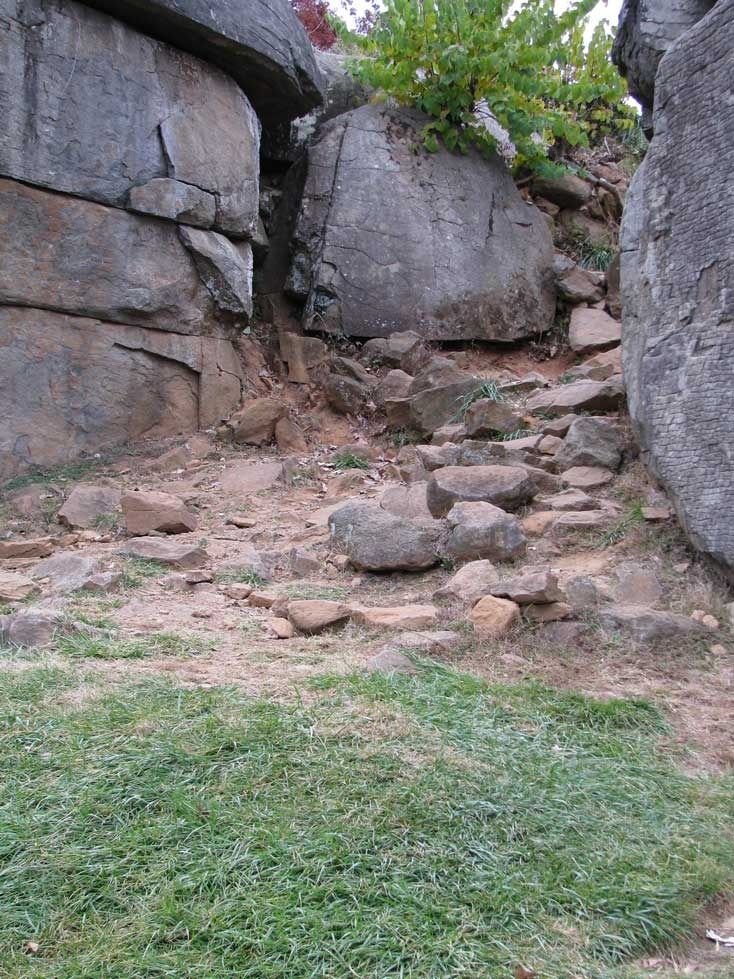 |
| Devil's Den - a famous photograph taken right after the war was taken at this same spot by Alexander Gardener showing dead soldiers between the rocks right here. |
It was getting dark and we went to a place that many reenactors know to go to for dinner when in Gettysburg - General Pickett's Buffet - a Southern buffet menu restaurant almost outside of town. Going into the main parking lot entrance of the restaurant the Roadtrek banged as it hit bottom in the back going up the driveway cut from the street. I hoped that no damage was done - and so far it seems we were OK. Leaving the restaurant later that night we went out the rear of the parking lot where the exit cut was less of an incline - and no bang.
We returned to the campground in Lancaster that night the same way that we came. What happened to the rain? It did not rain in Gettysburg while we were there. The roads to Lancaster where wet and it had rained there. We saw some interesting lighting shapes in the distant sky as we drove back - one of which was red and in the shape of a U - high in the sky.
I recommend going to Gettysburg. Go for more than one day. There are several campgrounds in Gettysburg. Some are better in the reviews than others so be sure to check RVparkreviews.com before you go and pay close attention to the reviews. There is a Walmart in Gettysburg but overnight parking is not allowed in their parking lot. This is a local ordnance and applies to all parking lots in Gettysburg. When in Gettysburg be sure to see walk around the town. There is a great history bookstore in town called The History Store. There are also a number of ghost tours of the town at night - these cost money and may or may not be showing you anything but legends, but we aware that Gettysburg is said to be one of the most haunted places in the country - and considering what happened here, I would not doubt that at all.
(The three photographs taken of the battlefield above were not taken on this trip. It was too dark and we had no time to stop for photos when we drove the battle route with the Roadtrek. These photos were taken by me on a trip to Gettysburg in the Fall of 2008 and this explains the color of the leaves on the trees in General Lee's statue photo.)
Wednesday, October 1, 2014
Gettysburg National Military Park, Gettysburg, Pennsylvania PART I
We were in Lancaster, PA on another of those days that seemed to be all too frequent during our travels this summer that was predicted to rain. We decided that this would be a good day to do something that we have never done with the Roadtrek but had done many times before we started traveling in the Roadtrek and that was to go to Gettysburg. This was a day trip. A day is really not enough to go to Gettysburg if you have never been there before. A visit can easily take two days - perhaps three. Our intention on this possibly rainy day was go to the NPS Visitors Center with its film, Cyclorama, and museum.We have been through the battlefield many times and knew that there would not be enough time to do that again on this trip and that was OK.
Gettysburg is about 75 miles from Lancaster to the west. There is a very direct route from Lancaster to Gettysburg going west on Route 30 and remaining on that same route right into the town of Gettysburg. I have always hated that route when we drove by car and I knew that it would be even worse in a larger vehicle like a Roadtrek - or any RV or Travel Trailer for that matter. Route 30 is fine until you get not too far from Gettysburg when it becomes a one lane each way road through small towns with slow speed limits and traffic circles. I will never forget the night years ago when we drove this back to Lancaster from Gettysburg in a severe storm with trees falling around us and barely able to see what was ahead. In good weather it is not much better. There is another route to Gettysburg that is far from direct but only adds five minutes to the trip and is completely on multi-lane highways that is just five miles longer but so much more comfortable to drive. This route takes you off Route 30 West right at Lancaster onto Route 283 up and across and around to Route 15 South and down right into the town of Gettysburg at Route 30. This is the preferred way to go and the drive from Lancaster is one hour and twenty minutes as opposed to one hour and fifteen minutes on the so called direct route. (I discussed this on an RV forum and had a number of locals and others who have driven both routes agree.) We set out from Lancaster, stopped for lunch at a Wendy's as soon as we got off Route 15 in Gettysburg, and after a fast lunch we headed for the National Park Visitors Center.
There is a relatively "new" NPS Visitors Center in Gettysburg. We were there several years back when it first opened. The old Visitors Center's building is still in the center of town and was actually much better located in relation to the battlefield and the town itself - which is also a place to tour as much of it is as it was during the battle. The "new" Visitors Center is off on a much bigger plot of land. Building this meant moving the small museum that they once had and expanding with many more artifacts into a large facility, moving the Cyclorama - which I will explain as we go along, and creating a theater in which to show a film made for the site that briefly explains the battle of Gettysburg. Before we left we learned from their website that due to construction one of the parking lots for the Visitors Center was closed. We had some concern that this might be a problem but we ventured out to see what we would find.
There is an RV parking lot at the Visitors Center. This is a good thing, particularly while one of the parking lots is closed, as the parking lot for cars was a problem for the Roadtrek. Lanes were narrow and spaces were tight. We drove through this parking lot and could not have fit into any of the few spaces that were open. Even had it been less crowded the Roadtrek would really not have fit. We drove back out and back down to the RV and Bus parking lot which was a distance away from the Visitors Center building. One can walk or wait for a not frequent shuttle bus. We walked.

As you can see from the photo above the RV spaces are large. The spaces behind where we parked had a number of large RVs in them, what looked like another Class B, and buses. From this parking lot you can arrange a tour of the battlefield with a guide, by bus, or go on bicycles. There are all types of tours one can take of the Gettysburg Battlefield including one on horseback.
A paved cement path that was for the most part uphill went from this parking lot to the Visitors Center building - and the car parking lot. As I said there was a sign for a shuttle bus, but no sign of any shuttle, and we would have walked even if it was sitting there waiting. (And I made this walk twice, as once at the Visitors Center building, I realized that I left something in the Roadtrek and went right back down the path to get it. Meryl stayed inside.)
You come up to see this building - the "new" Visitors Center.

There is a cafeteria in the building with very high prices. There is also a very nice and large gift shop including an excellent book selection of books on the Civil War and the Battle of Gettysburg. They also sell driving tour CDs in the gift shop to play while you take the tour of the battlefield which needs to be driven (with whatever form of transportation) and cannot be walked due to distance and safety. And as I said above in this building is the musuem, the film, and the Cyclorama.
Let me explain a little about how to understand the Battle of Gettysburg that is vital to know for anyone going to visit Gettysburg. This is a very difficult battle to follow. The battle took three days. Each day was very different from the day before and over each day and over the three days the battle took place in a variety of locations - some of what could be considered battles all on their own taking place at the same time as each other. I visited Gettysburg as a boy and as a young man and never really grasped what had gone on there other than it was another Civil War battlefield. Without this understanding all you are seeing are big fields, rocky hills, and you drive on a winding road throughout it all. When I was younger I never really liked visiting Gettysburg. It took until my interest in history grew - and then one big thing that helped me - and others I have discussed this with - to immensely finally understand and appreciate the battle in its entirety. That was seeing the major motion picture, Gettysburg, which stared Jeff Daniels and many others. Like the long battle this film portrays, it is a long movie. It was filmed in Gettysburg - some on location and some on nearby farms that were part of the battle. (National Park Service is very strict about reenactments in any of their parks including prohibiting the firing of any arms towards anyone - including reenactors firing blanks toward an opposing force of reenactors. When you attend a reenactment of the Battle of Gettysburg it is held at a farm just off the NPS park.) This movie shows each day of the battle and significant events that took place on each day of the battle. It does not include all parts of the battle but watching this movie before going to Gettysburg will bring these fields and rocky hills to life for you. You will stand in places you see in the film and know exactly what happened on that spot. You will know why those involved in the battle did what they did. You will appreciate your visit so much more if you and your family watch this movie before you go. And as it happens this movie is now available as a bargain DVD for $5 in many places that sell bargain DVDs. This is not a documentary film - it is a Hollywood movie made for entertainment that was made well. The film is taken from a book named. The Killer Angels by Michael Shaara. So, I get nothing from the producers of the movie for telling you any of this - it is just a very easy way to have this whole complicated battle make sense and you will appreciate your visit to what is known as hallowed ground so much more.
OK - so we get into the Visitors Center and go up to the ticket desk. I recently got a National Park Service Senior Pass that entitles those who have it to go into National Parks for free along with up to four guest - who also get in free. I was thrilled to finally be able to get this. I was all ready to use this to go to the three attractions in the Gettysburg Visitors Center building which, frankly, is not something I had paid to do in the past. Touring the actual battlefield is free to all. At the ticket desk there was a sign that said that no passes are accepted. Really!?! My first big chance to use my pass and it was not accepted. OK - we bought the tickets - and could not even buy them for the senior price as that was 65 and over! So we plunked down $12.50 each and got our tickets.
With your tickets you move on toward an outer gallery with exhibits behind glass along the walls - various weapons, uniforms, insignias, etc. The entrance to the film is there and this is the first part of your visit with tickets. The film is titled A New Birth of Freedom and is narrated by Martin Freeman with voices by many well known actors. You are presented a brief introduction to the start of the Civil War as it moves quickly on to the Battle of Gettysburg and its aftermath. This battle took its tolls not only on both armies but also heavily on the people of the town. This battle moved from the battlefield into the streets of the town and into people's homes. You get a brief understanding of what took place here - though far from what is done with the movie I have explained above. The film is presented in a comfortable auditorium designed for the showing of this film. When the film is over you are escorted from the theater and to the entrance way to the Cyclorama, which is the next thing your ticket entitles you to see.
As I am writing here, I am realizing that this article will be almost as long as the battle itself so I better split it at this point and leave you here with the end of Part I and start on a Part II in which you will hear about the Cyclorama, the museum, and a very abbreviated drive through the battlefield.
END OF PART I
PART II IN THE NEXT ARTICLE
Gettysburg is about 75 miles from Lancaster to the west. There is a very direct route from Lancaster to Gettysburg going west on Route 30 and remaining on that same route right into the town of Gettysburg. I have always hated that route when we drove by car and I knew that it would be even worse in a larger vehicle like a Roadtrek - or any RV or Travel Trailer for that matter. Route 30 is fine until you get not too far from Gettysburg when it becomes a one lane each way road through small towns with slow speed limits and traffic circles. I will never forget the night years ago when we drove this back to Lancaster from Gettysburg in a severe storm with trees falling around us and barely able to see what was ahead. In good weather it is not much better. There is another route to Gettysburg that is far from direct but only adds five minutes to the trip and is completely on multi-lane highways that is just five miles longer but so much more comfortable to drive. This route takes you off Route 30 West right at Lancaster onto Route 283 up and across and around to Route 15 South and down right into the town of Gettysburg at Route 30. This is the preferred way to go and the drive from Lancaster is one hour and twenty minutes as opposed to one hour and fifteen minutes on the so called direct route. (I discussed this on an RV forum and had a number of locals and others who have driven both routes agree.) We set out from Lancaster, stopped for lunch at a Wendy's as soon as we got off Route 15 in Gettysburg, and after a fast lunch we headed for the National Park Visitors Center.
There is a relatively "new" NPS Visitors Center in Gettysburg. We were there several years back when it first opened. The old Visitors Center's building is still in the center of town and was actually much better located in relation to the battlefield and the town itself - which is also a place to tour as much of it is as it was during the battle. The "new" Visitors Center is off on a much bigger plot of land. Building this meant moving the small museum that they once had and expanding with many more artifacts into a large facility, moving the Cyclorama - which I will explain as we go along, and creating a theater in which to show a film made for the site that briefly explains the battle of Gettysburg. Before we left we learned from their website that due to construction one of the parking lots for the Visitors Center was closed. We had some concern that this might be a problem but we ventured out to see what we would find.
There is an RV parking lot at the Visitors Center. This is a good thing, particularly while one of the parking lots is closed, as the parking lot for cars was a problem for the Roadtrek. Lanes were narrow and spaces were tight. We drove through this parking lot and could not have fit into any of the few spaces that were open. Even had it been less crowded the Roadtrek would really not have fit. We drove back out and back down to the RV and Bus parking lot which was a distance away from the Visitors Center building. One can walk or wait for a not frequent shuttle bus. We walked.
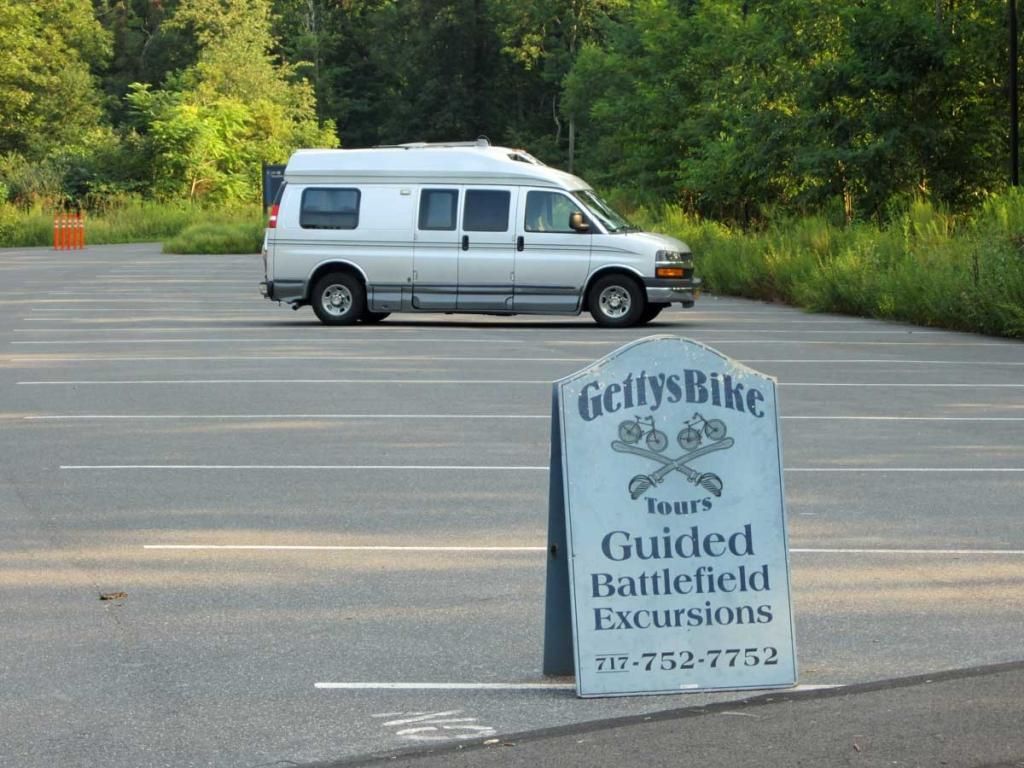
As you can see from the photo above the RV spaces are large. The spaces behind where we parked had a number of large RVs in them, what looked like another Class B, and buses. From this parking lot you can arrange a tour of the battlefield with a guide, by bus, or go on bicycles. There are all types of tours one can take of the Gettysburg Battlefield including one on horseback.
A paved cement path that was for the most part uphill went from this parking lot to the Visitors Center building - and the car parking lot. As I said there was a sign for a shuttle bus, but no sign of any shuttle, and we would have walked even if it was sitting there waiting. (And I made this walk twice, as once at the Visitors Center building, I realized that I left something in the Roadtrek and went right back down the path to get it. Meryl stayed inside.)
You come up to see this building - the "new" Visitors Center.
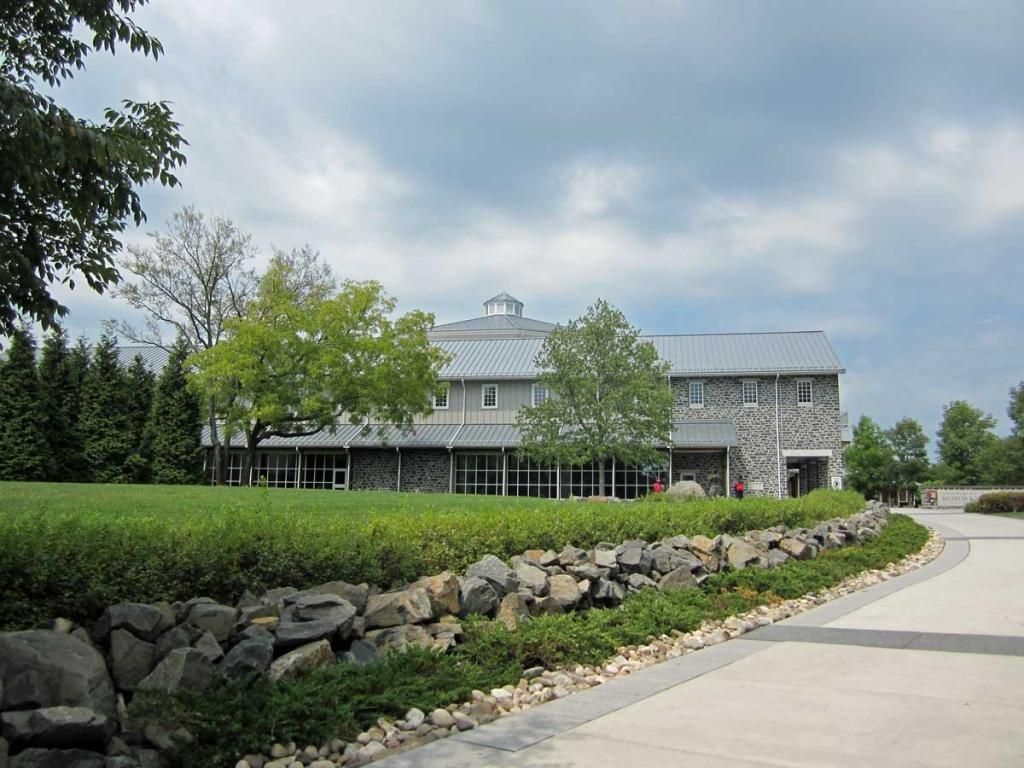
There is a cafeteria in the building with very high prices. There is also a very nice and large gift shop including an excellent book selection of books on the Civil War and the Battle of Gettysburg. They also sell driving tour CDs in the gift shop to play while you take the tour of the battlefield which needs to be driven (with whatever form of transportation) and cannot be walked due to distance and safety. And as I said above in this building is the musuem, the film, and the Cyclorama.
Let me explain a little about how to understand the Battle of Gettysburg that is vital to know for anyone going to visit Gettysburg. This is a very difficult battle to follow. The battle took three days. Each day was very different from the day before and over each day and over the three days the battle took place in a variety of locations - some of what could be considered battles all on their own taking place at the same time as each other. I visited Gettysburg as a boy and as a young man and never really grasped what had gone on there other than it was another Civil War battlefield. Without this understanding all you are seeing are big fields, rocky hills, and you drive on a winding road throughout it all. When I was younger I never really liked visiting Gettysburg. It took until my interest in history grew - and then one big thing that helped me - and others I have discussed this with - to immensely finally understand and appreciate the battle in its entirety. That was seeing the major motion picture, Gettysburg, which stared Jeff Daniels and many others. Like the long battle this film portrays, it is a long movie. It was filmed in Gettysburg - some on location and some on nearby farms that were part of the battle. (National Park Service is very strict about reenactments in any of their parks including prohibiting the firing of any arms towards anyone - including reenactors firing blanks toward an opposing force of reenactors. When you attend a reenactment of the Battle of Gettysburg it is held at a farm just off the NPS park.) This movie shows each day of the battle and significant events that took place on each day of the battle. It does not include all parts of the battle but watching this movie before going to Gettysburg will bring these fields and rocky hills to life for you. You will stand in places you see in the film and know exactly what happened on that spot. You will know why those involved in the battle did what they did. You will appreciate your visit so much more if you and your family watch this movie before you go. And as it happens this movie is now available as a bargain DVD for $5 in many places that sell bargain DVDs. This is not a documentary film - it is a Hollywood movie made for entertainment that was made well. The film is taken from a book named. The Killer Angels by Michael Shaara. So, I get nothing from the producers of the movie for telling you any of this - it is just a very easy way to have this whole complicated battle make sense and you will appreciate your visit to what is known as hallowed ground so much more.
OK - so we get into the Visitors Center and go up to the ticket desk. I recently got a National Park Service Senior Pass that entitles those who have it to go into National Parks for free along with up to four guest - who also get in free. I was thrilled to finally be able to get this. I was all ready to use this to go to the three attractions in the Gettysburg Visitors Center building which, frankly, is not something I had paid to do in the past. Touring the actual battlefield is free to all. At the ticket desk there was a sign that said that no passes are accepted. Really!?! My first big chance to use my pass and it was not accepted. OK - we bought the tickets - and could not even buy them for the senior price as that was 65 and over! So we plunked down $12.50 each and got our tickets.
With your tickets you move on toward an outer gallery with exhibits behind glass along the walls - various weapons, uniforms, insignias, etc. The entrance to the film is there and this is the first part of your visit with tickets. The film is titled A New Birth of Freedom and is narrated by Martin Freeman with voices by many well known actors. You are presented a brief introduction to the start of the Civil War as it moves quickly on to the Battle of Gettysburg and its aftermath. This battle took its tolls not only on both armies but also heavily on the people of the town. This battle moved from the battlefield into the streets of the town and into people's homes. You get a brief understanding of what took place here - though far from what is done with the movie I have explained above. The film is presented in a comfortable auditorium designed for the showing of this film. When the film is over you are escorted from the theater and to the entrance way to the Cyclorama, which is the next thing your ticket entitles you to see.
As I am writing here, I am realizing that this article will be almost as long as the battle itself so I better split it at this point and leave you here with the end of Part I and start on a Part II in which you will hear about the Cyclorama, the museum, and a very abbreviated drive through the battlefield.
END OF PART I
PART II IN THE NEXT ARTICLE
Wednesday, September 17, 2014
The Water Bandit and Household Sink Hose Adapter
A few days before our most recent trip we had a problem with the outdoor water faucet at our house. There was no way to rectify the problem before the trip and I wanted to leave, as we always do, with our fresh water tanks full. I remembered something that I saw at the RV accessories shop at our Roadtrek dealer that would allow me to attach a fresh water hose to any faucet. There was no way we could get to that shop three hours away so I decided to take a chance that a nearby travel trailer shop might have this. The problem is I could not remember the name.
We went to the trailer shop and looked on the wall of accessories for water hook up. There on a peg was a shopworn package that was it - the only one they had - and it is called the Water Bandit. We bought this - $7.99 - at this shop which was actually higher priced than it should have been but as they say " a bird in the hand is worth two in the bush" and we bought it.
The Water Bandit is made by Camco, that makes many other RV accessories. There is another company that puts the exact same thing out except in a different color and that one is called the Water Thief. It sounds like these are made for stealing water but what they are made for is attaching a water hose to an unthreaded faucet or a threaded faucet with broken threads.

The Water Bandit is a flexible but firm rubber sleeve with a brass water hose connection on the end. The inside of the top of the water bandit has rubber threads to screw onto a damaged, threaded hose faucet, and this is followed below with a smaller open for a friction fit on a non-threaded faucet. It can be used on any faucet. The instructions are VERY CLEAR to NEVER close the end of the hose that the water is coming out of as it will cause too much pressure at the connection and the Water Bandit will come shooting off the faucet. Complaints in reviews that I have read about this since purchasing it all focus on the user using a nozzle on the end of the hose or a water cut off and the Water Bandit ballooning and shooting off the faucet. This is not how this is to be used and this also makes this for filling tanks only. You cannot connect the end of the hose to the city water connection and then not have an open faucet for the water to flow through inside.
When we were getting ready to leave, we tried it and it worked. You first screw the hose onto the Water Bandit -

Next you push the water bandit over the end of the faucet -

Try to push it up as far as it goes. Positive user reviews of the Water Bandit suggest to use a screw tightening hose clamp on the Water Bandit to lock it onto the faucet. We did not want to do that on the kitchen faucet so Meryl held it in place while I had the hose outside to fill the front tank. Since the water cannot be shut off at the exit end of the hose, we used our back up the Roadtrek walkie-talkies to communicate when to turn on the water and when to shut it off. The Water Bandit ran with no leaks held in place by Meryl at the faucet. The water pressure did back up a little in the faucet and there was a small leak at the bottom of the faucet where the faucet turns. This was not a problem as the water just ran into the sink. I should add that our kitchen sink is about three feet away from our house's side door so the hose only had to go through the house a few feet, in case you thought we dragged the hose through the house.
As I have been reading about those who use the Water Bandit, I have learned that there are some State, Federal, and Regional campgrounds that have water spigots at the campsites with no threads for a hose. Unless you know the campground, this is a big surprise when you get there and find out you can't connect your water hose. The Water Bandit is ideal for this and will enable a connection to a spigot where one was not intended. For this I would use the clamp - easily found at any home or hardware store.
NOW - after we bought the Water Bandit I remembered another way to connect a hose to a household faucet. There are adapters sold in plumbing departments of home stores that will do this. Just in case the Water Bandit would not work on our kitchen faucet, I went to Home Depot to see if they had one. There were various types and I asked the salesman in the plumbing aisle what to buy. He gave me this one -

This is made by Neoperl and is just called "Faucet Adapter". It is lead free. The part number on the package is 571493. This connects a male 15/16" - 27 thread or a female 55/64" -27 thread household faucet to a female 3/4" hose (standard garden and fresh water hose size) and a female 55/64" -27 threaded end. The package will say male 3/4" hose as that is what the end is on the adapter. Why so many dimensions. This adapter is made to replace the water aerator/strainer on the end of a household faucet. On some faucets these are male attached and on the rest these are female attached. This will fit both. On the outlet end, you can put this on the sink and leave it installed all of the time. It allows you to screw the aerator/strainer back on the faucet when a hose attachment is not needed and then just remove that when you are going to attach a hose. These are made for portable dishwasher and portable washing machine attachments to sinks. It cost about $6.
To use this, you unscrew the aerator/strainer end off the sink, set it aside, screw this on and attach a hose just like you would screw the hose onto an outdoor faucet. When you are done, unscrew the hose, unscrew this adapter from the sink - unless you want to leave it there - and screw sink's the aerator/strainer back on.

This was fast and easy and the best part is that the end of the hose can be shut off with the water at the sink still on - as long as the adapter is screwed onto the sink tightly - there is a washer inside to prevent leaks. In fact, there are two washers included - one tall and one short to fit different sinks. The short washer fit our sink.
This was even better than the Water Bandit. It allowed us to both be outside at the Roadtrek - me with the hose in the door fill and Meryl inside the Roadtrek checking the water level on the monitor panel. I had my water fill nozzle on the hose that allows me to shut off the water flow as soon as the water starts to backup into the fill opening and could that caused no problem inside at the sink.
With the kitchen sink closer to the Roadtrek on the driveway than the outdoor water faucet on the other side of the house in the backyard, this was easier than filling the Roadtrek the way we usually do. The Water Bandit is now in the "water box" that we keep in the outside compartment of the Roadtrek that holds all we use for hooking up to water. It will be there with us in the event of a water connection problem on the road. The sink adapter will stay at home ready for the next time we need to - or want to - fill the Roadtrek from the kitchen sink.
Both are good to have if you ever find yourself with a problem outdoor faucet at home, and the Water Bandit is definitely good to have if you encounter a campsite water spigot with no hose threads.
We went to the trailer shop and looked on the wall of accessories for water hook up. There on a peg was a shopworn package that was it - the only one they had - and it is called the Water Bandit. We bought this - $7.99 - at this shop which was actually higher priced than it should have been but as they say " a bird in the hand is worth two in the bush" and we bought it.
The Water Bandit is made by Camco, that makes many other RV accessories. There is another company that puts the exact same thing out except in a different color and that one is called the Water Thief. It sounds like these are made for stealing water but what they are made for is attaching a water hose to an unthreaded faucet or a threaded faucet with broken threads.

The Water Bandit is a flexible but firm rubber sleeve with a brass water hose connection on the end. The inside of the top of the water bandit has rubber threads to screw onto a damaged, threaded hose faucet, and this is followed below with a smaller open for a friction fit on a non-threaded faucet. It can be used on any faucet. The instructions are VERY CLEAR to NEVER close the end of the hose that the water is coming out of as it will cause too much pressure at the connection and the Water Bandit will come shooting off the faucet. Complaints in reviews that I have read about this since purchasing it all focus on the user using a nozzle on the end of the hose or a water cut off and the Water Bandit ballooning and shooting off the faucet. This is not how this is to be used and this also makes this for filling tanks only. You cannot connect the end of the hose to the city water connection and then not have an open faucet for the water to flow through inside.
When we were getting ready to leave, we tried it and it worked. You first screw the hose onto the Water Bandit -
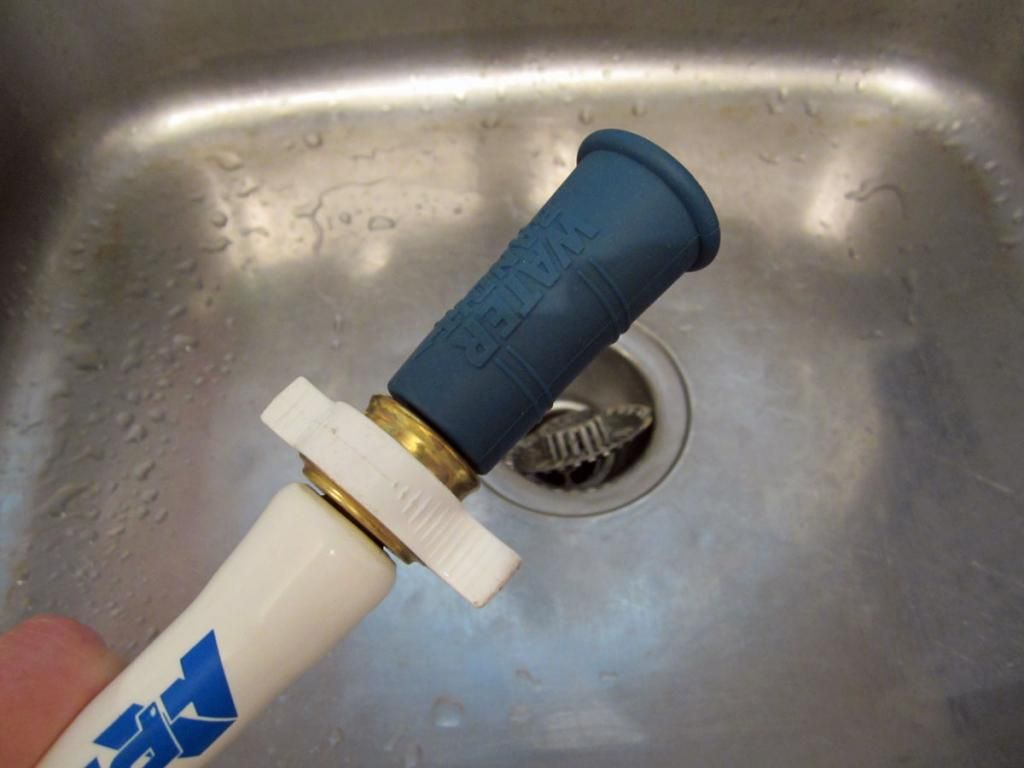
Next you push the water bandit over the end of the faucet -
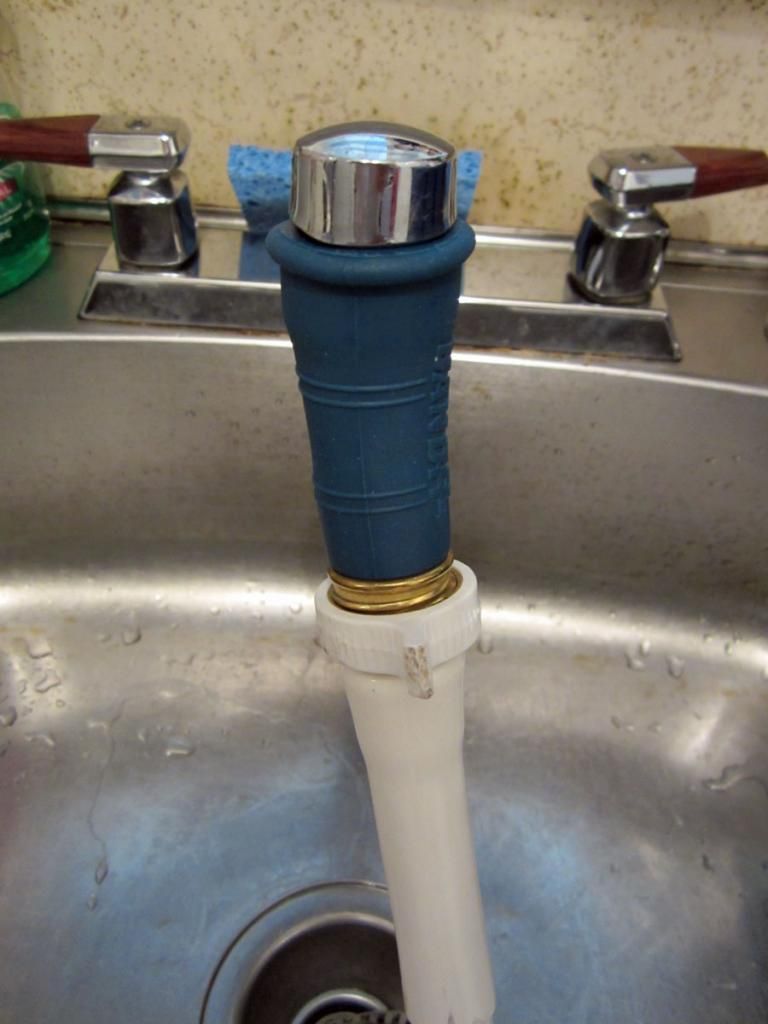
Try to push it up as far as it goes. Positive user reviews of the Water Bandit suggest to use a screw tightening hose clamp on the Water Bandit to lock it onto the faucet. We did not want to do that on the kitchen faucet so Meryl held it in place while I had the hose outside to fill the front tank. Since the water cannot be shut off at the exit end of the hose, we used our back up the Roadtrek walkie-talkies to communicate when to turn on the water and when to shut it off. The Water Bandit ran with no leaks held in place by Meryl at the faucet. The water pressure did back up a little in the faucet and there was a small leak at the bottom of the faucet where the faucet turns. This was not a problem as the water just ran into the sink. I should add that our kitchen sink is about three feet away from our house's side door so the hose only had to go through the house a few feet, in case you thought we dragged the hose through the house.
As I have been reading about those who use the Water Bandit, I have learned that there are some State, Federal, and Regional campgrounds that have water spigots at the campsites with no threads for a hose. Unless you know the campground, this is a big surprise when you get there and find out you can't connect your water hose. The Water Bandit is ideal for this and will enable a connection to a spigot where one was not intended. For this I would use the clamp - easily found at any home or hardware store.
NOW - after we bought the Water Bandit I remembered another way to connect a hose to a household faucet. There are adapters sold in plumbing departments of home stores that will do this. Just in case the Water Bandit would not work on our kitchen faucet, I went to Home Depot to see if they had one. There were various types and I asked the salesman in the plumbing aisle what to buy. He gave me this one -
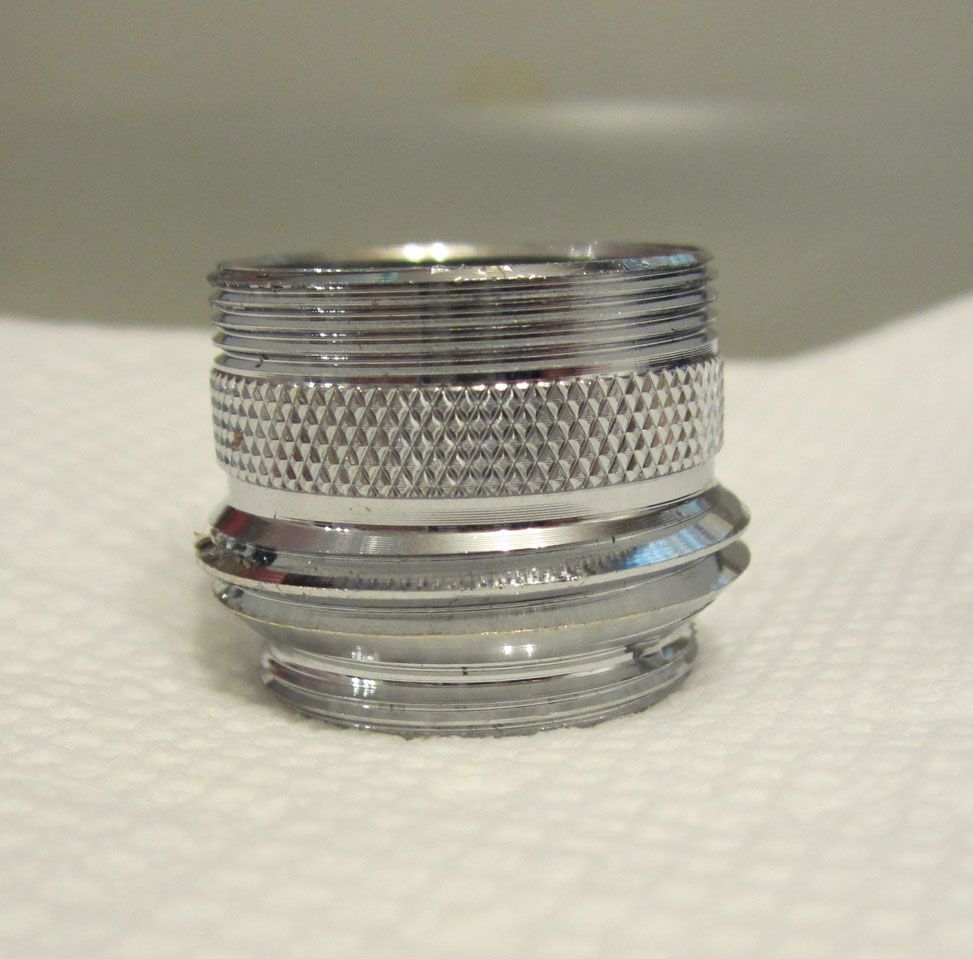
This is made by Neoperl and is just called "Faucet Adapter". It is lead free. The part number on the package is 571493. This connects a male 15/16" - 27 thread or a female 55/64" -27 thread household faucet to a female 3/4" hose (standard garden and fresh water hose size) and a female 55/64" -27 threaded end. The package will say male 3/4" hose as that is what the end is on the adapter. Why so many dimensions. This adapter is made to replace the water aerator/strainer on the end of a household faucet. On some faucets these are male attached and on the rest these are female attached. This will fit both. On the outlet end, you can put this on the sink and leave it installed all of the time. It allows you to screw the aerator/strainer back on the faucet when a hose attachment is not needed and then just remove that when you are going to attach a hose. These are made for portable dishwasher and portable washing machine attachments to sinks. It cost about $6.
To use this, you unscrew the aerator/strainer end off the sink, set it aside, screw this on and attach a hose just like you would screw the hose onto an outdoor faucet. When you are done, unscrew the hose, unscrew this adapter from the sink - unless you want to leave it there - and screw sink's the aerator/strainer back on.
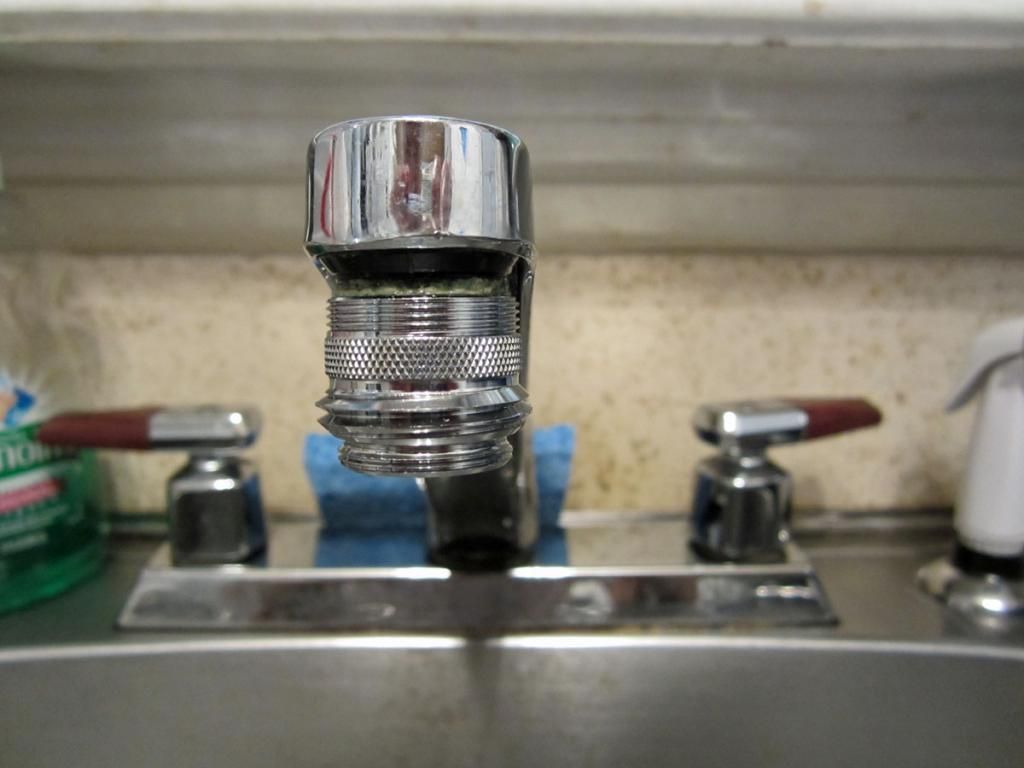
This was fast and easy and the best part is that the end of the hose can be shut off with the water at the sink still on - as long as the adapter is screwed onto the sink tightly - there is a washer inside to prevent leaks. In fact, there are two washers included - one tall and one short to fit different sinks. The short washer fit our sink.
This was even better than the Water Bandit. It allowed us to both be outside at the Roadtrek - me with the hose in the door fill and Meryl inside the Roadtrek checking the water level on the monitor panel. I had my water fill nozzle on the hose that allows me to shut off the water flow as soon as the water starts to backup into the fill opening and could that caused no problem inside at the sink.
With the kitchen sink closer to the Roadtrek on the driveway than the outdoor water faucet on the other side of the house in the backyard, this was easier than filling the Roadtrek the way we usually do. The Water Bandit is now in the "water box" that we keep in the outside compartment of the Roadtrek that holds all we use for hooking up to water. It will be there with us in the event of a water connection problem on the road. The sink adapter will stay at home ready for the next time we need to - or want to - fill the Roadtrek from the kitchen sink.
Both are good to have if you ever find yourself with a problem outdoor faucet at home, and the Water Bandit is definitely good to have if you encounter a campsite water spigot with no hose threads.
Wednesday, September 3, 2014
Storage and How We Store Things in the Roadtrek - Part 3
PART 2 WAS THE LAST ARTICLE
We have had many readers contact us to write an article with photos of how we store things in the Roadtrek when we travel. Meryl is a master of finding a place for anything to fit - in the house, in the car, and especially in the Roadtrek. I asked Meryl to write this article. Here, once again, is Meryl...
PART 3:
On the shelf over the toilet we have 2 fabric crates. One holds cleaning type items - like Lysol spray, spray cleaner, etc. The other holds personal type items - q tips, shampoo, bar soap for showers, etc. On top of the box with personal stuff is the privacy curtain we made which hangs from the shower curtain track so that one can use the toilet en route without having to stop and pull the back window curtains closed. Next to these boxes are a few latex gloves in a zip bag to use as it is easier to have a few out than pull the box out each time. These are basically bathroom related items. On the floor of the toilet compartment (we have an aisle toilet, not the permanent bathroom option) we have 2 boxes of camping toilet bags (wag bags). Just in case something happens with the toilet we have these to use and we use them during winter trips when we travel without using the water system. There are 2 boxes as one would shift around too much.

In the storage under the seat
of the third front seat (in front of the toilet compartment) I have another set of
personal and kitchen towels and another set of sheets and pillowcases sealed in
plastic zip bags so that they can be changed on long trips. The toilet chemicals are also in here. I have a large accordion folder with the
various instruction books and manuals in folders. A hair dryer is in here. There is also a second spare roll of toilet paper in here as it is easier
to access quickly if needed. We have
quilted foil inserts (Reflectix) for some of the windows and they are also in here. It is an area that can be reached fairly
easily, but still takes some work, but is large.


We have a mesh net that goes
around the back of the third seat which can hold magazines, brochures, etc. on
the front of the seat. It is a
convenient place for these.


On the shelf over the door we
have hats to wear if it is sunny and a jacket for me is rolled up in here. There is a folding “gopher”, the thing to
pick up items dropped on the floor (or items at the back of the space under the
bed if one does not want to crawl under.)
In the pocket for the opera window covers we keep a folder with maps of
and information about campgrounds which we go to on a regular basis.


We have the overhead front
drawer, which was an option when we ordered the Roadtrek. This holds an assortment of
items - folded up rain jackets, a zippered bag with tools, a rechargeable electric drill/driver, another with spare
parts, a clipboard that holds stationery items inside, two pop up garbage cans
- one for garbage and another to hold wet umbrellas if needed - and a vinyl box
to hold magazines brought along to read..
There is more than this, but this is all I can remember. The items here are fairly light in weight and
are used from nightly to as needed and need to be easy to access.


In the pocket on the back of
the passenger seat is a fold up umbrella and a very small fold up seat. On the floor behind the seat (in the carpeted
front area, not the dropped floor) is a bath mat rolled up that we use as a
door mat for the second passenger door when it rains.
In my map pockets I have
reflective markers that we put out on the campsite ground when we find a level spot so we can find it again,
walkie-talkies to use when pulling in and finding level, as well as when we
pull out of our driveway at home. A red
light flashlight to use when hooking up at night (red LED does not attract mosquitoes). Rubberized, knit gloves to use when setting up in
wet or cold weather. Coupon holders (I
have travel coupons and coupons for food and stuff and for restaurants that I
pull from our car and house hen we travel.)
I also have an envelope that holds items I have collected at home for
this trip - reservations, brochures, etc.
Car charger for laptop, basically stuff I might need from the seat while
riding or on my way out the door.
In the compartment over the
windshield, I have a spare pair of glasses, more spare parts - such as fuses -
and other small items that are rarely used as this is not an easy section to
access with the sliding top draw in front of it.
The glove compartment holds
glove compartment items. We also have a
plastic box between the seats which holds other items related to or needed
while driving. On the top of the glove
compartment I have sunglasses and we have the labeled, leather tags that that we made to snap onto the steering wheel
at night to remind us to check and take care of everything we need to before we drive off in the morning. During the day we
keep a remote thermometer for the refrigerator in one of the cup holders over the glove compartment.
I have no idea what “Me” has
in his map pockets other than sunglasses and eyeglasses.
Moving back behind the driver’s
seat where we started, in the pocket there is a folding umbrella. On the floor between the seat and the closet
(where we started) there is a very small folding table, a windshield reflector,
and a small folding step "Me" made.
On the shelf over driver’s
door is “Me’s” jacket rolled up as mine is on my side.

Wherever there is space that needs to be filled to keep stuff from moving I put the crumbled plastic store bags or sweatshirts if we bring them.
In the rear of the Roadtrek,
accessed from outside, we have 3 laundry baskets to hold assorted tools and
items we buy en route.
In the storage section
outside under the driver’s side we have a thin coiled general use garden hose, a
can of bug spray (sealed in a plastic bag) and a spare TV cable wire. There are leveling blocks, the water filter,
a piece of swimming pool noodle, 3 potable rolled water hoses stacked on each
other with a small plastic box in the middle of them with water related items (such as a water
pressure device, hose washers, etc.), then a slightly larger plastic box with electric related
items such as polarity and voltage testers, 30 amp to 15 amp converter and vice-versa, 50 amp to 30 amp adapter converter, a portable RV surge/power
protector , a TV coax cable wire and, of course, the Roadtrek's electric line to attach us to
the campground’s electricity. I try to
keep the water related items separate from anything, such as the bug spray,
that one would not want near one’s drinking water.
I think that covers
everything. There are always odd items
(both in that they are not normally with us and often in what they are) that have to
be fit in on different trips. It is
generally a quandary where to put them, but I always manage to find a place
that fits them, even if it does not seem the most logical place.
Subscribe to:
Posts (Atom)